Description and location of indicators and instruments on the panel
To begin with, we suggest that you familiarize yourself with the description and designations of the icons on the dashboard of the VAZ 21099 and 21093 carburetor or injector:
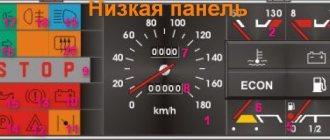
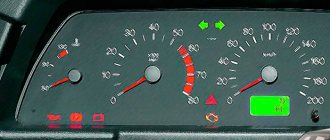
- A speedometer that allows you to find out at what speed the vehicle is traveling.
- Coolant temperature controller. If the indicator needle enters the red zone, this indicates engine overheating, sometimes this may be due to failure of the sensor itself. Overheating of the power unit can cause serious malfunctions, so it is necessary to diagnose the engine radiator fan.
- One of the features of VAZ cars is that the dashboard diagram involves the use of a voltage sensor in the car’s electrical network. According to the indicators of this controller, it is possible to determine the battery discharge when the indicator arrow is located in the left red zone. If it falls into the right red zone, then this means that an overcharge has been detected in the network. In case of such a problem, the generator device should be diagnosed.
- Gasoline volume sensor in the fuel tank.
- The symbol is in the form of a gas station; its appearance indicates that there are no more than 6.5 liters of fuel left in the tank.
- Another feature of VAZs is a fuel economy sensor. With its help, the driver can determine the optimal ratio of the number of crankshaft revolutions to fuel consumption. If the indicator needle is in the yellow zone, this means that there is excessive consumption of gasoline in the system; if it is in the white zone, then fuel consumption is economical.
- Daily mileage odometer.
- General odometer.
- If the word “STOP” appears on the instrument cluster while driving, the driver is warned to stop driving. Usually its appearance is associated with a decrease in the level of engine fluid pressure in the power unit. It can also appear due to a lack of brake fluid or when the parking brake lever is raised.
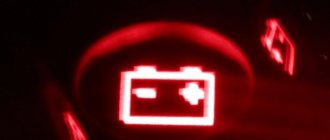
- The symbol in the form of a battery always blinks when the power unit starts. If it lights up after the engine has been started, then most likely the drive belt of the generator set has broken or the unit has failed. It also makes sense to check the charging circuit for damage and breaks.
- The choke icon indicates that the air damper is closed.
- An indicator in the form of a triangle indicates that the light alarm is on.
- An exclamation mark icon appears when there is insufficient brake fluid and the volume needs to be replenished.
- This symbol indicates that the vehicle's handbrake has been applied.
- The engine fluid icon informs the driver that the pressure in the engine lubrication system has decreased; first of all, you should check the fluid level and, if necessary, add oil.
- An icon in the form of arrows pointing in different directions indicates that the turning lights are turned on.
- Side light activation symbol.
- Indicator that the rear fog lights are on, if equipped.
- Symbol for activating high beam lights.
- This icon indicates that the rear window heating system is turned on.
Features of high and low shield
Domestic “Nines” have been produced for more than thirty years, during which time AvtoVAZ engineers have made many improvements. Injection versions of cars equipped with power windows and other “tricks” began to appear on sale. The interior of the car has also undergone changes - instead of the traditional low tidy, high panels have been used. They were installed on cars with improved central consoles, which became known as Europanels.
Despite the differences in design, in fact the “stuffing” of icons and sensors in both dashboards remained the same, only the location of the controllers changed. High versions do not have a voltage sensor or econometer.
Possible malfunctions and ways to eliminate them
What problems can a car owner encounter:
- The shield works fine, all sensors function, but there is no backlight. As you know, the backlight on the tidy appears only when the side lights are turned on. Therefore, if there is no light on the dashboard, you need to check whether the side light, license plate light and lamps in the engine compartment are working, since one fuse is responsible for all these elements. We are talking about a 7.5 ampere fuse device F10. If it is burnt out, the device needs to be replaced. Sometimes the reason lies in the inoperability of the backlight control located under the tidy.
- The speedometer does not work, in some cases the needle rises and falls, and it moves jerkily. If the speedometer stops functioning, then first of all you need to check the cable connecting it to the gearbox. Older versions used a mechanical cable, the ends of which wore out over time, causing the speedometers to not work. You need to replace the cable itself or try to restore its functionality by winding a piece of food foil around the end connected to the speedometer. If we are talking about an electronic sensor, then you need to remove it, clean the contacts and reconnect it; if this does not help, then the controller must be replaced.
- The economy sensor does not function. There can be many reasons for its inoperability, ranging from failure of the device itself to damage to the electrical circuit. In practice, this sensor breaks down in many cars; this is considered a “disease” of the Nines.
- The engine temperature controller does not work. If the needle does not rise at all, then you need to diagnose the sensor itself, located in the exhaust line of the cylinder head, next to the thermostat. You should also check the quality of the controller connection, make sure that the power circuit is intact, and diagnose the connector. It may happen that the needle rises sharply and goes beyond the red zone, while the engine has not even warmed up. Most likely, there is a short circuit problem; you will have to use a tester to diagnose car wiring or seek the help of a specialist.
- The indicators on the dashboard or part of the backlight do not work. In case of such a malfunction, the cause should be sought in burnt-out lighting sources. You need to remove the tidy and check the light bulbs; if they are really burnt out, then they will have to be changed (the video was shot by Semyon Pedan).
Backlight Land Rover Range Rover Vogue | Car repair - ordering spare parts
I drive with the low beams on all the time. There was a glitch when I bought the car. In my opinion, he wrote about.
Special offer for relighting the interior of a Range Rover from the RPM service
But perhaps we can repeat it again. I turn on the dimensions, and the instrument lighting should turn on along with them. But it doesn't turn on.
Turned it off, turned it on - doesn't work. I called the seller to find out what it is. Here begins the story about LR and RR sores, which most often happens in winter, but if you first turn on the dimensions and then start the car, everything burns.
In general, I listened to this and decided to look into it. The range rover interior lighting opens.
Either this entire on/off unit is changed, or the range rover interior lighting needs to be unsoldered and the microcircuit responsible for adjusting the brightness of the devices needs to be soldered in again.
As a result, we disabled this feature completely by forcing the maximum brightness. And since then everything has always been on for me, regardless of whether the first light or ignition is on. And in terms of brightness, I'm happy with everything.
I recently installed a small anti-theft system. Now I ride with a keychain and a bunch of other amulets.
A little later I will definitely tell you about this in more detail. I'm still getting used to it and learning how to use it. Our teammates took us on board. And we took a ride as passengers on a Discovery range rover. And it was there that I first noticed the interior lighting. Compared to the gray one, I had a black Frilom interior; the Discovery interior was impressive. Full size Rear door. Illuminated door release lever, door handle and door pocket.
And remembering this trip, I formed the task of how the backlight on my Sport should look and work. When you open the doors in the car, the standard door lights come on. It certainly illuminates something. And the interior lighting in the overhead lamp turns on. The backlight is bright. You could say white. It also illuminates, but not enough. That's why we decided to make the doors first, and then move on to the interior as a whole.
When opening the doors, the lighting of the door handle itself, the range rover interior lighting in the door and the upper lever that directly opens the door should turn on.
The range rover interior lighting must be white to match the standard interior lighting, otherwise there will be a collective farm. If we were to start a collective farm, then it would be beautiful. Full size Salon after lighting upgrade.
LED car interior lighting for BMW, MINI, Range Rover Sport
We walked up to the car, opened the doors, and the lights came on beautifully. We got into the car, started the engine, closed the doors, turned on the lights and low beams. Interior lighting range rover interior lighting.
When the dimensions are turned on, the standard instrument lighting turns on - green. Accordingly, our doors either have to turn off, and then it turns out that we did something, but nothing changed. Or glow white. But the interior is illuminated green. In this regard, we decide that the doors should glow green when the lights are turned on. Full size This is how the door is illuminated with the backlight on.
I also wanted the backlight to turn on and off softly. Smoothly flaring up and gradually fading. Ideally, it would be possible to adjust the brightness of the backlight.
But my range rover interior lighting was just broken, and since I didn’t want to buy a new one, they turned it on at maximum brightness all the time.
I also had to deal with the regulator. Unfortunately, we haven’t fully figured it out yet. Apparently you still have to buy a new one.
Instructions for installing a new panel
If you want to replace a low tidy with a more advanced, high one, then in any case you will have to change the entire center console.
Removal and installation instructions look like this:
- First, you need to turn off the power to the on-board network; to do this, disconnect the battery, remove the steering wheel, as well as the steering column switches and the ignition switch. You will also need to disconnect the ignition relay.
- Next, unscrew the two bolts that secure the control panel visor and remove it.
- Now you need to compress the spring and remove the shield itself from the center console. Disconnect all wires and connectors connected to the dash, including the speedometer cable, the econometer hose, and the odometer cable. After this, the tidy can be moved to the side.
- Then remove the regulator from the hydrocorrector of the optics light, the tidy light switch knob, as well as the interior heater and fan regulators. To do this, pull the controls towards you.
- After this, unscrew the two bolts securing the center panel trim on the sides; the trim itself can be moved towards you. Then you need to disconnect the connectors.
- Now the key in the lock should be turned to position “0”, this will disable the anti-theft system. A connector with wires is connected to the lock itself; it must be disconnected. Next, unscrew the two nuts and two bolts, after which you can remove the steering column pipe with the switch.
- Remove the choke handle located under the instrument panel. Pull it towards you so that you can feel the pull. You need to unscrew the two bolts that secure the damper guide rod, after which the choke can be removed.
- Now you can unscrew four more screws that secure the heater control panel in the car. Unscrew the bolts located on the side of the shield on both sides. Also unscrew the lower console mounting bolts with nuts that secure the control panel lighting switch and the optics hydraulic corrector. To do this you will need a 22mm socket wrench, it must be high.
- After completing these steps, you need to unscrew the bolt that secures the center console in the glove compartment. Then all you have to do is unscrew one bolt at a time on each side securing the center console. The console itself can then be dismantled.
- As for installing a new high panel with tidy, this process does not present any particular difficulties. All dimensions at the mounting points on the body are the same, but this procedure also has its own characteristics. To install your new console, you will need the appropriate wiring harness. If you use an existing harness, then you will need to rearrange the terminals in it, taking into account the connection diagram. In addition, it will be necessary to change the cables leading to the heater to longer ones, the same applies to the speedometer cable. If you are installing a new console, you will also need other roof pillar side trims, these must be installed before you install the console. Since the new dashboard will not use a flow meter, the tube from it will need to be plugged. In addition, the signal to the tachometer will need to be supplied from wire K on the coil, which is connected to the speed sensor cable bracket.
- Immediately before installation, you should reassemble the new console, and wrap the connection points of the blowers with electrical tape and, preferably, glue them with foam rubber or anti-creaking agent. It is also necessary to change the foam rubber of the heater, since the old one will no longer be able to perform its functions. Also make sure that the choke can close completely and remember that the cable from the new speedometer should be installed before you install the console. The assembly procedure begins with laying a new wiring harness and connecting all connectors. Before you finally assemble everything, turn on the dashboard and check how all the indicators and gauges work. After this, the console can be put back in place.
Photo gallery “Changing a low console to a high one”
Working with LED Parts
After making the holes, you can move on to the lighting itself. It will be located like on foreign cars, that is, from the inside. In specialized services, such a service costs several thousand rubles, so in order to save money, we will do it ourselves.
As we noted earlier, our lighting will be made on the basis of a regular LED strip. We cut it into several uniform pieces. As a result, we should have several tracks with 3 diodes on each. For uniform illumination, we make a reflector from foil. For the tachometer and speedometer we need 3 pieces of tape. For the remaining elements (scale of fuel level, coolant temperature, etc.) one piece is enough.
Video “Installing an LED strip in the dashboard of a VAZ 2109”
The procedure for carrying out one of the tuning options - installing a diode strip in the control panel - is described in detail in the video below (the video was published by Artem Volivach).
VAZ 2109 cars are equipped from the factory with low and high dashboards. Today we will introduce you to the features of the high panel, its symbols and the instrument panel.
Shield
Content
Owners of domestic cars pay quite a lot of attention to interior tuning. This is due to the fact that cars come out of the factory with very unattractive configurations: low-quality plastic, poor assembly, outdated controls and instruments, and so on.
If a few years ago VAZ somewhat revised its view of what a car should be, which was reflected in the design, then older models were still produced using old technologies that had been circulating since the creation of the car plant. They only improved a little.
No one can argue with the fact that VAZ has always lagged several times behind even inexpensive foreign cars in terms of quality and level of equipment. Now it has become possible to slightly transform your car, for which the front dashboard is replaced or modified.
High instrument panel
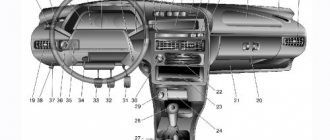
According to the diagram presented below, the VAZ 2109 with a high panel has the following components.
High dashboard
Item number
What is this
Hazard switch
Windshield wiper and washer control lever
Central nozzles of the interior heating and ventilation system
On-board computer (not available on all trim levels)
Glove compartment lid (glove compartment)
Side nozzles of the interior heating and ventilation system
Speaker (loudspeaker) trim
Power window switches (available on certain trim levels)
Control panel for heating and interior ventilation system
Gearbox shift lever
Hand brake lever
Carburetor choke handle
Horn switch (horn)
Instrument panel light switch
Front seat heating switch (available as standard)
Rear fog light switch
Front fog lamp switch (not available on all trim levels)
Rear defogger switch
Hood lock drive lever
Turn signal and light control lever
Outdoor optics switch
Removal
Having familiarized themselves with the diagram of the high instrument panel of the VAZ 2109, many will probably think about the issue of removing it.
There are more than enough reasons to dismantle the panel:
- Repair, modernization of the heating system;
- Body repair;
- Replacing the old panel with a new one;
- Car painting;
- Body sound insulation, etc.
Dismantling process
This is not to say that removing the panel is a difficult process. The main problem is the time that needs to be spent on the work. The task requires concentration and increased attention in order to dismantle all elements, devices, and linings.
The process looks like this.
- Remove the steering wheel itself, otherwise it will seriously interfere with you when dismantling the panel.
- Pull the carburetor choke towards you. Injection engines do not have such an element. Then remove the plastic handle from the drive rod.
- Next, the decorative trim of the console is removed. To do this, simply unscrew the two mounting screws on the sides.
- Dismantle the ashtray and remove the cigarette lighter from its seat.
- Remove the handle that controls the speed of the fan motor.
- Using a screwdriver, pry the levers of the interior heater drive, which will allow you to remove these decorative elements.
- Disconnect the block with wires from the heater fan mode switch.
- Remove the two power wires for the backlight of the stove control panel from the contacts.
- Now you will need to get rid of several decorative control knobs - headlight hydraulic adjustment, instrument lighting control.
- The next step is to dismantle the hydraulic corrector itself and the lighting regulator. You will need a socket wrench that matches the diameter of the mounting nuts you are using. After unscrewing, push them inside. A little later you will be able to take them out.
- The air deflectors for heating the side windows are removed on the left and right.
- Here, using a Phillips screwdriver, you need to unscrew one mounting screw on each side that holds the upper panel covers.
- Remove the exterior light switch from the dashboard. To do this, you need to carefully pry the switch with a flat screwdriver and pull it out. Do not pull too hard as the switch is limited by the length of the wires used. Disconnect the power supply with the wires from the switch and set it aside. The block can still be pushed inside the panel.
- If you have an audio system, remove the radio. Now remove the standard socket from the radio. Of course, if you still have it.
- Unscrew the central fastener from the panel trim.
- Let's start by removing the dashboard trim. Before doing this, be sure to unlatch the latches located under the dashboard. This is done with a pair of flathead screwdrivers. Insert the tools along the edges and press down. By performing upward movements, the panel rises and then is completely removed.
- The cover has been removed, but that's only half the battle. Next, you can easily disconnect the power supply from the cigarette lighter and the cigarette lighter lamp.
- Also, without much difficulty, the wires from the alarm signal and the hazard warning lights are disconnected.
- Be sure to remember to remove the decorative trim from the front speaker and the heated glass switch, plus the rear fog light switch trim. If you also have a speaker, you will need to remove it.
- Reach through the hole under the speaker to disconnect the wiring harness from the fog light and rear window defroster switch.
- The instrument cluster is held on the panel by two mounting screws, which must be unscrewed. Pull it towards you, unscrew the nut and remove the flexible drive cable from the speedometer.
- That's it, the block with wiring from the instrument cluster can be disconnected and put aside for now.
- Do the same with the ignition switch - disconnect the block with wires, remove the ignition relay ground wire from the connector.
- Here, in close proximity, you will see a wire from the air damper warning lamp. But only for the carburetor VAZ 2109. Injection versions are not equipped with this wire.
- On each side of the panel, unscrew one bottom mounting screw.
- Disconnect the power supply wiring for the glove compartment lighting.
- Unscrew the heater panel fasteners and move it down. This way the panel will not disturb you.
- Remove the fasteners for the interior heater guide rod.
- Unscrew all the remaining side top and center fasteners, after which the panel can finally be completely removed.
One of many screws
Your further actions directly depend on the reasons why you decided to go through this difficult path of dismantling the dashboard.
Removing the panel, as you can see, is not a difficult process, but it is troublesome. Lots of parts, elements, fasteners. The most important thing here is to strictly adhere to the instructions and not to forget that dismantling is only half the way. Some people encounter problems during the reassembly process.
Each vehicle must be equipped with an instrument panel (ID) that allows the driver to communicate with the vehicle. The dashboard displays the main parameters of the vehicle, so this device should always be in working order. What indicators and icons are installed in the VAZ instrument panel, what malfunctions can occur in its operation? Basic data, as well as recommendations for tuning, are given in this article.
Description and location of indicators and instruments on the panel
The VAZ instrument panel may differ depending on the vehicle model.
In general, domestic car equipment can be divided into three groups:
- shields for classic cars - VAZ 2101-VAZ 2107;
- devices for the Lada Samara family of cars - 2108, 2109, 21099;
- PP VAZ of the tenth family - 2110, 2111, 2112, etc.;
- tidy of more modern VAZ models - Priora, Granta, Kalina.
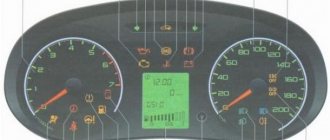
Seven dashboard
Since the last two options have already been discussed in previous articles, we will not focus on them.
Possible faults
More modern cars are also equipped with a connector for VAZ diagnostics. But even in the absence of a diagnostic connector, you can be guided by the indicators themselves.
If the instrument panel begins to work intermittently, the reasons may be different:
- The devices do not work due to mechanical damage to the device or moisture on the panel. To diagnose, you need to dismantle the device and make sure there are no cracks on the board or other damage, as well as moisture. If there are defects, most likely the device will have to be replaced.
- Some indicators have stopped lighting. As a rule, in this case the reason lies in the burnout of lighting sources. For diagnostics, you will also have to remove the shield and install new ones instead of burnt-out lamps.
- The backlight stopped lighting. This problem may be due to damage to the wire responsible for turning on the backlight.
- Some devices do not work - for example, a gas level sensor or engine temperature sensor. To diagnose the malfunction, you will need to dismantle the failed controller, which, depending on the device, may be located in the engine compartment or gas tank. The device is removed, its contact and electrical circuit are checked, you can also try installing a new sensor and checking the functionality of the device.
- The contacts have oxidized. This problem can arise as a result of long-term use of the car (the author of the video is the In the Garage channel).
Why doesn't it light up?
If suddenly electrical appliances and indicator lamps on the dashboard stop working, certain actions must be taken.
- First, remove the cover of the mounting block and make sure that the fuse is intact. The fuse markings are located on the inner surface of the cover. You should look for fuse F16 or F5, depending on the year of manufacture of your VAZ 2109.
- If the fuse is intact, be sure to check whether the contacts of the fuse you are looking for have not oxidized. It is not uncommon for shields to fail due to broken contact.
- Check if there is power to the dashboard. To do this, you will need a warning light and the ignition on. Disconnect connector X4 in the mounting block and check for voltage at pin 3. The disadvantage of the VAZ 2109 design is that when it rains, the mounting block immediately becomes wet. This causes oxidation of the contacts in the pads, which causes the electrics to stop working. Sometimes not only the contact is oxidized, but also the board of the Nine mounting block.
If none of the above actions yielded results, you will have to be disappointed. After all, now you need to remove the dashboard and check the condition of the wiring, contacts, and negative connections. Here it is better to trust a professional electrician or set aside a whole day to troubleshoot problems yourself. There is no need to rush here.
Where did the backlight go?
Dismantling instructions
Let's briefly consider the process of dismantling the dashboard using the example of a car of the ninth model:
- First of all, the hood opens and the battery is disconnected.
- Next, there are two screws on the top of the shield trim; they should be unscrewed.
- Then the lining itself is dismantled.
- Now work is being done on the shield. The device is removed from the seat, all wires leading to it are disconnected.
- The device is removed from the installation site, diagnostic equipment is used to check it, and if necessary, repairs are carried out. Further installation is carried out in the reverse order (the author of the video about removing the tidy is the In the Garage channel).
Experts' opinion
Alexander. It is recommended to abandon GPS navigators with external installation: there is no need to mount them on glass, as the view from the driver’s seat is significantly reduced. If the navigator is really needed, then you can create a special niche for it in the dashboard. The VAZ torpedo is quite simple and has a large amount of free space to accommodate various control units and multimedia systems.
Alexei. I installed a new torpedo from another car - a difficult job that required patience, precision and a lot of free time. I’ll say right away that you need to be well versed in the placement of important elements of your car: wiring, air ducts, and so on. Dismantling must be carried out carefully, since the original torpedo may still be needed.
Tuning ideas
There are several tuning options for the dashboard of VAZ cars:
- Installation of a new, modernized dashboard. The range of such devices on the modern market is quite large - consumers are offered many different options for control panels, differing in price and characteristics. As a rule, these are digital devices. The difficulty of this method is that the car owner will have to redo the connectors for connecting the dashboard, and it is also possible that changes will have to be made to the firmware of the control unit.
- Using overlays. One of the most popular and simple types of tuning. In this case, the overlays are mounted on top of the existing instrument scale - instead of the standard scales of the speedometer, tachometer, temperature sensor, gasoline level, etc. Installing the trim involves dismantling the tidy, as well as removing the arrows from the scale. You can purchase such overlays without any problems on the Internet, and if necessary, you can even download them from the Internet.
- Using LEDs. This option is one of the simplest in terms of execution. Its essence lies in removing factory lamps and installing brighter and more beautiful LED light sources instead. Such a simple upgrade will significantly improve the appearance of the control panel, as well as increase its illumination. But you need to understand that there should be enough light, since bright tidy can distract the attention of the motorist. There should be no problems with replacing lamps; they are simply dismantled and new ones are installed in their place. But if you decide to use an LED strip, then you need to take into account that it will have to be soldered to the board, in this case you need to be more careful and attentive.
- Shield trim. This type of tuning can be classified as external, since it will only affect the appearance of the instrument shell. Its implementation is relevant if the shield is worn out or has damage.
Car dashboard cover
Another way to get rid of low-quality plastic in the car interior is to cover the dashboard. As a rule, leather or a high-quality substitute is used for this. It is quite difficult to do the covering yourself; the plastic, which was previously part of the interior design, will serve as the basis.
Sidebar: Important: It is recommended to carry out the covering only after creating all the necessary niches for installing additional equipment. Otherwise, costs increase significantly.
When choosing a material, you need to abandon fabric, since the front panel is constantly exposed to direct sunlight and is often exposed to greater impact than other upholstery elements. When choosing a color, you need to give preference to not bright shades that will not be very noticeable. Quite often you can find examples of tuning that use bright fabric: red, blue and other colors. Note that this option looks quite attractive, but during a long trip the driver and passengers will be very tired.