02 April 2020 Lada.Online 43 232 0
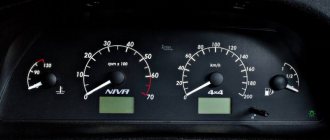
The Chevrolet Niva instrument cluster is designed to display driving characteristics, the current state of vehicle systems that ensure traffic safety, as well as the correct operation of the entire vehicle as a whole. If you are a novice driver, then this description of the dashboard will help you understand the readings of instruments and indicators.
Symbol designations on the Chevrolet Niva instrument panel
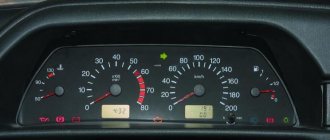
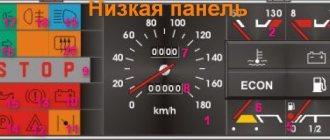
The stock 2004 version has a number of mechanical gauges and analogue icons. In the photo above the panel elements are numbered. The symbols are described below.
| Number | Meaning |
| 3/4 | Standard turn signals also illuminate when the hazard lights are activated. |
| 7 | Indicator of the minimum amount of fuel in the tank. Refuel. |
| 8 | This indicator indicates that the side lights are on. |
| 9 | The brake system is in disrepair. The system needs to be diagnosed. |
| 10 | The high beam of the head optics is on. |
| 12 | Digital mileage indicator, general on top – daily on bottom. |
| 13 | This indication indicates that there is a problem with the engine. In this case, you need to immediately go to the service station. |
| 14 | Emergency light indicator. |
| 15 | Digital display – daily time indicator. Also, during self-diagnosis, an error code is displayed here. |
| 16 | The battery is low. Check the generator and its drive belt. |
| 17 | Handbrake activation lamp. |
| 18 | The oil pressure in the crankcase is too low. |
| 19 | Reserve indicator. |
There is also an additional row of light bulbs on the dashboard, located outside the dashboard.
| Number | Purpose |
| 1 | Empty |
| 2 | The center differential lock is activated. |
| 3 | The immobilizer is activated. |
| 4 | There are problems with the operation of the ABS module; the entire device needs to be checked completely. |
| 5/7 | Backup lamps. |
Panel buttons
Push-button switches are located to the right of the instrument panel. The following description is given in order from left to right.
Exclamation mark on the Shnivy tidy: what does it mean
Indicates problems in the car's electronic systems. Check for additional indicators that light up at the same time. Often this is accompanied by the car not starting.
Drivers mainly look for reasons in nodes:
SRS on the Chevrolet Niva dashboard
If the indicator on the Shnivy dashboard lights up, it only indicates that there are problems in the car’s security system. Check the airbags, belt sensors and wiring.
Light bulb designations
3. Indicator lamp for turning on the direction indicators on the left side
. Lights up with a green blinking light when the left turn signal is turned on.
4. Indicator lamp for turning on the direction indicators on the starboard side
. Lights up with a green blinking light when the right turn signal is turned on.
7. Fuel reserve warning lamp
. If the fuel reserve indicator light comes on, refuel the vehicle as soon as possible. The arrow points to the right side of the car, on which the gas filler flap is located.
8. Indicator lamp for turning on the side light
. Lights up green when the exterior lighting is turned on.
9. Warning lamp for emergency condition of the service brake system
. Lights up red when the fluid level in the hydraulic brake reservoir drops below the “MIN” mark, as well as when the starter is turned on to monitor the serviceability of the lamp itself. Attention. It is prohibited to operate the vehicle with the warning lamp for the emergency condition of the service brake system constantly on.
10. Indicator lamp for turning on the high beam headlights
. Lights up blue when the high beam headlights are turned on.
13. Differential lock indicator lamp
. Lights up yellow when the differential lock is engaged.
14. Check Engine warning light
. When the lamp lights up when the ignition is turned on, it indicates a self-test of the system. If there is no malfunction, the lamp goes out after the engine starts. Attention. If any defect is detected in the system, the lamp lights constantly. To determine the cause, read the error using diagnostic equipment.
16. Battery charge indicator lamp
. Lights up red when the ignition is turned on and goes out after the engine starts. The lamp burning or glowing at full intensity while the engine is running indicates a lack of charging current caused by a malfunction of the generator or voltage regulator, as well as weak tension (or breakage) of the generator drive belt.
17. Parking brake indicator lamp
. Lights up red when the parking brake is applied.
18. Warning lamp for insufficient oil pressure
. Lights up red when the ignition is turned on and goes out after the engine starts. Attention. When the engine is running, a constant light or flashing warning light indicates insufficient pressure in the engine lubrication system. Further operation of the vehicle with the warning light on is prohibited.
19. Immobilizer operation indicator
.
You will find other background information on Chevrolet Niva (LADA) here.
Keywords: Niva instrument panel
0 0 0 0 0 0
Share on social networks:
Errors on the Shnivy panel
When performing self-diagnosis of the BC, the following faults may appear on the display.
| Number | Decoding |
| There are no problems in the system. | |
| 1 | The ECU controller is faulty. |
| 2 | Fuel level indicator is broken. |
| 4/8 | High or low voltage inside the on-board network. Check that the generator set is operating correctly. |
| 12 | The warning lamp diagnostic circuit is faulty. |
| 13 | Open circuit DK1 |
| 14/15 | High/low signal level from DTOZH. |
| 16/17 | High/low voltage inside the on-board network. Here the distributor and battery are checked. |
| 19 | The DPKV is transmitting the wrong signal. |
| 21/22 | Likewise for TPS. |
| 23 | The intake air temperature sensor is reporting incorrect data. |
| 24 | Open circuit of the vehicle speed meter. |
| 25 | DD produces erroneous information. |
| 27/28 | Potentiometer CO – increased/lowered value. |
| 33/34 | The absolute pressure sensor is faulty. |
| 35 | The XX regulator is faulty or does not work correctly. |
| 41 | Phase sensor - incorrect signal. |
| 42 | The ignition control circuit is damaged. |
| 43 | DD – errors in the operation of the highway. |
| 44 | The fuel mixture is too lean. |
| 45 | Opposite meaning. |
| 49 | Loss of vacuum in the fuel line. Check the line for leaks. |
| 51 | The PROM is faulty. |
| 52 | RAM failure or circuit malfunction. |
| 53 | Increased voltage in the circuit. |
| 54 | The octane corrector is torn or out of order. |
| 55 | ECU circuit error. |
| 61 | Oxygen sensor degradation. |
Most errors can be caused by the overlap of several problems. For example, 8+2=10.
Shnivy tidy does not work: reasons
Usually this is damage to the module's power circuit, moisture/condensation on the board, or mechanical damage caused by improper repair.
The problem is simple when studied in detail, and can be easily eliminated without the help of specialists.
The shield does not light up
If it just goes out (the backlight has failed), check the corresponding fuse inside the mounting block. Next you need to follow the wires towards the tidy. Here the condition of the contact groups and the presence of oxidation on the terminals are checked. If there are such problems, the problems should be eliminated.
If only some of the light bulbs stop lighting, dismantle the device and check the lighting elements directly for damage.
Shnivy's shield is blinking
A typical problem in cars that are driven on rough terrain or broken roads. A symptom of trouble is that the device periodically goes out while driving or blinks quickly.
Instrument needles Strings stuck
In such a situation, check the systems.
How to remove the tidy
Follow the simple procedure.
Reassembling the unit is performed in reverse order.
The standard Shnivy panel is a well-thought-out module with informative and easy-to-read information. The simple design ensures the reliability of the unit and the absence of serious breakdowns during operation.
Specialization : Graduated from the State Automobile University, worked for 20 years at GAZ-56, now I drive a Zhiguli.
Let's bring Shniva to mind: Our own icons in the BKL (Indicator lamp block)
I decided to add functionality to the ShNivovsky BKL, especially since it still does not use all the potential inherent in it. Attention! If you have a FAM or ReSHN with ABS+SRS, then the BCL is full-fledged, all indicators are wired. If you have a ReShN in the basic configuration (without ABS), then you do not have a BCL, instead there is a plug. Therefore, you will have to buy it separately if you want to make your own badges) If you have a pre-restyle, then the BKL has a short board and only the first 3 badges are soldered. You can read about how to make such a BCL full-fledged here
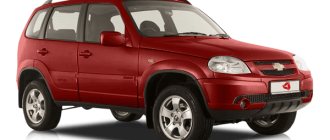
Exterior
When buying a car, buyers first look at the appearance, and then at the technical equipment. Engineers had to work hard on the shape of the body. They managed to embody a courageous, strict, daring image. If you look at the heavy Chevrolet Niva 2022 of the new body, you will immediately notice how it has changed:
- The car received a small head optics. There are no LED elements in it. The Chevrolet Niva in the new body has acquired an inexpensive, rustic look. The manufacturer did not use unusual colors for the body.
- There is no air intake on the front bumper, and small fog lamps are located in a niche.
- Since the not very powerful engine does not actively generate heat, Niva Chevrolet received a small grille for the radiator.
- The front of the car looks brighter than the rear. The rear door is equipped with a spare wheel. Old technologies were used to make small lanterns.
- Wheels with steel rims without decorative caps.
To prevent the Niva from scratching and damaging the new body, it was equipped with massive plastic protection against sharp objects on the road.
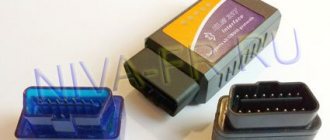
BC Chevy-Master (VAZ-master). Instructions
After identification I found the instructions. I post it for myself and other users.
CHEVY-MASTER VERSION 4.1 ROUTE ON-BOARD COMPUTER FOR Chevrolet Niva CARS WITH BOSCH MP 7.0 CONTROLLERS EURO 2/ EURO 3
MANUAL
The VAZ-MASTER on-board computer is designed to display route information, information about the current values of engine parameters and its components, as well as to control the operating modes of the electronic engine control unit. VAZ-MASTER 4.1, at the operator’s choice, allows you to display the values of the following parameters:
1. Total fuel consumption, l. 2. Instantaneous fuel consumption in l/100 km with a moving car, l/hour with a stationary car. 3. Average fuel consumption l/100 km 4. Coolant temperature in degrees. C. 5. On-board voltage, V. 6. Engine speed, rpm*10 7. Vehicle speed, km/h 8. Average speed, km/h 9. “Black box” speed, km/h 10. Injection controller error codes. -manage operating modes: 11. Erase the controller error code. 12. Adjust the total flow meter to reduce the error. 13. Automatically adjust the brightness of the computer indicator (when the side lights are on/off) 14 Warming up, drying, testing spark plugs. 15. Test the operation of the fuel pump on/off. 16.Forcibly control the cooling fan on/off.
OPERATION The menu sequence is cyclical and has the following functions:
Total flow meter adjustment mode.
Competitors
The Chevrolet Niva in the new body was able to perform worthy of its competitors:
- Renault Duster;
- Lada 4×4 Urban 3D;
- Suzuki Jimny;
- Nissan Terrano;
- Lada 4×4 Urban 5D.
But this is not a complete list of its competitors. The strongest opponent is Renault, as it has an attractive design, first-class equipment and is inexpensive. The new Niva SUV competes with serious cars. They all have their advantages and disadvantages.
Description of instrument panel icons Niva Chevrolet (LADA)
The Chevrolet Niva instrument cluster is designed to display driving characteristics, the current state of vehicle systems that ensure traffic safety, as well as the correct operation of the entire vehicle as a whole. If you are a novice driver, then this description of the dashboard will help you understand the readings of instruments and indicators.
Features of the module operation and malfunctions
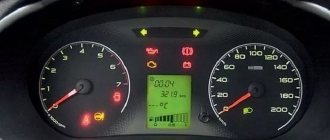
When the ignition is turned off, only the hazard warning lamp can work on the Chevrolet Niva instrument panel. When the ignition is turned on, the system performs a self-test. At this time, the check engine lights, oil pressure and battery charge lights are on. If there are any deviations in the operation of instruments and alarms, testing can be carried out. To do this, turn off the ignition, hold down the odometer reset button and turn on the ignition. All lamps on the instrument panel should light up and the arrows should move three times from the minimum to the maximum value. Typical malfunctions include lamp burnout. If there are no signs of “life” in the entire panel, but the car starts, then you should check the block of connecting wires. Often, for the same reason, one of the devices fails, but here everything is not so simple, because the corresponding sensor may fail.
As a result, we can add that since the instrument panel is a complex electronic unit, then faults should be diagnosed by scanning signals. The only thing a car owner can do at home is replace the burnt-out element.
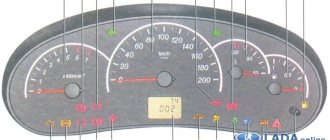
Rice. 1.8. Instrument panel and controls
The location of the controls is shown in Fig. 1.8.
1 – external lighting switch. The switch block contains two mechanically linked switches:
– side light switch (left). By successively pressing the switch key, the side lights in the headlights and rear lights are turned on and off; when the side lights are turned on, the control lamp in the button lights up green;
– headlight switch (right). When you press the switch button (fixed position), the headlights turn on. When you press the button again, the headlights turn off.
The mechanical connection of both switches eliminates the possibility of turning on the headlights without first turning on the side lights and, conversely, does not allow turning off the side lights when the headlights are on.
Rice. 1.9. Steering column switches: 1 – turn signal and light switch lever
headlights; 2 – switch lever for windshield wipers and washers
Description of devices
1. Coolant temperature gauge
. The red zone warns of engine overheating. If the arrow moves into the red zone, you should stop, let the engine cool down and eliminate the cause of overheating.
5. Speedometer (km/h)
induction type shows at what speed the car is currently moving. The speedometer drive is electric from a sensor installed on the transfer case housing.
6. Fuel level indicator
. Provides information about the approximate amount of fuel in the tank. To determine the correct position of the fuel level indicator, you must place the car on a flat, horizontal surface. Turn off the ignition. After 3 sec. turn on the ignition. The indicator will be in the position corresponding to the amount of fuel in the tank. It is recommended to perform this procedure before refueling the vehicle or if you suspect incorrect readings on the fuel level gauge.
12. Mileage indicator
. The top line of the indicator indicates the total mileage of the car, and the bottom line is a daily counter of the distance traveled. Reset the daily counter readings by holding button 11 pressed for more than 3 seconds with the car stopped. The daily counter is also reset when the terminal is removed from the battery.
15. Time indicator
, temperature and voltage of the on-board network. Switching between the indication of time, ambient temperature and on-board network voltage is carried out by briefly pressing button 11. When the ignition is turned on:
When the outside air temperature rises above +3 °C and drops again to +2 °C:
The instrument cluster displays the air temperature around the temperature sensor located in the engine compartment.
When the car is parked for a long time with the engine running, the air temperature in the engine compartment increases, and this is reflected in the readings of the ambient temperature sensor.
When the car starts moving, the air temperature readings change. The hours and minutes are set in the time display mode by rotating button 11 towards the signs “h” - hours and “m” - minutes.
After removing the terminal from the battery and then restoring the connection, the time is counted from zero.
11. Trip counter reset button
, switching the display of time, ambient temperature and on-board voltage.
DASHBOARD
The instrument panel is shown in Fig.
22. 1.External lighting switch, see “Push-button switches” page 9.
2. Lever for the direction indicators and headlights, see Fig. 25A and page 9.
3. Horn switch.
5.Lever of the windshield wiper and washer switch, see Fig. 25B and page 9.
6. Hazard warning switch, see “Push-button switches”.
12. Control panel for the ventilation, air conditioning and heating system of the vehicle interior.
13.Radio equipment socket. The installation of radio equipment is provided, corresponding in size and method of fastening to international standards ISO 7736, DIN 75500. Installation of radio equipment must be carried out only by official dealers of JSC GM-AVTOVAZ with mandatory o.
14. Gear shift lever.
15. Transfer case control lever.
18.Parking brake lever. By moving the lever up, the brake pads of the rear wheels are activated. To return the lever to its original position, press the button at the end of the handle and lower the lever down.
19. Ashtray, in a variant version. Before using the ashtray, you must remove the lid. To hold a cigarette, a shelf is installed in the edge of the ashtray glass, which can be removed for cleaning. If necessary, the ashtray can be removed from the niche on the floor tunnel and moved to the cup holder on the tunnel between the front seats.
20.Cigarette lighter. The cigarette lighter operates regardless of the position of the key in the ignition switch. To use the cigarette lighter, press the socket button until it locks into place. After approximately 20 seconds, the cartridge automatically returns to its original position, ready for use. When the exterior lighting is turned on, the cigarette lighter illumination turns on. Attention The maximum power consumption of electrical appliances connected to the cigarette lighter socket must not exceed 120 W. If the cigarette lighter does not pop out within 30 seconds, it should be removed and contact an authorized GM-AVTOVAZ dealer for repairs. A faulty cigarette lighter can cause injury and damage to your vehicle.
21. Exterior mirror control unit.
22. Switches for heating the front seats, in a variant. The front seat heating is turned on by pressing the switch button. A light indicator in the button itself warns that the heating is on. The built-in thermostat automatically maintains the temperature of the heating elements of the backrest and seat cushion in the range from +25 to +31 °C. By pressing the button again or turning off the ignition, the seat heating is switched off. The left and right buttons turn on the heating of the driver's and front passenger's seats, respectively.
From a technical point of view, any car is a complex system of interacting units. The main difference between a modern car and the self-propelled carriages that stood at the origins of the automotive industry is the presence of feedback. The driver has the opportunity to receive information about the status of vital systems. This information is displayed on a special panel that serves as an information panel. The Chevrolet Niva instrument panel meets all modern requirements for information content and functionality, and therefore should be considered in the context of its purpose, design and operating principle.