It is difficult to scare a person who owns a Chevrolet Niva with anything. He is not afraid of vibrations, ominous sounds from the distributor, or the darkness. Although, the darkness is sometimes annoying, especially in those moments when the lamps on the instrument panel do not light up. There is nothing special about the lamps themselves, W1.2W is exactly 1.2 W. These lamps are installed to illuminate the instrument panel, to illuminate the buttons on the panel, and as control lamps.
They are often replaced with LEDs, but this is a separate topic.
First, let's find out how to change the light bulbs on the instrument panel of a Niva Chevrolet.
Signs of a faulty dashboard
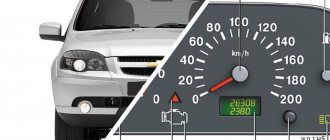
Faulty indicators on the dashboard can be noticed through simple observation . For example, this applies to an arrow indicating the speed of movement or the amount of fill in the gas tank. In this case, they will either remain stationary or change chaotically, regardless of external circumstances and speed of movement.
As a rule, such system failures do not affect the functioning of the vehicle itself . But at the same time they knock down the driver by providing him with incorrect information about the vehicle. For example, you can easily pick up fines for speeding without even knowing about such a violation.
Other signs include flashing of various lights on the panel and problems starting the engine . It is much more difficult to detect malfunctions in the operating system in such a situation, since the symptoms may be associated with breakdowns in other components. To find out that the malfunction is associated specifically with the panel, you need to conduct a thorough diagnosis that will help determine the cause of the problem.
A completely different situation arises if all the devices on the panel fail . In this case, the malfunction is beyond doubt and it is necessary to begin troubleshooting the problem. In most cases, the solution requires disassembling the panel and replacing failed elements. You can do this work yourself, without the help of a specialist.
How is lighting arranged in Niva?
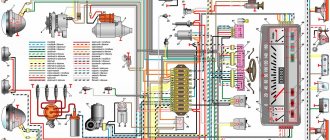
The Niva's lighting circuit is looped to the fuse box, which is located inside the car interior under the dashboard on the driver's side. Each of the fuses is responsible for a certain type of lighting device, not only inside the cabin, but also in the exterior lighting of the car. If the lighting of any interior device malfunctions, the first thing you need to do is check the fuses.
The lighting circuit of the VAZ 2123 has a weak link - the interior lighting switches. A breakdown occurs as a result of the car doors not closing tightly enough, or the door switches failing. The switches are located in the door support risers. During their partial breakdown, when the car is moving, the interior light may flash periodically, as poor contact occurs.
To eliminate the causes of the breakdown, first of all, you need to remove the power terminals from the battery. During the work you will need a screwdriver and new switches. They are inexpensive, so it is better to buy with a reserve. To replace, unscrew the fixing bolt and remove the button. Disconnect the contact wire from it, and then attach the new button. Be sure to check that the rubber gasket on the button switch is seated securely. If it is damaged, it is better to replace it, as it prevents moisture from entering the car door pillar.
After replacing all switch elements, make sure that the interior lighting circuit is working properly. If there are any problems, it is worth adjusting the doors, namely, checking whether the plastic button that presses on the switch works correctly - it should be positioned in the center.
Possible faults
If you understand the designations of the light bulbs in the Niva Chevrolet instrument panel, let's look at the next point - possible malfunctions of the device:
- The instrument cluster does not work, but the engine starts normally. Most likely, the problem is caused by either a failure of the shield itself or a lack of power.
- The lights on the instrument cluster do not light up. If all the indicators stop working at once, this may indicate a break or fraying of the wire responsible for the lighting. If only some of the lamps do not work, then most likely they are simply burnt out.
- Devices not working - speedometer or tachometer. Most likely this is an electrical type problem; you need to disassemble the panel and look for the fault.
- Sensors do not work - fuel level, antifreeze temperature. As practice shows, this usually indicates poor contact in the electrical circuit. Usually this problem is solved by disconnecting and cleaning the plug contacts (the author of the video is the Ig K channel).
DIY diagnostics
In accordance with the service manual for the car, the control panel has its own diagnostic system, which allows you to check the device without removing it.
The sequence of actions for diagnosis is as follows:
- The ignition must be turned off and the daily mileage reset button must be pressed. Next, the ignition is turned on and the key is released. The arrows on the tidy devices must pass through the entire scale several times - this is a tidy test.
- Then hold down the reset button for five seconds - this will clear the processor memory.
- Now press the odometer reset button; the version of the software used should appear on the display. When you press the button again, numbers should appear on the display. The number 0 indicates that there are no malfunctions in the operation of the device, 1 - the microprocessor has failed, 2 - the fuel controller circuit has broken, 4 or 8 - increased or decreased voltage in the on-board network. If there are several breakdowns, the sum of codes will appear on the screen. For example, 14 is errors 2, 4 and 8, fault 10 is errors 8 and 2, etc.
Interesting video about automatic power windows
1.Both window regulators do not work: 1.1. Fuse 1.2 has blown. Unreliable connection of wires to ground 1.3. The connector is disconnected or there is a break in the electrical network. 1.4. The main power window switch is faulty.
2. Does not work right: 2.1. Damage to the gearmotor or reverse current relay. 2.2. Electrical network break.2.3. The power window switch is broken.
3. The glass goes down, but does not go up. The reason is that the button is stuck in the down position.
4. Slowing down or raising the glass. The reason for this is contamination of the drainage holes at the bottom of the door.
5. The cable in the drum may be worn out or broken.
6. Mechanical damage also occurs. They are identified by characteristic noises and knocks. Troubleshooting begins with checking the fuse; it supplies power to both window regulators. If the cause of the breakdown is not found, you will have to disassemble the door.
1. The fuse is checked in the standard way. Using the diagram or visually we find the required fuse. We inspect it for broken wires and burnt marks. You can check with a tester (multimeter) by resistance or voltage.
2. Check the relay for serviceability. To do this, either connect a new one, or close contacts 30 and 87 with each other. The relay cannot be repaired; it must be replaced.
3. Window lifter buttons are easier to remove and replace. The reason for their malfunction is oxidation of the contacts. You can quickly restore the operation of the buttons by treating them with WD-40 penetrating liquid.
4. The faulty motor must be replaced. Its repair is possible only if the contacts are oxidized. They need to be cleaned. If there is no voltage in the walk-behind tractor wires, you need to find the break and repair the damage.
All moving parts of the removed ESP mechanism are inspected for mechanical damage, dust, and dirt. Sometimes it is enough to clean the parts from rust and lubricate them for the lift to work properly.
Replacing the backlight of the stove Lada 2123 (VAZ 2123)
You can try removing the dashboard. To do this, pull it towards you, but the panel fastening latch will get in the way. You need to press it slightly with your finger. Pull the shield towards you, moving it away from the instrument panel. We press the clamp of the shield fastening with your finger. Theoretically, the tidy is free, but it is held in place by wiring harnesses.
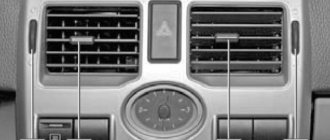
Carefully disconnect the contact blocks and remove the instrument panel assembly. Remove the instrument panel panel. When you flip the ashtray lid, you have simultaneous access to the ashtray and the cigarette lighter.
To use the cigarette lighter, press the socket button until it locks into place. After about 20 seconds, the cartridge clicks back to its original position, ready for use.
Design Features To clean the ashtray, press the cigarette extinguishing plate and remove the ashtray from its slot. When the exterior lighting is turned on, the inside of the ashtray and the cigarette lighter are illuminated with special lights.
Use a slotted screwdriver to pry up and remove two plugs. The first is located to the right of the hazard warning button, and the second is on the far right of the panel trim.
We turn out the screws located under the plugs. We pull out the right side of the dashboard trim and remove the connectors from the control buttons. Remember, take photos of which connectors go to which buttons!
We disengage the left side of the trim, remove the block from the buttons for turning on the headlights and dimensions. We remove and remove the lining.
Unscrew the two screws securing the dashboard. And, to be honest, reviews about it do not evoke positive emotions. First of all, this concerns the impossibility of repair.
Regardless of whether repair or replacement is needed, the shield will have to be removed. This is done using a Phillips screwdriver and a flathead screwdriver. Algorithm First of all, remove the negative terminal from the battery so as not to inadvertently short-circuit the electrical wiring.
Car fuses and relay box
The vehicle's power supply and consumption system ensures the correct functioning of components and assemblies and comfortable driving. The car's current source is the battery. The consumers are connected in parallel and combined into separate blocks with fuses.
On the Chevrolet Niva, the fuse box is mounted in a unit and is located in the passenger compartment. Fuses protect almost all electrical power circuits. They do not have such protection for the generator circuit, engine starting and battery charging.
The Niva fuse box is located on the driver's side under the dashboard. Access to the mounting block is closed with a lid.
To remove it, unscrew two screws.
We remove the cover from engagement with the instrument panel. Lift it up, remove the pins from the rubber bushings and remove.
In the photo you can see where the relay and fuse box is located.
What is a torpedo
All cars have a dashboard (board), which is located in front of the passenger compartment. In a Niva Chevrolet car, it is a plastic covering on which almost all vehicle control elements are located. Although the panel is not a necessary part for driving a car, without it driving turns into complete dissatisfaction. Under the socket there are parts that can fail from time to time. And sometimes, to get to them, it is necessary, as they say, to disassemble half the car. Let's take a closer look at the stages of removing a torpedo from a Niva Chevrolet car.
Steps for removing the instrument panel
The reason for removing the panel may be not only the breakdown of parts located under the panel, but also the following points:
- Car interior modernization;
- Insulation and noise reduction of the interior;
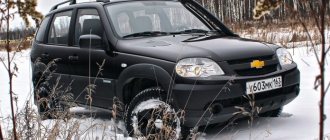
- Cleaning the car heater;
- Replacement with a new, improved one.
Removing the Niva Chevrolet dashboard is carried out in stages. You need to arm yourself with a simple set of tools and get started.
- Stage 1. The car is disconnected from the battery. This is necessary, because there is a huge amount of wiring on the instrument panel, which can accidentally be shorted during removal. To do this, simply disconnect the negative terminal from the battery.
- Stage 2. First of all, the part of the casing located under the steering wheel is removed. The five fastening screws are unscrewed with a screwdriver, and this casing, consisting of two parts, is removed.
- Stage 3. The steering wheel and the switches located on the side are removed. The steering wheel is removed by unscrewing the nut located inside the steering wheel. Remove the steering column shaft. How to remove the steering wheel and its parts can be found in the relevant sections.
- Stage 4. The car radio and its installation location are removed from the passenger compartment. Let's start removing the floor covering. To remove the A-pillar trim, you need to unscrew four screws. The ignition switch is also removed.
- Stage 5. We proceed to disconnecting the wires. The blocks with wires located at the bottom near the gas and brake pedals are disconnected and marked with a marker. The wires supplying the car's anti-theft system are disconnected. The power supply of the instrument board consists of three blocks, which are also detachable.
- Stage 6. The ground wire of the car is unscrewed from the stud. Under the hood, you need to remove the filter, which is designed to filter the air entering the cabin.
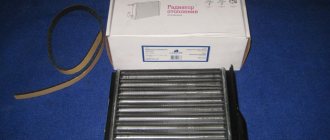
- Stage 7. Most of the liquid is drained from the expander, and the clamps suitable for the heater radiator are disconnected.
- Stage 8. Work is carried out with a wrench inside the car. The bolts securing the panel to the stand and the stand to the bracket are unscrewed. The cross member strut is removed. A cross member of the instrument panel is attached to the steering shaft bracket, which can be removed by unscrewing four bolts.
- Stage 9. All visible and invisible bolts securing the instrument panel are unscrewed. These fasteners are located on top near the glass and on the side. The front air duct, which is designed to supply cold and warm air into the cabin, is removed.
- Step 10. You can remove the dashboard. It is best to do this together, so that one person observes the removal processes from inside the panel. Otherwise, any power wire or part may be damaged or broken.
Interesting video about automatic power windows
The standard circuit consists of a control unit, drive and trigger mechanisms. The drive mechanism, or gearmotor, rotates the cable drum, directly raising or lowering the glass. The gearmotor is a solid block of an electric motor with a worm gear, which provides rotation in only one direction, from the worm to the wheel. This prevents the window from accidentally closing. The built-in thermobimetallic fuse protects against overloads.
1. There is a mounting block located under the instrument panel on the driver's side. Devices are powered from it.
2. The power window relay reduces the current in the control circuit.
3. Buttons with LED backlight, on the right and left doors, activate the glass lifting mechanism.
4. Gear motors for the passenger and driver's doors create a force that raises and lowers the window.
5. The ignition switch supplies power to the relay.
By default, the front door power windows on the Chevrolet Niva only work when the ignition is on. There are several ways to connect an ESP bypassing the central locking.
We will need a simple tool: a Phillips screwdriver, a thin screwdriver, wire cutters, and insulating tape. To replace the relay, we purchase a simple jumper, or make it ourselves. Process: 1. We bridge the power legs of the relay, which supply power to the window regulator. To do this, remove the protective plastic cover. There are three to five relays under the fuse block.
2. To determine which one is responsible for the window regulator, turn on the ignition, hold down the button and remove each relay in turn. At the desired relay, the glass will stop rising.
3. We jumper two contacts: 30 and 87. If you purchased a ready-made jumper, it is recommended, for safety reasons, to insulate it.
4. Install the relay in its original place.
The second method is to modify the ESP relay. Two contacts also close, but not outside the relay, but inside it. This modification is done at a car dealership.
The third method is to connect the power windows to the cigarette lighter:
- On the passenger side, remove the lower valve of the torpedo and remove the cigarette lighter wires.
- We connect the wire to the plus of the cigarette lighter.
- We connect the wire to the ESP buttons.
- We connect the assembled structure to the black and white wire. The power windows have a common plus, so we choose any wire.
- Remove fuse ESP F5. Replace the cigarette lighter fuse with a 30 A
Removing the dashboard of Niva Chevrolet
Dashboard Niva Chevrolet.
There is no way without removing the instrument panel and, by the way, replacing lamps is the only repair that the instrument panel is subject to.
If inaccuracies and malfunctions are found in the operation of at least one device, the shield along with the board is replaced. Regardless of whether repair or replacement is needed, the shield will have to be removed. This is done using a Phillips screwdriver and a flathead screwdriver.
Algorithm
The process goes like this:
- First of all, remove the negative terminal from the battery so as not to inadvertently short-circuit the electrical wiring.
Remove the negative terminal.
Using a Phillips screwdriver, unscrew the two screws of the upper fastening of the instrument panel.
Remove the plug next to the control lamp block.
We take out the plug to the right of the hazard warning switch and unscrew the screw.
Use a screwdriver to pry off the control lamp block.
Disconnect the wiring harness block from the block.
Pull the shield towards you, moving it away from the instrument panel.
We press the clamp of the shield fastening with your finger.
Remove the instrument panel panel.
Disconnect the wiring harness blocks from the shield.
Using a Phillips screwdriver, unscrew the two self-tapping screws securing the instrument cluster on the right side.
Remove the screws securing the instrument cluster on the left.
We put forward a combination.
We disconnect the wiring harness blocks from it.
We remove the instrument cluster.
The panel was pushed aside.
Replacing lamps on the instrument panel
Instrument cluster lamps: 1—backlight lamps; 2 - control lamps.
Rear view of the board.
When we have the dashboard in our hands, we turn it face down and find the plastic sockets for the backlight and warning lamps.
To remove them, simply turn the cartridge body counterclockwise. We take out the socket, take out the old lamp from it, and install the new one in its place. We insert the cartridge into the board and turn it clockwise to secure it.
Replacement of front SP
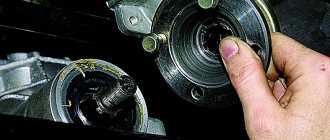
Remove the ESP mechanism from the front door to repair parts or completely replace it. The electric window lifter is also removed during other repair work, when the mechanism interferes with their implementation. A standard set of tools is required.
Sequence of work:
- Remove the plastic door trim. Using a thin screwdriver, carefully pull out the plastic plugs. We unscrew the cross-shaped screws on the frame near the opening handle, and the three at the bottom of the door on the bottom pocket and remove the parts. Remove the two large screws under the plug. We remove the main casing.
- Disconnect the wires from the buttons by pressing the latches. We remove the switches from the plastic case.
- We remove the speaker.
- We remove the front door glass. To do this, unscrew the bolts securing the glass plate to the bar and the bolt securing the door guide. We remove the guide, remove the glass seal, and remove the glass.
- We detach the ESP drive gearmotor from the block with the power wires.
- We unscrew the nuts securing the mechanism to the base of the door, the central and lower nuts.
- We take the mechanism out of the door hole. We inspect the mechanism for damage and replace parts. Next, we install the repaired power window in reverse order, or replace it with a new one.
Replacing Light Bulbs in the Dashboard of a Chevrolet Niva
Chevrolet Niva “Shinovka” > Magazine> replacement
light bulbs
instrument
diode panels
After a couple of years, almost all the lights burned out the instrument
panels, and so I could not stand it and finally replaced what still needs to be done for our client lamps with diodes)
the panel
at first had no problems, everything is very simple.
Price list: 300 ₽ Mileage: 102,000 km
Chevrolet Niva 2006, petrol engine 1.7 l., 80 l. n., all-wheel drive, manual transmission. tuning
Comments 26
they burn out in a month
How many 3V diodes?
And, a photo of the finished result. Where?)
we also need to do what we saved for our client, it remains burnt in the dark to the touch, our client just has to turn it on.
Are the light fixtures on the slab the same as those in the trim? Are they the same for our client?
How did you get the LEDs out of the oven?
He pulled out the scroll, took out the socket, and the light bulbs under it.
But how did you take the turn? I just pull, but they don't give up. And that's why I'm afraid of breaking
replacement dashboard on Chevrolet dashboard cornfield
Replacing light bulbs on the Chevrolet Lacetti dashboard.
Hi all. I wanted to show this video, most save some money)))
How did you get the LEDs out of the oven?
figured it out, just sat)
I installed the stove on an LED strip. But something bright, you need to reduce the number of diodes. And beauty too! Time for 15 minutes heat gun!
Tell me how to remove the hob, 4.5 screws on the panel and where are the extra 4?
1 plug under the button to the right of the emergency lighting, 4 plugs to the right of the indicator lamps, but usually to replace it in the stove panel
You don't have to remove, just the cool sticks for our client should be carefully pulled out and the socket will be removed, and there you can also remove the light bulbs.
No, I didn't do it right, there is no such person, I just wanted to remove the plate where the turn was and it didn't work, I thought you were wrong about that!
Is the LED stuck to the lamp charging point? Convinced of the correct polarity while on vacation?
I didn't realize it was a flask
charging how it differs from the rest. Our client still has the lamp that I pulled out in the same way.
As far as I remember, the excitation is supplied to the generator through a charging lamp. Is there a fee now?
And sell, everything works well.
When the ignition is turned on, the generator excitation voltage is supplied to terminal “D” of the regulator (terminal “D” of the generator) through a warning lamp located in the instrument cluster 3. After starting the engine approximately. The excitation coil is powered by three additional diodes installed on the rectifiers. generator block. The operation of the generator is controlled by a control lamp in the instrument cluster. When on
Replacing a Hyundai Accent light bulb.
During ignition, the lamp should light up and, after starting the engine, turn off if the generator is correct. veins If the lamp burns brightly with other radiation when fully heated, it indicates a malfunction.
Causes of breakdowns
The reasons for the problems are as follows:
- Damage to electrical wiring inside the system. A similar situation may arise due to manufacturing defects, improper operation or late diagnostics.
- Oxidation of contacts. The oxidation process starts immediately after electrolytes or its vapors come into contact with the contact. Leakage of the substance occurs due to cracks located on the automatic transmission cover or in places where current leads are loose. Vapors appear due to constant recharging of the battery or when exposed to high temperatures (in the heat). The result is operational problems in the instrument panel. Failure for this reason occurs least often, since the contacts oxidize over a long period of time. If you clean them periodically, you can completely eliminate the risk of such a breakdown.
- Malfunction of the electronic control unit. Many factors can cause this problem. The most common ones include the following: electrical intervention by unqualified specialists, a break or short circuit in the wiring system, and water getting into the ECU. In this case, malfunction may affect other vehicle systems, not just the instrument panel.
- Incorrect installation after removal. If the panel is installed in the wrong order or without taking into account the rules, then problems with the operation of the device cannot be avoided. In this case, you will most likely have to contact a specialist for qualified help.
Once the cause of the problem has been determined, the repair process can begin.
Attention! To avoid the occurrence of the listed malfunctions in the vehicle operating system, carry out diagnostics in a timely manner.
Malfunctions
The PCB is an electronic unit and therefore may fail in the event of a short circuit or open circuit in the power supply. If you encounter one of the problems, then the first thing you should pay attention to is what signs appeared:
- The engine starts and runs, but the panel shows no signs of life. In this situation, there may be no contact on the device connectors. This can be corrected in the following way: you need to disconnect the pads and clean the contacts; this problem can arise when there is an increased level of moisture, for example in winter.
- The tachometer and speedometer stopped working. This may also appear if there is a break in the power supply or if there are problems with the operation of the temperature and fuel level sensor.
- The light bulbs have stopped burning, but all the elements are working as expected, in this case there may be problems in the power wires or in the lamps themselves
Tuning options
The choice of options for tuning is not particularly large:
- Install a device from another car. In this case, you will need the services of a qualified electrician, since the connectors will have to be redone. You can also install a digital version of the tidy - it will be more than original.
- As a tuning option, you can install LED bulbs instead of regular ones. Many car owners choose this option because it is less expensive and the easiest to implement.
- Another tuning method is to install original instrument scales on the speedometer, tachometer and other sensors. Moreover, you can buy such scales either ready-made or make them yourself in accordance with your preferences.
Shnivy tidy does not work: reasons
Usually this is damage to the module's power circuit, moisture/condensation on the board, or mechanical damage caused by improper repair.
The problem is simple when studied in detail, and can be easily eliminated without the help of specialists.
The shield does not light up
If it just goes out (the backlight has failed), check the corresponding fuse inside the mounting block. Next you need to follow the wires towards the tidy. Here the condition of the contact groups and the presence of oxidation on the terminals are checked. If there are such problems, the problems should be eliminated.
If only some of the light bulbs stop lighting, dismantle the device and check the lighting elements directly for damage.
Shnivy's shield is blinking
A typical problem in cars that are driven on rough terrain or broken roads. A symptom of trouble is that the device periodically goes out while driving or blinks quickly.
Check the wiring and connecting terminals for possible damage or loose contacts.
Instrument needles Strings stuck
In such a situation, check the systems.
- Fuse and power circuits of the interior lighting line. The design of the network is such that the power is crossed, which causes problems.
- Mass disappears on the connected elements of the on-board circuits.
Instructions for replacing license plate lamps
So, two backlights are located in the recesses of the rear bumper, but getting to them will not be difficult.
Using a Phillips screwdriver, unscrew the screws securing the lampshade. If they are rusty, spray them with any penetrating lubricant or WD40 and wait.
After unscrewing the two screws, take out the lampshade and disconnect the power wires from it.
The lampshade is in our hands. Gently press the latch and remove the diffuser.
We take out the old lamp, clean the lampshade and diffuser if necessary, and install a new lamp. It is very important that the lampshade is sealed and no moisture gets into it. If necessary, it can be coated with silicone sealant.
I decided to change the license plate lights because the old one had stopped lighting completely. I took off the lights, and there was horror: everything was rusty, there was nothing left of the metal plates and lamps.
I looked on the Internet, this whole structure is nowhere to be found, so I went to the store and... Hallelujah, there is also a plastic one and a large selection of light bulbs, for the first time I decided to install light bulbs with 3 diodes:
I looked at the mount and saw a lot of cracks, I thought that if I left it like this, then there would be nothing left of the new ones. Without hesitation, I decided to immediately coat the metal arcs themselves with sealant, and at the place where the transparent cover was attached.
I installed one (the right one), tried it, it burns beautifully. I didn't take any photos during the day. I installed the second one (the left one) and here’s a strange thing: the dimensions of the left half of my shniva stopped lighting up ((((Does anyone know what it could be?
PS The entire right half is on, but when you close it, it turns completely around: the backlights and the left half are on, but the right half is not.
I found a solution to the problem, everything turned out to be much simpler than I thought: It turns out that my 5A fuse just blew. I replaced it and lo and behold, everything is on fire))
Replacing the license plate light bulb on a Chevrolet Niva is carried out as it burns out. You can make the replacement yourself without any difficulty, since the lampshades are held on by two self-tapping screws, and getting to them is easy; all you need is a Phillips screwdriver.
Possible faults
If you understand the designations of the light bulbs in the Niva Chevrolet instrument panel, let's look at the next point - possible malfunctions of the device:
- The instrument cluster does not work, but the engine starts normally. Most likely, the problem is caused by either a failure of the shield itself or a lack of power.
- The lights on the instrument cluster do not light up. If all the indicators stop working at once, this may indicate a break or fraying of the wire responsible for the lighting. If only some of the lamps do not work, then most likely they are simply burnt out.
- Devices not working - speedometer or tachometer. Most likely this is an electrical type problem; you need to disassemble the panel and look for the fault.
- Sensors do not work - fuel level, antifreeze temperature. As practice shows, this usually indicates poor contact in the electrical circuit. Usually this problem is solved by disconnecting and cleaning the plug contacts (the author of the video is the Ig K channel).
How to remove the tidy
To dismantle the panel you will need to follow a simple sequence of steps.
- Disconnect the battery and put the car on the handbrake.
- Next, you need to take a Phillips screwdriver and unscrew the two screws at the top.
- Next, you need to open the plugs on the dashboard and remove two more screws. They are located to the right of the hazard warning button and the warning lamp panel.
- After this, the board is pulled out towards itself, simultaneously with pressing in the latch
- Then two more screws under the cladding are unscrewed.
- At the end, the terminal blocks are disconnected and the part is completely removed from the machine.
- The car is assembled in reverse order.
Having figured out how to replace the backlight bulbs of the Shnivy tidy with your own hands, the user can significantly save money on contacting specialists. All actions are completed in 1-2 hours if the work is carried out slowly.
Specialization: Graduated from the State Automobile University, worked for 20 years at GAZ-56, now I drive a Zhiguli.
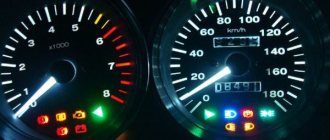
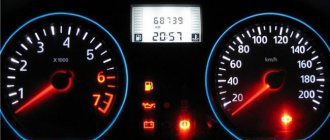
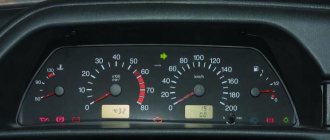
The instrument cluster includes many elements.
In accordance with the diagram above, the shield structure is as follows:
- The coolant temperature control sensor, the arrow on it rises as the engine warms up. The controller needle should not be allowed to move into the red zone, as this will indicate overheating of the power unit.
- A tachometer is a device that measures the number of revolutions of the engine crankshaft.
- The left turn signal activation symbol, made in the form of a green arrow, appears when the corresponding indicator on the steering column switch is turned on. If the light blinks faster than usual, this may indicate a burnt out bulb.
- Right turn signal.
- Speedometer, this device allows the driver to know how fast the vehicle is moving. The speedometer is connected to the transfer case via an electric drive.
- Gasoline fuel level controller; the Chevy Niva uses an electromagnetic device that functions only when the ignition is activated. When the ignition is turned off, the controller needle moves down the scale.
- The fuel reserve indicator in the gas tank appears on the dashboard when the fuel level in the system is about 4-6.5 liters.
- The side light activation lamp appears on the dashboard when the corresponding optics are turned on.
- The brake system emergency symbol appears if the brake fluid level in the expansion tank has dropped to a critical level.
- High beam indicator.
- A key that allows you to reset the daily mileage readings. You can also use this button to switch to the clock or outside temperature sensor.
- A screen that displays the total and daily mileage of the vehicle.
- The Check Engine indicator indicates the need for engine diagnostics. It should always appear when the ignition is turned on, and disappear after starting the engine. If this light remains on while driving, the engine management system needs to be checked.
- Light alarm activation lamp.
- Symbol of time and temperature; you can switch from one mode to another using button 11.
- Battery low indicator, this light should always appear when the ignition is turned on and disappear after the engine is started. If the indicator is always on, this indicates that there is no charging current in the on-board network. This may be due to a failure of the voltage regulator or generator unit, or the lamp may light up if the tension of the generator strap is insufficient or breaks.
- Handbrake activation symbol. If your Niva Chevy is on the handbrake, the indicator will light up when you turn on the ignition and start the engine.
- Indicator of emergency low pressure of engine fluid. It should always appear when the ignition is activated. If it lights up after turning on the engine, this indicates low pressure in the system or a lack of engine fluid.
- Reserve indicator (video author - Artem S).
Instrument panel elements
All components of the Chevrolet Niva instrument panel can be divided into two groups:
- Devices;
- Signaling lamps.
The instrument panel is supplemented with two liquid crystal displays that display parameters such as total mileage, daily mileage, time and ambient temperature.
Devices
Pointer-type devices that convert electrical impulses coming from the corresponding sensors.
- The speedometer is located in the central part of the panel. It receives a signal from the speed sensor, which is located in the transfer case. The device division price is 10 km/h. The speed limit is 200 km/h.
- The tachometer is used to measure the crankshaft speed. On the Chevrolet Niva panel, the tachometer, like the speedometer, is located in the center. On its scale the zone corresponding to values above 5500 rpm is marked in red. It is not advisable to operate the engine in such modes.
- On the right side of the panel there is a fuel level measuring device. The scale has divisions corresponding to the value 0, ½ and 1. These values indicate the amount of fuel in parts equal to the tank capacity.
- On the left side of the panel there is a device indicating the coolant temperature. The instrument scale is graduated so that the minimum value corresponds to 50 degrees. There is a “red zone” in which engine operation is prohibited.