Unfortunately, we have to put up with the fact that the heater radiator on a Chevrolet Niva sometimes fails and has to be replaced. The reason for the failure is some parts made of aluminum. Agreeing that the stove has begun to heat poorly is not only difficult, but also completely wrong. The correct temperature regime ensures the maintenance of an excellent microclimate in the cabin. It is comfortable to travel in such a car even for a long period at any time of the year.
So, if you are faced with poor performance of the stove, having found out that the main cause of the problem is the radiator, we do not recommend that you rush to the service station. The local craftsmen will quickly carry out the work, but will demand a tidy sum. We suggest you save it, keep it in your pocket, and do the work yourself. I would also like to note that sometimes service stations employ hacks who are ready to blindside you by ripping off your money. As a result of such “masterful” work, you will soon need to carry out repairs again. So it’s much easier to do everything yourself at once.
Replacing the device
First, you need to disconnect the battery terminal.
1. Remove the side panel and glove box
2. Unscrew the cabin filter, remove the wiring harness
3. Unscrew the screw and remove the engine control system
4. Using a screwdriver, remove the evaporator screws
5. Remove the radiator pipes or cut them
6. Remove the device and replace it with a new one
- Dismantle the side panel, as well as the glove box, by unscrewing all the necessary screws.
- Next, unscrew the bolt and remove the air duct located in the passenger’s feet. Unscrew the electronic engine management system, it will be easier.
- Dismantle the airbag plug, which is secured with four bolts on the inside. Next, cut out the plastic and remove the air duct.
- Now you need to remove the cabin filter element. Dismantle the so-called volute along with the damper body; the structure should be moved to the side. After this, disconnect the supply wires and dismantle the electric motor along with the snail.
- Next, you will need to unscrew the evaporator, which is secured with two bolts on the inside. In addition, disconnect the pipes along with their fastening device.
- The lower plates should be bent. The evaporator itself should be moved slightly to the side (to the right). Be extremely careful here; under no circumstances should you use a lot of force so as not to damage the element. Press the evaporator onto the floor of the vehicle and then simply pull it out.
- The radiator hoses should be removed. If you see that they are in poor condition, then it is advisable to replace them immediately, then the pipes can be cut off. In addition, it will be much easier. The bolts securing the device must also be removed.
- Then all you have to do is dismantle the element and replace it with a new one. All further assembly is done in reverse order. You need to wait a while for the Shumka to dry. Pay attention to the condition of all hoses and pipes; if you notice any shortcomings, we recommend replacing them immediately.
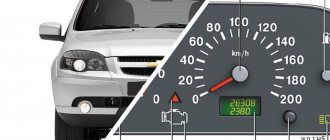
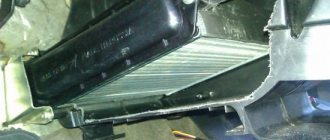
Location of the heater radiator on a Chevrolet Niva
The location of the radiator is marked with an arrow
In addition to the thermostat and pump, the heating system also includes a heat exchanger (radiator). It is located in the center of the instrument panel and can be seen visually.
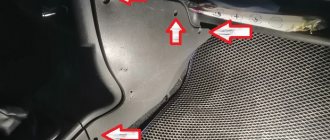
The heater radiator is located in the footwells to the left of the passenger
Causes of malfunctions
The heater radiator is leaking
Long-term use of a car inevitably leads to:
- Appearance: traces of antifreeze under the driver's mat, a specific smell, a (greasy) coating on the glass. Insufficient interior heating.
- The need to frequently fill the expansion tank with antifreeze.
The final stage of work
The tubes are mounted in the reverse order, the clamps are attached, and the expansion tank bolt is screwed on. The barrel is filled with antifreeze and after several days of operating the machine, the liquid level in the tank is monitored. The absence of smudges, odor and warm comfort in the cabin will be a reason to replace the glove box.
Comfort in the interior of any car during the cold season is largely determined by the efficiency and serviceability of the heating system. Heating problems most often arise due to a faulty stove radiator.
Where is the heater radiator located on the Chevrolet Niva?
The heating system of a car consists of a number of elements, without which its normal functioning is impossible. One of these is the stove radiator. Sometimes problems occur with the heat exchanger, to eliminate which it is necessary to dismantle the unit. The radiator is located in the cabin behind the heater control unit. In addition to heating and ventilation devices, the car can be equipped with an air conditioning system. If in the first case you can dismantle the radiator without much difficulty, then in the second case you will need to put in a lot of effort.
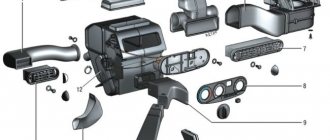
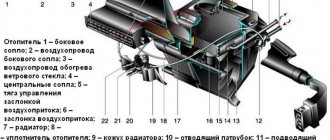
Body interior heating system: 1 — ventilation duct; 2 — air duct for heating the windshield; 3 — intermediate body; 4 - intermediate air duct; 5 — air intake filter housing; 6 — heating system fan; 7 — central cabin ventilation nozzle; 8 — facing of the control lever panel; 9 — front air duct for heating the interior; 10 — rear air duct for heating the interior; 11 — air duct for heating legs; 12 — heater assembly; 13 - side nozzle (heater radiator is located inside box 12)
When the radiator needs replacement
When using a vehicle for a long time, the following problems arise with the heat exchanger:
- the appearance of a leak, as evidenced by puddles under the carpet on the driver’s side, the formation of a greasy coating on the glass;
- clogging, which affects poor throughput and deterioration of heat transfer.
Replacing the Chevrolet Niva heater radiator: preparation
To replace you will need the following tools:
- 14" head with long knob;
- 10" head with long knob;
- head on "8";
- open-end wrenches;
- flathead and Phillips screwdrivers, available in a set;
- pliers that are needed to clamp and grip parts of various shapes.
Next, be sure to drain the antifreeze from the cooling system. When replacing the heater radiator on a Shnivy, the coolant is usually drained in the following ways:
- open the hood lid, open the cap on the expansion tank, on the front part of the cylinder block, drain the liquid through the drain hole;
- There is another way - you also need to open the cap of the expansion tank, remove the clamp on the throttle body hose, pull out this hose, and instead put another hose through which the liquid will immediately flow into the bucket.
But in theory, the easiest way is to use the first method, but anything can happen, maybe the drain hole cannot be unscrewed.
By the way, to prevent the airbags from suddenly deploying while replacing the heater radiator, you just need to turn the ignition key to the “Lock” position and also disconnect the ground on the battery. After disconnecting the battery, you need to wait a couple more minutes so that the backup capacitor has time to discharge.
You may also be interested in: The quietest summer tires: the best brands on the market
You can also prepare thin strips of foam rubber in advance, which will need to be used to cover the radiator around the perimeter. This must be done so that there are no gaps and the air flow goes only through the radiator.
If the car has air conditioning, then this changes the whole situation a little and complicates the process of replacing the radiator. Therefore, there are such options for the development of events:
- Without removing the instrument panel, you need to depressurize the air conditioning system, remove the evaporator and then fill it with refrigerant;
- If you completely disassemble the dashboard and remove the steering wheel, the air conditioning will still work.
It will be difficult to do this work on your own in the garage. You can change the heater radiator yourself only if the car does not have air conditioning. By the way, for those who live in Ukraine, there is an opportunity to buy spare parts for the Chevrolet Lacetti in Kyiv at competitive prices.
Signs of a leak
Unlike the VAZ 21214, the heater radiator on the Chevrolet Niva is not equipped with a tap and coolant circulates through it year-round. This does not mean that the heating works constantly; with the help of a plastic damper, the flow is switched past the stove, causing cold air to blow into the feet of the driver and passenger. But the stove itself is always hot, which can be felt by the slight heating of the side plastic panels of the center console.
It is impossible to know that a car’s heating system is leaking by external signs. There are no stains under the car, all connections between pipes and fittings are dry, and the liquid goes somewhere. Because of this, the electric fan that cools the engine may turn on even on cold days.
Replacing the radiator of a Chevrolet Niva stove with air conditioning is quite a difficult job, but at the same time it can be done independently. Just first you need to determine whether the cause is really in the heater radiator. Symptoms of malfunction are as follows:
- Poor operation of the stove;
- Regular lack of fluid in the heating system;
- The appearance of an antifreeze smell in the cabin (not always);
- A puddle of greasy liquid under the driver's mat (at the same time, read the article on how to dry it).
Just in case, before you climb to the stove, check the hoses and pipes supplying liquid to it. If they are wet, then that's the reason.
Tool. This work does not require any special tools; almost everything you need can be found in a regular set of keys. You will also need 2 screwdrivers (slotted and Phillips) and pliers. And also a box for screws. In addition, you can stock up on markers.
The causes of the malfunction can be listed in a small list:
- A breakdown of the control unit has occurred.
- Mechanical or operational damage to the radiator surface.
- Failed additional resistor.
- Radiator pipes damaged by external factors or worn out by prolonged use.
- Faulty heater valve.
How to determine what kind of breakdown occurred? Let's look at several different signs by which you can determine the cause of the malfunction and understand where to start repairing the stove.
Replacing a stove radiator on a Chevrolet Niva without air conditioning
To replace the stove radiator on a Chevrolet Niva you will need the same tools. However, the replacement algorithm is slightly different.
Sequence of actions when replacing a stove radiator
The procedure for replacing the heater radiator on a Chevrolet Niva without air conditioning is as follows.
- All antifreeze is drained from the heating system. Complete draining of the coolant takes 7–10 minutes.
Before replacing the heater radiator, it is necessary to drain the antifreeze from the expansion tank
- Use a Phillips screwdriver to unscrew the screws holding the glove compartment and the plastic side panel on the passenger side. Access to the mounting bolts and radiator pipes is provided.
The glove box can be removed using a Phillips screwdriver
- Use a flat-head screwdriver to loosen the metal clamps on the pipes. Then the pipes are removed. In this case, you should place a small container under the radiator, since even with a complete drain, a small amount of antifreeze remains in the radiator, which can get on the interior trim.
When removing the pipes, place a small antifreeze container under the radiator
- Use a Phillips screwdriver to unscrew the two radiator mounting bolts, and carefully pull it out until its right corner rests against the edge of the plastic panel.
The heater radiator is attached to the body with two bolts
- The corner of the plastic frame that does not allow you to pull out the radiator is carefully broken off with pliers or cut off with a hacksaw. The radiator is completely pulled out.
The corner of the plastic frame is broken off with pliers or cut off with a hacksaw
- Before replacing the plastic frame of the new radiator, a corner is cut off in the same way. Further actions are carried out in reverse order.
Let's get started
If you are replacing the radiator of a Niva-Chevrolet heater without air conditioning, you need to remove the glove compartment on the passenger side. It is attached with self-tapping screws. We put the latter in a separate box so as not to experience difficulties with installation.
If you are replacing the radiator of a Niva-Chevrolet stove with air conditioning, you will have to disassemble the front panel and part of the engine compartment.
Replacement process
Because replacing a heater core is not an easy process, it should be started when there are compelling reasons and you observe signs that clearly indicate problems in the heating system. Experienced technicians share recommendations based on which you can make a “diagnosis” for your car, indicating that it is time to replace the radiator. If the stove begins to heat poorly, so you constantly feel chills in the cabin of your vehicle, then there is a problem with the heating. If, in addition, you smell antifreeze, then your fears are even more confirmed. You should be even more concerned if you begin to notice that the level of coolant used is constantly decreasing, and under the carpet in the cabin you suddenly find a “swamp” of greasy liquid.
First, of course, check all the pipes and hoses that are part of the heating and cooling system. Make sure they are intact. If this is so, it means that the culprit of such troubles is, after all, your stove radiator, the resource of which has already been exhausted. Even if you don’t have the knowledge of how to change a radiator, don’t give in to the problem. We are ready to help you and give specific recommendations, based on which you will skillfully replace the heater radiator on a Chevrolet Niva with and without air conditioning.
There are two ways to replace the radiator. The first method involves carrying out work that does not require removing the torpedo. However, this method is accompanied by a clear disadvantage, namely that during the task the air conditioner will depressurize, so upon completion it will have to be refilled with refrigerant. The second method can be done by removing the dashboard. Unfortunately, such a replacement of the heater radiator on your Chevrolet Niva will be accompanied by a greater expenditure of physical and time resources. Decide which method will be preferable for you, study the recommendations we offer and get started.
First way
This method is suitable for those who are used to performing all actions at lightning speed, since they cannot allow their vehicle to simply sit idle in the garage. The main disadvantage of this method is that at the very beginning of the action you must release all the freon from the air conditioner. If you want to make the reassembly process easier for yourself, take care of this before disassembling, arm yourself with a marker and mark all the removed bolts, screws and other components.
First, unscrew all the bolts and remove the glove compartment. Next, refocus your efforts on the airbag, if you have one. Remove the passenger air duct by unscrewing the bolts and disconnecting the plugs. Don't be afraid that even when you apply force, the air duct won't give way to you. The manufacturer sometimes glues them together with tape, so increase your pressure and you will succeed.
Remove the pipe located at the bottom, where the passenger's feet are usually located. Next, dismantle the control unit by disconnecting the wires from it. To keep these wires out of your way, you can temporarily tie them together with electrical tape. The next step is to remove the cochlea. You will again have to unscrew several screws, then disconnect the cables and freely pull out the snail. Now go from the hood side, find the air conditioning pipes and unscrew them.
Now we get to the radiator. However, it cannot be dismantled immediately. Initially, you should cut a hole in it, substitute a previously prepared container and drain all the antifreeze remaining in it. Such actions are quite important, because if you ignore them, as soon as you disconnect the pipes and hoses, all the antifreeze will begin to splash in different directions, polluting everything around, including the interior. It will be difficult to continue the process.
Once the antifreeze is drained, you can safely remove the radiator and install a new one. Of course, you can immediately begin the assembly process. Do not forget to visually inspect the outer surface of the pipes and hoses to ensure they are unusable. Otherwise, you will have to repeat this procedure again if you install back the pipe that causes the leak.
Second way
You can also use the second method. First, disconnect the battery, then drain the radiator to the last drop of coolant. It wouldn’t be superfluous to even blow out the expansion tank. Now unscrew the four bolts and remove the radio with its guides. Let's move on to the crucial moment - you have to remove the instrument panel. Press the latch and pull the panel towards you. To make it easier for her to “obey” you, pull her not only forward, but also slightly to the right.
We suggest that you now use a marker and label all connecting parts. In this case, when assembling, it will be easier for you to complete all the necessary actions, and you won’t have to strain your memory. Next, unscrew the bolts and remove the dashboard. The next step involves removing the stove control unit. First, remove its side panel, then slightly pull it towards you, then disconnect the cables and backlight terminals. Next, remove the steering column. On the side of the panel you will see a spacer, which is also important to remove. Direct your efforts to removing the panel amplifier and fan mounts. Now you have managed to get to the stove and air conditioner. These two devices are fastened with four screws, three of them can be easily unscrewed, but the fourth, “the most stubborn” one, will only give in if you bend the edge of the amplifier. Remove the stove tee and its casing. Now nothing will hinder you; you can safely replace not only the radiator, but also, if necessary, even the entire stove. Next, you will need to perform reverse assembly. Take your time, perform all steps in reverse order carefully. In this case, you will be able to complete the replacement in such a way that even the most experienced craftsmen will simply gasp and envy your effective work.
So, the process of replacing a stove radiator is labor-intensive and responsible, but any car owner who is ready to set such a goal can cope with it. Based on our recommendations, it will be easier to understand the sequence of actions, carry them out and get the maximum result.
About removing other elements
When replacing the heater on all VAZ cars, questions often arise - how to get to the heater and how to remove the radiator in the easiest way. In this regard, the Chevy Niva is considered an exception; getting to the stove here is relatively easy. No special tools are required for this; all you need is a set of screwdrivers and the following tools:
Also interesting: How to tension a Chevrolet Niva alternator belt
You should also prepare a supply of antifreeze for refilling in an amount of 2-3 liters. An inspection ditch is not needed for work; a flat, open area will suffice. The process begins with partial emptying of the Chevy Niva cooling system. Antifreeze is drained only from the cylinder block; there is no need to touch the cooling radiator.
To empty the basin, you need to place the basin under the cylinder block on the left side (in the direction of travel) and pass the hose into it. Using a 13mm wrench, loosen the bolt - the plug on the block - and then unscrew it by hand, holding the hose at the ready. When the plug comes out of the hole, you need to quickly insert the hose and hold it until the antifreeze flows out.
After removing the element, it is worth examining the condition of the rubber pipes supplying coolant to it. If they become sour or cracked, they need to be replaced, otherwise you will have to undergo lengthy disassembly again later. To disconnect the pipes from the engine, you need to remove the plastic casing from the motor and unscrew 2 clamps, then pull the hoses out. That's all, we install the new unit, assemble it and fill it with antifreeze.
Car enthusiasts practice a simpler method, but it involves cutting out the plastic elements of the front panel. Here each motorist decides for himself which method to choose.
Taking advantage of the moment when part of the Chevy Niva’s interior has been disassembled, you can simultaneously replace other parts if they are faulty. If it is necessary to replace the fan, then the disassembly procedure is carried out in the same way, only at the end the motor and turbine located above the removed glove box are dismantled. The sequence of actions is as follows:
- Disconnect the motor power supply terminal.
- Disconnect the air duct from the supercharger.
- We unscrew 3 screws and dismantle the fan with turbine.
- To separate the turbine, simply remove the spring-loaded washer.
Radiator replacement process
In the process of replacing the radiator
Independent replacement of the radiator is carried out with a set of tools, including a flat and Phillips screwdriver, pliers, and small socket heads (8, 10, 14).
Preliminarily: the battery terminal leading to ground is disconnected. It is better to remove the ignition key. It is advisable to start the process after 2-3 minutes in order to completely discharge the reserve capacitor.
Drain the antifreeze
Adhering to the stage of preparatory operations, antifreeze is drained from the heating system.
Unscrew the lid
The usual option for draining the antifreeze is offered, which involves removing the bottom bolt and opening the expansion tank cap.
The second alternative method is performed by opening the reservoir cap and disconnecting the throttle body cooling tube. In place of the tube, another hose is inserted through which the antifreeze is drained. To speed up the process, the barrel can be purged to remove any remaining liquid.
Technology without removing the instrument panel
The basis for replacing the heat exchanger is the experience of drivers, which allows one to eliminate complex procedures for dismantling the dashboard.
Disassembly steps:
- The so-called glove compartment and the passenger (leg) heating duct are removed by unscrewing the self-tapping screw.
Glove compartment removed
- Loosen the clamp, remove the rubber tube, and drain the remaining liquid into a pre-prepared container. The upper clamp is loosened and the pipe is pulled towards itself.
For convenience, lay down a cloth. You can use a diaper to prevent any remaining antifreeze in the radiator from spilling into the passenger compartment.Drain off the remaining antifreeze
- The radiator, after removing two screws, pulls out until it hits the air duct.
- The nut securing the relay cover is unscrewed and then removed. It is visually noticeable how the corner of the plastic frame of the heat exchanger prevents the removal of the radiator.
Bolt location
- Use wire cutters (side cutters) to bite off the interfering piece of plastic.
For clarity, the photo is on the new radiator. Without removing this piece, the radiator cannot be put on
- The outer edges of the new radiator along the perimeter are covered (“moment”) with thin strips of foam rubber. This is done to prevent air from penetrating through the cracks.
Covering the edge of the radiator with foam rubber to prevent air from entering
As when dismantling the old unit, the frame of the new radiator with a cut off corner is inserted into the standard socket.
Equipment with air conditioning
Dismantling the heater radiator is complicated if the car is equipped with air conditioning. The operation is painstaking, but ingenuity and curiosity greatly simplify the process.
During the replacement process, you will need to remove the air conditioner evaporator
Of the existing two methods of replacing a stove radiator, the preferable option is to remove the instrument panel. The process guarantees the safety of the air conditioner. In another case, it becomes necessary to break its seal and then refill it with freon.
Removing the panel involves steps identical to the procedure for removing a heat exchanger without an air conditioner. With some exceptions:
- The battery terminal is disconnected and the antifreeze is drained into the prepared container. The barrel should be purged so that all the liquid flows out.
- The bolts are unscrewed, and the radio tape recorder is removed along with the slide. After unscrewing the screws (self-tapping screws), the side panels and instrument panel are removed. At the same time, do not forget to remove the fastening buttons. Having released the latches, we move the panel to the right and a little towards ourselves, freeing it from the grooves.
- It is advisable to mark the chips and connectors with a marker, which will speed up the assembly process. By unscrewing the speedometer drive, the bolts are released, as well as the torpedo itself. o By freeing the side shield and steering wheel casing, the control unit is removed. The backlight connector is disconnected.
- The steering column and the shield mounts (from below) are unscrewed and the spacer is dismantled.
- The panel amplifier is disconnected (4 bolts).
- Having released the fan mounts, the stove is removed along with the air conditioner and amplifier. The bolts securing the latter to the body are also unscrewed.
So, the stove is free after removing the tee from it. To ensure that there are no extra fasteners left during assembly, adhere to a strict, reverse sequence.
Conviction that the radiator is faulty comes after checking the supply pipes, pipes, and hoses for leaks.
About removing other elements
The device is replaced in stages:
- Remove the glove box and disconnect the air duct.
- To simplify the process of removing the rubber tube to drain the remaining liquid, loosen the bolts.
- The structure is attached using two screws.
- Using a side cutter, remove a piece of plastic that interferes with the dismantling of the structure.
- Then a new radiator is prepared. To prevent air from passing through the cracks, glue is applied around the perimeter.
Also interesting: Tuning a Niva 4x4 with your own hands: updating the interior of the Lada VAZ-2121
This procedure is based on the experience of a large number of drivers who have already replaced a part without the complex dismantling of the instrument panel. The work can be divided into several stages:
- We remove the glove box and disconnect the air duct leading to the front passenger's feet.
- Loosen the clamps so that you can remove the rubber tube to drain the remaining liquid. To do this you need to prepare a small container.
- To carry out this procedure more carefully, you can cover the interior with cloth or film so as not to accidentally spill antifreeze.
- The radiator is additionally secured with 2 screws. After removing them, you need to pull it towards you a little until its movement is limited to the air duct.
- Remove the relay cover fastener to remove it. This must be done so that the corner of the plastic frame on the heat exchanger does not interfere.
- Using a side cutter, you can bite off a piece of plastic that interferes with dismantling
- Then you need to prepare the new radiator for installation. To do this, use glue to apply thin strips of foam rubber around the perimeter of the part. This must be done so that the air does not pass through the cracks and warms up as efficiently as possible.
- Then the part is installed in its standard place
How to replace the heater radiator on a Chevrolet Niva without air conditioning
Before you begin dismantling the radiator, you will need to drain the antifreeze from the cooling system. To do this, unscrew the bolt on the cylinder block and remove the expansion tank cap. Another option is also possible, in which you open the tank lid and disconnect the cooling tube of the throttle assembly. Instead of this tube, another hose is inserted, through which the liquid is removed. To speed up the process, you can carefully blow out the tank to drain any remaining antifreeze. In addition, it is recommended to disconnect the negative terminal from the battery.
To replace the heater radiator, you need to unscrew the bolt on the cylinder block and the expansion tank plug to drain the coolant
Tools for work
To dismantle the radiator you will need:
- screwdrivers (flat, Phillips);
- pliers;
- wire cutters;
- socket heads of different sizes (8, 10, 14).
How to remove a stove radiator
It is worth taking into account that the manufacturer’s recommendations for car repair are not always the simplest and most accessible for the average motorist. Therefore, quite often you have to rely on the experience of owners who carry out repairs with their own hands using improvised means and tools, resorting to various tricks. Let's start the disassembly procedure:
- We dismantle the glove compartment, for which we unscrew the corresponding fasteners. We unscrew the screws securing the trim on the right and left sides in the passenger's feet, and remove the terminals of the lighting bulbs.
To remove the glove compartment, you will need to unscrew the corresponding screws and remove the side decorative trim in the legs
- We loosen the clamps of the rubber pipes from the radiator and carefully tighten them, pouring the remaining antifreeze into the prepared container.
After removing the hoses from the radiator, drain the remaining antifreeze into a prepared container.
- After removing the hoses, unscrew the fasteners of the heat exchanger itself and push the part towards you until it rests against the air duct.
- We unscrew the nut securing the relay cover with the “8” head and remove the element. It will be seen that the subsequent dismantling of the radiator is hampered by a corner of the frame. To solve this problem, use pliers to remove the interfering part of the plastic and remove the heat exchanger itself.
To remove the radiator from the seat, you will need to cut off a piece of plastic
- On a new radiator, it is recommended to glue the outer edges with foam rubber to avoid air penetration due to leaky connections.
- We also cut off a piece of plastic on the frame of the new heat exchanger, and then insert the part into its seat.
On a new stove radiator, it is necessary to cut off the corner of the frame, which will allow the part to be installed in place
- We perform assembly in reverse order.
Installation
So, the replacement of the Niva-Chevrolet heater radiator is almost complete. Now you need to install the new element in the reverse order. First you need to cover it with a thin strip of foam rubber. It is better to use “Moment” or “Liquid Nails” glue for this. Next, using a file, we bite off the plastic corner (the same as when dismantling). Installation may also be difficult. Often the foam would catch on interior parts.
The main signs that a Niva Chevrolet heater radiator needs to be replaced
If you drive a Chevrolet Niva for a long time and do not do or check anything in it, then an unpleasant situation can happen when the car becomes cold in winter because the heater will not work properly. To prevent this from happening suddenly, you need to take into account the following signs associated with the cabin radiator (also called a heat exchanger):
- if antifreeze appears under the driver's mat, this is a serious sign;
- the smell of antifreeze appeared in the cabin;
- a greasy coating began to appear on the glass;
- the air heats up slightly during the cold season;
- Antifreeze in the cooling system must be constantly topped up.
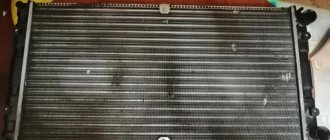
If there are no antifreeze leaks at the joints, it means that all of them need to replace the heater radiator. And then, you can see this just by looking at the radiator; if it is covered in drips, then it is clear that it must either be repaired or replaced. Then you need to choose a new stove radiator; they are usually made from aluminum or copper; both are good, depending on which one you already like.
Let's sum it up
As you can see, replacing the radiator of a Niva Chevrolet stove is not a complicated process, but it will require certain skills and knowledge. It is also important to take into account the nuances discussed above. It is necessary to decide in advance on the choice of a new radiator, as well as prepare a set of necessary tools. In turn, if the replacement is performed correctly, the functionality of the element will be fully restored.
We also recommend reading the article about how the cap of the expansion tank of a car engine cooling system works. From this article you will learn about the purpose and operating features of the expansion tank cap, as well as the signs and symptoms of malfunctions of the expansion tank cap.
As a result, we note that only correct operation and timely maintenance will help extend the service life of the stove and heater radiator (both copper and aluminum). The main thing is to change antifreeze on time, avoid mixing different types of liquids, and also regularly flush the cooling system if necessary.
Problems of choosing a new radiator
For the Chevrolet Niva car, you can find aluminum and copper radiators on the market, differing both in performance characteristics and in price.
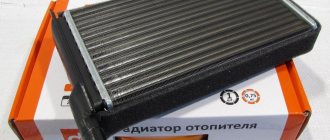
Aluminum radiators
The main advantages of aluminum radiators:
- low price (from 700 rub.);
- short heating time;
- light weight.
The disadvantages of such radiators include:
- low heat saving rates (heats up quickly and cools down quickly);
- low maintainability (impossible to solder holes and holes);
- the presence of steel inserts that are subject to corrosion and significantly reduce the service life of the radiator.
In Russia, aluminum radiators are produced by LUZAR and.
LUZAR radiators are low cost
Copper radiators
Copper radiators have a number of advantages, the main of which are:
- high heat saving rates;
- longer service life than aluminum radiators;
- possibility of repairing holes and holes using soldering.
Disadvantages of copper radiators:
- high cost (from 1700 rubles);
- slow heating;
- heavy weight making installation difficult.
DAAZ copper radiators retain heat well
Copper radiators produced by DAAZ and SHAAZ are in greatest demand among car owners.
Thus, replacing the heater radiator of a Niva Chevrolet car is quite simple. You will need a new radiator, a standard set of plumbing tools and no more than two hours of free time.