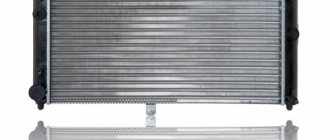
Sooner or later, any, even the most reliable and simple part in a car, wears out and requires replacement. First of all, this concerns technological and complex design elements. The VAZ-2110 heater radiator is just such an element of the interior cooling and heating system. If we have a copper radiator installed that is not standard, it can be successfully repaired and installed back. Regular DAAZ aluminum radiators, unfortunately, cannot be repaired. Therefore, today we will replace two heater radiators at once on the tenth family - the old and new models.
When and what kind of heater radiator was installed on the VAZ-2110
- Until mid-2003, the entire tenth VAZ family was equipped with DAAZ aluminum radiators with catalog number 2110-8101050.
- After 2003, radiators of an improved design began to be installed on the 2110. Its article number is 2110-81010160-00.
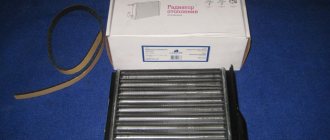
Old style radiator.
New sample radiator.
Prices
The price of a native DAAZ radiator should not exceed a thousand rubles. Radiators will sell for about the same money:
- Luzar;
- Kraft;
- Pramo LRZ;
- Bautler;
- Finord and a number of other manufacturers.
These are all aluminum heat exchangers, so their prices are not too high.
Aluminum or copper?
A copper radiator will cost more, but it's worth it.
A good copper radiator will cost approximately twice as much, but it is worth it : firstly, the heat transfer of copper is higher, secondly, a copper radiator has high thermal inertia (it takes a long time to heat up, but cools down slowly), thirdly, in case of damage, a copper radiator you can easily restore, clean, replace damaged elements and it will be much cheaper than replacing the entire stove radiator with a new one.
And copper is practically not subject to corrosion , if we talk about the life of the car. If we have made a choice, we assemble the tool, diagnose the heating system and replace the radiator on the VAZ-2110.
Tool
Everything you need to replace a radiator can be found in the garage of an ordinary car enthusiast. If there is a need to replace the stove radiator, you will need to buy some materials and spare parts:
- a set of wrenches, preferably with a ratchet and extension;
- figured and flat screwdrivers;
- a set of four new clamps;
- about 4 liters of fresh antifreeze;
- new heater radiator of the sample before September 2003;
- bottle or canister for draining old antifreeze.
Additionally, water and a rag are needed to wash the removed parts, since they may contain old antifreeze, dirt, dust, etc. When working with plastic elements, you need to be careful not to break the latches and fastening points of the screws.
When to change the radiator?
A heater radiator leak is an indisputable failure; it is immediately noticeable, if not by traces of antifreeze under the car, then by a drop in the liquid level in the expansion tank.
It is much more difficult when there seem to be no leaks, but at the same time, the radiator does not heat even at a high antifreeze temperature. In this case, the reason for the drop in heater temperature may be either a clogged or coked radiator, or a number of other reasons:
- air lock in the cooling system;
- non-working thermostat;
- breakdown in the hot air distribution system;
- air leakage through leaks in air ducts (this is a proprietary disease of the entire tenth family);
- low level of antifreeze in the expansion tank.
Antifreeze leaks under the radiator are a clear reason to look for a leak.
Heating system diagnostics
In short, before buying a new radiator or removing an old copper one for repair, you need to check the entire cooling system in detail so as not to throw money away.
By the way, about money and wind - at the service station they will ask for at least 2 thousand rubles to replace the heater radiator. Therefore, it is cheaper to do all the work of replacing the heater core yourself.
Replacement procedure
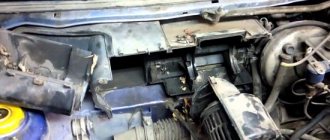
The radiator of the VAZ-2110 stove is replaced from under the hood. Before starting work, carefully remove the insulation from the rear wall of the engine compartment. In the opened space you can see the stove body, which is under plastic protection. To remove the heater radiator, you will have to dismantle the wipers, plastic protection, air intakes, as well as the plastic ski under the windshield. When removing the ski, carefully remove the wiring that goes to the windshield washer. They are unhooked directly near the washer reservoir, then carefully removed from the engine compartment.
Next, the plastic housing containing the heating system radiator is dismantled. Before this, you need to unscrew all visible screws and carefully unclip the latches holding its components. This is a complex and painstaking job, in which there is no need to rush so as not to damage the fragile plastic parts.
When removing housing elements, do not damage the stove motor, which is attached to its cover. There is one more feature when dismantling the plastic protection. When removing the plastic housing that directly covers the heater radiator, it is necessary to unclip two latches that are located in its lower part. The problem is that they are absolutely invisible from the engine compartment; everything needs to be done with a screwdriver, carefully and by touch, so as not to break off these fasteners.
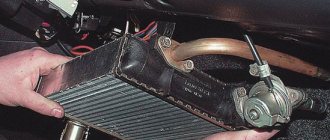
The radiator is located in the central part of the case and can be seen after removing the casing. On the right side there are hoses that go to the stove, and a hose leading to the expansion tank. To continue operation, you must drain the coolant from the cooling system. This can be done by unscrewing the hose that is attached to the injector. The disconnected hose must be taken out into some container so that it is below the level of the stove, then all the antifreeze will leave the radiator. After this, you can disconnect the hoses from the stove, since it will be dry.
Sometimes it happens that the hoses become woody, in which case it is better to simply cut them off and then replace them. After this, you can remove the heater radiator from the socket with virtually no effort. By looking at the removed part, you can identify leaks of antifreeze - a sure sign of depressurization of the radiator.
Having made sure that the stove radiator needs to be replaced, when purchasing a new unit, you need to pay attention to its model; you will need the old version, and the kit should include new pipes. In addition, buy new antifreeze, since some of it spills out when installing the heater radiator. A volume of 4 liters will be sufficient.
Before reassembling, thoroughly clean and rinse the seat, then install the heater radiator. Everything is put together in reverse order. When assembling a stove with an old-style heater, we pay attention to several important points. When reassembling the plastic case, you must make sure that its pedal fits into the groove intended for it. All components must clearly fit into their seat; if this is not done, there will be problems with the supply of warm air and the plastic casing will have to be disassembled again.
After assembly, antifreeze is poured through the expansion tank to the level so as not to get a cold heater radiator after repair, and the engine starts. When it warms up, you need to turn on the stove and let it run for a few minutes. This will help ensure that there are no leaks and that you can set the normal temperature inside the car. If the coolant level in the expansion tank drops, it must be topped up.
New sample stove
The new heater has its own peculiarities in its attachment to the body. To remove, you need to unscrew:
- Middle screw at the bottom of the windshield;
- Two nuts located above the intake manifold;
- Nut near the filter on the left;
- In addition, if there is a reservoir with washer fluid for the rear window (on VAZ 2112/2111 models), you need to remove it too. And also an air filter.
The peculiarity of the new heater is that it is disconnected. In principle, this is not difficult to do. And then change the heating radiator.
Old style stove
First, let's look at how to repair the heating radiator of an old-style stove. Its removal is done from the hood side as follows:
- Remove the rubber frill seal;
- We find the screw securing the frill under the main brake cylinder and unscrew it;
- We unscrew the screws securing the right part of the frill (there are 4 of them);
- We unhook the 2 clamps located on the frill, securing the hoses and wires;
- Disconnect the “plus” terminal and the “minus” wire of the fan;
- The left side of the frill needs to be moved forward without removing completely. To do this, just unscrew a couple of screws;
- Remove the windshield;
- If there is one, then the terminal of the sensor indicating the antifreeze level must be disconnected. Remove the steam exhaust hose from the expansion tank.
- Front window washer hose;
- Windscreen wipers;
- Windshield trim;
- Clamps securing the heater body;
- Its front part along with the fan;
- Cabin filter;
- Another part of the fan housing;
- All hoses: supply, return and steam exhaust;
- And finally, not without effort, we can remove the radiator housing.
Spare parts and tools
Before you replace a leaking or possibly clogged radiator, you need to choose a new one. Here you have space, it is quite possible that you will want a copper, DAAZ or Priorovsky one. But try to decide for yourself, look at reviews of different models on the forums, and only then buy.
Pay attention to the condition of the pipes; it is quite possible that they also need replacement. You will need more clamps, try not to limit yourself to the three recommended, as you know, a supply will not hurt.
You will need a Phillips screwdriver, preferably a short one. And also - tweezers, without them it is not easy to install the latches.
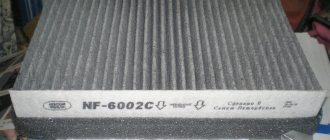
Do-it-yourself radiator cleaning
There are situations when you notice that the engine begins to overheat. In this case, it is necessary to check how the car’s engine cooling system works. The main “blow” from dust, dirt, poplar fluff, and leaves is taken by the radiator. As a result, it overheats and fails. Therefore, let's try to figure out how and, most importantly, with what, to clean it.
The concept of “cleaning” a radiator can be considered mainly from the following two positions: in the first case, if it needs to be cleaned from the outside, that is, its surface needs to be washed. The second option is to wash the insides of this device. The presented methods will allow you to achieve some positive results, but they require completely different amounts of effort and time.
In the photo you can see a radiator that is contaminated with poplar fluff. Next, we’ll look at how best to clean it from dirt (before work, be sure to make sure it’s cooled down).
Manufacturers and costs of radiators
Today there are quite a lot of manufacturers, but among them there are the most popular ones, the radiators of which can be easily found in stores.
- LUZAR
- FENOX
- OberKRAFT
- BAUTLER
- DZA LLC
- Radiator Iran Co.
- Orenburg radiators
As you can see, there are a lot of manufacturers, and each of them has its own pros and cons. If you decide to buy a high-quality radiator that will serve, it is better to choose a radiator from DZA LLC. It is the radiators of this company that are installed on the conveyor. Its cost varies between 700-1000 rubles depending on the region.
Dismantling
First of all, you need to drain the antifreeze. If it turns out to be clean, it can then be refilled into a new radiator, so prepare a clean container.
We unscrew the cap on the expansion tank to let the pressure drop. Then we find the plug behind the ignition module and unscrew it completely. Pour 4 liters of antifreeze into the drain hole.
Another option is to drain through the expansion tank. Although this method is less convenient. You need to remove the hose by disconnecting it from the stove, and then the rubber pipe.
After draining the antifreeze, repairs are slightly different depending on the heater model.
Causes of failure
There may be several reasons, but the main part are of the same type. Most often, the radiator fails due to a blockage or coolant leak. Each of the possible problems is discussed below.
Radiator clogged
There are two types of radiator clogs, external and internal. These types differ in the nature of their symptoms.
Internal blockage
With this problem, dirt accumulates inside the radiator, which blocks the circulation of coolant fluid along the circuit, which leads to insufficient heating of the radiator. This is fraught with the fact that the radiator does not heat up to a certain temperature and cannot transfer heat to heat the interior. With such a breakdown, the engine coolant temperature will be normal, but heat will not blow from the air ducts.
If the inside of the radiator is clogged, it must be washed or, at best, replaced.
External blockage
Such a blockage has nothing to do with the car’s coolant. With this problem, the radiator becomes clogged due to debris from the environment. Fragments of leaves, dust, etc. get into its honeycombs. which leads to poor fan airflow. This problem has symptoms when the air flow from the ducts has low pressure.
This problem is treated by washing it and replacing or installing the cabin filter.
Leak
A radiator leak is the most unfavorable failure scenario. Since when using the heater in the cold season, the radiator will heat up and the coolant leaking from it will begin to evaporate directly into the car interior, which will lead to an unpleasant odor in the car interior, as well as to rapid and severe fogging of the windows.
The leak can be eliminated by soldering the radiator at the leak site, but given the low cost of the radiator itself, it is best to replace it with a new one.
Quick replacement “through the brake”
It is not for nothing that they say that progress is driven by our laziness, which has been demonstrated more than once, and continues to be demonstrated by folk craftsmen. There is another way that allows you to repair or replace the radiator without removing the entire heater.
It will only take about an hour. We follow this algorithm:
- We drain the antifreeze through the pipe for heating the remote control;
- Disconnect all pipes and remove the expansion tank;
- Let's disassemble the frill;
- We remove the brake pedal together with the VUT and gain access to the radiator;
- We take out the old radiator and replace it with a new one.
We put everything back in place in reverse order. Don’t forget to fill up with antifreeze, and it is also advisable to change the cabin filter. That, in fact, is the entire replacement of the VAZ 2110 heater radiator, carried out “through the brakes”.
Remember: it doesn’t matter whether you install a DAAZ or a copper radiator, in order for it to work, you need to be very meticulous in approaching each stage of the work.
Source