The VAZ 2110 was equipped not only with an injection engine, but also with a carburetor. Great popularity and the rest of the years of production, the tenth Lada model was produced with an injection engine. The injector helped the “ten” improve its technical characteristics, increased the reliability and stability of the internal combustion engine. As you know, injection engines are equipped with a large number of different electronics and sensors aimed at maintaining the operation of the entire car. With the advent of the injector, the VAZ 2110 began to work much better, softer, and the dynamics began to please. Fuel was injected into the combustion chamber under pressure using fuel injectors; the fuel was atomized under pressure, which was pumped by a fuel pump.
Quite often, fuel injectors become dirty due to poor fuel quality, which makes their flow rate slightly lower and leads to a lack of fuel and loss of vehicle power.
In this article we will talk about fuel injectors on the Lada 110, namely their purpose, design, location, signs of malfunction, methods of washing and replacement.
Purpose
Fuel injectors are designed to spray fuel, which is mixed with air to form a fuel mixture and then enters the combustion chamber. The injectors replaced the old carburetor injection, which produced mono injection on all 4-cylinders, and the injectors allowed individual injection for each cylinder. Based on this, we can define the purpose of fuel injectors - this is the supply of fuel under pressure into the combustion chamber of a certain cylinder. There are a total of four fuel injectors on the VAZ 2110, which are connected into one system, to the fuel rail.
How to check the pressure in the fuel rail, methods of checking
This parameter can be measured using several methods. One of the most common is the purchase of a special kit, which includes a special adapter for connection, a pressure gauge (it is thanks to this that the measurement is carried out) and a drain. You will have to allocate approximately 1,500 rubles to purchase these devices. But you can do it differently - go to a service station, where specialists cost 300-500 rubles. will carry out the required measurements.
However, there is a more sophisticated method that does not require additional costs - you can measure fuel pressure using an ordinary pressure gauge used to check tire pressure. In this case, it is advisable to use pressure gauges for measurements, the limit of which is minimal (about 6-7 atmospheres). This will reduce the error to a minimum.
Device
A fuel injector is an electromechanical part that, under the influence of an electric current, opens a channel and passes the compressed fuel through the nozzle into the combustion chamber. The injector is an electromagnetic valve, the armature of which has a locking bar; when voltage appears on the injector winding, the armature is retracted, thereby opening the channel for the passage of fuel.
The injector consists of many parts, but most often the mesh filter is at risk of contamination, which becomes clogged due to fuel combustion products and low-quality fuel.
The nozzle consists of:
- O-ring;
- Strainer;
- Electrical connector;
- Windings;
- Return spring;
- Anchors;
- Housings;
- Needles;
- Pin;
Location
The injectors are located opposite each cylinder and are inserted into special milled holes in the cylinder head on one side, and on the other hand they are assembled into a single system through the fuel rail. All 4 injectors are connected in parallel and spray the same amount of fuel into the cylinders.
The location of the injectors depends on the engine type. For example, in an 8-valve engine, the fuel rail with injectors is located at the rear of the cylinder head, above the exhaust manifold.
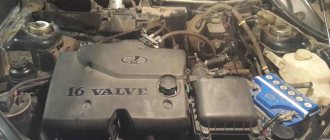
In a 16-valve engine, the fuel rail is located on the front of the cylinder head, under the intake receiver.
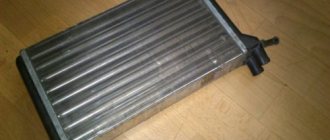
Fuel system on VAZ-2110 injector
The VAZ 2110 injector fuel system diagram is fundamentally different from the carburetor version described above. The fuel pump is located in the gas tank and pumps gasoline through the fuel filter directly into the rail. The ramp has a mechanical valve (fuel pressure regulator) that maintains a certain pressure. Next, the injectors are switched on, opening at the command of the engine control unit for a certain time, which depends on a number of factors.
Air is supplied through the air filter and throttle assembly. The throttle assembly consists of a throttle valve controlled by the gas pedal, as well as an idle speed regulator. The air is supplied directly to the intake manifold and mixed with the fuel sprayed by the injector.
The above-described power system is used on most VAZ engines. The fuel system of the VAZ 2110 8-valve injector is practically no different from the power supply circuit of a 16-valve engine.
Symptoms of a problem
Quite often, injectors fail due to winding burnout or contamination, which seriously affects engine performance. If in the first case the injector fails completely and it is difficult not to notice, then in the second case, if it is dirty, it is quite difficult to determine whether the injector is faulty, but still it will show signs by which you can find out whether the injector is working or not.
Signs of a broken injector:
- The engine is tripping;
- Loss of power;
- The car's dynamics disappeared;
- The internal combustion engine starts poorly;
All these symptoms are indirect and can be observed with other problems in the car; in order to more accurately determine faults in the injectors, it is necessary to diagnose them.
Examination
The injectors can be checked by measuring the fuel pressure, but the injectors can be checked in more detail only after they have been removed.
Checking fuel pressure
This test is quite primitive and will not determine the failure of the injector with 100% effect, but this test consists of determining whether the injector is leaking. Fuel injectors must maintain gasoline pressure and not leak it; it often happens that they begin to leak fuel, which then flows into the cylinders.
By measuring the fuel pressure, you can determine whether there is a leak or not, but it should be noted that this procedure without removal will not give an accurate result, since the pressure may drop for other reasons.
Check after removal
It is necessary to apply pressure directly to the injector and see if it allows fuel to pass through when the valve is closed.
The second step is to check the clarity of the fuel atomization, that is, for contamination of the injector. To do this, you need to connect the injector to the stand, or assemble your own circuit for washing the injectors.
When replacement is required
There are several signs that indicate you need to at least remove and check the condition of the fuel injectors. Next, a decision is made to clean or replace the elements.
Pay attention to the behavior of your car and specifically the engine. They will tell you if there is something wrong with the injectors. This may manifest itself as follows:
- The engine produces less power, the same acceleration efficiency is not felt;
- If the engine performs poorly or lacks power, fuel consumption still increases;
- Poor starting is not a rare sign of injector failure;
- If the engine does not hold idle speed well, the injectors may well be the cause;
- The amount of toxic components in exhaust gases increases;
- At idle the speed increases.
Without removing the injectors, you can indirectly check them for leaks (or leaks). The video shows an example: you need to unscrew and lift the fuel rail, apply pressure and see if a leak appears. The check is the simplest and only for an obvious malfunction, however, if you suspect the injectors, it won’t hurt to do this.
Do not rush to purchase new injectors right away, since cleaning old ones often restores their functionality and returns them to their previous stable functionality.
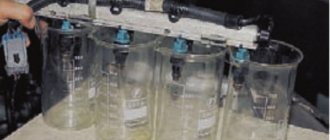
Cleaning VAZ 2110 injectors
You can wash the injectors in three ways: using a special wash, at a service station (service station) and with your own hands. The first method does not give the desired effect and often even worsens the situation, and washing at a service station costs a pretty penny, which not every car enthusiast wants to spend on such an easy procedure. Therefore, it would be best to do the washing yourself.
For self-washing, it is necessary to make a power supply circuit for the nozzle; for this we need:
- Carburetor cleaner;
- Wires 2 m;
- ON/OFF button;
- 12V lamp;
- Injector connector;
- Syringe;
Electrical circuit assembly
To flush the nozzle, it is necessary to supply power to it; for this you will need to assemble an electrical circuit according to the diagram presented below. It is not difficult to assemble such an assembly; you just need to look carefully at the drawing and everything will become clear.
Washing video
Injector repair kit
If the injectors cannot be washed and they are already in a deplorable condition, you can use a repair kit for fuel injectors for the VAZ 2110, it is sold in regular auto parts stores for domestic cars. The cost of this kit is small and amounts to approximately 200-300 rubles.
The repair kit includes:
- O-rings;
- Nets;
- Fasteners;
- Filters, etc.
Replacing injector consumables will help correct contamination.
Removal and replacement
Now we’ll talk specifically about how to properly remove and replace old injectors that have lost their usefulness with new units.
First, a good video instruction, and below in the text, step by step, how to proceed.
The process of dismantling each of the 4 injectors is identical, so there will be no difference in the process.
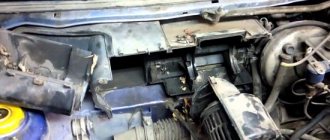
Perhaps the most problematic step in replacing or cleaning injectors is dismantling the fuel rail. Therefore, we will separately tell you how this knot is removed.
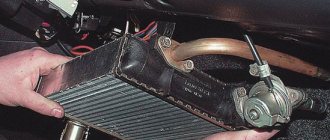
Fuel rail
The fuel rail is the bar on which the injectors are installed. It is secured with a pair of bolts on the intake manifold. To the left of the ramp there is a fuel pressure control fitting. To remove it you need:
- Disconnect the negative terminal from the battery. Nobody needs short circuits;
- Relieve pressure in the fuel line;
- Remove the air filter and disconnect the intake pipe hose, then remove the vacuum hose of the pressure regulator;
- Disconnect the power supply wire from the idle speed sensor. To do this, simply press out the pad retainer, made of plastic;
- Disconnect the block with the wires coming from the injectors;
- Disconnect the drain and supply hoses from the fuel pipes;
- Unscrew the pair of mounting bolts that secure the fuel rail to the intake pipe;
- The fuel pipes are held in place by a special holder, which requires unscrewing one mounting screw to remove;
- Remove the fuel rail by sliding it along the axis of the fuel nozzles. This way they will come out of their seat on the intake pipe;
- Assembly is performed in reverse order.
Ramp dismantling
Please note that under the fuel rail mounting bolts there are washers that must be returned to their place during reassembly or replaced with similar new ones.
If you need to add a video on removing and installing the ramp and injectors, write in the comments below.
- First, remove the fuel rail from your vehicle.
- Next, the ramp is laid on a flat surface, after which the wiring block is disconnected from the damaged injector. To remove it, you need to compress the spring mounting bracket and then disconnect the block.
- Using a screwdriver, slide the metal retainer toward the fuel rail. It serves to fix the fuel nozzle. For some reason, many people remove the lock completely. There is no need for this. Just move it a little to the side.
- Take the nozzle in your hand and rock it slightly to the sides. So it should come out of the fuel rail without any problems.
- At the same time, be sure to check the current condition of the sealing rings of the fuel atomizer body.
- The sealing ring of the nozzle spray element is checked in the same way. To do this, you need to pry both rings with a screwdriver and see if they are worn out.
- In the case of fuel injectors, there is no need to change the O-rings when replacing the injectors themselves if they are in good condition. Only if you are going to reuse them, be sure to lubricate the rings with oil before installation. Motorized, of course.
- When the nozzle is removed and the rings are replaced (or the old ones are left), you can begin installing new devices. The procedure is performed in reverse order.
- Insert the nozzle into the hole on the fuel rail and secure it with the clamp.
- Return the block with the wires to its place, and install the fuel rail in its rightful place.
Disconnect the wiring block
Replacing injectors is not always the only and rational way to restore the performance of fuel atomizers. Try cleaning them. This is not a difficult task, but the savings are impressive. .
Removing the injectors
In order to remove the injectors, you will need a special tool necessary for this work. It should be noted that the process of removing injectors on a VAZ 2110 depends on the type of engine; in an 8-valve engine, dismantling them is quite simple, but in a 16-valve internal combustion engine you will have to tinker. Let's look at each of the engines in detailed instructions.
Tool you will need:
- Flat and Phillips screwdrivers;
- Set of open-end wrenches;
- Set of hexagons;
After preparing the instrument, you can begin removal.
Dismantling the injectors of an 8-valve internal combustion engine
- We relieve the fuel pressure by disconnecting the fuel pump connector, which is located under the rear seat of the car.
- We start the engine and let it run until it stalls, after which we proceed to remove the injectors.
- We unscrew the fuel supply and return pipes (if there is one) with two 17 mm wrenches.
- Unscrew the tubes from the fuel rail.
- We unscrew the ramp from the cylinder head using a hexagon (2 bolts).
- Pull the ramp away from the cylinder head and remove it.
- Then remove the injector clamps and pull it out of the ramp.
Dismantling the injectors of a 16-valve internal combustion engine
- We relieve the fuel pressure by disconnecting the fuel pump connector, which is located under the rear seat of the car.
- We start the engine and let it run until it stalls, after which we proceed to remove the injectors.
- We unscrew the fuel supply and return pipes (if there is one) with two 17 mm wrenches.
- Unscrew the tubes from the fuel rail.
- Unscrew the two nuts securing the receiver.
- We unscrew the clamps from the cuffs connecting the receiver and the intake manifold.
- Disconnect the receiver from the intake manifold.
- We unscrew the ramp from the cylinder head using a hexagon (2 bolts).
- Pull the ramp away from the cylinder head and remove it.
- Then remove the injector clamps and pull it out of the ramp.
Video
Why do you need a fuel pressure regulator?
As mentioned above, this regulator maintains the required fuel pressure necessary for normal operation of the injectors, taking into account one or another operating mode of the power unit. In other words, the RTD affects the amount and intensity of the fuel supply that enters the engine cylinders through the injectors.
Simply put, the amount of fuel supplied to the engine at the time of injection depends on the pressure that is created inside the fuel rail (rail), as well as on the pulse duration for opening the injector and the vacuum in the intake manifold.
For more accurate dosing and maintaining constant pressure, a diaphragm valve-regulator is used, which experiences fuel pressure on one side, and a spring force on the other. RTD is used in power systems where there is a so-called “return”. The regulator is installed at the fuel rail. Also, this element can be located in the fuel tank, while such systems do not have a return line.
- Let's first look at the common design in which the regulator is located in the fuel rail. The element operates on the following principle: the fuel pump forces fuel from the fuel tank along the line. The resulting fuel pressure acts on the regulator. The device itself has two chambers (a spring chamber and a fuel chamber), which are separated by a membrane. On one side, the membrane is pressed by fuel, which enters the regulator through special inlet holes, and on the other side, there is spring pressure and intake manifold pressure. If the fuel pressure turns out to be stronger than the spring force and the pressure in the inlet, then the regulator opens slightly, resulting in some of the fuel being discharged into the return line. The fuel returns through the return line to the fuel tank.
- In systems without a return line, the regulator is usually located directly in the tank. The advantages include the absence of an additional pipeline. The injectors are supplied with the required amount of fuel directly from the tank, that is, excess fuel does not enter the engine compartment, and there is no need to deliver it back to the tank. This also allows us to talk about less heating of the fuel and provides a number of additional advantages in the form of less intense evaporation.