Good day! Many of the owners of car gadgets, such as those that operate from the cigarette lighter, have encountered the problem of the standard cigarette lighter of the VAZ 2110. Some gadgets are designed for a new type of cigarette lighter or Euro as some call it. What is the difference between the standard cigarette lighter and the VAZ 2110 cigarette lighter: the difference is in length and width, the standard cigarette lighter is narrower and longer - the euro is shorter but not much wider.
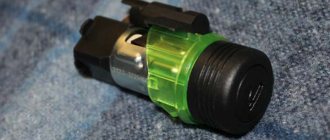
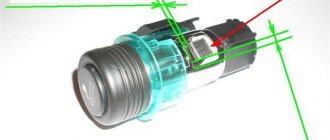
Let me return to the problem of gadgets that are designed for different cigarette lighters: from personal use, there is a cigarette lighter splitter for 3 ports (No. 1 in photo 2), it has a short connector, therefore it cannot be connected to a standard cigarette lighter since the positive contact is missing. Next, the charger for the navigator (No. 2 in photo 2) has a longer connector and fits perfectly in both the Euro and standard cigarette lighters. And the charger from the radar detector (No. 3 in photo 2) is designed for any cigarette lighter, but it fits better in the standard one; due to the shortness of the Euro cigarette lighter, it flies out, since the cable itself is twisted and has the property of a spring.
We take a utility knife and bore the hole for the new cigarette lighter about 1 millimeter in a circle for the new cigarette lighter. We connect the previously prepared wires to the cigarette lighter (which can be seen in photo 4), tie a rope protruding from the cigarette lighter socket to them, insert the backlight bezel into the socket, then the cigarette lighter itself, and pull the rope from the side where the legs are blown when the wires come out to the place we need We connect the sockets to the main power supply and rejoice. IMPORTANT NOT TO CONFUSE THE POLARITY RED IS “PLUS”, BLACK IS “MINUS”
I installed a Chevy Niva cigarette lighter in my car a long time ago. It’s just that half of my electronic devices, like a navigator, a phone charger, and a video recorder (before connecting it via a button) could not work. Due to the fact that they simply did not have enough size to connect, our standard cigarette lighter is too long, which is very stressful for new types of chargers. Since I made myself a cigarette lighter a long time ago, I couldn’t prepare a photo report =( But I bring to your attention the process itself.
And so, in order to install the Euro cigarette lighter.
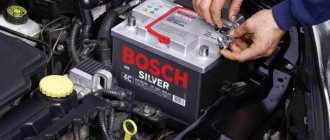
We need to remove the old one to do this: 1. Before carrying out work, disconnect the wire from the negative terminal of the battery and have a screwdriver ready. After this, remove the interior floor tunnel lining. To do this, unscrew the fastening bolts and disconnect the left edge of the cladding. Do a similar procedure with the right side. This will give you access to the cigarette lighter from the inside.
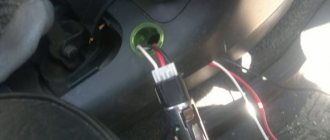
2. Carefully remove the cigarette lighter socket, then push the connectors with the wires of the cigarette lighter itself and its backlight through the hole in the interior tunnel lining. Gently squeeze the lamp shield and remove it. At the same time, carefully ensure that its latches come out of the slots in the light guide, otherwise you will not be able to remove this part.
3.Pick up a screwdriver and use it to press the latch of the cigarette lighter socket. Disengage it from the light guide. After this, push the socket out of the cladding and remove the socket. To do this, pass the block with wires through the hole.
4.The last thing to remove from the cladding is the light guide. To do this, squeeze its latches and pull outward.
To install a new cigarette lighter, make the hole for the old cigarette lighter a little smaller.
But this is easy to fix - with a file, or a soldering iron, or a drill.
Before doing this, mark the new outline of the Euro cigarette lighter with a marker, attaching the rim of the new light guide. Pinout of contacts, new euro cigarette lighter:
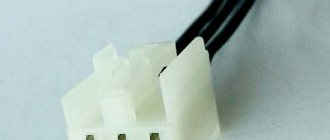
Standard connectors are not suitable for connecting a new cigarette lighter, but you can easily buy new connectors with wires at any auto store to assemble the adapter. Three blocks are required for connection: 1. Standard block with wires for the VAZ2123 cigarette lighter
2.Standard block with wires for 2 wires VAZ 2105
3.Standard block with a wire for 1 wire VAZ 2105
Or you can not buy the pads from the VAZ 2105, but simply cut them off from the old cigarette lighter and use a twist or soldering iron and solder (solder) to the pads for the Niva Chevrolet.
Install everything in place in the Auto and enjoy the new bright cigarette lighter =) good luck on the road!
How to remove the cigarette lighter of a VAZ 2110? Replacing the cigarette lighter on a VAZ 2110 with your own hands
Car cigarette lighter . Perhaps, every car without exception has it, and if previously only smokers needed it, today the cigarette lighter is also a socket for charging mobile phones, power for a navigator, DVR, FM modulator, car compressor, refrigerator and other electronics.
As you understand, it is simply unrealistic for a modern motorist to live without such a useful thing from any side, so it is not surprising that on the Internet the question of how to remove the cigarette lighter or how to replace the cigarette lighter is so popular.
Today I will try to answer your questions, I will talk about how to check the cigarette lighter if it does not work, as well as how to remove and replace the cigarette lighter at home.
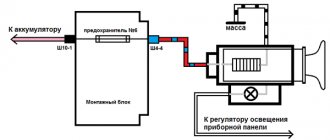
Cigarette lighters die most often from those who use it for other purposes, that is, they do not light a cigarette, but connect to it a bunch of different devices listed above that consume a lot of current. The electrical circuit of the cigarette lighter is quite simple and primitive; the cigarette lighter is connected to the battery directly through the mounting block. It is organized this way due to the fact that when the cigarette lighter is turned on, it consumes a large current. A similar picture with a car starter. it, as you know, is also powered directly from the battery for the same reason.
Why doesn't the cigarette lighter in the car work?
Posted in: Uncategorized on: December 8
Surely you, as the owner of a Hyundai Santa Fe, have had to deal with the problem of the cigarette lighter not working in the car
And it doesn't even matter whether you are a smoker or not. You may use the cigarette lighter for other purposes. Charging your phone and other devices. Connecting a car compressor to inflate the wheels. Connecting various devices powered from the Hyundai Santa Fe cigarette lighter. Anywhere.
15Mar
We protect your car from theft and burglary
All car owners worry about their car in terms of theft. And since this problem is always relevant, we will devote this post to the topic of do-it-yourself anti-theft devices for cars, because sometimes homemade protection can help out not only as well as a professional, factory-made one, so to speak, but even surpass it in terms of protection power
13Mar
Hyundai Santa Fe fuses
We will devote this article to the topic of the Hyundai Santa Fe fuse box, an inconspicuous thing in a car hidden from view, but if at least one Hyundai Santa Fe fuse fails, then you will immediately find out about it due to the fact that some one will refuse to work for you -either the system, for example, power windows or the high and low beams will not work
10Mar
Choose a pressure gauge and what you need to know about it
Compliance with and maintenance of the tire pressure specified by the manufacturer for a particular vehicle is an important aspect when driving a car. To monitor the air pressure in the wheels, a car tire pressure gauge is used. Depending on the tire inflation, the comfort of driving a car, its handling and fuel consumption will depend. Choosing a car tire pressure gauge Every car owner should always have
10Mar
Checking the generator for serviceability using a multimeter
Surely all car owners have encountered the phenomenon of a car not starting due to a dead battery. As a rule, most started charging their battery or bought a new battery. But perhaps the fault was not the battery, but a phenomenon such as the car battery not charging from the generator, due to the failure of the latter, so in this post we will talk
09Mar
Auto scanner for car diagnostics
Everyone likes to drive a car when it is in good working order, but when breakdowns and operational problems begin, many car owners do not even know in which direction to look for a breakdown. Fortunately, now all modern cars are equipped with an ECU - an electronic control unit, and if you connect a special device to it that detects problems in the car, it will give you problem areas
09Mar
Car charger circuits
Compliance with the operating conditions of the car battery and its maintenance is the key to long battery life. And for this, sometimes it is necessary to fully charge the battery, so in this article, called homemade circuits for charging a car battery, we will look at the most common circuits of such chargers that radio amateurs can make on their own at home. Device diagram for
07Mar
The principle of operation of a car generator and its design
Our article today will be devoted to such a topic as an explanation of the meaning and design of a generator in a car. Surely everyone knows that the engine is the heart of the car, and the generator, in fact, is its blood, which distributes nutrients in the form of energy to all energy-consuming systems of the car. How does a car generator work and on what principle does it work? Let's first give the exact
07Mar
06Mar
We assemble a pulse charger for a car battery ourselves
Our article today is devoted to the topic of homemade pulse charging for a car battery. Most car owners use car battery chargers in their practice. But sometimes, for various reasons, it becomes necessary to assemble such a charger for a car battery with your own hands, the reasons are different There is no financial opportunity to buy The settlement is located far from the place where such devices are sold Required
How to check the cigarette lighter?
- When the cigarette lighter fails, it is customary to check the fuse first; it is located in the fuse block and is indicated by the inscription F18 or the corresponding pictogram. The maximum permissible current that a fuse can pass through itself is no more than 25 amperes.
- check the cigarette lighter in another way - try turning on the heater fan. You may ask, where is the connection? My answer is that the fact is that the fan and the cigarette lighter “hang” on the same fuse, so if the problem lies in the fuse. then the fan will not work. If your fan is functioning, then fuse F18 has absolutely nothing to do with it, and the fault most likely lies in the wiring that goes from the fuse block to the cigarette lighter. However, before you start removing the cigarette lighter, I advise you to check fuse F6; in rare cases, this fuse can affect the operation of the cigarette lighter. If it burns out the cigarette lighter may stop working.
What will you need?
It is worth paying attention to the need for proper selection of fuses. This requires 25A fuses
.
If you take a lower value, they will light up immediately after turning on the cigarette lighter. If you take a fuse with a higher rating, it simply will not work. There is a known case where the driver installed a 30A
. As a result, when he noticed the smell of burnt insulation, some of the wires going to the cigarette lighter were burned, and the fuse itself melted. More precisely, the plastic shell melted, but the conductor was intact and working.
How to remove the cigarette lighter of a VAZ 2110? Replacing the cigarette lighter on a VAZ 2110 at home
- First, disconnect the negative from the battery.
- Next, we remove the covering of the floor tunnel in the cabin, for this we use a screwdriver, with its help we unscrew all the fastening bolts one by one, first on the right, and then on the left.
- Once you have free access to the cigarette lighter, remove its socket, and use a screwdriver to push the connectors with the cigarette lighter wires and the backlight through the hole in the trim.
- Next, we take out the light bulb screen, carefully squeeze the edges and take it out, while making sure that all the light bulb latches come out of the mounting slots.
- Using a screwdriver, you need to press the cigarette lighter latch, then remove it from the hook with the LED. And only now can you safely pull the cigarette lighter socket out of the lining.
- Next we repair the cigarette lighter or completely replace it.
- After replacement, check its operation. You must understand that in the case of a heated cigarette lighter coil, it should heat up in about 20-25 seconds, then an automatic rebound should occur with a characteristic click, after which you can light a cigarette. If this does not happen, adjustment will be required. The cigarette lighter is adjusted by bending or straightening the contacts on the cigarette lighter body.
We will be grateful if you share this article on social media. networks
The window regulator does not work on Kalina List of possible breakdowns and their repair
- The window regulator on Kalina does not work, then prepare a car tool kit and we will begin. So, in addition to a toolbox, we will need a tester, which can be purchased at any auto store or market.
- Considering that we will have to run, spin, and twirl near the car, we need a spacious place, for example, an area near a garage or house;
- We clearly determine which glass unit is inoperative;
- We open the hatch on the left side of the steering column, as the fuse box is located there. To do this, just pry off the valve with a screwdriver;
- We find under the marking F2 (30), it is he who is responsible for the operability of the double-glazed window chain and remove it;
- We carry out visual diagnostics and test it with a tester. There are two options: either it is intact or it is burnt out. In the first case, the reason is not in him, in the second - in him;
- Based on the decision in point 5, we carry out further actions. Apparently the fuse is intact. Let's move on to the central control unit for double-glazed windows, which is located on the driver's door;
- Using a screwdriver, we very carefully pry off the polymer cover, since it can be scratched and it will lose its aesthetic appearance, and we take out the entire board assembly. We find the switch we are interested in and check the fit of the wire terminals and the integrity of the wiring itself. Using a tester, we ring the switch to make sure it is working properly; if it shows a short circuit, then it is faulty and should be replaced;
- Once the functionality has been confirmed, we move on to the last stage of the search, namely into the doorway. To do this, we remove the door trim, depending on which side we are looking for the cause. We will see a picture in front of us in the form of: the double-glazed window itself, the release and lifting mechanism and an electric motor with a bundle of wires.
AutoFlit.ru
Device
The car cigarette lighter is connected to the battery through a mounting block. When the cigarette lighter starts working, a large current passes through it. If the cigarette lighter in a VAZ 2110 car does not work, then the problem may be in the electrical fuse.
The instructions for the car contain a wiring diagram where the required fuse is indicated under the F18 marking. It is located in the mounting block, on the front panel, to the left of the steering wheel. The marking is the same as in the diagram, that is, F18. The permissible current passing through the fuse should not exceed 25 amperes.
Fuses in the mounting block. F18 - cigarette lighter
Important points
- Replacing the cigarette lighter is good, but the new device is unlikely to last long if the car owner does not follow a simple rule: do not allow the current consumption to exceed 25 amperes. As soon as the current exceeds this limit, the entire above procedure will have to be carried out again, because the cigarette lighter (or fuse) will inevitably be damaged. Most often this happens when the driver uses various tees, that is, connects several devices to the cigarette lighter socket at once. This should be avoided at all costs.
- If the cigarette lighter remains intact, but only the fuse had to be replaced, it must be replaced with a device of the same brand. Auto parts stores today have a lot of fuses from various companies. Despite the fact that their passport characteristics are the same, in practice this is often not the case. And in the case of a cigarette lighter, an error of even half an ampere can be critical, and it will very quickly fail.
As can be seen from the above article, to replace the cigarette lighter you do not need to take the car to a car service center and even a novice car enthusiast can perform this operation. But it is important to remember that even the highest quality cigarette lighter is unlikely to last long if the owner has the habit of connecting everything to it at once. The best option here is to know exactly how much current a particular device connected to the cigarette lighter consumes. This knowledge will significantly extend the life of both the fuses and the device itself.
- Author: Alexey Stepanov
Copywriter with five years of experience. Rate this article:
- 5
- 4
- 3
- 2
- 1
(14 votes, average: 3.5 out of 5)
Share with your friends!
Troubleshooting
If the VAZ 2110 cigarette lighter does not work, you can have your vehicle repaired. But fixing the damage yourself is much cheaper. Before correcting breakdowns, it is necessary to take into account that a part may need to be replaced.
You can easily check the viability of the fuse using the heating system fan, since it, together with the cigarette lighter, is connected to one fuse.
If the fan does not work, then the problem is a blown fuse and it needs to be replaced.
conclusions
As you can see, problems with the cigarette lighter, although not common, do occur. Therefore, you need to know how to properly diagnose, as well as how best to avoid problems. Knowing how to remove the cigarette lighter on a VAZ 2110 and 2112 will make your task easier when you need to replace a faulty device. Despite the fact that this repair is one of the simplest, it also has its own characteristics that are worth considering. Otherwise, you will lose a lot of time and may break other structural elements. When performing work, be extremely careful and careful.
Backlight
In addition, the cigarette lighter lamp may fail. We replace the backlight lamp in the following sequence:
- Disconnect the wire from the battery terminal;
- Then the lining should be removed;
- Squeeze the lamp screen so that its legs come out of the slots; Squeeze the lamp screen so that the legs come out of the light guide
- Then you will need to slightly unclench it and remove it with the cartridge; Unclamping the screen, remove the lamp socket
- Rotate the light bulb 90 degrees and remove it from the socket; Press down on the lamp, turn it 90 degrees and remove it from the socket
- Now you need to change the light bulb, put everything back in place in the reverse order of disassembly. We insert the lamp in the reverse order. When installing a socket with a lamp into the screen, the annular protrusion on the socket must fit into the slots of the screen
When performing repairs, use an A 12-4 light bulb for illumination.
Replacing the cigarette lighter
Replacement is carried out according to the following algorithm:
- Disconnect the wire from the battery terminal;
- Then the lining should be removed;
- Get the cartridge; We take out the cartridge
- Pass the blocks with all the wires through the opening in the cladding; We pass the blocks with wires through the floor lining
- Squeeze the screen so that its claws come out of the holes in the light guide and disconnect it; Squeeze the lamp screen so that the legs come out of the light guide
- Press the socket latch to disengage it from the light guide;
Press the latch of the cigarette lighter socket with a screwdriver
Cigarette lighter socket latch
- After this, push the nest out of the floor tunnel lining itself and remove it; Pushing the nest out of the cladding
- At the end, remove this socket by passing it through the opening with a block with wires; We take out the socket and thread the blocks with wires
- The coil actually heats up for 20 seconds. Having heated up and clicked, the cartridge must return to its place. And if this happens at a time other than twenty seconds, the cigarette lighter must be adjusted by bending or bending the contacts more; We adjust the contacts if the cigarette lighter does not return to its original position within the required time
- Next, you need to remove the light guide from the cladding; Squeeze the latches and remove the light guide from the cladding
- Upon completion of work, perform all procedures in the reverse order of disassembly. When reinstalling, the protrusion of the light guide should fit into the slot in the cladding
Repairing the cigarette lighter will not take you much time.
Order of Operations
Before removing the cigarette lighter of a VAZ 2110, 2111 or 2112, you need to de-energize the circuit; to do this, remove the negative terminal from the battery. Now you can start working directly:
- It is necessary to remove the plates on each side of the instrument tunnel; to do this, unscrew two bolts from each. On the right side, disconnect the backlight and cigarette lighter connector.
The housing of the unit is fixed to the casing of the instrument tunnel; it must be removed. The trim is located under the handbrake lever. It can be easily removed with a flat screwdriver.
- Also, using a flat-head screwdriver, you now need to pry and remove the housing from the gearbox shift lever.
- There is a screw under the cover; you need to unscrew it with a Phillips screwdriver.
- You need to remove the top cover of the instrument tunnel. Now the cigarette lighter is accessible. You can remove its cartridge. Then the screen is removed so that the tabs come out of the grooves on the light guide.
- Use a flat-head screwdriver to press the latch next to the cigarette lighter socket, so it is released from the light guide.
- Now you can remove the assembly along with all the elements.
- Then you need to tighten the latches on the light guide, so it is immediately disconnected from the assembly.
- If you need to change the LED itself, it can be easily removed by pressing the tabs on the housing. When installing a new device, make sure that the slot in the casing aligns with the protrusion on the housing.
- Now you can begin installing the new cigarette lighter. First, it is connected to the light guide, the following operations are performed in the reverse order.
To replace the cigarette lighter of a VAZ 2110, 2111, 2112 with your own hands without disassembling the tunnel, watch the video:
Additional cigarette lighter
Sometimes a motorist wants to connect several devices at once that are powered by the cigarette lighter. The easiest way to solve this problem is to use a tee. The location of the cigarette lighter in the VAZ 2110 is very inconvenient for this, so it is better to install a second one.
Modern devices are designed for a short socket, the so-called Euro standard, which is not typical for this model. Therefore, think carefully about your choice.
You can connect a second Euro cigarette lighter in parallel with the standard one or run a separate wire from the battery using a 15A fuse. If there are two cigarette lighters in the car, they are replaced using the same algorithm.
Required Tools
Before dismantling the cigarette lighter on a VAZ 2110, repairing it or installing a new device, or replacing a fuse, you will need to stock up on suitable devices. To work you will need:
- Phillips and standard screwdriver;
- protective gloves.
To fix a broken cigarette lighter or fuse, the following will be useful:
- multitester;
- blowtorch with solder;
- heat shrink tubes, electrical tape;
- wire cutters;
- needle file
How does he work?
The cigarette lighter is connected to the battery using a mounting block. When the cigarette lighter is turned on, a strong current flows through it.
Actually, this current heats up the element or allows you to connect a volatile device. Many motorists use this connector to charge a mobile phone, connect a navigator, or a tablet.
But most often the cigarette lighter is used to connect a portable electric pump. It allows you to inflate tires on the road without physical effort when there is no ordinary household outlet nearby.
Light from ten
As you use and connect all kinds of gadgets, the cigarette lighter may eventually stop working. This is often caused by a failed fuse.
The instruction manual for the VAZ 2110 includes a wiring diagram. On it this same fuse is marked F18. You will find it in the mounting block to the left of the steering wheel on the front panel. Please note that no current of more than 25 Amps should pass through this fuse.
Troubleshooting
The easiest way to solve the problem of a faulty cigarette lighter is to take your car to a service station for repairs. But is it worth doing this if the work itself is not complicated, and the costs for the services of specialists can be significant?
Sometimes it's better to do everything yourself.
Now let's look at each of the presented breakdowns and replace the elements in more detail.
Replacing the fuse
Checking the functionality of the fuse is quite easy. To do this, you need to turn on the heating fan. If it doesn't work, then the cigarette lighter won't work either. This is because both devices are connected to the same fuse.
Replacement of an element is carried out as follows:
If the fan is working, it is obvious that the fuse is also intact. Therefore, there is no need to replace it.
Instead, look for the cause of the problem in the wiring that connects the mounting block and your cigarette lighter.
This requires a thorough check of the wires, contacts, that is, the entire circuit. There may be a short circuit or break somewhere.
Be sure to wear protective rubber gloves when checking the electrical circuit, since you may need to use metal tools during the diagnostic process.
The light bulb on a VAZ 2110 is also not a rare problem with a device malfunction. To replace it, you don’t need to have any special skills. Just carry out the work in a strict sequence of operations; for clarity, you can watch the training video.
- Disconnect the negative terminal from the battery located in the engine compartment of your car.
- Remove the lining.
- Squeeze the light bulb screen so that the arms can come out of the slot.
- Now the element unclenches a little, thereby removing it along with the cartridge.
- The light bulb is rotated 90 degrees and then removed from the socket.
- Arm yourself with a new bulb, insert it into the socket, and then follow the assembly procedure. It completely corresponds to the reverse dismantling sequence.
- To replace the backlight bulb in the cigarette lighter of a VAZ 2110, A 12-4 devices must be used.
Instructions for repairing and replacing the mechanism
Repair and replacement of the VAZ 2107 cigarette lighter are similar for the “VAZ classic”, so they can be considered as an example.
To perform these procedures you need to prepare the following tools:
- Screwdriver Set;
- pliers;
- small forceps or tweezers;
- soldering iron with solder;
- portable lamp or flashlight;
- electrical tape;
- cotton gloves.
Repair consists of a sequence of steps:
- The car is de-energized by removing the negative terminal from the battery.
- In the cabin we find where the AP socket is located and provide convenient access to it. Usually it is located on the center console, so we move the driver's seat as far back as possible.
- Now remove the cartridge from the socket. Having illuminated the inside of the nest, you need to remove all foreign objects or fragments using tweezers.
- Next you should check the fuse located in the mounting block. It is usually located under the hood, dashboard or driver's seat. Having opened the fuse block, we find the required fuse. Its location can be determined by the diagram on the inside of the cover or in the operating instructions. We take out the required fuse and check its jumper. If it burns out, the part must be replaced.
- If replacing the fuse does not help, move on to the next step. We take out the cigarette lighter. Then use pliers to carefully grab the rim and, without making any effort, pull it towards you so as not to damage the wiring.
- On the pulled out element, we inspect the place where it is soldered to the AP. If a poor-quality connection or break is detected, you need to solder the wire. When inspecting, pay attention to the wires and insulation. If there are abrasions, the wire should be insulated.
- After checking the device for functionality, we return the bezel to its original place.
Photo gallery “Replacement AP”
To replace the AP, you need to know how to connect the cigarette lighter. Information can be found in the instruction manual.
To replace the socket, you need to do the following:
- Disconnect the negative terminal of the battery.
- We remove the cartridge from the socket.
- Using a thin screwdriver, bend the fixing tabs.
- Carefully pry the inside of the socket and disconnect the connector.
- We change the socket and install everything in the reverse order.
When replacing a cigarette lighter bulb, remove the holder from the socket. Replace the lamp and reinsert the holder.
Replacing the cigarette lighter
If all previous troubleshooting measures have not given a positive result, there is nothing left to do but completely remove and replace the old cigarette lighter with a new one.
Here we definitely recommend watching the video tutorial to understand all the details of the operation. The replacement process itself looks like this:
- Disconnect the negative terminal from the battery.
- Remove the lining.
- Remove the cartridge.
- An opening is formed in the cladding through which the block with wires is brought out.
- Squeeze the screen so that the tabs can come out of the light guide holes. Disconnect the element.
- Now you need to remove the device from the connection with the light guide. To do this, simply press the socket latches.
- Next, we remove the nest by pushing it out of the floor tunnel lining. This will allow you to remove the device.
- The next step is to remove the nest. To do this, it is passed through an opening with a block of wires.
- In normal condition, the coil should warm up for 20 seconds. After that, it clicks and the cartridge returns to its place. If this process takes more or less time, be sure to adjust the operation of the cigarette lighter.
- The adjustment is quite simple. You just need to bend or straighten the contacts further.
- Now you can remove the light guide from the lining.
- All you have to do is perform the reassembly procedure, this time using a new cigarette lighter. You already know how to remove it, so reinstalling it shouldn’t be a problem.
The replacement procedure does not take much time and does not require much effort. All this can easily be done with your own hands if you know the connection diagram, the location of the mounting block and basic safety precautions when working with electrical devices.
Possible malfunctions: signs and causes
AP is not a reliable connecting device that lasts a long time. This is not provided for by its design. Good fixation can be ensured by increasing the number of presser feet, but a universal device has not yet been invented. In fact, the AP has only a central spring-loaded contact and two presser feet. The central contact may be located deep or close.
The grooves for the tabs on the fork may not coincide with the location of the tabs themselves. During operation, the contact between the plug and the socket of the device deteriorates, sparking appears at the connection point, and as a result, a short circuit is possible.
Possible malfunctions of the AP are listed below:
- The plug does not fit well in the socket. In such a situation, the driver has to hold the head in the socket until it is completely warmed up, which is inconvenient and unsafe when driving a car. The cause of the malfunction is the antennae located in the socket. Over time, they wear out and no longer hold the cartridge. To fix this damage, you just need to bend the antennae (author of the video - And not only about fishing).
- Burnout of the spiral in the cartridge. In this case, the problem can be solved by replacing the cigarette lighter head. You can restore the functionality of the old spiral by cleaning it from soot and carbon deposits. According to the rules, the coil heats up red-hot within 20 seconds after switching on. The head should then pop out. When this happens earlier or later, you can adjust the heating time by bending or straightening the contacts of the device. If the measures taken do not help, the head must be replaced.
- Fuse blown. Typically, if a fuse blows, the driver is to blame when connecting several additional devices using a splitter. Thus, the load on the cigarette lighter, which is designed for a certain power, increases. In addition, short-term use of the nest is provided. Therefore, when the load is exceeded and constant use, the fuse blows. The problem is solved by replacing the part located in the safety block. The fuse is designed for 10 A. You should not install a part with a higher rating, as this threatens to burn out the AP socket.
- Broken wiring. The operation of the device may be impaired if the wiring is broken. Wires may become pinched or chafed during operation, resulting in loss of contact. You can detect a break using a multimeter by ringing the circuit. Having found the break point, you need to replace the torn piece with a whole one. Wires should be properly insulated to avoid fire.