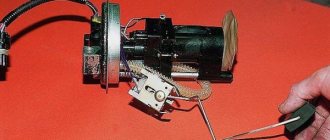
All descriptions are presented in the form of drawings, from which the main components and parts of the car are clearly visible. VAZ 2110
.
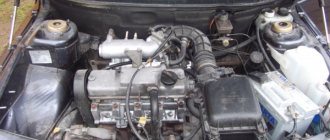
Rice. 1.4. Engine compartment
of cars with engine mod.
2111 (top view): 1 - engine; 2 — adsorber of the gasoline vapor recovery system; 3- receiver; 4- brake master cylinder; 5- expansion tank; 6 — washer reservoir; 7 - battery; 8- air filter; 9-ignition module Fig. 1.5. The engine compartment of all cars is from below (engine protection removed): 1 - engine; 2 - starter; 3 — cross member of the front suspension; 4 — gearbox; 5 - stretching; 6 — exhaust pipe; 7 — anti-roll bar; 8 — front suspension arm; 9 — wheel drive; 10 — engine oil sump; 11 — generator Fig.
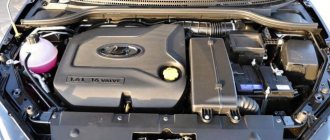
1.6. Engine compartment of cars with engine mod. 21124 (top view with the decorative cover removed): 1 - intake manifold with receiver; 2 — throttle assembly; 3 — brake master cylinder reservoir; 4 - expansion tank; 5 — washer reservoir; 6 — inlet pipe; 7 - battery; 8 — air filter; 9 — ignition coils; 10 — timing belt protective cover; 11 - adsorber; 12 — tailgate glass washer reservoir (on cars with station wagon and hatchback bodies) Fig. 1.7. Engine compartment of cars with engine mod. 2112 (top view): 1 - engine; 2 — adsorber of the gasoline vapor recovery system; 3 - receiver; 4 — brake master cylinder; 5 - expansion tank; 6 — washer reservoir; 7 - battery Fig. 1.8. Engine compartment of cars with engine mod. 21083-80 or 2110 (top view): 1 - engine; 2 — air filter: 3 — fuel pump; 4 — brake master cylinder; 5 - expansion tank; 6 — washer reservoir; 7 - battery; 8 — ignition distributor If you liked it?! Share with a friend or girlfriend or a plus from the heart. Thank you so much, friends. (Social networks connected in August 2013)
Your reviews, comments, questions and answers on LADA-10.ru
Everyone is welcome to participate in the discussion about the causes of the malfunction and other problems. If you know what to answer, write and thereby help other VAZ 2110 owners in searching for the truth.
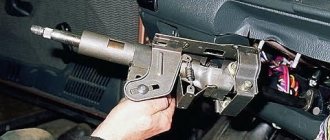
VAZ 2110 Location of units in the engine compartment
2.3. Location of units in the engine compartment
| GENERAL INFORMATION |
Location of units in the engine compartment of the 2F engine
| 1. Ignition coil 2. Oil dipstick 3. Windshield washer reservoir 4. Ignition distributor 5. Air filter 6. Spark plugs 7. Brake booster 8. Manufacturer's certificate plate | 9. Brake master cylinder reservoir 10. Clutch hydraulic reservoir 11. Fan 12. Power steering reservoir 13. Coolant reservoir 14. Engine filler cap 15. Oil filter 16. Radiator cap 17. Battery |
Location of units in the engine compartment of the 3F-E engine
| 1. Air filter 2. Windshield washer reservoir 3. Junction box 4. Ignition coil 5. Oil level dipstick 6. Automatic transmission dipstick 7. Spark plugs 8. Manufacturer's certificate plate 9. Brake master cylinder reservoir 10. Brake booster | 11. Fan 12. Headlight washer reservoir 13. Engine filler cap 14. Coolant reservoir 15. Ignition distributor 16. Oil filter 17. Power steering reservoir 18. Radiator cap 19. Battery |
Location of units in the engine compartment of the 1FZ-FE engine
| 1. Oil level dipstick 2. Brake master cylinder reservoir 3. Automatic transmission dipstick 4. Fuse box 5. Battery 6. Power steering reservoir 7. Ignition distributor | 8. Crankcase ventilation valve 9. Engine filler cap 10. Radiator cap 11. Coolant reservoir 12. Windshield washer reservoir 13. Air filter |
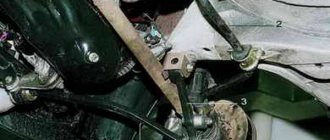
Bottom view of the front of the car
| 1. Filler plug for the front gearbox 2. Drain plug for the front gearbox 3. Cross rod 4. Steering gearbox 5. Spring 6. Shock absorber | 7. Anti-roll bar bracket 8. Engine drain plug 9. Automatic transmission pan 10. Front driveshaft 11. Exhaust pipe 12. Steer limiter |
Bottom view of the rear of the car
| 1. Cross rod 2. Exhaust pipe 3. Caliper 4. Shock absorber | 5. Rear gearbox inspection and filler plug 6. Rear gearbox drain plug 7. Muffler 8. Rear driveshaft |
↑ Body frame parts
- radiator grille,
- radiator frame,
- upper cross member of the radiator frame,
- right front fender,
- front panel,
- hood hinge,
- hood,
- right front door,
- wind window pillar,
- front door inner panel,
- rear door inner panel,
- right rear door,
- roof reinforcement,
- left side,
- roof panel,
- rear suspension spring support,
- trunk lid,
- trunk lid inner panel,
- side window frame,
- rear bumper,
- rear pillar,
- left rear door,
- rear wheel arch,
- middle gender,
- spare wheel niche,
- central pillar,
- left front door,
- front pillar,
- front floor,
- left front fender,
- front suspension spring support,
- bracket,
- front spar,
- towing eye bracket,
- front panel,
- front bumper
Best answers
Natalya Maslova: If a girl knows how to open the hood, she is a priori a Master!
Ilfat: Ha! Where!
Madness_of_female_logic: The engine, for example, at least)
Irina Ryabinina: All sorts of things...
Scorpio: They guess. For example - motor
Knopkina button: I know)))
I came to my senses...: Do we need this?! Oh yes, to bend over and make you feel good!
Yulchik: I know :)))
Yulia Sbitneva: Tell me?
Mystique: Engine...
BEZOOM-ZOOMEN: Better than you think
...: For example, a motor! This is enough for me)))
Oksana Frolova: mostly only approximately. Well, check the oil and top up the antifreeze, they can even do that.
Pavlinka new: We know! But we won’t tell!))))))))))
Valentina Izvekova: Of course we know. Don't you know what's under the hood?? ? We can tell and show.
Fanthom: I think they guess, UZBEKS!!!
User deleted: they still think there are live horses there
Italianka: Engine! And there are some other candles there. And there is also a little thing where they pour oil into! That's how much I know!!! xDDDD
Daria Guseva: yes. Under the hood of a car is what makes the car work.
Uncle Sasha: they open the hood and want to see a big mirror
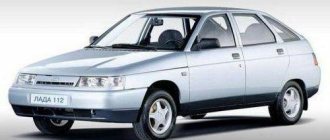
What cars was it used in?
The 2111 engine was installed on the following models of front-wheel drive VAZ cars:
- 2108 – three-door hatchback;
- 21083 – three-door hatchback;
- 2109 – five-door hatchback;
- 21093 – five-door hatchback;
- 21099 – sedan;
- 2113 – three-door hatchback;
- 2114 – five-door hatchback;
- 2115 – sedan;
- 2110 – sedan;
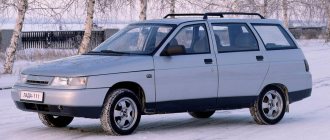
- 2111 – five-door station wagon;
- 2112 – five-door hatchback.
The engine was installed on the “eights” and “nines” after 1987, respectively.
VAZ 2110 engine compartment description
Dear visitors of the “Cars” website! We will be very grateful for your comments on the video clip “VAZ 2110 engine compartment description”; registration is not required for this. We also ask you to let us know if you have any problems playing the video.
Great
But why is it not possible to pull out the whole bunch? My car stalled and wouldn’t start, 21114 124, the state first showed 0328, then it disappeared and started showing 1602, 0338, 0340. I wanted to pull the whole bunch, but there it was. What should I do? I'm guilty of damage at the bottom, where the beam enters the torpedo, I can't reach it with my hands
Don't interfere with the machine's work
very informative. Keep stopping them from working. This is the most interesting thing. Stop something from working
how can I contact you I need your advice if possible call me from me subscribe 79780067322 my name is Evgeniy
Great job, accessible and understandable. We still have a lot of people repairing their iron bunks on their own. A good addition to the repair manual on your channel. Thank you.
romanysh has whatsapp
Thank you so much, thank you so HUGEly Cool video This is exactly the topic I needed, All that’s left is to find a warm garage so that it would be normal to work with electrical tape Romanych, well done, thanks again
Do it yourself lighting of the engine compartment on VAZ 2112, 2111, 2110
Many people are faced with the problem that domestic cars do not have engine compartment lighting. This phenomenon greatly disturbs the driver when the engine needs to be repaired at night and the parts are not visible at all. Naturally, a thought immediately arises. Often, many motorists had breakdowns at night and there was no lighting at all. In this case, you had to use flashlights or lighters, which were held in one hand, and the other hand needed to repair the part, which is not a very convenient way to repair.
Everything was done, but time and effort wasted. After such unforeseen situations on the roads at night, it is best to install backlighting on the VAZ 2112, 2111, 2110. So, the work begins.
This article will talk about installing backlighting with LED bulbs or regular halogen ones. To successfully complete the job, you need to have the following tools and materials.
1. Engine compartment lamp from VAZ 2113 -2115 cars 1 pc. 2.Two-core wire, with a cross-section of 1 mm, approximately five meters long. 3.On and off button 1pc. 4. Hanging fuse 1 pc. 5. Flat fuse for five amperes 1 pc.
The installation begins. To install the light bulb, you first need to remove the hood trim, if there is one. Then you need to choose the place where the backlight will be attached. It is best to install on the left side, because that is where all the very important elements of the motor are located. You need to make a mark in this place. You need to make a hole in the hood trim. You need to do this in order to install a light bulb there.
We make a hole and install the entire structure back to see how everything will look, after which we remove everything back. Then, using a thin drill, you need to make a small hole in the hood stiffener rib, into which the lamp fastening element will then be screwed. Then you need to lay the wires. The wire must be pulled under the factory casing. The wiring must be routed to the switch. You need to run the wiring in the plastic part of the hood, after making a hole there. Then we solder all the wires and install them on sealant for installation in a longitudinal hole.
Now we install the light bulb and secure it with wires. One wire must be connected to the positive of the battery; the wire must first be connected to a 5-amp fuse, which will thus increase the life of the light bulb. In this case, the second wire can be easily connected to the hood terminals. In this case, the limit switch will automatically turn off the backlight, even if the button on the dashboard is turned on. Instead of simple and traditional incandescent lamps, it is best to install LEDs or LED strips. In this case, you need to do the work exactly as described above, but the result will be much better. This is how the backlight will look if you install an LED strip.
↑ How and what the body is made of
The body is all-metal, welded, load-bearing structure.
Most of the body panels are galvanized to improve their anti-corrosion properties. Electrozinc is applied on the inside to the front and middle floor panels, the side of the body, the wind strut amplifier, the outer panels of the trunk lid and doors, the front and rear fenders and a number of other parts (more than 30 positions in total). The rear wheel arches are galvanized on the outside. The rear panel, cross members and floor connectors, the inner panel of the trunk lid and hood, the trunk lid reinforcement and a number of other parts are coated with electrozinc on both sides.
The engine splash guard, radiator frame, AB platform, gas tank flap cover, extensions and connectors of the rear wheel arches and a number of other parts (about 10 positions) are treated with hot-dip galvanizing (on both sides). The thickness of the main body panels is 0.8 mm.
The body elements are connected to each other by contact welding, and in hard-to-reach places by semi-automatic electric welding in an inert gas environment. Panel joints and welds are sealed with mastic. After welding the panels, the body is phosphated, electrophoretic and secondary primers are applied and painted. Hidden body cavities are treated at the factory with the Oremin preservative.
All glass is curved, polished, safety type. The windshield is three-layer, the door glass and rear window are tempered. The rear window has a heating element. The windshield, rear and side windows are glued into the body openings and are part of its power circuit. The door windows are sliding.
Energy-absorbing bumpers are installed at the front and rear. Removable body parts: doors 8, 12, 22, 27, trunk lid 17, hood 7, front fenders 4 and 30, bumpers 20 and 36.
Tuning the engine compartment. Engine lighting
In continuation of the materials on tuning, we would like to present an unusual option for decorating the engine compartment of your car.
The source of illumination for the engine elements in this case is LEDs and LED strips. And so let’s imagine, it’s getting dark outside, you approach the car and open the hood, the hot-looking engine shocks the people around you. This effect is created using red LED sources. Beautiful. And at the same time it looks impressive.
In the example presented, the LEDs were installed under the motor protective casing.
The result of such tuning will look impressive on cars that have a protective casing. In the presented example you can see how this was done on a VAZ 2110 engine.
For illumination, an LED strip was used, the length of which is 85 cm. It was also secured to iron corners in the radiator area
When connecting the LED backlight, you should pay attention that all the wiring that you used must be insulated and corrugated. The power source must be connected through a fuse (for convenience, use a plug-in fuse) Also make sure that all wiring is at a certain distance from very hot engine elements
Design features
After many years of modifications, the 2111 engine has the following design nuances:
- engine diagram - electronic control of distributed injection;
- engine block – has holes for fixing brackets for attachments;
- cylinders – bored to size 82 mm;
- crankshaft - with a long 71 mm piston stroke, reminiscent of the 2108 model, but the counterweights are more powerful to reduce vibrations;
- piston - oval recess on the bottom so as not to bend the valves, floating pin fit;
- connecting rod – length 121 mm, lower head is heavier;
- camshaft - the cam profile has been changed, the landing dimensions are the same as option 2108;
- Timing belt – copied from 21083, belt transmission;
- flywheel – the teeth are wider, the profile has been changed, the clutch seat diameter is larger (208 mm), the crown is wider than that of 2110 (27.5 mm);
- starter – gear with 11 teeth;
- belt – 742 mm in the basic version, 1115 mm with power steering, 1125 mm when the car is equipped with air conditioning;
- ECU - GM, Bosch or January;
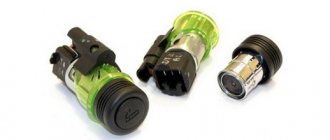
- injectors – Siemens VAZ 6393 (nozzle with 4 holes, yellow color) with controller January 7.2 or M 7.9.7 or Siemens 6238 (nozzle with 2 holes, color gray) with controllers January 5 or MP 7.0.
Thanks to these design solutions, engine performance is noticeably improved.
What's under the hood of a car
Battery - designed to power electrical equipment when the engine is not running or at low engine speeds. When the engine is running, the power supply is mainly provided by the generator, which also recharges the battery
The battery is one of those items that should be under special attention. Air filter - serves to clean (process) the air entering the engine cylinders. It consists of a housing with an inlet pipe, a cover and a paper filter element
Know that the correct “air” supply to the engine depends on the condition of the filter element. If there is severe clogging or destruction, quite strong losses in power are possible (poor traction). Radiator - serves to remove high temperature from the engine, thereby preserving and reducing wear of engine parts (after all, when the engine is running, temperatures up to 2500 ºС arise, and such a temperature causes strong heating of the parts and their expansion, which can cause intense wear). Radiator cap - hermetically closes the radiator filler neck and serves to automatically regulate the temperature and pressure of the coolant. Structurally, it has inlet and outlet valves. Ignition distributor (distributor) - refers to ignition devices, designed to supply high current to the spark plugs. It consists of a low voltage current breaker and a high voltage current distributor combined in one housing. Gasoline pump (or fuel pump) - serves to supply gasoline (fuel) from the fuel tank to the carburetor under excess pressure. Diaphragm type. Expansion tank - it contains a certain amount of coolant, designed to compensate for the constantly changing volume of liquid in the cooling system of a running engine (by the way, the “supply” of liquid is regulated by a valve in the radiator cap). Windshield washer reservoir - serves to store a certain amount of water, which is supplied to the jets, which, if necessary, clean the glass. Structurally combined with an electric pump. Relay – designed for switching (turning on, turning off, switching...) electrical circuits from an external signal. Structurally, it consists of a relay element (usually a coil) and a group of contacts that open or close depending on the state of the relay element. There are a large number of relays - electrical, optical, thermal, etc. Mounting block - it contains fuses for electrical circuits that protect the car’s electrics from possible short circuits. In addition, it contains relays for switching headlights (high/low), turning on the sound signal, etc. Engine – serves to set the car in motion. Spark plugs - used to ignite the working mixture in the cylinders with a spark. Structurally, it consists of a metal casing, inside of which a ceramic insulator is placed. Inside the insulator there is a central electrode, the upper part of which is steel, and the lower part consists of an alloy of nickel and manganese. Brake fluid reservoir – serves to compensate the brake fluid in the brake system. Structurally, the nutrient tank is combined with a brake fluid level sensor. Clutch fluid reservoir - serves to compensate for the volume of clutch fluid during operation.
Electronic control unit
This is, so to speak, the very heart of the system. On the VAZ-2110, the injector circuit comes down to precisely this device. A small case with many pins, and inside is the most interesting thing - a microcontroller. It is he who regulates the entire operation of the engine. The internal memory contains a so-called fuel map. Using it, the controller determines how much air and gasoline must be supplied to the ramp so that the engine operates in normal mode and detonation does not occur. But the most important thing is how long it is necessary to apply an impulse to the fuel injectors so that they open and inject the mixture into the combustion chamber.