Every part of the VAZ 2110 will sooner or later require replacement, and the steering mechanism will not be an exception. This is a fairly simple unit, since there are few elements in it, and some parts need to be changed no earlier than after 100 thousand kilometers. After studying this article, the reader will learn what is included in the steering and how it works. Also in this material there are three instructions that talk about replacing the steering rod, tips and the “steering wheel” itself. The only special requirements that can be highlighted are the presence of an inspection hole and a jack, but these components are present in almost every garage.
Important! You can find out the service life of each part that is included in the steering in the VAZ 2110 operation and maintenance manual. The manual also contains a description of malfunctions and ways to solve them. It is recommended that you go through the entire manual at least once so that you know approximately when a part requires replacement or service.
Signs of steering rack defects, dozens and pre-repair preparation
A sign indicating problems in the steering mechanism, and most likely in the rack, is a knocking sound in the steering mechanism. It manifests itself when driving on a bumpy road surface, where the road is replete with potholes, holes and bumps from uneven soil or expanding asphalt. This creates a feeling in the car user that this knock is heard directly into the steering column. If such sounds occur in the steering system, it is necessary to diagnose it.
At this stage of identifying a defect, it is too early to conclude that the VAZ steering rack, the price of which is quite high for the average car enthusiast, requires repair or replacement. To clarify the “diagnosis” of the car, it is necessary to conduct a personal visual inspection of the area where the steering shaft is connected to the rack. To do this, you need to try to move the steering gear shaft with vertical jerks using your hand at the mounting point of the steering system components.
If knocking noises appear when moving up and down, then the car needs to be serviced. As a rule, such a knock is produced by a needle bearing that did not receive its portion of lubricant in time. An alternative to the knocking noise can be a weak fastener of the steering wheel bushing with the gear. In this case, it is necessary to tighten the fastening of the parts.
When the cause of the malfunction is established, the car owner decides on the need to replace or repair this important element of the steering mechanism. On our website there is a video on servicing the steering rack of a VAZ 2110, which demonstrates the procedure for repairing and replacing a part by a car chassis specialist
Control rod VAZ 2110, 2111 left assembly (old model rack 2108) 21100-3414053-00
| Manufacturer: | VIS |
| Vendor code: | 21100-3414053-00 |
| Catalog: | 21100341405300, 2110-3414053 |
| Title: | Control rod VAZ 2110, 2111 left assembly (old model rack 2108) 21100-3414053-00 |
| Product from the group: In categories: | Spare parts for VAZ manager control |
| Availability: | clarification required to see availability in other towns |
Replacing steering shaft bearings VAZ 2110 1996
1. Disconnect the wire from the “–” terminal of the battery.
2. Remove the steering wheel (see subsection 5.3.1).
3. Loosen the bolt securing the base of the steering column switches and slide the base towards you.
4. Disconnect the wire from the oil pressure sensor.
5. Disconnect the two connectors with the horn wires from the contacts on the base and remove the base of the steering column switches.
6. Insert the key into the ignition switch and turn it to position I to unlock the steering shaft.
7. Disconnect the ignition switch wire block from the wiring harness. If the ignition switch wires are connected to the wiring harness with a clamp, cut or loosen the clamp.
8. The steering column is secured with bolts with break-away heads (the same as the ignition switch). If new bolts with breakaway heads are not available, you can replace them with regular M6 bolts 20 mm long.
9. Unscrew two nuts and two bolts with break-away heads, remove spring and special washers. If the bolt heads are stripped, the bolts must be drilled out or removed using a screwdriver and hammer.
10. Remove the steering column from the studs, slide it towards you and lower it down. Then remove the bolt securing the propeller shaft to the steering shaft.
11. Remove the bolt and remove the column assembly, while removing the thrust bushing from the shaft. 12. Press the steering shaft along with the bearing out of the pipe. It is recommended to press the shaft towards the steering wheel mounting.
13. Remove the front (steering wheel side) bearing from the shaft.
14. Replace the steering shaft if the splines or threads are worn or damaged.
15. Using light hammer blows and a drift, press the rear bearing out of the steering bracket pipe.
16. Before installing the bearings, check that they rotate easily and without jamming. The plastic bearing bushings must not be damaged.
17. Press the rear bearing all the way into the pipe collar using a suitable mandrel, applying force only to the outer race of the bearing. The bearing is mounted on a plastic bushing, which has a wide flange on one side. When installing the bearing, it is the wide flange of the bushing that must be directed outward.
18. Slide the front bearing onto the shaft with the wide flange of the bearing bushing facing the end of the shaft.
19. Insert the shaft into the pipe. In this case, the rear end of the shaft should enter the rear bearing.
20. Press the front bearing all the way into the pipe collar using a suitable mandrel, applying force only to the outer race of the bearing.
21. Install the steering column in the reverse order of removal. Install the thrust bushing on the shaft with the side with the larger diameter.
22. Install special washers for the bracket fastening bolts with their protruding part a in the opposite direction from the bolt head.
23. When installing the base of the steering column switches, before tightening the bolt securing it, adjust the position of the base on the steering column. To do this, install the lower casing and move the base so that the screw holes in the casing and the base match. After this, carefully remove the casing and tighten the base bolt. Install the steering wheel in the reverse order of removal.
Old style VAZ 2110 steering rods
Have a nice day everyone! The control tips died, so I decided to change all the rod assemblies. A year earlier, a familiar master said to install control rods from a VAZ 2110, because there the adjusting rod is screwed into the rod itself and the tip, and is fixed with 2 bolts.
Therefore, adjusting the toe on the 10th is easier and more accurate than on the original ones with 2 locknuts. And they are adjustable from below, and you don’t even have to open the hood.
But there is one trick - we need internal rods from the old-style VAZ 2110, which fit on the “eight” rail. See photo for differences:
There were no problems during installation. I didn’t remove the rail, so it was hard to put the rods into the boot, but I’ve already gotten the hang of it. After installation, I immediately went to the wheel alignment, although I measured the length from the old rods, the destruction was still broken. On the wheel alignment, everything was adjusted quickly and simply. And the tips were installed by Kalinovsky. If everything is installed correctly, then nothing will be affected. A few photos after a week of use:
What is needed to replace the steering rack of a VAZ 2110
To replace the old rack with a new VAZ 2110 we will need: WD-40 fluid, a vice, a puller for removing the tips or a hammer, an open-end wrench “13”, “22”, “19”, a socket wrench with a head “13” , “17”, “22”, chisel and screwdriver, pry bar, jack, new steering rack.
You should pay attention to the fact that the VAZ 2110 power steering steering rack with the article number (21100340001030) costs much more. When buying a new rack, it is more profitable to take the rack assembled so that there are rod ends, etc., and it is better to choose a new part when you have the old one on hand
The price of a standard rack for a VAZ 2110 with article number (21100340001200) will be about 2,500 rubles, and an improved version with power steering costs 15,000 rubles.
The cost of spare parts is indicated for spring 2022 in Moscow and the region.
Control rod VAZ 2110, 2111 left assembly (old model rack 2108) 21100-3414053-00
| Manufacturer: | VIS |
| Vendor code: | 21100-3414053-00 |
| Catalog: | 21100341405300, 2110-3414053 |
| Title: | Control rod VAZ 2110, 2111 left assembly (old model rack 2108) 21100-3414053-00 |
| Product from the group: In categories: | Spare parts for VAZ manager control |
| Availability: | clarification required to see availability in other towns |
Pickup from a warehouse in Yekaterinburg
Payment (issue of money for any obligation)
upon receipt:
- Cash
- Transfer to card
- By bank card
- By invoice (for organizations with VAT)
Fundamentally. Before receiving the product, please check its availability by phone or place an order on our website.
Delivery by courier in Yekaterinburg and nearby towns
- Payment (issue of money for any obligation)
in cash upon receipt of the product - The cost of delivery within the city and nearby towns is 100-250 rubles
- Free delivery throughout Yekaterinburg for orders over 10,000 rubles.
- Please check with the RusAvto manager for delivery times and costs.
For small orders and delivery costs, see the Delivery section.
| Small order | Cost of delivery | Free delivery from | |
| Ekaterinburg | 1000 | 150 | 6000 |
| Upper Pyshma | 3000 | 200 | 10000 |
| Berezovsky | 3000 | 200 | 10000 |
| Aramil | 3000 | 200 | 10000 |
| Revda | 5000 | 400 | 17000 |
| Pervouralsk | 5000 | 400 | 17000 |
| Polevskoy | 7000 | 500 | 26000 |
| Sysert | 7000 | 500 | 26000 |
| Novouralsk | 10000 | 600 | 34000 |
| Nevyansk | 12000 | 700 | 37000 |
| *does not apply to large spare parts and special products. cost | |||
Delivery by Russian Post
- Prepayment 30% of the product price (Cashless payment on invoice)
- The balance of the amount is cash on delivery upon receipt of your product at the post office.
- Delivery services are paid by the recipient according to the current tariffs of Russian Post.
Why do we ask for partial payment in advance before shipping? In our practice, there have been cases when a product sent by cash on delivery remained for a long time in the recipient’s post office and was not picked up. We were required to pay for storage and bear additional costs for the return shipment of the unclaimed product to our warehouse.
Source: rusautoopt.ru
We carry out repairs
Remember that this unit is a rather “delicate” and fragile mechanism.
under the octagonal nut of the stop there is a spring that needs to be removed;
then remove the retaining ring, which is located under the specified spring;
lightly tap the wooden spacer to tap the rack stop out of the crankcase (note that there is a rubber sealing ring in the groove of the stop);
Next you need to remove the front shield seal;
- under the seal there is a boot, which is also removed (you can use a screwdriver that has a wide and thin blade);
- behind the boot there is a locking ring, which is also removed;
Using a 24mm octagonal head, unscrew the gear bearing mounting nut and remove the nut from the shaft;
we press out the shaft from the gear together with the bearing using a 14mm wrench, which we rest on the mounting blade; the shaft can be clamped in cleats;
Cotton steering wheel and how to deal with it
The design of front-wheel drive VAZ cars corresponds both to its price niche and partly to its purpose. An average car for economical travel over average distances at average speed. Know-how of the 80s of the Soviet automobile industry, the MacPherson suspension coupled with rack and pinion looked like something perfect in the early 80s. Although, in fact, the long-travel steering rack 2108 and the classic MacPherson of the 1948 model are not the most progressive solution even for a cheap car.
Compared to classic VAZ models, rear-wheel drive, with a classic steering mechanism and double-wishbone front suspension, the 2110 has more sluggish and imprecise handling. In a word, a wadded steering wheel. It won’t take long to figure out why this happened. Elementary geometry - MacPherson does not hold the car well in turns and during acceleration and braking, and the steering had a long stroke and an unsuccessful upper rack location. Hence the looseness of the steering wheel. It is technically inherent and cannot be cured by any settings or adjustments.
Video tutorial on repairing a VAZ steering rack
However, since the 2000s, a slightly improved design of the power steering rack has been used. There wasn’t enough for everyone at once, because first of all, cars with hydraulic booster were exported. Later, when Europe was full of Zhiguli cars, cars with power steering began to appear more often. But the hydraulic booster did not save the situation. And that's why.
Step-by-step replacement of the steering column
Having decided to replace the steering column on a VAZ-2106 yourself, you need to stock up on free time and patience, and experts recommend performing this step in stages:
- The steering shaft, which is clamped in the column, should be carefully removed.
- Using a size 30 wrench and a long wrench, you should try to rip off the connecting nut that secures the steering column. It is not always possible to remove the fasteners the first time, but since this stage is mandatory, you have to return to it several times.
- The three fasteners that connect the column to the car body are unscrewed. It is most convenient to use a so-called ratchet for this process, since the bolts are not so easy to get to with a regular wrench.
- After unscrewing all the fasteners, you need to free the column from the tie rod splines, which continue to hold the assembly. To do this, you should pry the structure with a pry bar and try to knock it down with sharp jerks.
- After dismantling the unit, it is necessary to check the condition of the boot and oil seal; if even minor damage is detected during a visual inspection, these components must be replaced. By installing a new boot, the life of the bearing and shaft will be extended, and the new oil seal will not allow automotive lubricant to leak out of the steering column.
If all components are installed correctly, the car owner will replace the failed elements with high-quality and reliable ones, and the steering column will have a long service life.
To simplify the assembly process, experts recommend putting all the removed elements from the car in strict sequence, so that when assembling the structure, you don’t confuse anything and repeat the whole process again.
As you can easily see, the process of replacing the steering column of a VAZ-2106 is not that complicated, so every car owner can do it if he has the strength and patience and, of course, does all the work step by step. But if difficulties still arise when replacing a car element, it’s time to use the hint, which at a convenient time can be found in the video instructions on the Internet resource. The educational video lesson is conducted by qualified specialists who understand the intricacies of car repair and present their visitors with extremely effective and most necessary advice on the topic of interest to them.
Checking the oil level in the steering column on a VAZ 2101-VAZ 2107
Welcome! Steering column - thanks to it, both front wheels of a rear-wheel drive car of the “Classic” family are turned. In order for the steering wheel to rotate well and with little effort, the steering column is constantly lubricated with oil located inside it. But like any other oil, the oil inside the steering column disappears over time, and therefore its level must be constantly monitored and topped up whenever possible. You can find out how to check the oil level below.
Note! To check the oil level in the steering column, you will need to take: “8” wrenches, and also, just in case, take with you a funnel, clean oil and a brush or just a rag!
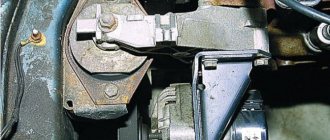
Where is the steering column located? Most likely, you have already seen where the steering column is installed, and more than once, because it is located in almost the most visible place, namely in the engine compartment of the car, on the left side (Indicated by a red arrow), and just above the steering column is the main brake cylinder on the photo indicated by the blue arrow.
Steering column for VAZ 2110 do-it-yourself repair
steering adjustment
We carry out the work on an inspection ditch or a lift.
Using pliers, remove the cotter pin... ...and use a 22mm wrench to unscrew the nut securing the middle link to the pendulum arm. Using a fork puller, we press the middle thrust ball pin out of the hole in the pendulum arm of the Niva 2131. The pin can also be pressed out by applying a sharp blow from below (near the hinge) with a chisel with a blunt end to the pendulum arm. Remove the ball pin from the eye of the pendulum arm.
Similarly, we press the ball pin of the VAZ 2131 rod out of the bipod.
Remove the middle link.
Install the middle link in the reverse order.
The left hinge pin (inserted into the bipod hole), in addition to rotation, can swing (unlike the right one).
At the same time, when installing the VAZ 2121 on a car, we orient it so...
...so that its longitudinal axis is in front of the Niva 2131 hinge axes.
Checking and adjusting the steering of VAZ 2121, Niva 2131
- – Steering gear adjustment
- – Replacement of side rod
- – Removing and installing the middle link
- – Replacement of steering tips
- – Assembling and disassembling the lever bracket
- – Removing and installing the steering wheel
- - Steering column
- – Replacement of the steering mechanism
- – Steering bipod
Steering design of VAZ 2121, VAZ 2131
Features of the Niva 2121 steering device. Adjusting the steering column, eliminating knocks in the Niva 2131 steering mechanism.
DIY steering repair design- Check and adjustment
Steering adjustment, inspection and maintenance
NIVA / 2121, 2131 / repair / steering / checking and adjustment / Removing and installing the middle link
↑ Control drive
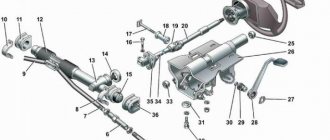
The control drive contains two composite control rods and rotary levers 11, welded to the telescopic struts of the front suspension. Any rod, in turn, consists of two parts - internal 12 (long) and external 9 (short) with split tips with internal threads, as well as an adjusting rod 8 (connecting the internal and external rods) with external threads of different directions on it ends and a hexagon in the center. The length of the control rod changes when the adjusting rod is rotated.
For a reliable connection, you need to ensure a distance between the ends of the tips and the hexagon: on the inside within the range of 10.8-14.2 mm, on the outside - 10.6-16.3 mm. After completing the adjustment, the ends of the control rods are tightened with bolts. The external (small) rod 9 is connected to the rotary lever 11 through a ball joint 10, consisting of a liner, a liner spring and a pin. To protect against dirt, the hinge is covered with a rubber protective cover (boot). The hinge forms a non-separable system with the tip, therefore, if it fails, the tip should be changed with the following wheel toe adjustment.
Source: ovaze.ru
Diagnosis of steering problems dozens
Every car has weaknesses. For VAZ 2110, this is the tie rod end. This part is an integral part of the car's steering system. The tie rods on the tenth generation VAZ end with tie rod ends. Rods are rarely changed, but tie rod ends must be replaced every 40 thousand kilometers of the car.
But this is an average and approximate figure. The service life of the steering tip depends on the driving style of the car owner and the conditions in which the car is operated.
Any driver of a vehicle can notice a problem with the steering. The main signs of the need to replace steering tips on a VAZ 2010 are as follows:
- difficulty driving, especially when turning;
- strong noise and knocking from one or both sides in the front, more pronounced when turning;
- The tread on the tires wears unevenly.
In the latter case, most likely the problem is not only with the tips. It is necessary to diagnose the front suspension as a whole. Perhaps replacing the tie rod end won't do the trick.
The steering tips in the VAZ 2110 car are a hinged joint. Wear in the tip joint leads to a malfunction in the steering. You can check the steering tips on the VAZ 2110 yourself.
First of all visually. To inspect the tip on the left side of the car, you need to turn the steering wheel all the way to the right; to inspect the right steering tip, turn the steering wheel to the left.
You should pay attention to the rubber boot that protects the tie rod end. If it is torn or cracked, then it is time to replace the tips.
Through the hole in the boot, dust and dirt enter the hinge, which leads to faster wear of the steering tip.
To carry out the second stage of diagnosis, it is necessary to jack up one of the sides of the car so that the wheel is freely suspended in the air. Tug the tip with your hand, if there is any play, then you need to replace the steering tip. The tips should be changed on both sides. It is not worth saving and changing one tip; it is better to save on the services of a service station technician and carry out the replacement procedure yourself.
Selection of repair kit
Before starting repair and restoration work, you should decide on the choice of repair kit.
Minimum set. This set includes the necessary list of fastening and sealing elements: washers, bearings, nuts and fluoroplastic bushings.
The basic set has bearings and shafts in addition to the minimum set, but its cost can be twice as high as the first option.
Please note that the steering rack can be either old or new. The old racks are designed for the VAZ 2108, while the new ones are designed for the “tenth” model. The new version is also more convenient to repair. If there is a need to repair the steering rack, which involves replacing the bushing, then there is no need to disassemble the entire mechanism. Remove the corrugation, unscrew the central nut and disassemble the rack into two component parts. One part will contain the mechanism, and the other part will be the one where the bushing is located.
Preparatory activities
The first thing you need to do is buy a steering rack repair kit. Without it, starting work is completely useless. The set may have different configurations.
- Minimum (washers, fasteners, bushings, nuts, bearings).
- Medium (in addition to all of the above, shafts are added). The cost of such a kit is twice as much.
- Maximum (everything is included here, including the rack).
Please note that there are different slats - old and new. The former are intended mostly for the VAZ 2108, and the latter for the VAZ 2110. It is better, of course, to give preference to the second option, because in this case the bushing is much easier to change (there is no need to disassemble the entire rack).
The main differences between the control racks on the old and new VAZ-2110
Long, hard and painful. This is how VAZ cars are usually modernized. This can be clearly seen in the example of our top 10. The VAZ-2110 received the steering control, engine and suspension from the first front-wheel drive Tolyatti car VAZ-2108 and for almost 20 years it underwent insignificant changes in the design . As a result, we have several options: 1 motor, 1 suspension, 1 steering control. We will deal with him now.
Steering innovations
It seems like the issue has been resolved. Now it was possible to increase the force on the steering wheel, make the number of revolutions from lock to lock minimal, everything was smoothed out by the amplifier, but another problem arose. The car is operated in too different modes and the exact dosage of the steering angle at speeds of 140 and 55 km/h have completely different values. Not to mention the fact that there was almost no effort on the steering wheel, which made the steering even more insane. Then we had to change the design of the steering rack again. This time the objects of attention were the rack/pinion pair. Installing a new pair helped. The new steering rack was called “short” because the number of steering revolutions was reduced from 3.8 to 2.9. As a result, the waviness has almost disappeared and the steering wheel has become sharper.
Short slats
Not counting the helical rack, with the release of the Kalina assembly line, so-called shortened racks began to appear on sale and on services.
The full rotation of the wheels is 3.1 revolutions . This gives the sharpest feeling of the steering wheel, the control is the clearest and a little more informative. This type of rack also has a small minus - the force on the steering wheel increases slightly.
- The catalog number of the short rack for the VAZ-2110 is 11183-3400010-10 (11183-3400010-12) , the number of the gear rack itself is 11183-3401068-00 (11183-3401068-01) .
Source: carfrance.ru
How does the steering mechanism work?
Steering
injury-proof, with a height-adjustable (tilt-angle) steering column, and a rack-and-pinion steering mechanism.
Steering gear
assembled with steering rods, it is attached in the engine compartment to the front panel of the body on two brackets using brackets 2 (Fig. 1). The mechanism is secured with nuts on welded bolts through rubber pads (supports) 3.
A drive gear is installed in the steering gear housing 5, which meshes with the rack.
The steering shaft consists of an upper 14 and an intermediate 10 shaft, connected to each other by a cardan joint. The intermediate shaft is connected to the drive gear by a flange through an elastic coupling. The upper shaft is installed in the bracket pipe 21 on two ball bearings with elastic bushings on the inner ring.
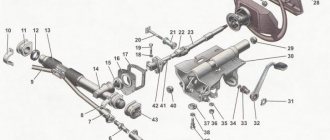
Fig1. Steering parts: 1 – inner tie rod ends; 2 – steering gear mounting bracket; 3 – steering gear support; 4 – spacer ring; 5 – steering mechanism; 6 – sealing gasket; 7 – thrust plate of the seal; 8 – seal; 9 – lower flange of the elastic coupling; 10 – intermediate steering shaft; 11 – coupling bolt; 12 – spacer sleeve; 13 – facing casing (upper part); 14 – upper steering shaft; 15 – steering wheel; 16 – signal switch cover; 17 – adjusting sleeve; 18 – steering column position adjustment lever; 19 – retaining ring; 20 – facing casing (lower part); 21 – steering shaft mounting bracket; 22 – steering shaft bearing; 23 – adjusting rod; 24 – outer tie rod end; 25 – spring ring; 26 – protective cap; 27 – sealing ring
At each vehicle maintenance check the condition of the protective cover, the protective caps of the 26 linkage joints and the tightness of their fit. They must be replaced if there are cracks, ruptures or other defects that impair their tightness.
Make sure that the steering wheel spoke is horizontal when the vehicle's wheels are straight. Otherwise, determine the cause of the problem and correct it.
Turn the steering wheel from lock to lock and check visually and audibly:
- reliability of fastening of the steering mechanism and steering wheel;
- is there any play in the rubber-metal joints, in the steering rod joints, as well as in the rivet and spline joints of the elastic coupling of the steering shaft;
-reliability of tightening and locking the bolts securing the rods to the rack and the nuts of the ball joint pins;
- are there any jams or obstacles that prevent the steering wheel from turning?
If knocking or binding is detected, disconnect the tie rods from the swing arms of the telescopic suspension struts and recheck. After confirming that the knocking and sticking noise is coming from the steering, remove the steering gear from the vehicle for repair.
The maximum permissible gap between the stop and the nut is 0.2 mm. If necessary, replace worn parts and adjust the gap between the stop and the nut.
↑ Control details
1 – lower part of the facing casing 2 – control shaft mounting bracket 3 – shaft bearing 4 – coupling bolt 5 – spacer sleeve 6 – upper part of the facing casing 7 – upper shaft 8 – control wheel 9 – horn switch cover 10 – adjusting sleeve 11 – lever for adjusting the position of control column 12 – locking ring
