VAZ 2110 cars are equipped with a safety steering system, with a tilt-adjustable steering column and a rack and pinion steering mechanism. The steering consists of a steering wheel, a steering column, a steering gear and two steering rods connected by ball pins to the swing arms of the front suspension struts.
The steering wheel is mounted on the splines of the upper steering column shaft and secured with a self-locking nut.
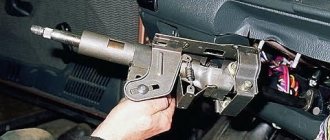
The steering column consists of an upper and intermediate steering shaft, connected by a universal joint and a bracket for their fastening. The upper steering shaft rotates in two bearings pressed into the bracket tube. An ignition switch with an anti-theft device is installed on the bracket pipe.
The pipe has the ability to move in the longitudinal and vertical direction relative to the bracket itself, after which it is fixed in the selected position with a coupling bolt on which
An adjusting sleeve with a lever is installed. By lowering the lever, you can change the height of the steering wheel. By lifting the lever, the wheel is fixed in the selected position. The front end of the steering column bracket is attached to the body using break-away bolts and special locking plates. The bolts are tightened until the heads break off. This prevents them from being unscrewed and the steering column and ignition switch are replaced when trying to steal a car. The safety of the steering column is ensured by special fixing plates. During a frontal impact, the plates are deformed and no longer hold the front part of the steering column bracket, allowing it to fall down. In this case, the steering column is moved to a vertical position, and the steering wheel moves away from the driver.
The intermediate steering shaft is connected to the steering mechanism through a rubber elastic coupling, which allows for slight misalignment of the drive shaft and the lower steering column shaft.
The steering mechanism is of the rack and pinion type and consists of a crankcase, a drive gear and a steering rack in gear engagement. The steering mechanism is attached to the engine shield using two rubber supports, two clamps and four bolts and nuts. When the steering wheel is turned, rotation through the upper and intermediate shafts of the steering column is transmitted to the drive gear, which, when turning, moves the rack.
Tie rods consist of the tie rods themselves, ends and threaded inserts connecting the tie rods and ends. Ball pins are installed in the tie rod ends.
At one end, through a silent block (rubber-metal hinge), the tie rods are attached to the steering rack of the steering mechanism, and with the tips, using ball pins, to the rotating arms of the shock absorber struts of the front suspension. When the steering rack moves, the rods turn the front suspension struts on which the drive wheels are mounted.
The length of the tie rods can be adjusted by rotating the threaded inserts and thereby changing the toe-in of the front wheels.
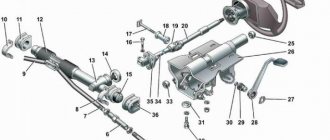
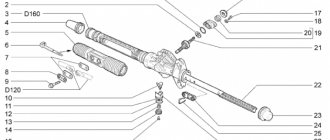
Steering device diagram:
1 - sealing ring; 2 — protective cover for the tie rod end; 3 - spring ring; 4 — ball pin; 5 — tie rod end; 6 — threaded insert; 7 — left tie rod; 8, 10 — steering gear mounting brackets; 9 — right steering rod; 11 — right steering gear support; 12 — spacer ring; 13 — protective cover of the steering mechanism; 14 — steering mechanism; 15 - seal; 16 - thrust plate; 17 — gasket; 18 — spring washer; 19 - bolt; 20 — coupling bolt; 21 - spacer sleeve; 22 — universal joint; 23 — upper steering shaft; 24 — steering wheel; 25 — steering wheel fastening nut; 26 — steering wheel pad; 27 — decorative overlay; 28 — self-tapping screw, 29, 40 — bearings; 30 — bracket for fastening the upper steering shaft; 31 — retaining ring; 32 — steering column position adjustment lever; 33 — adjusting sleeve; 34, 35 — washers; 36 — self-locking nut; 37 — fixing plate; 38 — spring washer, 39 — special bolt with a tear-off head; 41 — intermediate steering shaft; 42 — rubber elastic coupling; 43 — left steering gear support
The vehicle control system is responsible for the direction of its movement, as well as, to a large extent, for the safety of the driver and passengers. One of the most important elements of this system is the steering rack. Its role is to transfer force from the steering wheel to the rods, which, in turn, force the steered wheels to turn in one direction or another.
With the exception of the latest versions in VAZ-2110 cars, the steering rack is not equipped with a power amplifier, but this does not mean that its mechanical design will last forever. Like any other moving mechanism, it sometimes fails. We will talk about what the VAZ-2110 steering rack is and what problems happen with it in this article. In addition, we will figure out how to repair or replace it yourself.
Signs of steering rack defects, dozens and pre-repair preparation
A sign indicating problems in the steering mechanism, and most likely in the rack, is a knocking sound in the steering mechanism. It manifests itself when driving on a bumpy road surface, where the road is replete with potholes, holes and bumps from uneven soil or expanding asphalt. This creates a feeling in the car user that this knock is heard directly into the steering column. If such sounds occur in the steering system, it is necessary to diagnose it.
At this stage of identifying a defect, it is too early to conclude that the VAZ steering rack, the price of which is quite high for the average car enthusiast, requires repair or replacement. To clarify the “diagnosis” of the car, it is necessary to conduct a personal visual inspection of the area where the steering shaft is connected to the rack. To do this, you need to try to move the steering gear shaft with vertical jerks using your hand at the mounting point of the steering system components.
If knocking noises appear when moving up and down, then the car needs to be serviced. As a rule, such a knock is produced by a needle bearing that did not receive its portion of lubricant in time. An alternative to the knocking noise can be a weak fastener of the steering wheel bushing with the gear. In this case, it is necessary to tighten the fastening of the parts.
When the cause of the malfunction is established, the car owner decides on the need to replace or repair this important element of the steering mechanism. On our website there is a video on servicing the steering rack of a VAZ 2110, which demonstrates the procedure for repairing and replacing a part by a car chassis specialist
Design and role of the steering rack in the control system
The VAZ-2110 steering rack is a steel form, one side of which has teeth that mesh with the teeth of the drive gear. The latter is driven by the steering wheel through the shaft and its cardan. In VAZ-2110 cars, the steering rack is located in a column, which is mounted on the partition between the engine compartment and the passenger compartment.
Its upper part has a mount for two rods, which are connected to the shock absorber struts through the tips and their fingers.
When you turn the steering wheel, its shaft rotates and transmits force through the cardan to the drive gear. As it rotates, it moves the rack along with the rods in the desired direction. This is how the car is controlled in such a simple way.
Naturally, to ensure normal operation of the rack, the design of the steering mechanism includes a number of other parts:
- column housing (case);
- protective casing (corrugation) with clamps;
- two drive gear bearings (ball and needle);
- support sleeve (fluoroplastic);
- emphasis;
- thrust nut;
- anthers, plugs, washers, etc.
Replacing steering shaft bearings VAZ 2110 1996
1. Disconnect the wire from the “–” terminal of the battery.
2. Remove the steering wheel (see subsection 5.3.1).
3. Loosen the bolt securing the base of the steering column switches and slide the base towards you.
4. Disconnect the wire from the oil pressure sensor. 5. Disconnect the two connectors with the horn wires from the contacts on the base and remove the base of the steering column switches.
6. Insert the key into the ignition switch and turn it to position I to unlock the steering shaft.
7. Disconnect the ignition switch wire block from the wiring harness. If the ignition switch wires are connected to the wiring harness with a clamp, cut or loosen the clamp.
8. The steering column is secured with bolts with break-away heads (the same as the ignition switch). If new bolts with breakaway heads are not available, you can replace them with regular M6 bolts 20 mm long.
9. Unscrew two nuts and two bolts with break-away heads, remove spring and special washers. If the bolt heads are stripped, the bolts must be drilled out or removed using a screwdriver and hammer.
10. Remove the steering column from the studs, slide it towards you and lower it down. Then remove the bolt securing the propeller shaft to the steering shaft.
11. Remove the bolt and remove the column assembly, while removing the thrust bushing from the shaft. 12. Press the steering shaft along with the bearing out of the pipe. It is recommended to press the shaft towards the steering wheel mounting.
13. Remove the front (steering wheel side) bearing from the shaft.
14. Replace the steering shaft if the splines or threads are worn or damaged.
15. Using light hammer blows and a drift, press the rear bearing out of the steering bracket pipe.
16. Before installing the bearings, check that they rotate easily and without jamming. The plastic bearing bushings must not be damaged.
17. Press the rear bearing all the way into the pipe collar using a suitable mandrel, applying force only to the outer race of the bearing. The bearing is mounted on a plastic bushing, which has a wide flange on one side. When installing the bearing, it is the wide flange of the bushing that must be directed outward.
18. Slide the front bearing onto the shaft with the wide flange of the bearing bushing facing the end of the shaft.
19. Insert the shaft into the pipe. In this case, the rear end of the shaft should enter the rear bearing.
20. Press the front bearing all the way into the pipe collar using a suitable mandrel, applying force only to the outer race of the bearing.
21. Install the steering column in the reverse order of removal. Install the thrust bushing on the shaft with the side with the larger diameter.
22. Install special washers for the bracket fastening bolts with their protruding part a in the opposite direction from the bolt head.
23. When installing the base of the steering column switches, before tightening the bolt securing it, adjust the position of the base on the steering column. To do this, install the lower casing and move the base so that the screw holes in the casing and the base match. After this, carefully remove the casing and tighten the base bolt. Install the steering wheel in the reverse order of removal.
Dismantling, diagnostics and installation of the steering rack
Regardless of whether the rack is being repaired or replaced, it must be properly removed and reinstalled.
Replacing the steering wheel on a “classic” is not at all difficult if you have the proper desire. Information on dismantling can be obtained from this material: https://vazweb.ru/desyatka/upravlenie/kak-pomenyat-rul-na-klassicheskih-modelyah-vaz-2101-2107.html
List of DIY tools
For dismantling and repair you will need the following tools:
- flat screwdrivers of different sizes;
- pry bar or mounting blade;
- small hammer;
- pliers;
- torque wrench;
- a set of socket and ring wrenches ranging in size from 10 to 27;
- open-end wrenches for 10, 13, 15;
- special key for adjusting the steering rack. Such a key can be purchased at a car dealership or made independently.
Example of a wrench for tightening a steering rack
How to remove a part from a car for inspection
You need to know the location of the parts in the rack in order to carry out diagnostics carefully and scrupulously
Removal sequence for the rack:
- We unscrew the fastening of the steering cardan to the steering rack shaft in the cabin.
Remove all mounting bolts
Removing the dismantled part
The need to replace the steering rack: diagnostics
To restore the performance of the steering rack, it is not always necessary to replace it; often the problem can be solved by carrying out maintenance with the replacement of tips, covers and bushings. Beginners should not service the steering wheel on their own. The design of this mechanism has many springs and pressing washers, and not everyone can disassemble the mechanism, sort through the parts and correctly replace them with new ones. Unprofessional installation of these parts will lead to incorrect functioning of the mechanism. The same applies if you need to loosen the mechanism or tighten it. It is also necessary to remember that repair work may well be more expensive than replacement, so the choice is sometimes obvious.
Steering rack repair kits of different compositions are produced for VAZ 2110 vehicles. They also differ in the year of manufacture and the presence of an amplifier.
Experienced car owners restore the slats themselves, but this is not always possible
The steering wheels of VAZ 2113-2115 cars do not have an outstanding design, so many car enthusiasts prefer to replace them. To carry out an independent replacement procedure, it is recommended that you read this article: https://vazweb.ru/desyatka/upravlenie/kak-snyat-i-zamenit-rulevoe-koleso-na-vaz-2114-i-2115-svoimi-rukami.html
It is necessary to change the part in the following cases:
- a crack in the rack body or the threads for fastening the tips are broken;
- very strong knocking in the rack, increased play in the steering mechanism;
- corrosion of the internal parts of the steering rack caused by rupture of the rubber boot;
- the rack was deformed after the accident.
In the above cases, restoring the removed part does not make sense. Restoration by professional craftsmen will cost a lot of money. Therefore, it would be more expedient to change the entire rail, which will require less time and financial costs. It will be much easier to purchase a new one in the store and install it assembled in place of the old one, ensuring excellent operation of the steering mechanism for several years to come.
In order to do a wheel alignment in a VAZ 2110 car, it is not at all necessary to contact a car service center. Details of the procedure: https://vazweb.ru/desyatka/hodovaya/razval-shozhdenie-vaz-2110.html
Installing a new
After diagnosing and repairing the rack, we install it in place:
- We set the rack to the middle position. To do this, unscrew the shaft in any direction until it stops and return it 2.5 turns. The shaft flat should be on the right and located vertically.
- Carefully insert the mechanism through the arch and secure it in the reverse order of dismantling. Tighten the bolts with a torque wrench.
If the steering system malfunctions, you should not immediately call a service station or buy the entire unit. If you have basic plumbing skills, you can repair and adjust the steering rack in your own garage. At the same time, you will be sure that you did not spend extra money and the work was done to a high standard.
Source
What is needed to replace the steering rack of a VAZ 2110
To replace the old rack with a new VAZ 2110 we will need: WD-40 fluid, a vice, a puller for removing the tips or a hammer, an open-end wrench “13”, “22”, “19”, a socket wrench with a head “13” , “17”, “22”, chisel and screwdriver, pry bar, jack, new steering rack.
You should pay attention to the fact that the VAZ 2110 power steering steering rack with the article number (21100340001030) costs much more. When buying a new rack, it is more profitable to take the rack assembled so that there are rod ends, etc., and it is better to choose a new part when you have the old one on hand
The price of a standard rack for a VAZ 2110 with article number (21100340001200) will be about 2,500 rubles, and an improved version with power steering costs 15,000 rubles.
The cost of spare parts is indicated for spring 2022 in Moscow and the region.
Steering wheel
The steering control of the VAZ-2109 car is built according to the following scheme:
- steering wheel;
- column;
- cardan or intermediate shaft (cardan);
- rail;
- rods and tips.
Let's look at the meaning of each element of the chain.
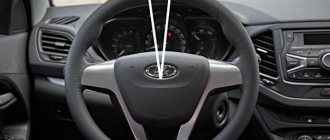
Steering wheel
The steering wheel - the steering wheel, the steering wheel, the steering wheel - is an important part of the control system - is in the hands of the driver. The device transmits a person’s muscular force to the wheels of a car to set them in one direction or another.
The steering wheel is the visible part of the system. The remaining components are hidden in the steering column and under the hood.
VAZ steering wheel
The steering wheel of the VAZ 2108 is a simple 2-spoke design, covered in leather. You can find the “native” steering wheel using catalog number 21083-3402012. In the fifteenth version of the Zhiguli, the steering wheel became 3-spoke, but it cannot be called modern and multifunctional.
Cardan or intermediate shaft
Cardan joint - universal joint - a movable joint between the steering rack and column. The unit ensures easy rotation of the drive wheels.
The element consists of two sliding U-shaped forks connected by a cross. At the joints there are miniature needle bearings, which are prone to souring if water gets on them.
The steering of the VAZ-2110 car has two cardan shafts. In designs with one element (the Soviet Volga), the transmission of rotation to the wheels occurs intermittently, in pulses. Cars 2108-2115 have two hinges: the upper one is located in the driver’s feet, the lower one is located near the steering rack under the bottom.
Crosspieces are considered maintenance-free. This is due to the fact that the elements operate in gentle conditions - they are not influenced by external factors. The service life of the intermediate shaft under favorable conditions is up to 500 thousand km.
But the entire mechanism bears the same loads as the transmission when driving on uneven roads. In fact, the cardan may succumb to corrosion (stop bending) or wear out (play will appear). To repair parts, buy a set of crosspieces and bearings of a suitable size.
Rail
There are no secondary components in the system. But the rack in the steering device of the VAZ-2109 car plays a special role. The part is responsible for the maneuverability of the vehicle, turning the wheels of the car in the desired direction at the command of the driver. The rack cannot be called the main element of the mechanism, but the comfort and safety of travel depends on it.
The assembly looks like this: a gear rack is placed in the crankcase. Protection from dust and dirt is in the form of anthers - rubber accordions, like on CV joints. There are two threaded holes on the bar - these are sockets for securing the end rods. There is a drive gear, support rings for smooth sliding and a stop mechanism that regulates the amount of clearance of the rack-pinion pair.
Rack VAZ
This is a loaded unit with high efficiency. Wear of the mechanism affects the controllability of the vehicle. The steering wheel turns hard, there is play, and there is a knocking sound coming from underneath when the car maneuvers.
However, the steering rack is a simple mechanism that can be easily repaired in a garage.
Traction
They transmit force from the steering mechanism to the wheels. Technically, the rod is made like a metal bar. One side of the bar is attached directly to the steering rack through a hinge. Here, special mounting sockets are provided for the rods. On the other side there is a regular thread for attaching tie rod ends.
Fingers (tips)
The steering system in a car is rigidly fixed, while the wheels are movable. The rods, in order to transmit the driving force to the wheels, are connected to the steering knuckle lever through the steering tips (fingers) - the last link in a long steering-wheel chain.
The tie rod end is an extremely simple, and therefore reliable, hinge. It consists of a housing with an axle shaft and a threaded ball pin. And also an insert for fixing the finger. The device body is closed with a lid. The cover is fixed to the finger with a ring, the latter is attached to the body with a spring.
The Teflon liner holds your finger tightly. Therefore, steering tips last a long time. But when the liner wears out, play appears. The protection (anthers) can also be broken.
A problem with the tips is indicated by kickback in the steering wheel on any bump and a dull sound when turning. The phenomenon is prevented by timely maintenance and repair of the steering control of the VAZ-2110 car. Driving with a faulty mechanism is not only uncomfortable, but also dangerous.
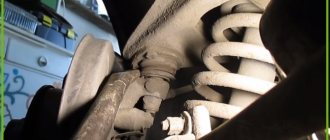
Shock absorber struts
In cars without springs (which is practically all modern vehicles), shock absorbers or shock absorber struts are installed. These are mechanisms of different design and functionality that inexperienced drivers confuse:
- A shock absorber is an oil pump that dampens vibrations that occur when the car is moving. The term "telescopic strut" refers to a shock absorber.
- The shock absorber strut, in addition to softening the ride of the car, sets the geometry of the suspension. Another function is to create multiple support points.
The design of the unit is complex. The key components work in pairs - the shock absorber and springs themselves. The latter are compressed when the car hits obstacles and, due to elasticity, are released. The springs then continue to oscillate up and down until they reach equilibrium.
Shock absorber struts VAZ
Vibrations are transmitted to the car body. But here a shock absorber is connected - a cylinder, inside of which a piston moves in a gas or oil environment. The strut shock absorber dampens unnecessary vibrations of the springs. If the body begins to sway strongly or the car begins to roll, you need to check the condition of the shock absorber struts.
What racks and rods were installed on 2108-2115
Modernization of Tolyatti VAZs has always been slow. Starting in 1984, there were no changes in the suspension, engines, or steering for 20 years.
The steering rack of the VAZ-2108 was under catalog number 2108-3400009-20, passed from model to model until the release of the “ten”. The article number of the VAZ-2110 part, called “old-style slats”, is 2110-3400009-20.
What is the difference between racks and rods of different models?
The factory equipped V8s with straight-toothed racks developed in the 70s with a full steering rotation of 3.7 turns.
Subsequent modifications of the car were equipped with such elements. And initially the tenth model. But then the rack was improved: it, like the drive gear, became helical. The manufacturer strengthened the VAZ-2110 steering gear housing and used a “figure-of-eight” gear-rack pair. The latter received the name “rasp” from auto mechanics. The full stroke of the new-style helical rack became 4.2 turns of the steering wheel. The catalog number has changed - 2110-3401068.
The Lada Kalina came off the assembly line with a shortened helical rack with a full steering rotation of 3.1 turns. The part number is 11183-3401068-00 (11183-3401068-01).
Are racks and rods of different models interchangeable?
The topic of interchangeability is lively discussed on automotive forums. The answer is yes, but with some nuances:
Are racks and rods of different models interchangeable?
On the VAZ 2108-2115 model from 1984 to the present day, you can install steering racks:
- manufacturer code – TRIALLI, article – CR 108;
- from AVTOVAZ the part goes under catalog number 2108-099,2113-2115. 2108-3400009-20.
Steering rods: manufacturer VIS ZAO, article number 21080-3414060-00.
Dimensions: length, width, height of rods – 370x50x50 mm.
We carry out repairs
Remember that this unit is a rather “delicate” and fragile mechanism.
under the octagonal nut of the stop there is a spring that needs to be removed;
then remove the retaining ring, which is located under the specified spring;
lightly tap the wooden spacer to tap the rack stop out of the crankcase (note that there is a rubber sealing ring in the groove of the stop);
Next you need to remove the front shield seal;
- under the seal there is a boot, which is also removed (you can use a screwdriver that has a wide and thin blade);
- behind the boot there is a locking ring, which is also removed;
Using a 24mm octagonal head, unscrew the gear bearing mounting nut and remove the nut from the shaft;
we press out the shaft from the gear together with the bearing using a 14mm wrench, which we rest on the mounting blade; the shaft can be clamped in cleats;
Cotton steering wheel and how to deal with it
The design of front-wheel drive VAZ cars corresponds both to its price niche and partly to its purpose. An average car for economical travel over average distances at average speed. Know-how of the 80s of the Soviet automobile industry, the MacPherson suspension coupled with rack and pinion looked like something perfect in the early 80s. Although, in fact, the long-travel steering rack 2108 and the classic MacPherson of the 1948 model are not the most progressive solution even for a cheap car.
Compared to classic VAZ models, rear-wheel drive, with a classic steering mechanism and double-wishbone front suspension, the 2110 has more sluggish and imprecise handling. In a word, a wadded steering wheel. It won’t take long to figure out why this happened. Elementary geometry - MacPherson does not hold the car well in turns and during acceleration and braking, and the steering had a long stroke and an unsuccessful upper rack location. Hence the looseness of the steering wheel. It is technically inherent and cannot be cured by any settings or adjustments.
Video tutorial on repairing a VAZ steering rack
However, since the 2000s, a slightly improved design of the power steering rack has been used. There wasn’t enough for everyone at once, because first of all, cars with hydraulic booster were exported. Later, when Europe was full of Zhiguli cars, cars with power steering began to appear more often. But the hydraulic booster did not save the situation. And that's why.
Assembly procedure
We begin repairing the VAZ-2110 steering rack by installing the needle bearing of the drive gear. The seat is first generously lubricated with a special lubricant such as “Fiol-1”. After this, we press a new ball bearing onto the drive gear shaft. Next, install the support sleeve from the repair kit inside the control unit housing. Now we fill the inner cavity of the column with lubricant and insert the steering rack into it.
We mount the drive gear and secure it with a locking ring and nut. We put a new boot on its shaft.
We install the stop with the seal in place, secure it with a stopper and a thrust nut. That's basically it. Now you need to adjust the control unit and put the protective cover on it.
Step-by-step replacement of the steering column
Having decided to replace the steering column on a VAZ-2106 yourself, you need to stock up on free time and patience, and experts recommend performing this step in stages:
- The steering shaft, which is clamped in the column, should be carefully removed.
- Using a size 30 wrench and a long wrench, you should try to rip off the connecting nut that secures the steering column. It is not always possible to remove the fasteners the first time, but since this stage is mandatory, you have to return to it several times.
- The three fasteners that connect the column to the car body are unscrewed. It is most convenient to use a so-called ratchet for this process, since the bolts are not so easy to get to with a regular wrench.
- After unscrewing all the fasteners, you need to free the column from the tie rod splines, which continue to hold the assembly. To do this, you should pry the structure with a pry bar and try to knock it down with sharp jerks.
- After dismantling the unit, it is necessary to check the condition of the boot and oil seal; if even minor damage is detected during a visual inspection, these components must be replaced. By installing a new boot, the life of the bearing and shaft will be extended, and the new oil seal will not allow automotive lubricant to leak out of the steering column.
If all components are installed correctly, the car owner will replace the failed elements with high-quality and reliable ones, and the steering column will have a long service life.
To simplify the assembly process, experts recommend putting all the removed elements from the car in strict sequence, so that when assembling the structure, you don’t confuse anything and repeat the whole process again.
As you can easily see, the process of replacing the steering column of a VAZ-2106 is not that complicated, so every car owner can do it if he has the strength and patience and, of course, does all the work step by step. But if difficulties still arise when replacing a car element, it’s time to use the hint, which at a convenient time can be found in the video instructions on the Internet resource. The educational video lesson is conducted by qualified specialists who understand the intricacies of car repair and present their visitors with extremely effective and most necessary advice on the topic of interest to them.
Checking the oil level in the steering column on a VAZ 2101-VAZ 2107
Welcome! Steering column - thanks to it, both front wheels of a rear-wheel drive car of the “Classic” family are turned. In order for the steering wheel to rotate well and with little effort, the steering column is constantly lubricated with oil located inside it. But like any other oil, the oil inside the steering column disappears over time, and therefore its level must be constantly monitored and topped up whenever possible. You can find out how to check the oil level below.
Note! To check the oil level in the steering column, you will need to take: “8” wrenches, and also, just in case, take with you a funnel, clean oil and a brush or just a rag!
Where is the steering column located? Most likely, you have already seen where the steering column is installed, and more than once, because it is located in almost the most visible place, namely in the engine compartment of the car, on the left side (Indicated by a red arrow), and just above the steering column is the main brake cylinder on the photo indicated by the blue arrow.
Steering column for VAZ 2110 do-it-yourself repair
steering adjustment
We carry out the work on an inspection ditch or a lift.
Using pliers, remove the cotter pin... ...and use a 22mm wrench to unscrew the nut securing the middle link to the pendulum arm. Using a fork puller, we press the middle thrust ball pin out of the hole in the pendulum arm of the Niva 2131. The pin can also be pressed out by applying a sharp blow from below (near the hinge) with a chisel with a blunt end to the pendulum arm. Remove the ball pin from the eye of the pendulum arm.
Similarly, we press the ball pin of the VAZ 2131 rod out of the bipod.
Remove the middle link.
Install the middle link in the reverse order.
The left hinge pin (inserted into the bipod hole), in addition to rotation, can swing (unlike the right one).
At the same time, when installing the VAZ 2121 on a car, we orient it so...
...so that its longitudinal axis is in front of the Niva 2131 hinge axes.
Checking and adjusting the steering of VAZ 2121, Niva 2131
- – Steering gear adjustment
- – Replacement of side rod
- – Removing and installing the middle link
- – Replacement of steering tips
- – Assembling and disassembling the lever bracket
- – Removing and installing the steering wheel
- - Steering column
- – Replacement of the steering mechanism
- – Steering bipod
Steering design of VAZ 2121, VAZ 2131
Features of the Niva 2121 steering device. Adjusting the steering column, eliminating knocks in the Niva 2131 steering mechanism.
DIY steering repair design- Check and adjustment
Steering adjustment, inspection and maintenance
NIVA / 2121, 2131 / repair / steering / checking and adjustment / Removing and installing the middle link
Useful tips
Finally, here are some useful tips that will extend the life of the steering rack and other elements included in the control unit:
- At least once a quarter, check the condition of the steering at a service station or yourself.
- Pay attention to the condition of the steering column protective cover.
- Try to limit driving on uneven surfaces, especially at high speeds.
- Do not test the strength of the steering rack and the entire mechanism by moving away with the steering wheel turned all the way to the side.
- If play or other signs of steering rack malfunction are detected, repair or replace it.
The steering mechanism of dozens has undergone several ongoing improvements throughout the entire production period of the car, but in general, the steering system is not far removed in design from the VAZ 2108-09 design. Perhaps that is why almost everyone who operates a ten repairs and adjusts the steering rack with their own hands. There is nothing complicated about this and now we will see it.
Diagnosis of steering problems dozens
Every car has weaknesses. For VAZ 2110, this is the tie rod end. This part is an integral part of the car's steering system. The tie rods on the tenth generation VAZ end with tie rod ends. Rods are rarely changed, but tie rod ends must be replaced every 40 thousand kilometers of the car.
But this is an average and approximate figure. The service life of the steering tip depends on the driving style of the car owner and the conditions in which the car is operated.
Any driver of a vehicle can notice a problem with the steering. The main signs of the need to replace steering tips on a VAZ 2010 are as follows:
- difficulty driving, especially when turning;
- strong noise and knocking from one or both sides in the front, more pronounced when turning;
- The tread on the tires wears unevenly.
In the latter case, most likely the problem is not only with the tips. It is necessary to diagnose the front suspension as a whole. Perhaps replacing the tie rod end won't do the trick.
The steering tips in the VAZ 2110 car are a hinged joint. Wear in the tip joint leads to a malfunction in the steering. You can check the steering tips on the VAZ 2110 yourself.
First of all visually. To inspect the tip on the left side of the car, you need to turn the steering wheel all the way to the right; to inspect the right steering tip, turn the steering wheel to the left.
You should pay attention to the rubber boot that protects the tie rod end. If it is torn or cracked, then it is time to replace the tips.
Through the hole in the boot, dust and dirt enter the hinge, which leads to faster wear of the steering tip.
To carry out the second stage of diagnosis, it is necessary to jack up one of the sides of the car so that the wheel is freely suspended in the air. Tug the tip with your hand, if there is any play, then you need to replace the steering tip. The tips should be changed on both sides. It is not worth saving and changing one tip; it is better to save on the services of a service station technician and carry out the replacement procedure yourself.
Checking the condition of the tie rod ends
You will need an assistant to perform this test. Take 2 jacks and lift the front of the car. Secure the machine to support stands. If you have a lift at your disposal, use it. Ask an assistant to grab the wheel and jerk it sharply in a horizontal plane, i.e. pull the rear part of the wheel toward you and the front part away from you. During this, you place your hand on the body of the ball joint of the steering tip and the swing arm and evaluate their mutual movement relative to each other. If you feel the ball joint move freely, replace the tie rod end immediately. In addition, change the steering tip if, during the inspection, you notice that the ball joint boot is torn.
Selection of repair kit
Before starting repair and restoration work, you should decide on the choice of repair kit.
Minimum set. This set includes the necessary list of fastening and sealing elements: washers, bearings, nuts and fluoroplastic bushings.
The basic set has bearings and shafts in addition to the minimum set, but its cost can be twice as high as the first option.
Please note that the steering rack can be either old or new. The old racks are designed for the VAZ 2108, while the new ones are designed for the “tenth” model. The new version is also more convenient to repair. If there is a need to repair the steering rack, which involves replacing the bushing, then there is no need to disassemble the entire mechanism. Remove the corrugation, unscrew the central nut and disassemble the rack into two component parts. One part will contain the mechanism, and the other part will be the one where the bushing is located.
Symptoms of a problem
Without proper care, such as lubricating bearings and checking play, the steering rack can quickly fail. Signs of malfunction that indicate that the mechanism should already be changed:
- A noticeable knock when driving over bumps, which is transmitted to the steering wheel. If a knocking noise is heard when turning the steering wheel, it is unsafe to drive such a car; it is necessary to urgently diagnose the mechanism.
- Strong play in the steering wheel indicates loose fasteners or wear of the rack-and-pinion joint.
- The effort when turning the wheels has increased.
- You can hear noise from the hydraulic booster (if equipped).
- The cause of the knocking noise may be an insufficiently lubricated bearing or wear of the gear-rack pair. If, when rocking the steering shaft, there is noticeable play at the junction with the rack, repair is necessary. If not, just check and tighten the joints between the bushing and the steering shaft gear.
A powerful vice is used to fasten the rail
Video: How to tighten a loose mechanism
Preparatory activities
The first thing you need to do is buy a steering rack repair kit. Without it, starting work is completely useless. The set may have different configurations.
- Minimum (washers, fasteners, bushings, nuts, bearings).
- Medium (in addition to all of the above, shafts are added). The cost of such a kit is twice as much.
- Maximum (everything is included here, including the rack).
Please note that there are different slats - old and new. The former are intended mostly for the VAZ 2108, and the latter for the VAZ 2110. It is better, of course, to give preference to the second option, because in this case the bushing is much easier to change (there is no need to disassemble the entire rack).
Steering innovations
It seems like the issue has been resolved. Now it was possible to increase the force on the steering wheel, make the number of revolutions from lock to lock minimal, everything was smoothed out by the amplifier, but another problem arose. The car is operated in too different modes and the exact dosage of the steering angle at speeds of 140 and 55 km/h have completely different values. Not to mention the fact that there was almost no effort on the steering wheel, which made the steering even more insane. Then we had to change the design of the steering rack again. This time the objects of attention were the rack/pinion pair. Installing a new pair helped. The new steering rack was called “short” because the number of steering revolutions was reduced from 3.8 to 2.9. As a result, the waviness has almost disappeared and the steering wheel has become sharper.
How does the steering mechanism work?
Steering
injury-proof, with a height-adjustable (tilt-angle) steering column, and a rack-and-pinion steering mechanism.
Steering gear
assembled with steering rods, it is attached in the engine compartment to the front panel of the body on two brackets using brackets 2 (Fig. 1). The mechanism is secured with nuts on welded bolts through rubber pads (supports) 3.
A drive gear is installed in the steering gear housing 5, which meshes with the rack.
The steering shaft consists of an upper 14 and an intermediate 10 shaft, connected to each other by a cardan joint. The intermediate shaft is connected to the drive gear by a flange through an elastic coupling. The upper shaft is installed in the bracket pipe 21 on two ball bearings with elastic bushings on the inner ring.
Fig1. Steering parts: 1 – inner tie rod ends; 2 – steering gear mounting bracket; 3 – steering gear support; 4 – spacer ring; 5 – steering mechanism; 6 – sealing gasket; 7 – thrust plate of the seal; 8 – seal; 9 – lower flange of the elastic coupling; 10 – intermediate steering shaft; 11 – coupling bolt; 12 – spacer sleeve; 13 – facing casing (upper part); 14 – upper steering shaft; 15 – steering wheel; 16 – signal switch cover; 17 – adjusting sleeve; 18 – steering column position adjustment lever; 19 – retaining ring; 20 – facing casing (lower part); 21 – steering shaft mounting bracket; 22 – steering shaft bearing; 23 – adjusting rod; 24 – outer tie rod end; 25 – spring ring; 26 – protective cap; 27 – sealing ring
At each vehicle maintenance check the condition of the protective cover, the protective caps of the 26 linkage joints and the tightness of their fit. They must be replaced if there are cracks, ruptures or other defects that impair their tightness.
Make sure that the steering wheel spoke is horizontal when the vehicle's wheels are straight. Otherwise, determine the cause of the problem and correct it.
Turn the steering wheel from lock to lock and check visually and audibly:
- reliability of fastening of the steering mechanism and steering wheel;
- is there any play in the rubber-metal joints, in the steering rod joints, as well as in the rivet and spline joints of the elastic coupling of the steering shaft;
-reliability of tightening and locking the bolts securing the rods to the rack and the nuts of the ball joint pins;
- are there any jams or obstacles that prevent the steering wheel from turning?
If knocking or binding is detected, disconnect the tie rods from the swing arms of the telescopic suspension struts and recheck. After confirming that the knocking and sticking noise is coming from the steering, remove the steering gear from the vehicle for repair.
The maximum permissible gap between the stop and the nut is 0.2 mm. If necessary, replace worn parts and adjust the gap between the stop and the nut.
↑ Steering gear
The steering drive includes two composite steering rods and swing arms 11, welded to the telescopic struts of the front suspension. Each rod, in turn, consists of two parts - internal 12 (long) and external 9 (short) with split tips with internal threads, as well as an adjusting rod 8 (connecting the internal and external rods) with external threads of different directions at its ends and a hexagon in the middle. The length of the tie rod changes when the adjusting rod is rotated.
For a reliable connection, it is necessary to ensure the distance between the ends of the tips and the hexagon: on the inside within 10.8-14.2 mm, on the outside - 10.6-16.3 mm. After the adjustment is completed, the tie rod ends are bolted together. The outer (short) rod 9 is connected to the rotary lever 11 through a ball joint 10, consisting of a liner, a liner spring and a pin. To protect against dirt, the hinge is covered with a rubber protective cover (boot). The hinge forms a non-separable structure with the tip, therefore, if it fails, the tip should be replaced with subsequent adjustment of the wheel toe.