Payment for goods and downloading of the book in electronic form (PDF format) is made on the website.
To do this, you need to find the book you are interested in and click on the “Buy” button. The price of the book is indicated on the button.
For convenience, the price on the website for residents of Russia, Belarus and Kazakhstan is presented in rubles.
For residents of Ukraine in hryvnias, and for all other countries - dollars.
After clicking on the “BUY” button, a payment window will open where you can select a payment system with which you can pay for the selected book using any bank card (Visa, MasterCard, MIR, etc.)
When you click on the “Pay by bank card” button, the Portmone payment system will open, which is the easiest way to make a payment.
In addition, the website offers four payment systems for payment:
- Yandex (payment from any bank cards, Yandex Money account, QIWI Wallet, terminals, etc.);
- Portmone (payment from any bank cards, Portmone account);
- PayPal (payment from any bank cards, PayPal account);
- WebMoney (payment from any bank cards, payment from WebMoney wallets).
Payment via Yandex Cashier
After selecting payment via Yandex, the Yandex Cashier payment system will launch, where you need to select a convenient payment method (bank card, QIWI, Yandex Money account, etc.)
After specifying payment details and confirming payment, payment for the goods will occur.
If you have a bank card in a currency other than the ruble, then the money will be debited from the card at the rate of the Central Bank of Russia at the time of the purchase.
This payment method is optimal for residents of Russia, Kazakhstan and Belarus.
Official website of the Yandex Kassa payment system https://kassa.yandex.ru
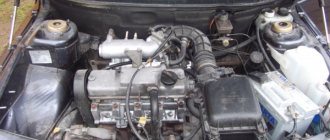
Lada 2112 2007, 89 l. With. - with your own hands
Cars for sale
Lada 2112, 2007
Lada 2112, 2008
Lada 2112, 2008
Lada 2112, 2007
Comments 48
I don’t know what they write about here regarding belt tensioning on 2112; on PRIOR everything is tightened bit by bit through the tension roller. The right branch of the belt must already be laid through the guide roller: - through two camshaft pulleys, a crankshaft toothed pulley, through the pump and have sufficient tension. In this case, the marks on the camshaft pulleys and the crankshaft toothed pulley must be fixed to the corresponding counter marks. In this position, holding the belt with your hand on the left side of the branch, on the side of the tension roller, so that it does not weaken and does not jump over the teeth, no matter where and in what place (and this is possible even for one tooth), we place or slip the tension roller under the belt , insert its bolt and tighten everything with such a turn of the roller by hand that the belt does not loosen and does not jump over the teeth.
Next, spin the engine several times, or maybe it’s better, by the wheel with 4-5 gear engaged, and make sure that all the marks on all the pulleys match perfectly. How to recognize the mark on the gear ring of the generator drive pulley on the crankshaft, I have already written below and given a drawing. With the wheel removed and the stand hanging up with the steering wheel turned, this crown and the DPKV are clearly visible, or almost well, through the mirror.
Then, after cranking the engine several times by hand, carefully, slowly - and what the hell is not joking, the marks didn’t match when parked and the valves were bent with the starter, yikes, then you begin to tighten the roller to working condition.
At the moment when, when cranking the engine, the right branch self-tensions when viewed from the side of the pulleys - and the left one weakens, this is where you need to tighten the roller - like how everyone around writes and rips off each other. On a Priora, the tension of the roller may be weak or weak, the belt will jump, or the roller may be pressed against the belt so that it and other damn spare parts will become sick.
Don't be afraid to start the engine to see how your video lives when the engine is running. Nothing will happen to either the belt or the roller when adjusting in a tightened state. The main thing is that the belt does not dangle too much, otherwise it will either fly off or fly like plywood over the toothed pulleys and damn it, bend the valves. If the tension roller is dead, overtightened, the belt may hum a little from the tightening, which in turn will affect the PUMP because it will not last long from a strongly overtightened belt (of course it will not immediately fall apart) - then we begin manipulations to tension the roller . The ROLLER on a Priora should be alive when the engine is running. It should vibrate inconspicuously on the tension spring and this is clearly noticeable, and when you press the gas sharply it jumps, pushing up well with the belt and this can be seen even by a blind mole.
Payment via Portmone
After selecting payment through Portmone, the payment system will launch, where you need to select the payment method: bank card or Portmone account.
The price in the Portmone payment system is converted into dollars at the exchange rate of the Central Bank of the country where you are located.
If you have a bank card in a currency other than the dollar, then the money will be debited from the card at the rate of the Central Bank of your country at the time of the purchase.
After specifying payment details and confirming payment, payment for the goods will occur.
Official website of the Portmone payment system https://www.portmone.com
Video on repairing KZ VAZ
There were no prerequisites for replacement. The original coil worked fine, well, almost normal. I didn’t like that the car was adjusting under constant load. Therefore, I decided to conduct an experiment on replacing the coil with something larger and more interesting. I looked at Oleg reekardo’s blog about replacing the coil and decided to go the same route, but make it a little more complicated. Without thoroughly reading the entry (and it says to buy a coil, not an ignition module from a VAZ), I went and first bought an ignition module and a connector for it. The same module was in my Niva.
I started connecting it, but it didn’t work—the car wouldn’t start. I built a mini test bench (4 spark plugs, wires and battery). The stand showed that the module was working. (And it was written to take a coil, not a module) I went and replaced the module with a coil (I also got the difference in price in my pocket 
Then it's easier. I found the necessary connection points and checked the operation. Then I soldered the wires to the original wiring. The original connector was wrapped with electrical tape. I mounted the module diagonally on the standard plate, just removed the wire fastening to the knock sensor and screwed the bolt into the vacant hole.
Payment via PayPal
After selecting payment via PayPal, the PayPal payment system will launch, where you need to select the payment method: bank card or PayPal account.
If you already have a PayPal account, then you need to log into it and make a payment.
If you do not have a PayPal account and you want to pay using a bank card via PayPal, you need to click on the “Create an Account” button - shown with an arrow in the picture.
PayPal will then prompt you to select your country and provide your credit card information.
After specifying the information required to make the payment, you must click on the “Pay Now” button.
Official website of the PayPal payment system https://www.paypal.com
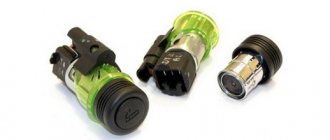
Module design
Before you begin repairing the ignition module, it is worth understanding what it consists of. So, let's look at the design of this element:
- Two ignition coils that generate a high-voltage pulse.
- Dual channel switch.
If there are problems with the operation of the ignition module, there are reasons for this. It is worth warning that in the event of a malfunction, the “Check Engine” warning light will not light up: engine stops, loss of spark, interruptions in the operation of the power unit, etc.
For diagnostics and repairs, basic knowledge is required not only in conventional electrics, but also in the principles of auto electrics. Also, for a successful process you will need skills in working with a digital multimeter.
Repair process
Often, the high-voltage pulse disappears in cylinders 2 and 3 . So, to begin repairing the ignition module, of course, you will need to dismantle it. To do this, disconnect the high-voltage wires and unscrew the assembly itself from the fastenings. When the preparatory operations are completed, you can proceed directly to the repair process:
- We tear off the aluminum plate.
Use a screwdriver to open the aluminum plate
Scheme of soldering wires and arrangement of elements on the boards
Diagram of the assembled ignition module
Completely assembled ignition module
Video about repairing the ignition module on a VAZ-2112
The video material will tell you about repairing the ignition module, as well as how to remove it from the car.
Payment via WebMoney
After selecting payment via WebMoney, the payment system will launch, where you need to select the payment method: bank card or WebMoney wallet.
If you already have a WebMoney wallet, then you need to log into it and make a payment.
If you do not have a WebMoney wallet and you want to pay in another way, you need to select any of the methods that WebMoney offers and make the payment
After specifying payment details and confirming payment, payment for the goods will occur.
Official website of the WebMoney payment system https://www.webmoney.ru/
Signs
- If one of the module coils completely fails, then two cylinders do not work. This is clearly visible even to the naked eye - the engine is feverish at idle, starting is difficult, fuel consumption is sky-high, loss of dynamics.
- To eliminate all other components of the ignition system, make sure that the spark plugs are in working order. To do this, unscrew them and check the spark on each of the spark plugs by cranking the engine with the starter and placing the spark plug with the high-voltage wire on the head so that the body (threaded part) of the spark plug touches the engine mass. If there is no spark or it is weak, replace the spark plug with one that is known to work.
- If this does not lead to anything, check the high-voltage wires. Thus, we will exclude spark plugs, caps and high-voltage wires from the list of non-working elements. Next we will check the ignition module.
Downloading a book
After successfully completing the payment (by any method) and returning to the KrutilVertel store from the payment system website, you will be taken to the successful payment page:
On this page you need to indicate your e-mail, where access to download the book will be sent.
If you are already registered on our website, then simply follow the link to your personal account.
The book you purchased will be in your personal account, from where you can always download it.
Please note that after making the payment, you need to return back from the payment system website to the KrutilVertel website.
If for some reason you did not return back to the site and closed the payment system tab with a message about the successful completion of the payment, please let us know - we will send you a letter indicating access to download the book.
How to check the ignition coil of a VAZ
If the ignition coil is faulty, the engine will not start. A characteristic sign of a faulty coil is its increased temperature when the ignition is turned off. This is easy to determine by touch.
Signs of a faulty ignition module may include the following:
- hesitant engine starting or failure to start;
- failures during sudden changes in speed;
- high fuel consumption;
- two cylinders do not work, the engine is feverish;
- lack of dynamics;
- a sharp drop in power;
- drop in power and thrust after warming up.
These symptoms may not only be caused by the ignition module. To determine the malfunction, it is enough to spend a few minutes diagnosing spark plugs, high-voltage wires and caps. This will eliminate the remaining elements of the ignition system and make sure that it is the ignition module that is faulty.
Checking the ignition coil is performed in one of 2 ways. The simplest one is to remove the central wire from the breaker-distributor, bring it to the motor housing and turn it with the starter, and a running spark should appear. After this, we check the energy supply to a separate spark plug, for which we unscrew the working spark plug, bring its contact to ground and attempt to start the engine. In this case, the spark should come from the wire to ground. If it is absent, the reason will be a malfunction of a system element such as the ignition coil.
To check the module in the second way, we only need a multimeter, then follow the step-by-step instructions:
- We check the power supply and the presence of pulses supplied from the ECU. We check the power between the central terminal (15) of the wire block connected to the module and the engine ground. When the ignition is on, the voltage should not be less than 12 V. Otherwise, either the battery is dead or the ECU does not work.
- We check the pulses from the ECU on the wiring block. We install one tester probe on connector 15, the second on the far right, then on the far left. The assistant cranks the engine with the starter, and at this time we record short-term voltage surges with a tester. If there are no impulses from the ECU, it is he who is to blame.
- We check the resistance on the secondary windings of the coils. We put the tester in resistance measurement mode and measure it at the high-voltage terminals of the module cover. Between pins 1 and 4 and pins 2-3, the resistance should be 5.4 kOhm. Otherwise, the module must be replaced.
- We check the resistance of the primary windings between contacts 15 and the rightmost, then the leftmost terminals. Nominal - 0.5 Ohm. Deviation is not allowed.
- Check the module for a short circuit. In ohmmeter mode, install one multimeter probe on the central terminal, the second on the metal body. There shouldn't be any resistance. If the device detects at least some resistance (other than unity or infinity), the module must be replaced.
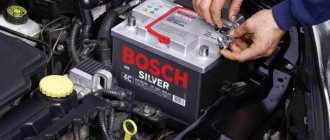
Problems when paying with bank cards
Sometimes difficulties may arise when paying with Visa/MasterCard bank cards. The most common of them:
- There is a restriction on the card for paying for online purchases
- A plastic card is not intended for making payments online.
- The plastic card is not activated for making payments online.
- There are not enough funds on the plastic card.
In order to solve these problems, you need to call or write to the technical support of the bank where you are served. Bank specialists will help you resolve them and make payments.
That's basically it. The entire process of paying for a book in PDF format on car repair on our website takes 1-2 minutes.
If you still have any questions, you can ask them using the feedback form, or write us an email at [email protected]
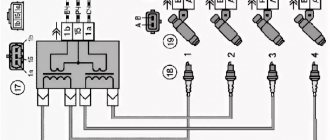
Pinout and diagram of the VAZ ignition coil
Pinout of ignition coil modules for various car models of the VAZ family:
Ignition VAZ 2101
1 – generator; 2 – ignition switch; 3 – ignition distributor; 4 – breaker cam; 5 – spark plugs; 6 – ignition coil; 7 – battery.
Ignition VAZ 2106
1 – ignition switch; 2 – fuse and relay block; 3 – EPHH control unit; 4 – generator; 5 – solenoid valve; 6 – microswitch; 7 – spark plugs; 8 – ignition distributor; 9 – ignition coil; 10 – battery.
Ignition VAZ 2108, 2109
Ignition VAZ 2110
Ignition VAZ 2111
Ignition VAZ 2112
Ignition VAZ 2114
Diagram of a non-contact ignition system: 1 – non-contact sensor; 2 – ignition distributor sensor; 3 – spark plugs; 4 – switch; 5 – ignition coil; 6 – mounting block; 7 – ignition relay; 8 – ignition switch.