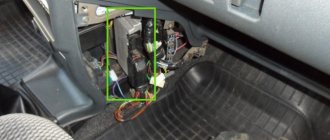
Contact ignition system VAZ 2107
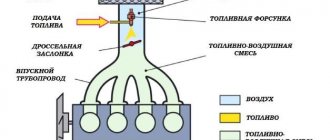
The classic contact system used on the VAZ consists of 6 components:
- Ignition switch.
- Breaker-distributor.
- Spark plug.
- Low voltage wires.
- Ignition coil.
- High voltage wires.
The ignition switch combines two parts: a lock with an anti-theft device and a contact part. The switch is secured with two screws to the left of the steering column.
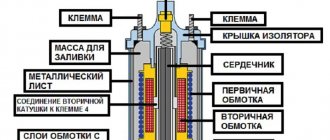
The ignition coil is a step-up transformer that converts low voltage current into the high voltage needed to produce a spark in the spark plugs. The primary and secondary windings of the coil are placed in a housing and filled with transformer oil, which ensures their cooling during operation.
The ignition distributor is the most complex element of the system, consisting of many parts. The function of the distributor is to convert constant low voltage into high pulsed voltage with the distribution of pulses across the spark plugs. The design of the distributor includes a chopper, centrifugal and vacuum ignition timing regulators, a movable plate, a cover, a housing and other parts.
Spark plugs ignite the gasoline-air mixture in the engine cylinders using spark discharges. During operation of the cross sections, it is necessary to monitor the gap between the electrodes and the serviceability of the insulators.
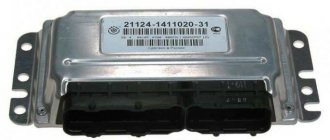
New ignition module
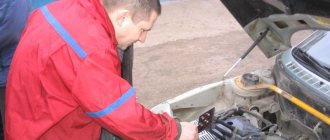
Checking the battery with a multimeter
They are attached completely differently. Therefore, the new one, unlike the old one, is held on by one bolt, and not by three. I secured the controllers to a corner, which I attached under the air filter mounting bolt.
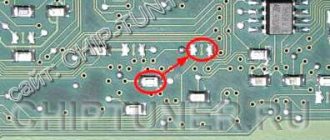
The letter designations are clearly visible on the device body. Because it is in it that a high-voltage pulse is generated, and there, in most cases, a break or rupture of the turns can occur.
It happens because of the following: The car was operating when the high-voltage wires were not working - approx.
And also the cause of the malfunction may be a soldering failure; this usually happens due to frequent vibration. Or moisture formed during washing or condensation. Testing with the engine running is done as follows.
The first contact of the tester is in socket D, the second is to ground. The multimeter switch position is 20 volts. If there is power, the tester shows 12 volts. The first contact is in socket C, the second is ground.
Switch on 20 Ohm ohmmeter. Normally it shows less than 1 ohm, that is, the mass is normal. The first contact is in socket B, the second is ground.
20 volt switch. The norm is not less than 0.3 volts. If this is the case, it means that a normal pulse is coming from the Hall sensor to position B. Contact A is checked in the same way as the previous one.
Chevrolet Niva ignition coil
If such a check shows the norm, you need to test the module. The old spark plugs are black with soot, but there is nothing criminal in appearance. We install new ones, pray and start them. Vzhiiiihh - it started, it doesn’t bother. I warmed up the engine a little, I try to drive - everything is cool, I’m on my way. I fly home quickly, joyful, it’s already 8 pm.
I think to myself - lucky that there are candles. It happens - it breaks through.
The next day in the morning I take my wife to work for 15 minutes there, I drive back and almost approach the house, I feel that the traction has disappeared, I press on the gas and the car slows down. A couple of seconds later the engine started up.
Damn, I think it’s good that I got there on my own. Google says - change the high-voltage wires, they also break through and in theory they should also be changed more often, and not ride on the same wires for years.
BB wires I take the bus and go to the nearest spare parts store. The choice is not great, there are no branded and cool Teslas and the like. This is especially true when operating in difficult conditions, when the engine operates at high speeds, while the travel speed is low and, as a result, the interior ventilation is insufficient.
On the Niva Chevrolet, the spark plugs are closely related to the previous device. And if they malfunction, all the same problems as described above are possible. Spark plugs fail especially often in winter. This is due to the fact that the car is not used so often and mainly for short trips. Due to the low ambient temperature, the candles do not warm up to the maximum temperature at which they self-clean from carbon deposits.
If problems occur, it is necessary to replace the spark plugs in a timely manner so that this does not affect the performance of other system components. Spark plugs for the Chevrolet Niva must be purchased specially for eight-valve injection engines.
Loading ..
When purchasing, you should pay attention to the gap between the electrodes. It should be no more than 1.5 mm
If this distance is greater, this will affect the duration of the candle.
Remove the engine screen. We remove the tips of the high-voltage wires from the ignition coil terminals. Having released the lock of the engine control system wiring harness block... ...disconnect the block from the coil connector. Using a 5mm hexagon, unscrew the four screws securing the coil to the bracket... ...and remove the coil. Install the ignition coil in reverse order. For the correct connection of the tips of high-voltage wires... ...the cylinder numbers are marked on the coil body next to its terminals.
Replacing the Niva 21214 timing chain on an injector with your own hands, video
Here we will talk about independently replacing the timing chain drive on a Niva 21214. The timing belt affects the operation of the entire car, so the importance of this unit should not be underestimated. Replacing a chain drive is a rather complicated process, which, however, can be done by any car enthusiast, provided that he follows the instructions and shows a little diligence.
A chain has significant advantages over a belt drive. These include, first of all, its reliability. While a belt can break, this rarely happens with a chain. Usually it just stretches. It lasts much longer than the belt, which means it needs to be changed less often. But still, the chain does not last forever, and after a while it also has to be replaced with a new one. When replacing the chain yourself, it is very important to set the marks correctly and follow safety precautions.
When to change the timing chain?
The manufacturer does not give clear recommendations regarding the timing of replacing the timing chain on the Niva. Experts assure that the need for replacement may arise no earlier than after 100,000 km. But it is very important to periodically carry out diagnostic procedures for chain transmission. It may well happen that the chain weakens. This will be noticeable by the characteristic sound that the running engine will make. First you need to try to tighten the chain. If this cannot be done in the usual way, replacement becomes necessary. In this case, you can contact a service center, where this repair will be carried out by professionals, or you can try to change the chain yourself. The latter option is preferable in terms of savings and gaining the necessary experience.
If the mark on the camshaft gear does not match the mark on the bearing housing, it's time to take action. The chain drive also needs to be replaced if chips or cracks appear on it. All this suggests that your chain has served its intended life and it is time to replace it.
So, you have decided that you will make the replacement yourself. What do you need to do next? First of all, go to the store and buy a new chain there. You can check the quality of the chain you are purchasing. We take the chain and place it flat on our palms. If its sagging exceeds 1 cm, you better look for consumables elsewhere. In addition to the chain itself, you will also have to buy a set of oil seals, a tensioner, dampers, and a set of gaskets. Then we prepare the tools that will be useful in the work and begin the repair.
Replacing the chain drive
- Place the car on a level surface. Open the hood. Disconnect the battery. Remove the air filter.
- The choke cable should be disconnected and moved away. It is also necessary to disconnect all electrical drives and pipes.
- Remove the fan, generator belt and pump roller. The belt should be thoroughly examined. If deep cracks or other damage is found on it, it must be replaced with a new one. Remove the tray protection and thoroughly clean its cover.
- Remove the valve plug. Unscrew the camshaft sprocket screw.
- Take a wrench and unscrew the ratchet nut.
- Now we begin to rotate the crankshaft until the marks on it and on the engine casing completely coincide. Make sure that the marks also match on the bearing housing and camshaft sprockets.
7. Then remove the casing covering the motor. To do this you will have to remove several bolts. We remove the sedative. Unscrew the screw securing the oil supply pump. There is no need to remove the screw. It should only be loosened and left in place.
8. We begin to remove the tension element mechanism. We remove the MM line, remove the pressure sensor, after which you can remove the tensioner itself.9. We turn out the screw on the camshaft gear. We remove the gear. After this, remove the timing chain. At this point, the parsing process can be considered complete. Now we assemble the mechanism.10. We take the purchased oil seals and begin to install them in place of the old ones. First of all, we change the crankshaft oil seal. After removing the old component, clean the installation location and install a new oil seal. First, it is recommended to lubricate the new oil seal with engine fluid, for example.11. Now we take the chain in our hands and also begin to lubricate it. After this, we put the drive on the crankshaft gear, the oil pump and then the camshaft. This sequence must be followed. When tensioning the chain, you need to ensure that the alignment of the marks is not disrupted.
12. Install the tensioner and carefully tighten the nuts securing it. We tighten the screws on the sprockets and check the alignment of the marks again. To do this, turn the crankshaft to the right again.13. We put the generator belt in place. If the old belt is in good condition, then it is quite possible not to change it.14. We lubricate the gasket that we will install on the cylinder head and install it. Don't forget to clean the seat from traces of the old gasket. We put the head in place and carefully tighten all the fasteners. We install all other parts in reverse.
Now let's check the operation of the mechanism. To do this, start the engine and listen to how the engine operates. By hearing it is quite possible to determine whether everything was done correctly or something went wrong. If the sound is familiar, rustling, then everything is done correctly. If there is a characteristic grinding sound, the procedure must be repeated.
Replacement video
Modules and ignition coils Lada Niva 4x4
Checking the generator with a multimeter
This group of products includes modules and ignition coils for Lada Niva 4x4 cars (VAZ 2121, 2131).
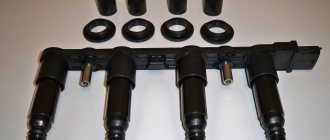
The ignition module is an element that is designed to receive current and transmit it through high-voltage wires to the spark plugs. The modules come in two types: 2112-3705010 and 2111-3705010, but they are not interchangeable, as they are installed on different ignition systems. There are also separate ignition coils, one for each cylinder, installed on the spark plug without high-voltage wires 2112-3706010.
The ignition coil is needed to produce an ignition spark and ignite the fuel-air mixture.
- 2112-3705010 on cars with eight and sixteen valves with an engine capacity of 1.5;
- 2111-3705010 on eight-valve cars with an engine capacity of 1.6;
- 2112-3706010 on cars with sixteen valves with a volume of 1.4, 1.6.
What are the signs of a faulty ignition module?
- traction failures during acceleration;
- “check engine” lights up on the instrument cluster;
- uneven engine operation at idle speed; “floating”;
- the engine “troubles”, one of the pairs of cylinders does not work (you can hear it).
But unlike the module, if the coil malfunctions, the controller may also fail.
How module malfunctions are shown by diagnostics
Ignition module: check and signs of malfunction
By visiting a service station or using amateur diagnostic equipment (error scanner, special application and adapter for computer diagnostics via Bluetooth), you can also find out that the “root of evil” is in the ignition module.
In this case, the following error codes should be displayed:
- P3000 (P3001, P3002, P3003, P3004) - ignition in the cylinders does not work;
- P0351 - break in the winding of a pair of cylinders 1-4;
- P0352 - break in the winding of a pair of 2-3 cylinders.
However, it is not at all necessary that the results of engine diagnostics indicate the “death” of the module. High-voltage wires (for example, breakdown) and spark plugs can also create problems. Therefore, it is recommended to first go from small to serious. And only if other elements of the ignition system are fully operational does it make sense to start checking the module.
Candle making options:
Checking the DPD with a VAZ 2110 multimeter
To increase productivity when creating these products, some technological features are used, which in theory can increase productivity, and as a result, the highest quality fuel combustion:
- Platinum coating. Allows you to increase the service life up to 50 thousand kilometers due to the fact that the surface becomes more resistant to the combustion products of the fuel mixture.
- Multi-contact spark plugs. Typically used in cars that are operated in regions with predominantly low temperatures. Such products make it possible to improve the starting of a cold car in the morning. In summer, it is recommended to replace them with regular ones.
The principle of operation of the ignition module on a Chevrolet Niva
Ignition modules are structures equipped with both secondary and primary windings. Additionally, there is a commutator, inside which the current switches from one coil to another. The work is carried out from the computer or vehicle control unit. Analysis and collection of information is also performed using the specified blocks. This check gives an accurate result.
The ignition module has four sockets for connecting high-voltage wires. They then move on to the spark plugs.
Varieties
Over the entire period of production of these cars, manufacturers equipped them with two main groups of devices:
- MZ from a VAZ 2112 car. Mounted until 2006. It is equipped with a system responsible for controlling the sparking system.
- The module is from a VAZ 2111. It is controlled by signals from the ECU. In fact, this is an ordinary modern ignition coil.
The indicated modules are not classified as interchangeable parts. Their design is different, so it is impossible to replace one type with another. By appearance it is easy to determine which part is used in a particular case. The old Niva Chevrolet ignition module has increased dimensions and weight.
Module design
Converting low voltage signals to high voltage is the main purpose of any module. It is based on the process of spark formation inside the cylinders. The design of the module is similar to a pulse transformer. The signal from the electronic control unit is supplied to the input of the device. In this case, the voltage is removed from the output to 20-30 kW. This means that each wire works stably.
The module has a connector to connect the low-voltage part and four additional sockets. So-called armored wires are inserted into them.
High voltage is supplied to two cylinders at once. The formation of a spark takes up to 90% of the total energy of the device. The conductivity of the mixture is associated with high pressure, which is maintained on a constant basis. The module has only two independent coils.
Where is the ignition module located?
The part is fixed to the bottom of the cylinder block. For this reason, the ignition module is constantly exposed not only to corrosion, but also to high temperatures. The second factor for this system can be called the most critical. Therefore, owners often move the structure themselves to another place where the conditions are not so problematic.
Tools and Diagnostics
ATTENTION! A completely simple way to reduce fuel consumption has been found! Don't believe me? An auto mechanic with 15 years of experience also didn’t believe it until he tried it. And now he saves 35,000 rubles a year on gasoline! Read more". Tools are an important part of any job.
They will be needed to make adjustments to the process of issuing SOP. Mandatory tools include screwdrivers, a measuring instrument, keys and preferably a laptop with a specially installed program designed for diagnosing injection-type power units
Tools are an important part of any job. They will be needed to make adjustments to the process of issuing SOP. Mandatory tools include screwdrivers, a measuring instrument, wrenches, and preferably a laptop with a specially installed program designed for diagnosing injection-type power units.
First, you should know that on an injection engine, electronics are responsible for driving the car. It is subordinate to the head – the computer system. Conducting quality testing of all components of the injection system is the first thing to do.
Here's how it's done:
- the ignition is turned on;
- the supply of fuel by the electric fuel pump is checked (the characteristic sounds of activation of the pump performing the injection should be heard).
If there are no sounds of the fuel pump operating, you need to check the relay that controls the operation of the pump.
You should also pay attention to the instrument panel, on which the indicator may indicate. If this is the case, then you need to connect a laptop with a special program to the BC system
It will help you analyze errors and display them in a list.
If no problems are identified at this stage, then it’s time to start the internal combustion engine. On a functioning engine, the throttle assembly is checked first.
Here's how it's done:
- first, an external inspection of the sensor, which is responsible for the position of the damper, is carried out;
- then the wiring condition is tested;
- if everything is in order, it would not be superfluous to measure the voltage of the entire circuit and sensor using a measuring device;
- the obtained values must be compared with the standard indicators specified in the vehicle repair manual.
A normal current value can be considered to be in the range of 0.45-0.55V. The current value should not exceed 12 V, and the throttle opening degree should not be more than 1%. If deviations are noticed, then you need to adjust the throttle drive so that it closes the damper entirely.
Next, you need to press the gas pedal all the way, re-measuring the indicators this way. The damper open level should be 90%. As for the sensor voltage, the voltage must be 4.5 V.
Throttle actuator tuning is considered an important part of the work included in the diagnosis. It allows you to simultaneously set up a node and check the consistency of the values.
In order to adjust the drive you need to:
- disable the RDPV (sensor responsible for additional air flows);
- half open the throttle;
- make adjustments so that the damper completely covers the hole.
Peculiarities
The operation of the Niva 21213 system depends on the condition of its parts. High-voltage wires must have a distributed resistance, the value of which is in a certain range. Too much resistance will result in the ignition coil not having enough power to cause a breakdown. Low resistance increases interference. Although, some install just such wires. Of course, the spark power will increase and engine performance will improve. Spark plugs can lose their properties over time. The electrodes melt and carbon deposits appear.
The high temperature inside the cylinders greatly heats the spark plugs. Therefore, even when the ignition is turned off, ignition occurs from heated spark plugs.
It is important that all spark plugs have the correct gap between the electrodes. This will ensure high-quality ignition of the mixture. The distributor cap must be clean from dirt, t
because its presence can lead to current leakage
The distributor cover must be clean from dirt, since its presence can lead to current leakage.
Malfunctions and solutions
As a rule, most malfunctions occur due to the fault of spark plugs and high-voltage wires. However, other reasons cannot be ruled out. In non-contact systems, you cannot disconnect the terminal from the battery to check the operation of the generator. Otherwise, the switch may fail. A malfunction of the ignition coil can be determined by measuring the resistance of its windings. Replace with a suitable one. A coil from a contact system will not work, because its parameters are different. The commutator can be checked by examining its pulses to the coil. In this case, all conditions are necessary to ensure its operation. For example, the health of the Hall sensor. The easiest way to check spark plugs is to replace them with ones that are known to work with the same gap and preferably of the same type. Burnt distributor contacts and jammed carbon contribute to deterioration of spark formation.
Therefore, it is necessary to carry out a visual inspection at least once a year. Some engine malfunctions are not necessarily caused by ignition problems.
In addition, it is worth paying attention to the correct setting of the lead angle. Some experts do not believe the strobe data and rely on engine operation in different modes. If piston pin sounds are heard, this indicates that the advance angle needs to be reduced.
If piston pin sounds are heard, this indicates that the advance angle needs to be reduced.
How to check the ignition module, ignition coil and armored wires?!
I change the wires, pray, start it - it starts. No problem, everything is fine. Since I saw oxides inside one old wire, I decided that now the problem was definitely solved. Tomorrow we are planning to go to my mother-in-law's, a kilometer away, so it was still a good idea, what if there were no wires? There is nothing to do, we are taking risks. We leave in the morning, we drove 20 kilometers, everything is fine, I am already relaxed, it’s good that we are still driving through populated areas.
Resistance between the high-voltage terminals of the KILLED ignition module.
In Vakhrushi - again, according to the classics - traction disappears, the car jerks. The likelihood of both breaking down is very high, I hope, of course, to get by with little damage and only change the sensor.
Meters behind me I saw a VAZ auto parts store, I walked there and warmed up. First I take the sensor, it costs rubles. I change things there a little, unscrew a couple of small bolts, pull out the connector and change the sensor. But, damn it, the bolts stuck, one was unscrewed, and the other began to roll, since you can’t really get to it, you need a screwdriver with a flexible shaft type. There is nothing to do - I stupidly broke off the sensor with pliers, only after that I managed to crawl up and unscrew the boiling bolt with pliers.
I change the engine control valve, start it up, and again it’s a dog. Ignition module All hope is that by changing the ignition module, the car will drive and we will still get to mother-in-law Shuruya back to the store and buy an ignition module from MZ, it is not cheap - it costs rubles, domestic. Changing it is quite easy, the MZ is attached to the engine with 3 bolts, and explosive wires go from it to the engine itself.
And also the cause of the malfunction may be a soldering failure; this usually happens due to frequent vibration. Or moisture formed during washing or condensation.
More details about breakdowns Armored wires are marked with arrows. The same high-voltage pulse that occurs on the secondary winding must be fully used, that is, if this does not happen when the integrity of the wire is violated - approx. The first signs of a malfunction As a rule, two coils do not fail at once, therefore, it will still be possible to start the engine even with a partially faulty module. But an experienced car owner should immediately suspect a problem, and it is accompanied by the following: Jerking may be observed while driving.
All of the above reasons can also be observed during other breakdowns, so it is necessary to diagnose it correctly, and for this you need to know how to check the ignition module with your own hands.
Niva Club - OFF-ROAD Wheels Nissan Skyline of the Year in Bishkek. Price: 3,$ & | Car sales in Kyrgyzstan - diabloarea.ru The interior smells of antifreeze Niva Chevrolet: where does the smell come from?
Location of Timing Pulley Marks for Car Niva 21214 Injector
Chevrolet Niva timing belt replacement
And with such a jump, the valve should already be bent. The fuss for half a day begins. Maybe the drive disk has moved? I go to the store and compare - all the marks are there. In general, as a result of long jumps, we find the reason - the camshaft is turned to 1.
Part 2. Valve + piston = repair Niva Chevrolet NIVA Chevrolet 4+4
Well, that’s right, the factory doesn’t give a damn about the marks, but the fact that later someone will be *******, dealing with this fool, is not their problem.
How to check the ignition module on a Chevrolet Niva - check procedure
A multimeter will help you check the condition of the node. It is not necessary to use expensive instruments with high accuracy. The main thing is the presence of a digital display, then any measurements are simplified.
First you need to make sure that the wiring of the device remains intact. To do this, perform the following steps:
- The switch on the rear panel of the device is set to the 200 Ohm position.
- The connector is disconnected from the module and the high voltage wires are disposed of.
- The voltage is measured sequentially between the middle and extreme contacts of the terminal blocks.
- The device readings should be within 5 ohms. The heater, for example, works while maintaining other indicators.
The resistance of the secondary winding is checked in the next step. Here you need to move the switch to the 20 K position. The probes are connected to wires with the appropriate voltage. 5.4 Ohms is the standard reading for instruments in this situation. Otherwise, the connection cannot be properly organized.
Procedure for checking the ignition module on a Chevrolet Niva
Before proceeding with dismantling the module, you need to make sure that the cause of unstable operation is not a simple lack of power contact. To do this, we “move” or turn on and off the connected block of wires several times. If such a procedure does not bring any results, then the functionality should be checked on a dismantled device.
The values on the multimeter are normal.
- When the element is removed, we prepare the multimeter for use and check the integrity and cleanliness of the sockets on the terminals (A, B, C, D - approx.).
- First of all, connect the red probe to contact – D, the second one to ground. We turn the multimeter into voltmeter mode - 20 volts, and if the socket is working, then the readings on the tester should be 12 volts.
- Next, go to contact – C, the second again to ground. We switch the multimeter to the ohmmeter mode and look at the readings of the device, and if it is less than 1 ohm, then the socket is normal.
- We check contacts A and B one by one, but in the same order. We connect the multimeter in voltmeter mode and if the readings do not exceed 0.3 volts, then the device can be considered fully working.
If any measurement shows results that do not meet the standards, then you should look for problems immediately in the coil circuit.
Transferring the ignition module
The ignition module has been moved higher
As already written above, for better operation of the ignition module, it is recommended to move it higher in the engine compartment.
Module replacement
How to remove and connection order:
The ignition module (IM) is an electrical device whose main task is to generate high voltage current and subsequently transmit it to the spark plugs. High-voltage wires are used to connect the MH and spark plugs. MZ made it possible to abandon the traditional distributor and ignition coil. The ignition system does not require maintenance due to the absence of adjustments and moving parts.
The principle of operation of the ignition module VAZ 21214
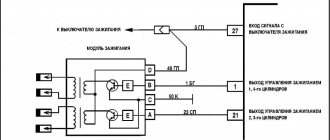
The MH control is performed by the Electronic Control Unit, which supplies current to the coil windings. After which a high voltage is generated (according to the law of induction) and at the required moment it is supplied to the spark plug. MZ consists of two ignition coils, two switches, four outputs to high-voltage wires and a plastic case. The ignition system uses the “Cold Spark” method - each coil is connected to two cylinders: the first - the first and fourth cylinders, the second coil - the second and third cylinders.
Symptoms of a problem
Four signs of malfunctioning MH: Loss of power; Dips during acceleration; Cylinders 1-4 or 2-3 do not work; Unstable idle.
How to find the ignition module?
To find the MH, you need to find high-voltage wires, because one end of the explosive wire goes to the spark plugs, and the other to the ignition module.
Connecting explosive wires to the ignition module
In the process of connecting high-voltage wires to the MZ VAZ 21214, a certain order must be followed. If the module is held strictly in front of you, the connection will be made as follows: the first cylinder is connected to the lower left terminal, the second is connected to the upper left terminal, the third to the upper right terminal, and the fourth to the lower right terminal.
The cost of the ignition module for VAZ 21214
The approximate cost is from 650 to 1100 rubles.
The ignition coil on a VAZ 2121 and Niva 2131 is removed for replacement in case of failure. The coil cannot be repaired and must be replaced. To carry out repair work, you will need a standard set of tools, after which, if you have everything necessary, do the following sequence of actions:
Open the hood. The work is carried out with the ignition turned off; you can also disconnect the minus terminal from the battery.
- Disconnect the central high-voltage wire from the coil by removing its rubber cap and pulling the wire toward you.
- Next, using an eight-mm wrench, unscrew the two nuts securing the tips of the low-voltage supply wires to the coil studs and remove them together with the washers.
Now you can remove the coil. To do this, use a ten-point socket to unscrew the two nuts securing the coil bracket to the body studs and remove it.
At this point, the repair work on removing and replacing the ignition coil on the VAZ 2121 and Niva 2131 has been completed. Replace it or make any other repairs, after which we carry out the installation in the reverse order.
ATTENTION! The electronic catalog of spare parts intended for reference purposes only! Our company does not sell all spare parts presented in this list. If there is a “Cost” link in the right column, these spare parts are on active sale
Availability in warehouses for details and prices, see the product card. If there is no “Cost” link in the right column, we do not sell such parts and do not accept orders for them.
If there is a “Cost” link in the right column, these spare parts are on active sale. Availability in warehouses for details and prices, see the product card. If there is no “Cost” link in the right column, we do not sell such parts and do not accept orders for them.
Symptoms of a problem
As already mentioned, symptoms of a faulty ignition module are also typical for many other components of the car. There are almost no signs that directly indicate MH. This significantly complicates repairs. However, with experience, conclusions about a malfunction of the Chevrolet Niva ignition module can be drawn from the following symptoms.
- Two cylinders are not firing at once. This is the only sign that, although not always, indicates MH. The likelihood of this increases if cylinders 1 and 4 or cylinders 2 and 3 are not working at the same time.
- Idle speed “floats”.
- Diagnostics shows misfires in all cylinders.
- As the engine warms up, its power drops and interruptions appear.
- The CHECK ENGIN alarm comes on.
Also interesting: Diagnostics of electrical wiring in Vladimir, call a specialist
It should be noted that a complete failure of the motor, in which the engine does not start at all, happens very rarely. Basically, this symptom of a malfunction of the Niva-Chevrolet ignition module indicates damage to the low-voltage part of the wiring.
Often the cause of problems with the Niva Chevrolet ignition module are breaks in the second winding, because it is this that generates the high voltage pulse. This mainly happens due to the fault of car owners:
- in case of untimely replacement of failed high-voltage wires
- installing spark plugs that do not match the car model.
- moisture ingress due to improper washing
Also, the cause of burnout may be delamination of the solder due to increased vibration during frequent use of the engine at high speeds or during frequent temperature exposure - engine overheating.
Problems with the ignition module can be determined in advance, since two coils do not fail at the same time, so car owners will still have the engine start, but with some difficulties:
- it takes a long time to gain working momentum
- floating idle speed
- excessive engine vibration
- jerking while driving
But these problems may be associated not only with the ignition module, so before replacing it is recommended to check its condition
Procedure for checking the ignition module
First of all, you will have to get a multimeter. There is no need to look for any high-precision and expensive instruments. The usual Chinese one will suffice. The main thing is that it has a digital display, this will greatly simplify the measurement. The optimal multimeter in terms of price and functionality is the DT 830 and its numerous modifications. This is one of the most common and easy to use devices. The verification process will be discussed using his example.
First of all, you need to make sure that the primary winding of the Niva-Chevrolet ignition module is intact. For this:
- the switch on the front panel of the device is set to the 200 Ohm position;
- disconnect the connector from the module, remove the high voltage wires;
- sequentially measure the resistance between the middle and extreme contacts of the terminal block;
- The device readings should be within 0.5 Ohm.
The accuracy of a multimeter, of course, is not enough to measure such small quantities, but to check the primary winding for an open circuit, this is quite enough.
The next step is to measure the resistance of the secondary. Sequencing:
- set the range switch DT-830 to position 20 K;
- The probes of the device must first be placed between the high-voltage terminals of cylinders 1 and 4, then 2 and 3;
- the device display should display 5.4 kOhm.
It should be said that it is possible to diagnose a malfunction of the Niva-Chevrolet ignition module only if the readings differ significantly from the norm, or, more often, if “1” lights up on the device indicator. This means an infinitely large resistance, in other words, a winding break.
Some gasoline engines that are installed on modern domestic and imported cars are equipped with ignition modules, which are a pulsed high-voltage current source. There are situations when these devices fail, leading to a complete or partial loss of performance of the car engine. Ways to check for a malfunction in the ignition module in a garage are covered in this article.
Symptoms of a problem
As already mentioned, symptoms of a faulty ignition module are also typical for many other components of the car. There are almost no signs that directly indicate MH. This significantly complicates repairs. However, with experience, conclusions about a malfunction of the Chevrolet Niva ignition module can be drawn from the following symptoms.
- Two cylinders are not firing at once. This is the only sign that, although not always, indicates MH. The likelihood of this increases if cylinders 1 and 4 or cylinders 2 and 3 are not working at the same time.
- Idle speed “floats”.
- Diagnostics shows misfires in all cylinders.
- As the engine warms up, its power drops and interruptions appear.
- The CHECK ENGIN alarm comes on.
Also interesting: Diagram and pinout of the Niva 4x4 instrument panel (VAZ 2121, 2131) » Lada.Online
It should be noted that a complete failure of the motor, in which the engine does not start at all, happens very rarely. Basically, this symptom of a malfunction of the Niva-Chevrolet ignition module indicates damage to the low-voltage part of the wiring.
Often the cause of problems with the Niva Chevrolet ignition module are breaks in the second winding, because it is this that generates the high voltage pulse. This mainly happens due to the fault of car owners:
- in case of untimely replacement of failed high-voltage wires
- installing spark plugs that do not match the car model.
- moisture ingress due to improper washing
Also, the cause of burnout may be delamination of the solder due to increased vibration during frequent use of the engine at high speeds or during frequent temperature exposure - engine overheating.
Problems with the ignition module can be determined in advance, since two coils do not fail at the same time, so car owners will still have the engine start, but with some difficulties:
- it takes a long time to gain working momentum
- floating idle speed
- excessive engine vibration
- jerking while driving
But these problems may be associated not only with the ignition module, so before replacing it is recommended to check its condition
How to fix a breakdown
As for the question of how to fix a breakdown, there are two options - fast (“field”) and slow (“garage”). In the latter case, everything is simple - it is advisable to completely change the coil, especially if the breakdown is significant. As for quick repairs, either electrical tape or glue is used for this.
Isolating a damaged coil
The most interesting question for car owners in this context is how to eliminate a breakdown of the injection ignition coil? In the simplest case, that is, if there is a small spark breakdown on the body (and this is the most common type of breakdown), after localizing this place you need to use insulating materials (insulating tape, heat shrink, sealant, epoxy glue or similar means, in some In cases, even nail polish is used, but the polish should only be colorless, without any paints or additives), and isolate the place (path) of the breakdown. It is impossible to give universal advice; it all depends on the specific situation.
When performing repairs, it is necessary to clean and degrease the area of electrical breakdown before applying a protective insulating layer to it. This will increase the resistance value of the resulting insulation. If, when the insulation is damaged and there is a breakdown, liquid appears in the coil (usually from a damaged seal), then it makes sense to additionally use dielectric grease.
Well, in the most severe case, you can, of course, install a new coil. It can be original or not - it depends on the price. Many car owners are saved by the so-called “dismantling shops”, that is, places where you can buy spare parts from disassembled cars. They are cheaper there and you can easily find high-quality components.
Finally, a few words about preventive measures that will allow you to get rid of troubles and operate the reel for a very long time and without problems. The simplest measure in this context is to use heat shrink of a suitable (large) diameter, which must be applied to the surface of the tip of the ignition coil. The procedure is simple, the main thing is to choose heat shrink of the appropriate size and diameter, and also have a hair dryer (preferably a construction hair dryer) or some kind of gas burner on hand. However, before applying heat shrink, do not forget to clean and degrease the working surface of the tip. This procedure can also be used not as a preventive measure, but rather as a repair measure.
Also, for prevention, it is advisable to keep the coil housing, and other engine elements, clean so that there is no “sparking” through dirt and dust. And when replacing spark plugs, always use dielectric grease for spark plugs.
The ignition module (IM) of the Niva-Chevrolet car is highly reliable and, most often, provides sparking over many tens of thousands of kilometers. However, if it fails, it is difficult to diagnose due to the lack of obvious signs. The decent cost of a module does not always allow it to be replaced with a new one, which is called “blindly”. First you need to reliably verify that the old one is faulty. Read the article about how to check the ignition module of a Niva-Chevrolet.
How to restore
Opening the aluminum plate, you will find a small printed circuit board on which the active components are located. It is coated with transparent silicone. It will need to be removed as it will interfere with repairs.
Pay attention to the wires that connect the board and connector pins. They are aluminum, and this metal undergoes destruction much faster than copper. All these wires will need to be replaced
Some motorists who repair modules use wires that are used in mice for personal computers. But you need to get used to working with them - they are covered with paint
All these wires will need to be replaced. Some motorists who repair modules use wires that are used in mice for personal computers. But you need to get used to working with them - they are covered with paint.
In general, the diagram of the entire module is simple, it contains:
1. Two BU931 transistors (you can use the domestic analogue of KT848A, it performs well and is much cheaper).
2. Two SGS-THOMSON switches (model L497D1).
Description of the ignition module
Before you learn how to check the ignition module, let's figure out what it is and what kind of MH device it is. The ignition module is the main element of a contactless system, the purpose of which is to generate high-voltage voltage. In turn, this contributes to the formation of a spark on the candles.
Operating principle
How does the ignition module work? The device is powered from the car's electrical network, and the negative terminal of the MH is connected to the vehicle body. The main feature of the MZ is that it can simultaneously supply two sparks. One of them is supplied by the device to the group of spark plugs at the moment of greatest compression of the combustible mixture, the second - at the moment of the injection stroke. One group is the spark plugs of the first and fourth cylinders, and the second is the second and third.
Design
As for the design, the ignition module includes two transformers, as well as. On one side of the MH there are four outputs to which the candles are connected. All structural components are hidden under the plastic body of the device; the weight of the device is more than 1 kg.
New MZ from the manufacturer Bosch
The MH is connected to the spark plugs by connecting high-voltage cables. The control option is performed by the built-in controller. This element makes one decision or another based on the information received about the crankshaft speed and engine temperature, the load on the power unit, etc. As for the operating temperature range, it is quite wide - from 40 degrees below zero to 130 degrees above zero.
Possible malfunctions and ways to eliminate them
The ignition module, like any other device, can fail over time. Before checking the unit, you need to make sure that the symptoms of failure indicate its functionality.
So, what are the signs of a faulty ignition module:
- there is intermittency in idle speed;
- engine power decreases;
- malfunctions occur in the operation of the power unit;
- Twin cylinders may not function correctly.
In addition, if the ignition module is not working correctly, a Check indicator may appear on the control panel. In addition, if symptoms of a breakdown are detected, you should make sure that the high-voltage cables are securely connected to the spark plugs, and that the latter, in turn, are working and intact (the author of the video about diagnosing the device at home is Igor Belov).
https://youtube.com/watch?v=4wHGBUx6x3M
Phase adjustment in case of mismatch
If the notches do not match, work continues:
- The “whiskers” of the lock washer are bent. The fixing bolt is unscrewed using a key set to “13”, and the position of the camshaft sprocket is loosened. The first gear on the gearbox is engaged, allowing you to avoid spinning when unscrewing the crankshaft gear bolt. The fastener is removed with a lock washer. To prevent the bolts from falling into the engine sump, use a deep-head wrench or unscrew the bolt by hand. Remove the chain tensioner using a screwdriver. It should be replaced if it is stretched or strained, during scheduled maintenance, after 60-80 thousand kilometers.
- The camshaft sprocket is removed. If you pull it towards yourself (a distance of 5-10 cm), it will be removed along with the chain. Check for wear on the sprocket teeth, which form an inverted “V” shape. The part must be replaced if there are grooves on the leading part of the teeth. On a working mechanism, the chain moves on the teeth. The scrolling step is one tooth. The sprocket with chain is placed on the camshaft flange. When the chain moves on the sprocket, its holes will not line up with the pin. The crankshaft should be rotated in the specified direction until the mark and pin match. It is important to secure the part with a bolt and washer (without tightening it all the way). After turning the crankshaft twice with a special wrench, check the placement of marks on the camshaft gear and bearings. If the marks correspond, their adjustment has been successfully completed. The fastenings of the crankshaft and camshaft sprockets are tightened tightly.
If there is a discrepancy, you must repeat the steps.
For clarity of the obtained result, it is suggested to look at the example in the photo .
In the upper corner is an overview of the notch placed against the DPKV core. Below is an asterisk on the flange. The dot is visible opposite the bed in the aluminum cylinder block.
Important ! The large mark for the phase sensor is ignored in the gear assembly. The work uses small lines. The CPPS (crankshaft position sensor) is installed against the 20th gear tooth. When a match is achieved, the bolts securing the crankshaft and camshaft sprockets are tightened.
We disassemble the design of the ignition module of a modern injector
As an example, consider a similar device used on injection VAZ cars. The module operates according to the good old principle: 12 volt power is supplied to the input, and a high voltage is generated at the output contacts for sparking.
The control is electronic, but the operating principles differ from a simple distributorless ignition system:
- All components are located in one housing. On the one hand, this is convenient - fewer wires and contacts - lower probability of breakdown. On the other hand, if the ignition module burns out, it must be repaired; simply replacing the failed element will not work.
- The device is compact and can be conveniently placed in the engine compartment.
- The ignition module is powered at low voltage, which increases the reliability of the device.
- The cost of the finished device is low.
- This ignition module has two coils. This contributes to the survivability of the device - each transformer is loaded twice as much.
The secret of the module’s operation is as follows: it uses not four, but two coils for 4 cylinders. Masters of the old school call this device a two-spark bobbin. Alternating connection of each coil produces two sparks: working and idle. Due to proper distribution among the spark plugs, the idle spark is ignited at the moment when there is no air-fuel mixture in the corresponding cylinder.
The signal for sparking is given by the switch (acting as an electronic distributor). Before checking the ignition module, you need to make sure that control pulses are coming to the contact blocks from the switch.
This block is responsible for the so-called ignition advance, that is, it generates a signal at the right moment. The control pulse about the position of the crankshaft is issued by the Hall sensor, which also synchronizes the operation of the entire system.
Common causes of malfunctions
It is rare to encounter a situation where both coils fail at once. The engine can be started even if the module is only partially faulty.
But when the following signs appear, it becomes easier to identify the problem:
- jerking while moving;
- the so-called “triple” of the engine;
- idling with “floating” indicators;
- “working” speed is gained by the engine more slowly than we would like.
However, these problems often appear when other parts of the engine break down. The main thing is to carry out correct diagnostics and figure out how to check the ignition module itself.
Types of breakdowns
The ignition module is highly durable and reliable. But there are problems that arise immediately or after some time during active use.
For example, when the ignition system is used with inappropriate components
It is important to select high-voltage wires depending on the characteristics of specific devices. Malfunctions occur if the voltage is too low or too high