He could have left them under the ceiling or not led them at all, tore them off, you need to look at this, well, disassembling the ceiling is a gimar, you can just do it under the dashboard at the driver’s feet, there is a connecting piece of wires, there and for the interior lighting and for the heated rear window if there is... and there should be a brown wire there (rear license plate light). Does the interior lighting even work?) But it’s easier to ignore, as many say, the rear dimensions.
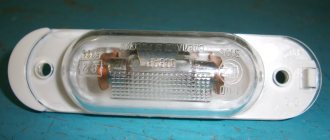
Note! To replace this lamp, you will need to stock up on just one new light bulb; for license plate illumination, lamps of the “AC12-5” type are used (This lamp is shown in the photo below). You can buy both the simplest and LED ones if you want the color of the license plate illumination to be at your discretion (Pure white for example) and not just yellow!
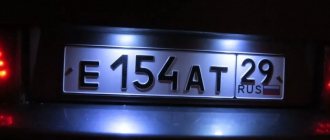
Where is the rear license plate light located? Let’s make an amendment, it’s not the backlight lamp, but the backlight lamps, there are simply two of them, if you take cars with a hatchback body, then on them the lamps are installed in the lights that are located in the rear trunk door, see photo 1 for more details, and on cars with a sedan body it’s the same two lamps and two lanterns (One lamp in each lantern) for more details about the location of the lanterns, see photo 2.
When should you change the rear license plate lamp? Like all other lamps, it changes as it burns out, at the beginning one lamp may fail, in this case the number will still be illuminated, but only worse, if both lamps fail, the backlight of the number will disappear altogether and In this case, you will need to think about replacing the lamps with others (LED lamps, for example, they shine brightly), by the way, if only one lamp fails, then take a new one of the same manufacture and with the same light, otherwise it will not look very nice, one the lamp will shine, for example, with bright white light and the other with yellow light, in this case both lamps can be changed at once, especially since they are not so expensive.
How to replace the rear license plate lamp on a VAZ 2108-VAZ 21099?
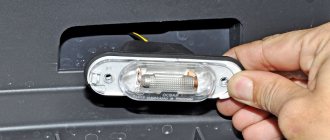
1) So, by the way, just so you know, on both types of bodies this lamp changes in the same way and there is no difference, so take a screwdriver in your hands and use it to pry off the right (there will be a slot for a screwdriver on the right) part of the lamp and pull it out thus outwards, when you pull it out from the back side, disconnect several terminals and completely remove the lamp from the door or trunk lid of the car as shown in the small photo.
2) Now, when the lampshade is removed, pull its cover, which is made of rubber, and thereby remove it (see photo 1), after removing it, use a screwdriver to pry up the light bulb and take it out (see photo 2), when assembling the lampshade, install the lamp as well and put the cover on, make sure that the contacts of the lampshade go into the holes of the cover as shown in photo 3, and when you insert the lampshade into place, install it at the beginning so that it fits into the small hole which is shown by the arrow in the fourth photo, and then snap it into place by pressing your finger on him.
Good morning. VAZ 2109. Such a problem: the rear license plate light does not light up. Looks like a wire is broken somewhere, because... The wiper doesn't work either. Is it possible to get power from the dimensions and what color is the wire? The illumination of the VAZ 2109 license plate does not work.
If you find problems with the license plate lighting, you need to check the corresponding fuse. If there is order there, then most likely the backlight lamp has burned out. In this instruction we will show you how to remove and replace the license plate illumination lamp on a VAZ 2108, 2109, 21099 with your own hands.
You will need: a new license plate lamp, a flat-head screwdriver.
We pry up the license plate light.
We take out the lampshade and disconnect the wires.
We take out the cover from the lampshade.
Use a screwdriver to bend the plate and pull out the burnt out lamp.
We put a new lamp in the lampshade.
We put the cover back.
We connect the wires and install the lamp in place with the right side forward.
He could have left them under the ceiling or not led them at all, tore them off, you need to look at this, well, disassembling the ceiling is a gimar, you can just do it under the dashboard at the driver’s feet, there is a connecting piece of wires, there and for the interior lighting and for the heated rear window if there is... and there should be a brown wire there (rear license plate light). Does the interior lighting even work?) But it’s easier to ignore, as many say, the rear dimensions.
Rear license plate illumination VAZ 2108, 2109 connection diagram
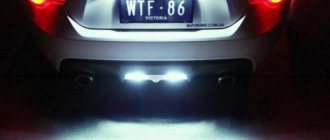
The rear license plate illumination for VAZ 2108, 2109 cars consists of two lights installed at the bottom of the trunk door.
Their serviceability is one of the prerequisites for allowing a vehicle to move at night and even during the day. Here is a wiring diagram for these lights with a description of the features of their operation.
Rear license plate illumination VAZ 2108, 2109 connection diagram
Description of the scheme
— The voltage in the electrical circuit for turning on the rear license plate lights on VAZ 2108, VAZ 2109 cars is supplied from the positive terminal of the battery, through terminal “30” of the generator, the ignition switch and the external lighting switch. After turning the key in the ignition switch, the ignition is turned on.
— After which, when you press the switch key to the second fixed position, the side lights and rear license plate lights turn on.
— There are two lights, but they are powered through one brown wire, which stretches from the mounting block (block X9/pin 11) through the entire cabin (under the headliner on the left side) and the car trunk door to the lights.
— The mass of the lights is a black wire that is attached to the body (next to them).
— The electrical circuit is protected by fuse F11 (7.5A) in the mounting block.
— On some vehicles VAZ 2108, 2109 with a carburetor engine and VAZ 21083, 21093 with an injection engine 2111, a relay for monitoring the health of the lamps in the mounting block can be connected to the rear license plate illumination circuit, which is activated if one of the lamps burns out and lights the warning lamp in instrument cluster...
Notes and additions
— The rear number light in the catalog number is 2108-3717010-10.
Source
Tools:
Prepare a flat-head screwdriver to remove and replace the lamp used to illuminate the license plate.
Procedure for removing and replacing the license plate lamp:
First you need to pry off the lampshade with a screwdriver.
Then disconnect the contacts from the lamp.
Remove the rubber cover from the lampshade.
Bend the contact and remove the lamp.
Next, you need to insert a new lamp into the lampshade.
Now put on the rubber boot and insert the contacts into it.
Put on the contacts, insert the lamp into the trunk lid.
How to change the license plate light bulb of a VAZ 2114
To replace a light bulb you do not need to have any special skills, and this work will only take 5-6 minutes. All you need is new lamps and a suitable screwdriver.
Replacing the VAZ 2114 license plate light bulb consists of the following simple steps:
- turn off the lighting;
- open the trunk;
- pry up the sealing clamps of the lampshade using a screwdriver;
- pull the backlight housing out of the lampshade and disconnect the contacts;
- remove the coupling and insert new light bulbs;
- We assemble the entire structure in reverse order.
Replacing the license plate lamp
How to replace bulbs on license plate lights
Replacing a light bulb in a VAZ 2110
In order to replace the diodes, you only need a flathead screwdriver. No other tools are required. The work must be performed in the following sequence:
- First of all, you need to pry off the lampshade using a screwdriver.
- Then, with a gentle movement, disconnect the wires on the lampshade.
Note: They can come off very easily, which is not advisable. Otherwise, you will have to carry out additional manipulations. That is why you need to act as carefully as possible.
- Disconnect all contacts.
- Remove the rubber cover that serves as a protective function for the lampshade.
- Now very carefully bend the contact to the side. Without this, it will be impossible to get the lamp.
- Then you can easily remove the light bulb from the lampshade.
- Insert the new lamp in place of the old one.
- Unbend the contact so that it returns to its original position.
Note: Frequently replacing the bulb may cause this contact to break.
- Put the rubber cover back on. Without it, the lampshade will quickly crack, as it is very delicate.
- Put all contacts back.
- Connect all wires back.
- Insert the lamp into the luggage compartment lid. Snap on the left side of the lampshade so that it holds better.
- After that, you just need to check if the backlight works. If everything is done correctly, then there should be no problems with its operation. Otherwise, you should repeat the entire process from the beginning.
After replacement the indicator lights up
Many people encounter a problem when, after replacing light bulbs, the indicator lights up, as if signaling that the light bulb has burned out.
There may be several reasons for this behavior:
- Indeed, the light bulb has burned out. This happens when new light bulbs immediately burn out. This shouldn't be surprising. However, you should check that all the bulbs are working as they should.
- After replacing the lamp, the resistance changes. Usually it decreases. This is why the lamp monitoring relay thinks that the lamp is burnt out, although it is still functioning normally. There are two ways to solve this problem: either buy a new relay or resolder the resistors.
Note: if you have no experience with soldering, then you need to entrust this to someone else, otherwise you can only damage the relay.
Fixing the light
Removing the lampshade
First, let's look at how to remove the interior lamp. Removing the interior lamp can be done using two screwdrivers: a flathead and a Phillips. First we will remove the lens. To do this, take a flat screwdriver, insert it into the gap between the glass and the lamp body and carefully pry it off.
Most likely, there are even special grooves on the lamp body into which you need to insert a screwdriver. There must be at least two of them.
After this you will already have access to the lamps. If one of them burns out, simply replace it.
However, the reason for the lack of light may also be hidden in poor contact of the wires connected to the lamp. If all the lamps are in order, you will have to disassemble the device further to get to the wires.
Take the flathead screwdriver again. Feel for the groove on the outside of the light housing. Insert a screwdriver into it and pry it off. After this you will probably be able to remove the cover.
If the lamp is equipped with any buttons, it is better to remove them too by prying them off with a screwdriver or your finger.
The remaining plastic cover may also have grooves, can be secured with latches, or can be screwed with Phillips screws. Here you will probably understand what to do. Removing the remaining plastic piece reveals the wires. Check their integrity and, if necessary, solder.
Most likely, after this the problem with the light will be solved.
How to put the lampshade in place?
Installation of the interior lighting lamp is carried out using the above-described manipulations, performed in reverse order. To begin, take the plastic cover that was removed last and attach it. Then we install the buttons, the lampshade cover, into which we insert the lens back. That's all. The lampshade is in place, and it gives you light again.
Repairing a car interior lamp is no more difficult than changing a light bulb at home. The reason why car enthusiasts are looking for help in this matter lies in the fact that few drivers encounter problems with car interior lighting and therefore do not know where to start.
Rear number plate illumination
Replacing a VAZ 2110 lamp
To install the backlight on the rear license plate, you can do it in two ways:
- Or replace the standard incandescent lamps that are used for lighting with LEDs.
- Or install additional lighting.
The first option is much simpler than the second. To implement it, all you need is:
- Unscrew the lampshade.
- Replace the light bulb with an LED.
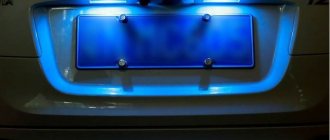
Note: The choice of LED color affects what color the backlight will be. Blue or red looks most impressive.
- For illumination, you can also use an LED strip, which law enforcement agencies do not like. And in general, because of it you can get a rather large fine.
Replace light bulbs on VAZ 2110
The second option is not implemented as easily as we would like. However, at the end there will be a beautiful backlighting of the rear license plate:
- Take a piece of plexiglass with a thickness of 3 mm.
- Build about 8 LEDs into it.
- Cover the back with foil.
- LEDs should be ground down to such an extent that they are flush with the plexiglass.
- The diodes need to be distributed in the corners and secured with sealant, due to which moisture will not get here.
Note: do not pay attention to the fact that too many wires come out during operation. In the end, there will still only be two of them left.
- Connect the wires either to the standard license plate illumination or to a separate button.
Choosing a light bulb for illumination
Replace a light bulb on a VAZ 2110
Typically, dozens of owners complain that the light bulbs used to illuminate the license plates only function for a few months. However, the reason for this is that the bulbs were selected incorrectly. When choosing light bulbs, you need to pay attention to the following details:
- They shouldn't be too bright. The fact is that due to the increased brightness, the light bulbs quickly fail, since the system may fail due to a drop in energy.
- It is also not worth using expensive light bulbs for this purpose, since the backlight will be too noticeable, because expensive light bulbs are often more powerful than cheap ones.
By the way, the reason light bulbs burn out is not always due to their poor quality. Quite often, light bulbs stop working because there is a failure in the system, as the voltage “jumps.” Therefore, you need to see if the wiring is intact, since problems can arise due to various defects present on it, check the fuses (see VAZ 2110: how to replace fuses). If necessary, it can be insulated.
All work on replacing the license plate lamp lamps must be performed with the lighting completely turned off.
Open the trunk lid. At the end there will be two license plate lamps:
In order to remove the lampshade from its seat, you need to pry it off with a thin screwdriver...
and, pressing lightly on the screwdriver, pull the lampshade out.
The lamp body is enclosed in a rubber housing, from which two contacts protrude:
they need to be disconnected.
Removing the rubber casing
and replace the lamp with a new one.
We put everything back together in the reverse order and, turning on the ignition, check the operation.
To replace the trunk light bulb, follow the same steps in the same order.
VAZ cars are equipped with trunk lighting, which turns on together with the side lights and license plate lighting. Oddly enough, many cars of this brand do not even have the “Lux” configuration, although there is room for it. You can install the lamp yourself. The figure below shows the location of the standard location of the trunk light lamp:
The regular place is located in the trunk immediately behind the rubber seal of the trunk lid, where you will also find a technological cutout for the lamp and power wire contacts.
To install you need:
- approximately two meters of wire with a cross section of 0.25 square centimeters
- trunk light
- button for installation in trunk
- insulating tape
- 2 small and one large female connectors
Before installation, it is extremely useful to study the electrical diagram for connecting the trunk light.
We start by installing the mounting plate (the button for automatically turning on the lamp when the trunk is opened will be attached to it). We fasten it to the trunk beam with two self-tapping screws as shown in the figure:
We install a button in a special hole and adjust the height using two nuts located on both sides of the plate -
by adjusting it in such a way that the trunk lid touches the button pin almost at the very end of closing.
Next, you need to remove one license plate lamp from the grooves. It is more convenient to take the left lamp due to the fact that it is closer to the trunk button. We measure the wire from the trunk light to the switch, passing it along the trunk beam. The wire length should be slightly longer than shown in the picture.
Having measured and cut the wire of the required length, remove the insulation of the wire from both ends by about 5 millimeters and install a small connector on one end,
and on the other big one:
The small connector is for the lamp dome contacts, the large one is for the trunk button. We pass this wire through the hole in the lampshade and further along the body through the clamps to the trunk button.
Now you need to find the wire near the license plate light that receives the current. To do this, you can use either a multimeter or the device shown in the following illustration:
One of the contacts of the device must be attached to ground; in our case, it can be the strike plate of the trunk lock:
We alternately connect the other contact to the contacts of the wires of the license plate lamp. The first terminal shows us nothing...
... and the second carries current.
We will power the trunk light from this wire. Now you need to pass the wire that will power the lamp itself through the trunk lid, first exposing one end and installing a small “female” connector on the other.
Now you need to expose the power wire with a knife:
And connect the bare end of the lamp's wire to it (by twisting, or even better by soldering)
ATTENTION! This area must be well insulated to prevent sparks!
And install it in its normal place
Reinstalling the license plate light:
Finally, you should recheck the adjustment of the trunk button.
Please rate the article
Diode strip for the standard license plate lamp of VAZ 2109
I bought a piece of LED strip and it was decided to make the number plate illumination in the standard lamps... I took it off and measured it... a 5 cm strip of three diodes just fits. I cut off the strip, soldered it and put the strip on a transparent construction sealant inside. At the same time, I also coated the rubber band of the lamp with sealant. The width is possible Of course, you can insert another one if you cut the tape, but I didn’t do this and left 3 diodes for each lamp... I think it will be enough... I’m happy with the result.))
Comments 45
I’ve also done this for over a year now, there were no problems, I also added it to the front dimensions, the light is great!
How did you do the front dimensions? please describe
well done, what's the point of buying if you have it at hand?) I bought three diode light bulbs for 25 re, now I bought ceramics for 100 re and ok, but in the end I ended up with 450 (((
Then I would have used a tape the entire length of the number... it’s about 50 cm or something. But the light would be uniform and the prices are really wild!
We have light bulbs for 50 rubles. burn out quickly and burn dimly
In short, don’t listen to anyone, it shines great, brightly, and most importantly, it’s budget-friendly, for 130 rubles these pieces of tape can be stuffed anywhere