Colored wiring diagrams for the VAZ 2110 (injector and carburetor engine) are provided with a description of all elements for various modifications. The information is intended for self-repair of the car. Electrical circuits are divided into several blocks for ease of viewing via a computer or smartphone; there are also circuits in the form of a single picture with a description of the elements - for printing on a printer in one sheet.
There are two types of electrical wiring for the VAZ-2110: carburetor and injector. There are slight differences, but the basic principles of operation and wiring are the same. Depending on the location, the wiring differs into: under the hood and in the cabin. All electrical equipment of the car is connected using wires of a certain color. Each element has its own wiring harness through the blocks and fuses.
Is it important to change the license plate light bulb?
Above, I indicated that license plate lighting is a very important point, and not a whim of the traffic police, but why? After all, it has absolutely no effect on driving safety and does not affect drivers in any way - neither oncoming ones nor those following behind. Is it so?
Let's assume that a car with a faulty backlight has committed some minor offense (in the dark, of course). How can a traffic police officer or random witnesses identify him? Naturally, by license plate. But since there is no backlight, the number is impossible to read. This means that the violator is not caught, not punished, and will continue to violate until he himself gets hurt or injures other drivers or pedestrians. It turns out that the lack of license plate illumination affects road users!
Now let's look at the legal aspects of this problem. According to Art. 12.2 part 1 of the Code of Administrative Offenses of the Russian Federation, failure to illuminate the rear license plate at night will result in a warning or a fine of 500 rubles.
Important! Illumination of the front license plate is prohibited (same article, part 3), and the punishment for such a violation is much more severe: deprivation of the right to drive a vehicle for six months to a year. Therefore, when tuning your car, know when to stop.
In addition, we can say that the rear license plate should be illuminated only with white light of any shade (GOST 8769-75 clause 2.8.2). This is understandable; multi-colored lights can create confusion and confuse drivers following behind.
Product delivery options
Note! Below are the shipping methods available specifically for this product. Payment options may vary depending on the delivery method.
Detailed information can be found on the “Delivery and Payment” page.
Parcel by Russian Post
Available payment methods:
Cash on delivery (payment upon receipt)
Using cards Sberbank, VTB, Post Bank, Tinkoff
Yandex.Money QIWI ROBOKASSA
Shipping throughout Russia. Delivery time is from 5 to 12 days.
Parcel by Russian Post 1st class
Available payment methods:
- Cash on delivery (payment upon receipt)
- Using cards Sberbank, VTB, Post Bank, Tinkoff
- Yandex money
- QIWI
- ROBOKASSA
Shipping throughout Russia. Delivery time is from 2 to 5 days. More expensive than regular delivery by Russian Post, approximately 50%. Parcel weight up to 2.5 kg
Express Parcel EMS
Available payment methods:
- Cash on delivery (payment upon receipt)
- Using cards Sberbank, VTB, Post Bank, Tinkoff
- Yandex money
- QIWI
- ROBOKASSA
Shipping throughout Russia. Delivery time is from 3 to 7 days. More expensive than regular delivery by Russian Post, approximately 100%.
Transport companies
Available payment methods:
- Using cards Sberbank, VTB, Post Bank, Tinkoff
- Yandex money
- QIWI
- ROBOKASSA
Delivery is possible to any locality where there is a representative office of the transport company. Delivery time is from 2 to 10 days. Sending large parcels is approximately 50% more profitable than by Russian Post.
Courier delivery in Togliatti
Available payment methods:
- Cash upon receipt
- Using cards Sberbank, VTB, Post Bank, Tinkoff
- Yandex money
- QIWI
- ROBOKASSA
Delivery time from 1 to 12 hours.
Pickup from our warehouse
Available payment methods:
- Cash upon receipt
- Credit, installments
- Using cards Sberbank, VTB, Post Bank, Tinkoff
- Yandex money
- QIWI
- ROBOKASSA
Pickup times must coincide with store opening hours.
Article rating:
Illuminated license plate VAZ 2110Link to main publication
Related publications
Bolt pattern Renault Megane 3
Why do you need to change the license plate lamp?
Today, any car must be equipped with special lighting that illuminates the rear license plates. When a car just comes off the assembly line, it has 2 lamps installed; they are usually located in the lower trunk saber. The lamps work fine at first, but over time they burn out. Some car owners do not even think about replacing burnt out lamps, which is wrong and entails quite serious consequences.
Traffic police officers have the right to fine negligent car owners who drive cars without license plate lights.
It is important to take into account that the basis for collecting a fine is not only the lack of room lighting, but also the incorrect installation of lights.
Therefore, such situations should be avoided in order to save nerves, time, and money that will have to be spent on paying the fine. Moreover, any driver can replace the backlight on a car on their own with minimal knowledge in this area.
Electrical circuit of ECM VAZ-21104
1 — block of the ignition coil wiring harness to the ignition system harness; 2 — block of the ignition system harness to the ignition coil wiring harness; 3 — ignition coils VAZ-21104; 4 — immobilizer warning sensor; 5 — immobilizer control unit; 6 — spark plugs; 7 — nozzles; 8 — diagnostic block; 9 — block of the ignition system harness to the ABS cabin group harness; 10 - controller; 11 — electric fuel pump; 12 — block of the ignition system harness to the fuel level sensor harness; 13 — block of the fuel level sensor harness to the ignition system harness; 14 — block of the ignition system harness to the injector harness; 15 — injector harness block to the ignition system harness; 16 — block of the ignition system harness to the side door harness; 17 — speed sensor; 18 — idle speed regulator; 19 — throttle position sensor; 20 — coolant temperature sensor; 21 — mass air flow sensor; 22 — oil pressure warning lamp sensor; 23 - phase sensor; 24 — oxygen sensor; 25 — crankshaft position sensor; 26 — knock sensor; 27 — solenoid valve for purge of the adsorber; 28 — oil level sensor; 29 — coolant temperature indicator sensor; 30 — block of the ignition system harness to the instrument panel harness; 31 — block of the instrument panel harness to the ignition system harness; 32 — ignition relay; 33 - ignition relay fuse; 34 — fuse for the electric fuel pump power supply circuit; 35 — electric fuel pump relay; 36 — electric fan relay; 37 — controller power supply fuse; 38 — ignition system harness block to the air conditioner connector; 39 — instrument cluster; 40 — ignition switch; 41 — electric fan of the cooling system; 42 — on-board control system unit; 43 — starter relay; 44 — contacts of the 8-terminal blocks of the instrument panel harness and the front harness; 45 — contacts of the 21-terminal blocks of the instrument panel harness and the rear harness; 46 — trip computer; 47 - diagnostic connector.
- A - to the “plus” terminal of the battery;
- B1 — grounding point of the ignition coil wiring harness;
- B2 — grounding point of the fuel level sensor harness;
- B3, B4 - grounding points of the ignition system harness;
- C - to the starter;
- D - to the driver's door interior lamp switch.
According to the scheme described above, fuel regulation in a car is carried out. Moreover, it depends not only on the load of the valves in the engine, but also on the corresponding position relative to the throttle valve. With the help of a diagram of electrical wiring and valves, it is possible to understand which of the relays or fuses is malfunctioning and replace it in time. In this case, one of the main roles when supplying fuel is played by electrical equipment (controllers) that regulates the operation of the injector.
Checking possible reasons for the lack of backlight
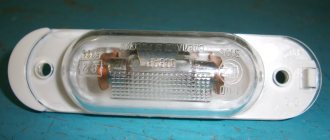
The factory assembly provides for the installation of lighting lamps in the lower saber of the luggage compartment. The lampshade is mounted next to the frame intended for the vehicle license plate.
If the lighting device initially functions within normal limits, then over time the following problems may appear:
- there is no lighting at all;
- the backlight does not function correctly;
- the lighting fixture is faulty;
- replacement of lamps or shades was carried out in violation of the rules.
The main cause of problems with room lighting is vibration and shaking. The lighting fixture burns out or its threads are damaged. In addition to vibration, damage can result from:
- incorrect operation of the generator (leads to an increase in voltage in the on-board network and the simultaneous burnout of all backlight lamps);
- severe contamination of the area where the lampshades are attached;
- penetration of liquid and subsequent corrosion of contacts;
- body movements leading to wire fractures at bend points;
- short circuit in one of the circuits.
To eliminate the breakdown, you need to check the possible reasons for the lack of backlight according to the principle “from simple to complex”:
- establish darkening of the lighting fixture, possible deformation of the plastic housing of the lampshade, accumulation of condensation, by cleaning the surface with a piece of rag;
- check the serviceability of the wiring and fuses by turning on the low beam (one lamp should work);
- By tapping on the surface of the lampshade, try to cause the lamp to light up briefly.
If the cause of the backlight not working is faulty devices, they need to be replaced.
Messages 10
1 Topic by drummer04 2015-09-12 14:17:30
- drummer04
- New member
- Inactive
- From: St. Petersburg
- Registration: 2015-01-03
- Messages: 78 Thanks : 5
- Car: VAZ 2110 8 valves (2004)
Topic: Resolved: License plate lights do not light up, fuse is intact
The license plate light bulbs do not light up, I took out the old light bulbs, they were black, I replaced them with new ones, they still do not light up, I checked the fuse, it is working. So I guess there is no mass? Where to look for it?
2 Reply from drummer04 2015-09-12 15:03:06
- drummer04
- New member
- Inactive
- From: St. Petersburg
- Registration: 2015-01-03
- Messages: 78 Thanks : 5
- Car: VAZ 2110 8 valves (2004)
Re: Resolved: License plate lights do not light up, fuse is intact
and looked at fuses f1 and f10
3 Reply from Anton 2015-09-12 15:24:07
- Anton
- Local
- Inactive
- Registration: 2014-02-20
- Messages: 2,207 Thanks : 255
Re: Resolved: License plate lights do not light up, fuse is intact
if you are guilty of mass, try feeding the mass directly
4 Reply from Serg 2015-09-12 20:50:47
- Serg
- Lada2111.rf fan
- Inactive
- Registration: 2013-07-29
- Messages: 830 Thanks : 363
- Car: 2111 dwg 2114 year 2008
Ceiling lamp
All illumination of the room is carried out by the lampshade into which the lamp is directly installed. It is the lampshade that scatters the light and fully illuminates the license plate of the car. It happens that when dismantling or in the process of replacing lamps, the lampshade may break. If this happens to you, then do not panic, lampshades are sold at any auto parts store.
Catalog number of the Priora lamp: 2170-03717010-00;
Its price is: from 100 to 200 rubles;
You should also not forget about the lampshade gasket; it is necessary to protect against moisture getting into the interior.
Gasket catalog number: 2170-03717012-00;
Cost of laying: from 20 rubles;
The lampshade is the same for all Lada Priora models.
Fuse box
The fuse box in Grant is located to the left of the steering column, near the light switches. To remove the cover and access the fuses and relays, pull the top left side of the cover towards you. It’s made conveniently, everything is at hand and you don’t have to climb anywhere when getting up from the driver’s seat. Maybe this is a hint that they will often have to be changed, or maybe just convenience - the developers know better.
F1 (15 A) - engine control unit, injectors, ignition coil, cooling fan relay, short circuit 2x2.
If you have problems with electronics, and replacing this fuse does not help, in the worst case scenario, you will have to reflash the ECU or replace it. Also, if this fuse blows, the injectors and ignition coil stop working, which makes engine operation impossible. Therefore, if the Grant does not start, check this fuse first.
F2 (30 A) - electric windows.
If they do not work and replacing the fuse does not help, try unplugging it completely or removing the terminal from the battery for a couple of minutes, then connect it again. In this way, all temporary errors should be reset and if this is the case, the power windows will work again.
F3 (15 A) - alarm. If it doesn’t work, check this fuse, as well as the emergency light button, its contacts and the functionality of the lamps.
F4 (20 A) - windshield wiper, airbag. If the airbag warning light on the instrument panel comes on, check this fuse. The problem could be either in it, or in the electronic unit, or in the pillows themselves.
If the windshield wiper does not work and this fuse is intact, also check relay K6, the power handle, the reliability of the connectors connected to it, as well as the electric wiper drive itself.
F5 (7.5 A) - terminal 15 of the ignition switch. If you have problems turning on the ignition, check this fuse, as well as the reliability of the wire connections to the lock terminals.
F6 (7.5 A) - reverse lamp. If it does not work, but this fuse is intact, check the lamp itself, as well as the contacts connecting the connectors to the headlight.
F7 (7.5 A) - Mass air flow sensor, adsorber valve, oxygen sensor, speed sensor. If the engine runs erratically, does not idle, or stalls spontaneously, the problem may be this fuse or the corresponding sensor. We already had an article on how to check the mass air flow sensor.
F8 (30 A) - heated rear window. If it does not work, check this fuse, the terminals connecting the wires to the heater, and the integrity of its elements.
F9 (5 A) - right side lamps
F10 (5 A) - left side lamps. If the dimensions do not light up, the problem may be in these fuses or in the lamps themselves, as well as their connectors. It wouldn't hurt to check the headlight switch on the dashboard.
What lamps are usually installed
Most existing makes and models of cars use W5W bulbs for license plate illumination. But there are manufacturers who equip their cars with C5W lamps, which differ significantly from the previous ones in the type of base. Therefore, before buying light bulbs, you need to find out what type of devices are installed on your car.
W5W (left) and C5W lamps used for license plate illumination
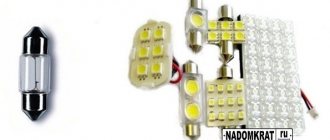
Naturally, there are LED analogues of these devices.
LED bulbs W5W (left) and C5W
Expert opinion
Alexey Bartosh
Specialist in repair and maintenance of electrical equipment and industrial electronics.
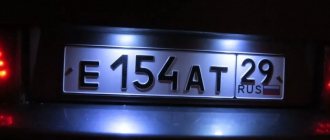
Important! Replacing conventional incandescent devices with LED ones in license plate lights is, in principle, legal. It is only important that the LEDs have a white glow, the license plate is clearly readable from a distance of 20 m, and the backlight itself should illuminate only the license plate, and not the entire road behind the car.
Lamps used in the VAZ 2110 recommended by the manufacturer
The VAZ 2110 car has long been known to Russian drivers. And this is not surprising, since its manufacturer is the Volzhsky Automobile Plant. It first appeared on the market in 1995, and production ended more than ten years ago. Despite this, the car is still often found on Russian roads today.
The VAZ 2110 is a reliable, comfortable, inexpensive to maintain and quite beautiful looking front-wheel drive sedan. If you compare the cost of consumables with foreign cars, you will notice a significant difference. The price of spare parts, fluids and other things for the VAZ 2110 is several times lower. It is also worth noting the efficiency in fuel consumption. A car with a 1.6 liter unit spends 8-10 liters of gasoline per 100 km. Quite playful and fast, acceleration takes 11 seconds.
Having become the owner of such a car, you need to know the type and power of light bulbs that the manufacturer has provided for it. Since periodically they burn out and require replacement.
Electrical circuit of ECM VAZ-21101
1 — VAZ-21101 controller; 2 — block of the ignition system harness to the ABS cabin group harness; 3 — diagnostic block; 4 — immobilizer warning sensor; 5 — immobilizer control unit; 6 — ignition coil; 7 — spark plugs; 8 — nozzles; 9 — electric fuel pump; 10 — block of the ignition system harness to the fuel level sensor harness; 11 — block of the fuel level sensor harness to the ignition system harness; 12 — block of the ignition system harness to the injector harness; 13 — injector harness block to the ignition system harness; 14 — speed sensor; 15 — idle speed regulator; 16 — throttle position sensor; 17 — coolant temperature sensor; 18 — mass air flow sensor; 19 — oil pressure warning lamp sensor; 20 - phase sensor; 21 — oxygen sensor; 22 — crankshaft position sensor; 23 — knock sensor; 24 — solenoid valve for purge of the adsorber; 26 — coolant temperature indicator sensor; 27 — block of the ignition system harness to the instrument panel harness; 28 — block of the instrument panel harness to the ignition system harness; 29 — controller power supply fuse; 30 - ignition relay; 31 - ignition relay fuse; 32 — fuse for the electric fuel pump power supply circuit; 33 — electric fuel pump relay; 34 — electric fan relay; 35 — ignition system harness block to the air conditioner connector; 36 — block of the ignition system harness to the side door harness. 37 — electric fan of the cooling system; 38 — diagnostic connector; 39 — ignition switch; 40 — instrument cluster; 41 — on-board control system unit; 42 — starter relay; 43 — contacts of the 8-terminal blocks of the instrument panel harness and the front harness; 44 — contacts of the 21-terminal blocks of the instrument panel harness and the rear harness; 45 - trip computer.
- A - to the “plus” terminal of the battery;
- B1 — grounding point of the fuel level sensor harness;
- B2, B3 — grounding points of the ignition system harness;
- C - to the starter;
- D - to the driver's door interior lamp switch.
Lamps
Lamps installed from the manufacturer's factory have a filament. After the first replacement, many install brighter LED lamps in place of the standard ones, which can illuminate the number much more effectively and attractively, giving the car a more beautiful look.
Standard lamps have the number W5W. Lampanakala has a power of 5W, which is quite enough to consecrate the room.
Cost of W5W lamp: from 20 rubles;
You can also install LED analogues instead of the standard lamp. LEDs consume less electricity and have a higher luminous flux.
It should be noted that according to the law of safe operation of a car, the consecration of the license plate must allow one to see letters and numbers from a distance of at least 20 meters.
An example of replacing lamps on different cars
Let's move on to replacing the license plate light bulb. Of course, the replacement algorithm differs on different brands and even models, so as an example, let’s look at the replacement process in the most popular cars in Russia.
Hyundai Santa Fe
First, let's look at how to replace the headlight bulb on a Korean Hyundai. For work we will need:
- Crosshead screwdriver.
- 2 W5W bulbs.
Each of the license plate lamps on this car is attached using a self-tapping screw and an L-shaped clamp. I marked the location of the screws with red arrows and the locations of the clamps with green arrows.
Attaching license plate lamps
We unscrew the screw and remove the flashlight, disengaging the latch. The wire powering the lampshade is quite short, so we pull out the light fixture carefully and without fanaticism.
Removing the lantern
Now we see the cartridge with power wires (photo above). Turn it counterclockwise and remove it along with the lamp. The light bulb is removed from the socket by simply pulling it out. We dismantle the burnt one and put a new one in its place. We install the cartridge in place, fix it by turning it clockwise. All that remains is to put the illuminator in place and secure it with a self-tapping screw.
Expert opinion
Alexey Bartosh
Specialist in repair and maintenance of electrical equipment and industrial electronics.
In some modifications of the Santa Fe, the license plate lights are secured with two self-tapping screws and do not have an L-shaped lock.
Option for mounting rear room lamps
Nissan Qashqai
On this model, replacing the license plate lamp is even easier, since the lamp is attached using latches. We arm ourselves with a flat screwdriver (the author of the photo used a plastic card) and pry the flashlight from the side located closer to the center of the car.
Removing the lampshade using a plastic card
Carefully remove the lampshade from its seat and get to the socket.
Removed license plate light for Nissan Qashqai
Turn the socket counterclockwise and remove it along with the W5W bulb. We pull out the burnt out device, insert a new one and install the lamp in place, making sure that the latches snap into place.
Lada Priora
Here the Lada Priora will act as a “test subject”, in which you don’t even need to dismantle the lamp to replace the license plate light bulb. Open the trunk lid and find the back of the lamp sockets, focusing on the location of the lamps.
License plate light socket
We take the socket, turn it counterclockwise until it stops and remove it from the lantern along with the light bulb.
Removed license plate light socket
We pull out the burnt out device (W5W) and install a new one in its place. We turn on the dimensions and make sure that everything works. We return the cartridge to its place and fix it by turning it clockwise.
Volkswagen Tiguan
How to change the license plate lamps in a car of this brand? To replace them you will need:
- Crosshead screwdriver.
- Gloves (preferably).
- 2 C5W bulbs.
First of all, open the trunk lid and remove the lights, for which we unscrew 2 screws on each.
Removing the license plate lamp
The light bulb itself is installed in two spring clips and can be removed by pulling it out. You will have to pull quite hard, but without fanaticism, so as not to crush the flask and cut yourself. I use thick gloves during this operation.
License plate light bulb location
We install a new one in place of the removed light bulb, simply snapping it into the latches. We insert the lampshade into place and fix it with self-tapping screws. Turn on the side light and check the result of the work.
The lighting works, everything is fine
Toyota Camry V50
Replacing the license plate light bulb on this model is perhaps the most interesting. However, there is nothing strange here: anyone who has at least once disassembled Japanese equipment into parts only to replace some kind of drive, belt or rod will agree with this. To work, we need a flat-head screwdriver and, of course, W5W lamps.
So, open the trunk lid and release part of the upholstery opposite the lamp. The upholstery is secured with clever plastic clips, which must be removed carefully and carefully.
Piston design
We take a flat-head screwdriver, pry up the piston retainer (not the piston itself!) and pull it out. We take the head and remove the piston from the upholstery. We carry out the same operation with all the fasteners that prevent us from bending the upholstery opposite the lampshade.
Removing the upholstery clips
We bend the upholstery and find the back part of the flashlight housing with a cartridge sticking out of it. The cartridge is fitted with a power supply.
License plate light socket
Dismantling the lampshade
We pull out the block, and then, squeezing the flashlight clamps, push it (the flashlight) out.
We pry up the protective glass with a screwdriver (carefully!) and remove it. We have a W5W light bulb in front of us.
Removing the protective glass
We pull out the burnt one and install a new one in its place.
Replacing a light bulb
We snap the protective glass into place, insert the flashlight into its standard socket and press until the latches click. We connect the power supply, check the operation of the lights by turning on the dimensions. If everything is in order, then return the upholstery to its place and secure it with caps.
Installing the locking piston
That's all about replacing license plate light bulbs. After reading this material, I’m sure you will understand the design of your car’s ceiling lights and be able to carry out these minor repairs yourself.
Previous
Replacing car lamps How to change a low beam lamp on a Kia Spectra?
Next
Replacing car lampsReplacing a low beam lamp on a Niva Chevrolet
Self-replacement
Now we should separately consider the question of how you can replace the license plate light bulb with your own hands. The procedure largely depends on the design features of your car.
But in general terms, the replacement process looks approximately the same for all cars. It is better for you to know and understand in advance how to correctly change the license plate bulb, so that in the future you can cope with the task quickly and without unnecessary hassle.
First of all, buy a set of new light bulbs, which you should always have in your car. Typically, the space under the armrest or the glove compartment is chosen for such purposes. There's a place for everything.
Today's new cars primarily use LED lens bulbs. But other types of light bulbs may also be provided for your car. It would be correct to disassemble one lampshade, take out 1 lamp from there, and bring it to any auto supply store. Buy a few extra light bulbs, and you can also take the lampshade assembly with all the wires for connection. This is an option in case the lamp itself fails, and not just a light bulb burns out.
To replace the backlight lamp you need:
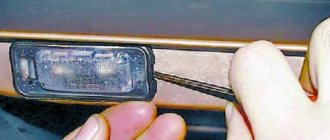
- Disassemble the lampshade by unscrewing the corresponding fasteners, using a screwdriver to pry up the lampshade body and remove it from its seat.
- Carefully unscrew the burnt out light bulb. This must be done extremely delicately, since the lampshades are quite fragile, and it will not be difficult to damage the mounting socket for the lighting. Some motorists even tear out the ceiling lamp from its seat due to excessive force.
- Now you can take a new light bulb, making sure that it is in good working order when you purchased it, and screw it into the standard socket.
- All that remains is to return the lampshade to its place by snapping the fasteners and tightening the screws, if they were provided.
But don’t rush to get into the car and hit the road right away. First, check that after replacing you managed to get the backlight working again.
You should not exclude the possibility that the car owner will not be able to change the lighting elements on his own. This happens if the wiring is too short, access to the ceiling requires a special key of a special size that you do not have, or you have to carry out complex dismantling work to replace it. However, the design of cars varies, and not always even such a simple procedure as replacing a lamp can be completed quickly and without problems.
Here it is logical to contact a car service that has specialists, has the necessary equipment and is ready to take on the task.
Why doesn't it light up?
- First, remove the cover of the mounting block and make sure that the fuse is intact. The fuse markings are located on the inner surface of the cover. You should look for fuse F16 or F5, depending on the year of manufacture of your VAZ 2109.
- If the fuse is intact, be sure to check whether the contacts of the fuse you are looking for have not oxidized. It is not uncommon for shields to fail due to broken contact.
- Check if there is power to the dashboard. To do this, you will need a warning light and the ignition on. Disconnect connector X4 in the mounting block and check for voltage at pin 3. The disadvantage of the VAZ 2109 design is that when it rains, the mounting block immediately becomes wet. This causes oxidation of the contacts in the pads, which causes the electrics to stop working. Sometimes not only the contact is oxidized, but also the board of the Nine mounting block.
If none of the above actions yielded results, you will have to be disappointed. After all, now you need to remove the dashboard and check the condition of the wiring, contacts, and negative connections. Here it is better to trust a professional electrician or set aside a whole day to troubleshoot problems yourself. There is no need to rush here.
Important Features
The main culprits for non-working room lighting are burnt out lamps. However, often the backlight bulbs that have gone out can remain in working condition. To correctly determine the real cause of the breakdown, you need to carefully examine the lamp removed from the socket. The main sign of failure is a darkened bulb or damage to the threads visible to the naked eye.
If the lamp is working properly, but the lighting does not work, oxidized contacts may be the likely culprit of the breakdown.
To resume operation of the C5W cylindrical lamp (equipped with end contacts), it is enough to carefully clean and bend them.
The spring contacts do not hold the light bulb - another likely cause of the malfunction. Replacement is also not required. It is enough to return the light bulb to its place.