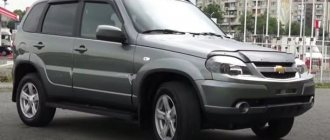
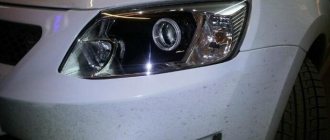
Replacing light bulbs in the dashboard of Lada Kalina, Priora
During vehicle operation, the backlight of the vehicle's instrument panel may burn out, causing some of the readings to lose their illumination.
There is no need to disassemble the “tidy” for this. This instruction tells you how to change the light bulbs on the instrument panel of a Priora or Kalina. The process looks similar on both cars. You will need : remove the instrument cluster, buy new backlight lamps for the instrument cluster (A12-1.2 W1.2W with a power of 1.2 W).
Procedure:
- Turn the panel with the back side facing you.
- Remove the backlight bulb by turning the socket counterclockwise.
We install the lamp and socket in the reverse order.
The panel can use various sockets, some of which require the use of a soldering iron to install the lamp. In this case, to save time, it is recommended to buy the lamp together with the socket assembly. By the way, you can use LEDs instead of conventional lamps. When installing them, observe the polarity, otherwise it will not burn.
The entire process of replacing lamps in the instrument cluster is also shown in the video:
Let us remind you that the backlight can be modified so that it turns on with the ignition.
Source
Tuning and repair of VAZ 2110
Quite often on many foreign cars you can notice the smooth illumination of the dashboard, which is pleasant to the eye. This is what many call polite lighting. What's worse than our VAZs? Why not do this kind of dashboard tuning yourself?
The process of modifying the VAZ 2110 dashboard is quite simple. All you need to do is use the circuit and change the standard 130 kOhm resistance to 51 kOhm.
To give you plenty to choose from, we will show you several ways to tune the VAZ 2110 tidy.
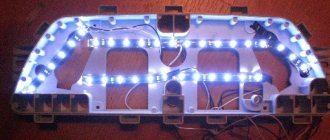
Method 1. When all the light bulbs in the tidy were replaced with LEDs, the process of polite illumination approached.
First, the necessary parts were purchased and the soldering process took place. At the very beginning, I was upset, because for some reason nothing worked, as it later turned out the problem was oxidation, which caused short circuiting of several tracks. I corrected it and decided to place the circuit in a regular telephone socket.
Our positive wire goes to the dashboard backlight button, namely to the wire that goes to the LED strip. That is, the wire that becomes a plus when the side light button is turned on. With this connection, the polite lighting will spread not only to the VAZ instrument panel, but also to all other interior lighting elements connected to the dimensions (buttons, BC, etc.). It was decided to take the input plus behind the dashboard, which receives power when the ignition is turned on.
There is, however, a small problem in this circuit, there is a large number of consumers, and the capacitor was designed only for the backlight of the tidy, so the backlight does not turn on very smoothly, but if you take into account how it was, then this is “heaven and earth”.
Method 2. The connection in this case is as follows: The harness with white block No. 4 already has a permanent plus, but there is no contact for it on the dashboard. I decided to do it myself. In the photo of the VAZ 2110 tidy from the back side, a red wire goes to this contact.
Do-it-yourself replacement of light bulbs in the dashboard of a Lada Kalina
Although not often, it does happen that one of the bulbs in the car’s dashboard burns out and therefore needs to be replaced. Of course, this is not so difficult to do, but you will have to tinker. You can do this kind of work on your own in 30-40 minutes. To work, you will need a long and short Phillips screwdriver.
The video below describes the detailed process of replacing light bulbs in the dashboard on a Lada Kalina car.
How to install LED sources?
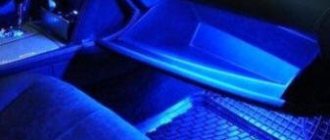
Quite a lot of Lada Kalina owners are fans of tuning. They are leaning towards replacing the standard lamps present in the panel with LED options. These components are significantly brighter than their traditional “competitors,” which radically changes the appearance of the panel, especially in the dark.
For installation, both the diodes themselves, which are to be installed in the mounting sockets for standard lighting components, and diode strips are used. In the second option, the products are glued around the perimeter of the LADA Kalina dashboard.
The following procedure is identical to the algorithm of actions described here. A significant difference is the need to file the tip of the diode before direct installation. This manipulation should be performed with the utmost care to avoid damage to the lighting component itself. Without the specified undercut, the diodes will not be able to provide light scattering, but will begin to direct the light beam to a point.
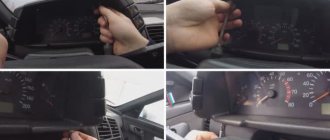
Removing the instrument panel
- Using the steering wheel adjuster, it must be lowered to its lowest position. The lever itself is located under the steering column.
- Unscrew the two bolts and remove the decorative casing.
Two decorative casing screws
The picture shows two instrument panel mounting bolts
Visible wire chips to the instrument panel
At this point, the work of removing the instrument panel can be considered complete.
Replacing light bulbs on a Lada Kalina panel
Standard instrument panel lamp
- After completely removing the instrument panel from the panel, you can begin replacing the light bulbs. They are located behind the shield. You can remove them by hand, without using special tools. You can also use pliers if difficulties arise.
- New light bulbs are installed in the reverse order of removal.
The photo shows all 5 instrument panel lamps, they are removed counterclockwise
Installation of LED lamps
Most modern lighting devices have an LED design. LEDs are economical, consume little energy, and have high brightness. In addition, you can choose a different color shade of the backlight, which will diversify and decorate the dashboard of the Lada Kalina. However, you should remember some features of LED backlighting:
- LEDs are longer than regular light bulbs, so the brightness may be excessive;
- When installing, you must carefully monitor the polarity, otherwise the lamps will not light;
- The brightness control has practically no effect on LED devices.
Diagnostics
- Check the panel backlight brightness adjustment slider. It often happens that the brightness adjustment is at a minimum and the backlight is very dim or does not light at all;
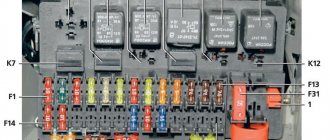
- Check the panel hanger fuse. On Kalina, the fuses are located under the cover of the light switch block. In the block you need to check fuse F7, it is responsible for the panel illumination. The fuse location diagram is on the light switch block cover;
- One of the most common problems is a wiring problem that causes the panel backlight to not work. This usually happens when some wire breaks. In this case, only an electrician can help you.
Why did the instrument panel illumination disappear on the VAZ-2114: does it not work and does not light up?
Recently, it has become fashionable to install LED lighting for the VAZ dashboard with your own hands. However, not all car enthusiasts correctly connect it to the on-board network. This can cause the light to go out at the most inopportune moment. So, it’s worth checking the contacts of the entire backlight circuit.
There have been cases where, as a result of bumps, all the light bulbs burned out at once. In this case, you need to look for a breakdown in the wiring, you can get stuck like that again!
The same applies to standard incandescent light bulbs that come with the car from the factory. Thus, a break or burnout of one of the light elements can lead to the fact that the entire backlight stops working. If you run the tester through the entire circuit, you can easily find an open circuit.
The most unpleasant and hardest-to-test element of a car is the wiring.
So, a broken wire can cause the dashboard lights to stop receiving power and therefore not light up.
In order to eliminate the problem, you need to test all the wires with a multimeter . which are responsible for illuminating the car’s dashboard. So, any, even insignificant, wire that breaks can cause the light in the dashboard to go out.
Oxidized contacts in the mounting block.
Another cause of malfunction can be oxidized wire pads.
Accordingly, there will be no contact, and not only will the light in the instrument panel not light up, but the other indicators located here may also not work. To fix the problem, you will have to disconnect the wire block on the fuse block and the parting panel itself. After this, clean the contact group and connect everything back. If everything worked, then the reason was found.
Safety block
Another important element that can rarely fail is the mounting block.
Lamp selection
When choosing lamps, you can go in two ways:
- Install regular incandescent lamps, such as those installed by the manufacturer.
- Install LED lamps.
We recommend installing LED lamps, since their lifespan is longer than standard ones and you can also slightly reduce the load on the generator. Also keep in mind that LED lamps have pros and cons. If you install an LED lamp and it does not light, turn the socket with the lamp 180 degrees.
The instrument panel on Kalina uses a type of lamp with a W1.2W socket. In any auto store you can buy a socket with a lamp or a light bulb separately.
Replacing low beam lamps
The standard replacement of the low beam bulb on a Lada Kalina is quite simple. The procedure does not require deep knowledge of auto electrics or the presence of specialized tools.
To perform the procedure correctly, you must prepare all the tools and follow the sequence of actions.
- Place the car on the handbrake and remove the terminals from the battery. It is recommended to drive the car into a well-lit garage or leave it outside, this will make it easier to see small parts and fasteners.
- Remove the plastic block cover. Here you can tighten the element by hand without using tools. In some configurations, the plug can be made of hard rubber (what it depends on is unknown). It is important to consider that the element often dries out and cracks. Therefore, you need to buy it in advance.
- The replacement of the low beam bulb on the 1st generation Lada Kalina continues, at the stage of disconnecting the wiring. The contact group often gets stuck, which forces the master to tense up a little. By rocking the block from side to side, you will need to pull it off its seat. In this case, you need to hold the device body so as not to damage the element. If a part is broken, it cannot be repaired - the entire unit is replaced.
- Next, remove the lamp retaining spring from the hook. Then you will need to move it to the side so that it does not interfere.
Important! You should not completely pull out the latch - it will be extremely difficult to install it in place. The bar simply slides out so that the light bulb can be removed.
- Next, the light bulb itself is pulled out of the socket. You only need to support the emitter by its metal elements; you should not even touch the glass part of the lamp.
- Installation of the new part is carried out in the reverse order. At the same time, it is important to check the reliability of the device. If there is increased vibration, the lamp may fall out of its socket, which may cause an accident.
Step-by-step instruction
- Before starting work, use a ten-point open-end wrench to loosen the nut securing the negative terminal of the battery and remove it. It is worth noting that when the instrument panel is removed, all readings except mileage are reset.
- For ease of operation, position the steering wheel as if driving straight.
Using a small Phillips screwdriver, unscrew the two screws securing the plastic cover of the shield.
Remove the plastic trim of the instrument panel by disengaging the two spring clips at the bottom.
Using a small Phillips screwdriver, remove the two screws securing the instrument panel.
Remove the instrument panel and go to a well-lit area to change light bulbs. It is worth noting that the lower part of the parting shield is inserted into the recess and supported by rollers on the sides.
To replace the lamp, grasp the socket with pliers and turn it counterclockwise. After turning, remove the socket along with the lamp.
Take a new lamp socket, install it in the seat and turn it clockwise until it stops. It is worth noting that if your lampshade is in good condition, the lamp can be replaced separately. You remove the lamp by simply pulling it towards you.
Replacing light bulbs
When the console is freed, you can disassemble the backlight of the Lada Kalina stove without unnecessary interference. Essentially, disassembly comes down to removing burnt out light bulbs. This is done with a slight twisting movement counterclockwise.
The light bulbs are sold assembled, but purchasing them can be problematic. Therefore, it is often necessary to resolder burned-out elements, for which it is recommended to stock up on LEDs. The lamp replacement process looks like this:
- by pressing with a thin screwdriver on the base of the housing lock, the sides of the light bulb are squeezed out one by one;
- at the base of the old lamp, the legs leading to the terminals are cut off;
- diodes purchased in advance are soldered to the terminals;
- the resulting structure is embedded into the lamp body.
Once the bulbs are back in place, you can reinstall the console. Here you need to pay attention to the fact that the top part of the panel is inserted first. You need to make sure that the air intake regulator slider fits into the space allotted to it - otherwise the console will not stand up. Care with the wires is important - after connecting them to the controls and buttons, they should not curl up under the panel; they must be returned to the tunnel.
When installing the center console, force will be required to secure the metal latches. Please note here that light pressure is enough to secure it, otherwise the console will burst. If problems occur, check what exactly is preventing the plastic cover from returning into place. Excessive force will lead to cracks and chips.
Compliance with the rules and recommendations described in the article will help solve problems in a situation where the backlight of the Kalina stove does not light up. The procedure is simple, but the integrity of the most noticeable element of the interior - the central lining of the instrument panel - depends on the dexterity and calmness of the master.
The absence of a center console makes it possible to lubricate the heater damper position switch. By the way, on Kalina the switch “moves” quite tightly. Lubricate with lithol, applying lubricant to the rotation shaft.
Now let's change the light bulbs and remove the burned out ones from the console.
We take out the light bulbs from the base.
We will install LED light bulbs in place of conventional light bulbs.
We insert LED bulbs into the base and place them in the console.
We put the console in place and connect the connectors. Putting the switches in place
If you still have questions about replacing the tabs in the console, write, I will be happy to answer
The instrument panel must always be in good condition. It displays information about the status of important systems and components of the vehicle. The accuracy of the information that the driver receives while driving depends on the serviceability of the devices. Power surges, vibrations, and temperature changes significantly reduce the life of backlight lamps. Therefore, replacing lamps in the instrument panel is a problem that often recurs.
Changing the light bulbs on the dashboard of Lada Kalina
The mileage of our editorial Kalina is only 45,400 km . Which is quite a bit for a car produced in 2011 .
Our "low oil pressure" light in the instrument panel burned out.
Replacing lighting elements with your own hands is not difficult. With the right approach, the entire procedure will take no more than 40 minutes.
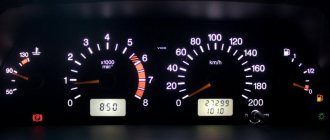
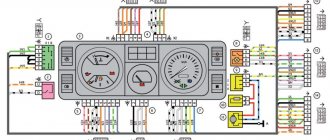
Description and location of indicators and instruments on the panel
Thanks to the tidy, the driver receives information about the condition of the car and the speed of movement.
Tidy Lada Kalina 2
A novice car enthusiast should know about the purpose of warning lights from the very first days.
Below is a description of the device:
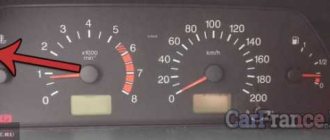
1 - tachometer - a device showing at what frequency the crankshaft rotates; 2, 4 — direction indicators, left and right, respectively; 3 — speedometer, displays the actual speed of the vehicle; 5 — coolant temperature indicator; 6 - indicator showing the fuel level in the tank; 7 — fuel reserve warning light; 8 - button with which the daily mileage readings are reset; 9 - a lamp indicating that the emergency lights are on, during which the side lights and turn signals flash, indicating a car malfunction; 10 — electric power steering lamp. Goes off when the ignition is turned on. If it continues to light, then the EUR is faulty; 11 — high beam indicator. The light is on if the high beam is on; 12 — indicator of the applied hand brake; 13 — external lighting indicator; 14 — airbag malfunction indicator; 15 — emergency oil pressure indicator in the car system; 16 — immobilizer warning light; 17 - liquid crystal screen displaying information from the on-board computer; 18 — seat belt malfunction indicator; 19 — battery charging lamp; 20 — emergency brake fluid level indicator; 21 - electronic brake force distribution light, red light indicates a malfunction; 22 — brake pad warning light; 23 — anti-lock braking system (ABS) indicator; 24 - a constantly burning orange light indicates problems with the engine.
After the engine starts, the indicators light up orange. If everything in the system works normally, then they go out after 1-2 seconds.
Tidy Lada Kalina
Removing the dashboard
To do this you will need a short and a long Phillips screwdriver. The removal process is carried out in several stages.
- Lower the steering wheel to its lowest position. There is a regulator at the bottom, it is located under the steering column.
The bolts are marked with arrows.
The decorative plug was removed.
Replacing lamps
The backlight is located on the back of the shield. You can remove the light element (light bulb) without using tools. If difficulties arise, pliers will help you .
Layout of the backlight lamps on the rear wall of the instrument panel.
Next, you should install new light bulbs in the vacated sockets. After that, connect the power connector and install the shield in place.
How to remove the panel on Kalina 2 (VAZ 2192, 2194)
h3 >Removing the Kalina 2 dashboard Required: Disconnect the negative terminal from the battery. For Kalina 2 vehicles with air conditioning, unload the refrigerant from the air conditioning system in accordance with the operating instructions for the service equipment. Prepare a 8-point, 10-point, 13-point, 21-point socket, a Phillips and a flat-head screwdriver.
Unscrew the two bolts (No. 2) securing the thermostatic valve (No. 1) of the air conditioner using a 10" socket.
Unscrew the nut (No. 7) securing the heater using a '10' wrench. Loosen the clamps (No. 4 and No. 6) using the '8' socket. Disconnect the outlet (No. 3) and inlet (No. 5) hoses from the heater radiator. Remove the cabin filter.
Remove the four screws (No. 1) securing the heating and air conditioning system air intake using a Phillips screwdriver.
Remove Kalina's beard 2. Unscrew the bolt (No. 1) securing the parking brake lever, remove the bracket (No. 2) of the handbrake limit switch using a 13-inch socket.
Unscrew the two bolts (No. 2) from the right and left sides that secure the pillar (No. 1) of the instrument panel cross member to the floor tunnel, using a 13-inch socket. Unscrew the nut (No. 3) of the ground wire of the instrument panel harness using a 10mm socket. Under the front seats, unscrew the nut securing the air duct (No. 4) for heating the interior using a 10mm socket. Remove the air duct.
Remove the steering column
Lamp type
Standard lamps are installed from the factory - 12V , lamp type - W1.2W , glass base W2x4.6d .
If you change to diode lamps, be sure to check their functionality before assembly. The diode only works in a certain position. If it does not light, then change its contacts the other way around!
I wish I had read this article earlier, but I had to contact the service. It turns out it wasn't difficult to replace.
Overall, nothing complicated, you just need to tinker a little and try not to rush too much.
Source
Do-it-yourself replacement of backlight bulbs in the Lada-Kalina dashboard: photo, video
It is important to keep the instrument panel in good condition in order to receive timely information about the components and systems of the vehicle.
The shelf life of lamps is reduced due to vibrations, power surges and temperature changes. As a result, the question of replacement arises regularly. To carry out such work you will need pliers, Phillips screwdrivers and a set of new lamps. It is better to immediately buy a set of 5 pieces of 12 V baseless incandescent. You will also need new cartridges, since the manufacturer solders the backlight to the cartridges with antennae (if you purchase each unit separately, you will need a soldering iron). To preserve the mounting screws, magnetize the screwdriver. This way the small details will remain under your control.
Find out the cost of replacing the backlight bulbs in the Lada-Kalina dashboard online in 3 minutes
Don't waste your time - use the Uremont search and get offers from nearby services with specific prices!
Sound insulation of Kalina panel/dashboard
| The disease of Russian cars is rattling, crickets and squeaks, and the LADA Kalina panel is no exception; it is also made of inexpensive plastic, like the rest of the interior elements. Let's figure out how to soundproof Kalina's instrument panel without removing or dismantling it. |
If you decide to make soundproofing for Kalina yourself, then you will have to buy:
- Anti-creak (modelin).
- Vibrating material (for example, STP).
- Plastic clamps.
- Hot-melt gun and hot glue.
- Bitoplast or splen, optional.
Instrument panel Kalina, sound insulation without removal
There is no need to remove the dashboard assembly, but you will have to remove the attached elements. As a result, you should see something like this:
Sequence of replacing the backlight lamps of the Kalina dashboard
The technology is very simple. To remove cartridges, turn them half a turn counterclockwise. Remove the burnt element with your hands or pliers, picking up the shank. Install a new spare part. Install the cartridge (turn clockwise).
Tip #1 for replacing Kalina dashboard lamps from experienced car owners - change all the lamps at once.
This will eliminate the need to repeat the procedure in the near future. Although it is simple, it is still labor-intensive. Another important advantage of this advice is the uniform illumination of the entire “tidy” (the elements produce a glow of different intensities over time). The work is quite simple, but you should not lose your vigilance - there is always a risk of damaging the threads or thin elements.
Removing and installing the panel (dashboard) of Kalina with heater
Depending on the year of manufacture of the car, it may be possible to remove the Kalina panel with or without a heater. In this article, dismantling a dashboard with a stove:
Required tools: Phillips and flat head screwdrivers, 8 socket, 10 high socket, 13 socket. Disconnect the negative terminal of the battery. Drain the Kalina coolant.
From the bottom of the car, loosen the clamps ("8" socket) and disconnect the hoses from the heater radiator pipes passing through the front panel. Unscrew the nut securing the heater to the front panel using the high "10" socket. Remove the Kalina cabin filter. Unscrew the 4 screws securing the filter housing using a Phillips screwdriver.
Unscrew the nuts securing the Kalina steering column and lower it to the floor. Remove the central tunnel.
Disconnect the wire ends from the brake light switch. Disconnect the 7 connectors with the wires behind the fuse block. Unscrew the bolts securing the console brackets to the floor tunnel on both sides, using a socket “13”. Unscrew the nuts securing the air ducts for the rear passengers under the front seats, using a socket “ on 10".
Remove the pillar covers by snapping off the plastic clips.
Remove the end cap from the left and right sides of the instrument panel using a flathead screwdriver. Unscrew 2 bolts securing the instrument panel on both sides, with a “13” head. Unscrew the self-tapping screws of the right and left fastenings of the front trim of the instrument panel using a Phillips screwdriver. Remove the front trim of the instrument panel, overcoming the resistance of 7 spring holders. Location of the holders for the Kalina panel trim. Unscrew the 7 instrument panel nuts in front of the windshield using a 10mm socket. Unscrew the 2 bolts securing the instrument panel cross member to the pedal bracket using a 13 socket. Unscrew the third bolt securing the instrument panel crossmember to the pedal bracket.
Kalina Torpedo (rear view):
1 — heater fan electric motor; 2 — heater fan casing; 3 — air recirculation damper; 4— air ducts; 5 — heater casing; 6 — inlet pipe of the heater radiator; 7 — heater radiator outlet pipe
Unscrew the 2 nuts (under the windshield) securing the instrument panel cross member to the body using a 13mm socket. Remove the end of the “mass” wire from the stud. Disconnect the wiring block from the Kalina ECU.
Move the rear passenger air ducts towards the rear of the car, disconnecting them from the heater. Move the Kalina instrument panel away from the front panel and disconnect the block from the wires behind the heater. Remove the dashboard assembly with the heater from the passenger compartment.
Installation of the dashboard is carried out in the reverse order. When installing, make sure that the heater radiator pipes fit into the hole in the front panel. We pour coolant into the cooling system and bring it to normal. See also, removing the Kalina panel without a heater.
| If you decide to soundproof the engine shield, or tuning the panel (re-tighten or paint), then carefully study the instructions on how to remove and install the Lada Kalina panel with your own hands. |
Replacing lamps in the Kalina instrument panel - installing LEDs
LEDs are most often used (tuning enthusiasts cannot do without them at all). They are bright and economical, but there are nuances:
- length (may “overexpose”);
- When installing, it is important to observe polarity (otherwise they will not work);
- The glow intensity regulator is useless in this case.
The advantage of LEDs is their durability (they can last for several years). At the same time, it is important to provide them with timely cooling (at temperatures above 80 degrees Celsius, the shelf life is shortened and the brightness decreases).
Installation of such parts is carried out according to the canonical diagram. Just cut off the tip of the LED first (take care of the luminous component during the procedure). If you forget about this, there will be no diffuse glow. When using tapes of this type, they are glued around the perimeter of the “tidy”.
Replacing instrument panel backlight lamps “Kalina” - tuning
When it comes to car lighting, I would like to mention spectacular modifications. Fans of an original approach sometimes decide to decorate the dashboard. To do this, use super-bright diodes and a light strip. Installation is carried out according to the standard scheme. The search for the necessary elements here depends on the preferences of the car owner and technical limitations. In the standard scenario, they buy lighting devices W1, W2, A12-1 with a power of 1.2 W. If you want to take a non-standard approach, consult with technical center specialists.
The Uremont.com aggregator makes it possible to find out technical nuances online. To get a qualified answer, write a question in the chat. Professionals from partner service stations will promptly give you the necessary information. Also here for the convenience of car owners are provided:
- interactive map indicating the addresses of auto repair shops;
- feature articles;
- consultation with a car expert;
- online application form for making a request;
- user reviews and ratings.
Source
Soundproofing Lada Kalina dashboard
When I picked up the car from the cabin, I heard some noises from the dashboard, so I already knew what I needed to do. I waited until the noise became unbearable and decided to soundproof the front panel of the Lada Kalina with my own hands.
What you will need:1. Madeleine is a whole topic! Can be used everywhere - universal anti-creak!2. Thermal gun with rods.3. Straight arms - as always.4. Lots of time and patience!
Do-it-yourself soundproofing of Lada Kalina dashboard:
1. Disassemble the panel. We have already published a guide on the site on how to remove a torpedo on a Lada Kalina.
2. He took off his beard and tidy. I removed unnecessary parts from the panel.
3. We remember where all the wires came from. I filled all the connectors on the wire side with hot glue from a gun so as not to make noise.
4. Removed the shelf from the panel. That's how it was for me before Shumka.
5. Looked inside from the tidy side. There's a lot of dust.
6. So I finally removed the panel!
7. Dust, fear and horror when looking at the photo!
8. I wish I could put everything back in place and have no extra screws left! Dreams Dreams…
9. Now the panel is pulled off. I glued the panel itself from the inside with madeline (anti-creaking agent) in the right places in the beard area. STP didn’t bother gluing it - it didn’t bother him at all...
10. I taped the air ducts at the junction points.
11. I taped the wires with Madeleine.