Why do you need additional lighting?
Today, car tuning is carried out not only outside, but also inside its interior, and there is no better place than the dashboard. Diodes built into the panel will allow you to achieve the following positive aspects:
- give the dashboard a new unusual look;
- High-quality illumination of important elements of the dashboard;
- make additional lighting for the vehicle interior;
- make your car ride more comfortable;
- improve road safety. When the instrument panel is well lit, all the indicators are clearly visible on it, which allows you to correctly assess the position of the car on the road and not violate the rules of the road with your driving.
The easiest way to illuminate such an element of a car as the dashboard is to install diodes in it. The following types of LED products can be used here:
separate diodes. Using them as backlight, you can create full or decorative lighting for the dashboard. It is worth noting that LEDs can glow in different colors. Therefore, such LED lighting can beautifully complement external tuning, glowing with it in the same color scheme;
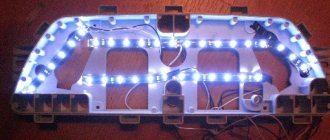
LED Strip Light. This tape is very often used as decorative lighting not only for a car, but also for home premises or street elements. It can be easily replaced with another, which will allow you to change the boring color scheme to a new one. The LED strip has a self-adhesive base, with the help of which its installation by hand is quite easy and quite quick.
Introduction to the matter.
Such lighting appeared on the markets not so long ago, but it has managed to gain a secure foothold there and acquire a whole army of fans who decorate its elements of their cars. The tape is equipped with a silicone shell, which provides protective functions, so that external factors, dirt and debris, water, do not affect it. This fact makes such a “garland” a unique tuning element, which is applied to both headlights and car interior elements.
Instrument panel - removing and replacing lamps
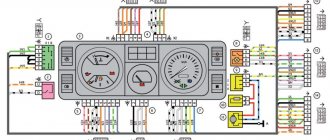
Location of lamps on the instrument panel: 1 — fuel reserve indicator lamp (A 12-1.2 (W1.2W); 2 — instrument illumination lamps (AMN 12-3-1 (T3W); 3 — turn indicator indicator lamp (A 12-1.2 (W1.2); 4 — warning lamp for malfunction of the engine management system (A 121.2 (W1.2); 5 — warning lamp for turning on the external lighting (A 12-1.2 (W1.2); 6 - indicator lamp for insufficient oil pressure (A 12-1.2 (W1.2); 7 - indicator lamp for turning on the parking brake (A 12-1.2 (W1.2); 8 - indicator lamp for turning on the high beam headlights (A 12-1.2 (W1.2); 9 - battery charge indicator lamp (A 12-1.2 (W1.2)
1. We prepare the car for operations (see “Preparing the car for maintenance and repair”).
2. Disconnect the wire from the negative terminal of the battery (see “Battery - removal and installation”).
3. Using a slotted screwdriver, remove the handles from the heater control levers.
4. Unscrew the nut securing the trip odometer reset handle. Remove the nut and washer and push the handle into the space behind the panel.
5. Using a thin slotted screwdriver, pry up and remove the screw plug for fastening the shield, located on the right edge of the block of control levers for the interior ventilation and heating system.
6. Use a Phillips screwdriver to unscrew the self-tapping screw.
7. Remove the shield from the panel.
8. Unscrew the knurled nut of the speedometer drive cable and disconnect the cable.
9. Remove the vacuum supply hose from the econometer fitting.
10. Disconnect the three colored connectors of the wiring harnesses.
11. Remove the instrument panel.
Replacing the instrument backlight lamp
1. Having turned the lamp socket 90° until its protrusion coincides with the slot in the board, remove the lamp socket.
2. By pressing and turning 90°, remove the lamp.
Replacing warning lamps
1. Having turned the lamp socket 90° until its protrusion coincides with the slot in the board, remove the lamp socket.
2. Replace the lamp together with the socket.
Installation of all removed parts is carried out in reverse order.
Choosing a belt for the machine
I will try not to pour water, but will briefly look at what to look for when choosing an LED strip.
LED Matrix Type
Firstly, we get an average power of 4.4-4.8 W per linear meter with a luminous flux of about 250-300 Lm. With such power, LEDs do not require heat dissipation and the LED strip can be easily mounted on plastic elements. And the luminous flux is sufficient to fully illuminate any interior elements.
If you don’t have enough brightness, take 120 pcs/m.
Secondly, this is the most common tape on sale, we buy it in the first store we come across.
Options like SMD 5050, 5630, 5730 are not suitable due to their high power. Unpleasantly high brightness and the need to mount a heat sink make them not the best choice for LED car interior lighting.
Exterior car lighting. Here we turn on the head. If there is LED lighting under the bottom of the car, you can choose more powerful LEDs - SMD 5050 30/60 pcs/m. The aluminum profile will be our heat sink (more about installation later). For LED illumination of license plates or (God forbid) headlights, this is a bad choice. Such LED lighting will be a bait for traffic police inspectors (read about installation rules and fines at the end of the article).
Regular LEDs or RGB - there is no difference. RGB is a little more expensive, it is more difficult to connect and requires an additional control controller (read more about connecting an RGB strip). But it allows you to change the backlight color.
Protection class
There are mainly three protection classes on sale - IP20, IP65, IP68.
- IP20 – open tape without protective coatings, suitable for use indoors in dry rooms. Afraid of moisture, dust, and any mechanical influences.
- IP65 – with a protective silicone layer that can protect against condensation.
- IP68 - sealed, waterproof LEDs that can be placed on the bottom of the car.
For LED illumination of the glove compartment or the bottom of the dashboard, IP20 is also suitable if no one pulls it or pours water on it.
For illumination of other elements, IP class 65-68 is desirable.
Replacing the backlight
To improve the quality of your dashboard lighting, it is advisable to install new LEDs in place of the old ones. They provide excellent illumination, consume minimal energy, and guarantee a high level of data reading.
- Buy a set of LED lamps, having previously calculated the number of devices needed for each sensor.
- After removing the block, install the resistors and lamps in specially designated places on the VAZ 2114 - in the sockets. To dismantle the cartridges, they are carefully unscrewed counterclockwise. New sockets are installed in their place and light bulbs are inserted. Respect the polarity and position the LED heads. They will have to be carefully ground off.
- Connect the power and check how the new backlight works.
- Reassemble step by step. Be sure to route the wiring to the board and carefully secure it to it. This way, the backlight components will not interfere with the reassembly process.
- Make sure the instrument panel arrows are positioned correctly. When trying to quickly complete a job, they often become deformed and bent.
- The backlight structure is fixed with screws.
- The power for the LEDs is connected to the power supply for the light bulbs, the arrows are put on and set to zero.
- Using the on-board computer, check the operation of each sensor and device. If the IDs are functioning correctly, return the instrument panel to its original condition. That is, assemble the entire assembly.
The backlight of the Lada 2107 tidy does not work: the reason
- Fuse. The fuse link often fails or burns out due to moisture or condensation.
- Contact groups and wire blocks. Here the terminals often break off and the pads oxidize.
- Damage to the dashboard itself. Voltage surges can damage sensitive tracks, causing lighting failure.
On versions of the injector and carburetor type, the tidy is identical. The only difference here is the connection to the check engine lamp.
Replacing dashboard lamps yourself
When the panel lamps stop lighting, you should immediately replace them with new ones. For this job we will need the following arsenal:
Let's get started
First of all, we remove the decorative trim of the radio (since the dashboard and radio are connected to each other, you will have to disturb the music system too), which is held on by fasteners; here it is better to use a screwdriver, threading it under the trim.
The main condition of work is caution. You need to start detaching the cover from the bottom edge
When the bottom edge comes off, you need to pull it towards you a little. Now detach the top edge. Further:
- Disconnect the wire directed to the cigarette lighter.
- In the same way as we removed the cover from the radio, we remove it from the dashboard. Above the left and right edges we find two self-tapping screws. They need to be unscrewed. We unscrew the screws located at the top and bottom.
- We remove the trim with a little effort (since it is also held on by fasteners, so the decorative plate will have to be rocked a little).
- We disconnect all the wires: from the alarm system, from the clock, from the headlights and other things.
- We remove the control panel itself, for which we unscrew the four screws on which it is held. In order not to damage the wires, it would be better to disconnect them on the one hand.
- Now the most important thing. We remove the sockets of the light bulbs that have stopped burning. To remove the cartridges, you need to turn them counterclockwise with a gentle movement. We replace the defective lamps with new ones, wrap them and install the entire structure in the reverse order of disassembly.
We mount the LED strip with our own hands
Outside onto the car
Any external car lighting is an aggressive working environment. We select a protection class of at least IP65, install the tape with glue, with additional fastening with plastic ties.
For LED illumination of the bottom of the car, we choose a tape of the SMD 5050 class or any other with a power of more than 10 W/m. For such power, a heat sink is required. Experience shows that the most reliable installation method is an aluminum profile fixed to the body, onto which the diode strip is already attached with plastic clamps and glue. This installation method eliminates bridging the wiring with fasteners, but adds holes in the car body (if you fasten the profile with self-tapping screws).
Replacing instrument panel backlight lamps on a VAZ 2107 car - removing/installing the dashboard
Removing the instrument panel from a VAZ 2107 car
1. We prepare the VAZ 2107 car for operations (see “Preparation of the VAZ 2107 car for maintenance and repair”). 2. On a VAZ 2107 car, disconnect the wire from the negative terminal of the battery (see “Battery for a VAZ 2107 car - removal and installation”). 3. Using a slotted screwdriver, remove the handles from the heater control levers.
4. Unscrew the nut securing the handle for resetting the daily mileage meter of the VAZ 2107. Remove the nut and washer and push the handle into the space behind the instrument panel.
5. Using a thin slotted screwdriver, pry up and remove the self-tapping plug for securing the instrument panel, located on the right edge of the block of control levers for the interior ventilation and heating system.
6. Use a Phillips screwdriver to remove the self-tapping screw securing the instrument panel.
7. Take out the dashboard of the VAZ 2107.
8. Unscrew the knurled nut of the speedometer drive cable and disconnect the cable.
9. Remove the vacuum supply hose from the econometer fitting.
10. Disconnect the three colored connectors of the wiring harnesses.
11. Remove the instrument panel from the VAZ 2107 car.
Replacing the backlight lamp in the instrument panel of a VAZ 2107
1. Having turned the lamp socket 90° until its protrusion coincides with the slot in the board, remove the lamp socket.
2. By pressing and turning 90°, remove the lamp from the socket.
Replacing warning lamps in the instrument panel of a VAZ 2107
1. Having turned the lamp socket 90° until its protrusion coincides with the slot in the board, remove the lamp socket.
2. Replace the lamp together with the socket.
Installing the instrument panel on a VAZ 2107 car
Installation of the dashboard and all removed parts on a VAZ 2107 car is performed in the reverse order.
Dashboard of a VAZ 2107 car (location of lamps)
How to properly connect an LED strip in a car
You can connect the LEDs in your car to the on-board network or directly to the battery (not advisable, more on that later).
The on-board electrical network of the car does not correspond to the nominal power parameters of the LEDs, since the voltage taken from the battery reaches 14.5 Volts. This is not fatal for LEDs, but it significantly reduces their service life.
The second risk factor for direct connection to the on-board network is significant current drops. Any car has units with significant power draw from the battery - starter, head lighting, air conditioning, electric power steering. They consume hundreds of watts, and currents reach tens of amperes.
You've probably noticed how, when starting the engine, the headlights go out, the radio and on-board computer turn off, and turning on the air conditioner "cuts down" the volume of the music. And this is when the wiring lines are separated through a distribution box and there are current stabilizers in the equipment.
Use stabilizer
Any LED can operate for a long time only in a narrow range of currents and voltages. For example, an SMD 3528 LED element requires 2.8-3.4V and 0.02A for power supply. Thanks to the limiting resistors on the tape itself, they only feel comfortable at a mains voltage of 12V.
To connect the LED strip to the 12V of the car, use a stabilizer; it is connected to the gap in the positive wire from the battery. You can assemble it yourself. Below is a diagram using the example of a voltage stabilizer LM 7812. It has an output voltage of 12V and produces a current of up to 1A. This is an outdated model and requires additional cooling.
More modern switching stabilizers will be a good replacement for outdated analogues. Here are the characteristics of a regular switching stabilizer from Aliexpress:
- Wide range of input voltage (4-36V) and adjustable output (1-36V);
- adjustable output current (0-5A);
- protection against overheating and short circuit;
- a wide range of operating temperatures is declared -40 +80 degrees;
- Conversion efficiency 96%;
- They cost around $3-4 on Ali (220-270 rubles).
Connecting RGB strip
Remember, there is a list of lighting colors that can be used on a car. Violation of the rule entails deprivation of rights, with confiscation of lighting devices. Read below about the legality of installing the backlight.
When connecting an RGB strip, an RGB controller is added to the circuit, which regulates the power of each color LED and allows you to obtain any color. It is connected after the stabilizer, before the RGB strip.
Connection diagram for RGB tape in a car
When connecting the diode strip to a car, you should avoid bending it. Any break will lead to a rupture of the conductive coating. If you need a sharp turn, make a break and connect the ends with connectors.
Use connectors
They clamp the contacts tightly and are quite reliable even in conditions of constant vibration. But it is better to fill the places of such connections located outside the car with sealant or hot-melt adhesive. If you had to make additional holes in the machine body to route the LED strip wiring, carefully treat them with an anti-corrosion compound and, if possible, seal them. The connection points of the wires should be covered with heat-shrinkable tubing for reliable insulation.
Additional Description
Designation - 621.3710 Name - instrument scale lighting switch
Applicability
— cars: VAZ-2104. 2107 and modifications, IZH.
Specifications:
— turning on and adjusting the lighting of the instrument scale; — number of positions: 2; — nominal voltage: 12 V; — rated load current: 1.5 A; — weight: 0.049 kg.
The main manufacturer is JSC LETZ
Information used: Avtokomplektatsiya LLC
The parts data presented on this page is for informational purposes only.
Download price lists
To download price lists, you need to log in. If this is your first time on the site, please fill out the registration form.
How to make illuminated arrows with your own hands
If you want to make the backlighting of the PP more interesting, then you can experiment a little. I offer one of the lighting options for the VAZ 2107, in my opinion, the most effective. To implement the idea you will need:
- Conventional indicator LEDs of the desired glow color.
- Resistors (according to the number of LEDs) with a nominal value of 550 Ohms.
First you need to disassemble the dashboard to get to the front side of the circuit board. We solder a resistor to the anodes of each LED and fix each pair along the inner perimeter of the instrument panel using a hot glue gun or sealant.
Using short pieces of wire, we connect all the cathodes of the LEDs and separately all the free terminals of the resistors. After this, we remove the standard backlight bulbs and solder wires to the current-carrying contacts of any of them - from the resistors to the “+” power supply, from the resistors to the “-”. The backlight connection diagram will look something like this:
Electrical diagram for connecting homemade illumination of pointer instruments for VAZ 2107
The more LEDs are used, the brighter and more uniform the illumination of the instrument scales will be.
Now you know how to replace the backlight and display bulbs in the dashboard of a VAZ 2107 car and, I hope, you can easily cope with this problem yourself.
Block lights
Here are the turn signal bulbs, dimensions, low and high beams. To get to the side lights and low and high beam lamps, you need to:
Remove the protective cap. We turn it counterclockwise, the indicators are marked on it. It has no thread, but can be removed by turning it 180 degrees. In its inner part there are “antennae” with which it is fixed in the body of the headlight unit.
Remove the wire retainer. It secures the low beam lamps in the reflector housing. This clamp is made of elastic metal, so you need to remove it carefully. We take its upper ends out of the grooves and lower them down, freeing the socket of the high and low beam bulbs.
We take the lamp out of the reflector, holding it by the base, and remove the plug.
Changing the headlight bulb
We take it out of the reflector housing along with the socket. If you haven't done this for a long time, then getting it out will be problematic. To do this, remove the low and high beam unit. We insert a finger into the reflector hole, feel for the size bulb and push it out with a little force.
To replace, you need to lightly press the light bulb and turn it half a turn. It will come out of the plinth retainers and can be easily removed. We insert the new one in reverse order.
Video, instructions for replacing light bulbs in the headlights and dimensions of the VAZ “Seven”:
https://vk.com/video_ext.php
Direction indicators
We turn the turn signal socket counterclockwise half a turn in the headlight unit housing.
Let's take it out. The lamp, similar to its dimensions, is fixed in the socket with two “antennae”. Therefore, they pressed lightly on it, turned it and took it out. The cartridge is made in the form of a single plate with a slot on one side. Therefore, the light bulb must be pulled out of it with little effort, because its contacts will cling to the socket.
Video about modifying the direction indicator in the headlight unit of a VAZ 2105-07, removing and replacing the lamp in it:
https://vk.com/video_ext.php
Workflow Description
Preparation
If the low beam on a VAZ 2107 has disappeared and as a result of the check it is found that the lamps are to blame, then you should purchase new products. This model uses the AKG12-60+55 modification with an H4 socket; this marking indicates that the product has a power of 60 W for high beam and 55 W for low beam; you can purchase such an element at any store that deals in spare parts for domestic cars.
The working process
A huge advantage of the work is that, unlike modern models, access to the headlights is not limited in any way; this greatly simplifies doing the work yourself and allows you to achieve the best result, since you are in complete control of the process.
Important! To prevent the battery contacts from oxidizing during operation, you should protect them with lubricant; if there is no special composition, then ordinary grease would be an excellent option - it will protect lead from oxidation and ensure excellent contact over a long period of time
- If there is no low beam on a VAZ 2107 on only one side, then you can replace one lamp, although experts advise installing two at once, since the light may vary. One way or another, the work begins with any headlight that is convenient for you, first wipe the inside, since most often it is dirty and debris can get inside later.
- First of all, it is necessary to remove the plug, which covers the installation site of the light bulb and serves as protection against moisture and dirt getting inside the housing. This element is removed very simply: grab it and turn it counterclockwise until it comes off, usually this happens in half or even a quarter of a turn.
Advice! When disconnecting a block, it is better to immediately check how well the wires fit, since long-term use may cause the connection to break.
Next you will see a spring clamp that presses the lamp to the body and ensures its immobility during operation. To release it, you need to press the element on top and carefully move it to the side, everything is very simple and very quickly, when you see this knot, you can easily figure out how this is done.
How to fix the dashboard backlight on a VAZ 2107?
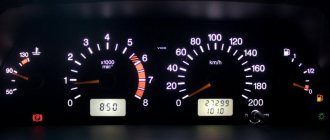
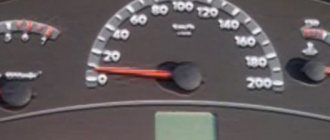
One of the breakdowns that does not directly affect the operation of the car, but causes a lot of trouble for the driver - the backlight of the VAZ 2107 instrument panel does not work. During the day the problem is invisible, but at night the missing backlight significantly complicates driving your VAZ 2107. Because of this malfunction It becomes impossible to see the readings of the main instruments: tachometer, speedometer, econometer, fuel level indicators, charge level, coolant temperature.
The reason that the backlight of the VAZ 2107 dashboard does not light up is most likely the failure of incandescent lamps. Therefore, to eliminate it, you will need to replace the damaged light bulbs with new ones. The task is simple and requires a minimum of tools and skills. However, in order to access the bulbs, you will have to remove the entire dashboard. Armed with a flathead and Phillips screwdriver, you can get to work by first removing the positive terminal from the battery.
First, you need to remove the plastic handles from the heater valve and air damper control levers and unscrew the nut securing the daily counter reset handle so that they do not interfere with removing the VAZ 2107 dashboard.
Next, you need to use a Phillips screwdriver to unscrew the self-tapping screw hidden behind the plug next to the above-mentioned levers. The instrument panel is freed, it remains to perform a few simple manipulations to remove it completely and begin the repair:
- Unscrew the speedometer cable nut;
- Disconnect the hose from the econometer;
- Disconnect the three electrical connectors.
After this, we remove the instrument panel of the VAZ 2107 and begin replacing the failed light bulbs. Everything here is completely simple, we take out the burnt out ones and install new ones in their place.
Thus, on the VAZ 2107, both the backlight and control lamps are replaced. Their location diagram is shown in the following figure.
Here the number 2 indicates the instrument panel backlight lamps. The remaining lamps are control lamps:
- Fuel level;
- Direction indicators;
- Engine control systems;
- Turning on the side lights;
- Engine oil pressure;
- Activation of the handbrake;
- Turning on the high beam;
- Battery charge.
It should be noted that many car enthusiasts, having reached the instrument panel of the VAZ 2107, do not bother with trivial repairs and perform backlight tuning. To do this, instead of conventional light bulbs, LEDs of the appropriate size are installed. Thanks to this modernization, lighting works more efficiently. You just need to choose the right resistance (resistor) connected in the circuit in series with the LEDs. In addition, you can stick stylish scales on the instruments instead of dull standard ones. Another option for implementing LED backlighting is to install lighting elements not in standard places, but along the perimeter of the panel. This method requires large material costs, but the result is more effective.
Reassembling the dashboard is performed in the reverse order:
- The electrical connectors, the econometer hose, and the speedometer cable are connected in series;
- Install the panel in its regular place;
- Fix it with a self-tapping screw and put the plug in place.
- Put the handles in place and secure the daily counter reset handle with a nut.
As a result, the instrument lighting works, the task can be considered completely completed.
How to change standard lighting
Standard lamps can be replaced with more powerful and modern ones. The most suitable option is considered to be the main lamp for interior lighting, borrowed from Priora. To install it you will need to have:
- masking tape;
- sharp knife (can be a stationery knife);
- wrench 12;
- Screwdriver Set;
- pencil or marker for making marks.
Carefully remove the visor next to the rearview mirror. Please note that its weight is quite high, so if you are not careful, the ceiling may collapse completely. Outline the place of the new shade on the visor with a pencil, cut a hole along the contour. Secure the new lamp in this hole using sealant.
Since the old wiring does not work with more modern devices, make a new one. You will need to throw at least 2 wires - “minus” to the body and “plus” to the contact of the new lamp. In foreign cars, the light comes on when the doors are opened, this is very convenient. If you want to do the same, then place the third wire on the limit switch in the door. Route the wiring along the right pillar.
Light bulbs - indicators
The electronic part includes seven light bulbs located in the center of the dashboard, in one column. To the left of them, the shield has dial indicators: tachometer, econometer and coolant temperature sensor, and to the right, symmetrically to the left side: speedometer, fuel level and battery charge sensor. Let's start with the light bulbs:
- Direction indicators - located at the very top of the column, blink when the turn signal is turned on;
- The malfunction sensor of the system responsible for engine operation is the second indicator from the top. Used only on VAZ 2107, with an injector engine. The carburetor engine shield includes this light, but it does not carry any symbols.
During normal operation of the system, this indicator lights up for a few seconds when the injector starts, and soon goes out. If there is a malfunction in the system, the light will flash, provided that the engine is running. Also, flashing means that a breakdown in the system allows you to get to the service station under your own power. I changed the bulbs in the foglights with the language of what kind of bulbs are in a Nissan, maybe MTF. If the light is constantly on, then the engine must be turned off immediately. Driving this vehicle is strictly prohibited;
- The indicator showing the battery charge level is the third light from the top. When the battery is charged normally, it lights up when the key is in the “ignition on” position. Once the engine starts, the light should go out. If this does not happen, then your battery has a critical charge level. What kind of light bulbs are there in - cr-v.su. But, do not rush to go charge it, because if it is discharged during the operation of the car, it means that it did not receive a charge from the generator. The reason may be: a loose alternator belt, a malfunction of the mechanism, or a breakdown of the control lamp indicating the charge level. In any case, driving on such a battery is prohibited, since the charge may be lost at any moment and the car will not start;
- The side lights light is the fourth from the top, lights up when the low/high beams are off, but when the side lights are on;
- The high beam lamp is the fifth from the top, activated when the high beam lights on the car are turned on;
- The low oil level sensor is the second light from the bottom. During normal operation, it lights up when the ignition is turned on, and goes out when the engine starts. If, after the engine has started, the light continues to light, this indicates one of two reasons: a malfunction of the engine lubrication system, or insufficient oil level. In the first case, the reasons may be: oil pump, highly liquid state of the oil, clogged cooling system. In the second case, the malfunction can be eliminated by simply adding oil to the cylinder block.
Stop signal
The brake light switch is located on the brake pedal hanger holder. The brake light is turned on as follows: when you press the brake pedal, the spring in the switch presses the control pin. At the same time, the contacts in the switch close the brake light circuit. When the brake pedal is released, the pin returns to its original position and the brake light goes off.
If the brake lights do not work on a VAZ-2107, you should make sure that the cause of the malfunction is not in the switch. To do this, you need to unscrew the ends of the power wires and place a jumper between them: if the brake lights turn on, the switch should be repaired or replaced. To replace the brake light switch, you must turn it clockwise 90 degrees and remove it from the mount. After installing the new switch, make sure that the neck of the switch fits snugly against the brake pedal and turn it 90 degrees counterclockwise. The new switch is adjusted automatically when the brake pedal is pressed. The switch operates normally if the brake light is turned on no earlier than the brake pedal has been moved 5 mm, but no later than it has been pressed 20 mm.
Fuse F11 is installed in the brake light circuit, which, in addition, is responsible for the operation of the interior body lighting.
Some VAZ-2107 owners install an additional brake light so that the signals given by the driver are more visible on the road. This type of brake light is usually placed on the rear window inside the cabin and operates on LEDs.
Other problems that cause the backlight to not light up
Bulb burnout is the most common, but not the only reason why the dashboard backlight fails. Therefore, we are ready to offer several options for solving this problem:
- failure of the dashboard backlight brightness control. This part breaks quite rarely and requires quite complex work to dismantle and replace. Therefore, if you are sure that this is the problem, you can at least temporarily transfer the positive wire from the side lights to the backlight bus. The regulator is located on the right side of the steering wheel next to the hydraulic optical correctors;
- combustion of fuses responsible for protecting the backlight system from voltage surges and sudden increases. They will need to be replaced, since these parts cannot be restored;
- break of resistance in the panel, which is usually caused by overheating;
- poor contact where the lighting system is connected to the on-board network.
Almost all of the problems listed above can be fixed on your own. If you have all the necessary tools and experience in removing the dashboard, the repair will take little time and will not create any serious problems.
https://youtube.com/watch?v=zjHQj2c1M-w
Factory backlight
Often there is not enough light in the center in the interior, so the question arises how to add it. To do this, you can install factory lighting from the Lada Priora car. It is presented in the form of a compact lamp that has three operating modes: bright light, low backlight and off. This lamp must be installed in the interior of the seven under the visor next to the rearview mirror. The principle of installing the lampshade on the visor is to perform the following steps:
- First you need to remove the visor.
- Using a marker or pencil, you need to trace the outline of the lampshade on the visor, and then cut out a hole.
- Install the lamp assembly with the wires that need to be connected to the on-board network.
- To ensure that the lamp stays firmly on the canopy, it is necessary to resort to the use of sealant.
There are no problems with connecting the wires, since one wire is connected to the positive, and the remaining two to the negative (as an option, lead one negative to the wire from the door switch so that the lamp can light up when the interior door is opened). As a result, we get updated lighting in the interior of the VAZ 2107 car. If you need a simple option, then instead of the lampshade you need to take a piece of LED strip and glue it to the visor. This method is fast, but there is no need to talk about aesthetics, although such “collective farm” tuning is very popular among owners of not only sevens.
Tuning interior lighting
The standard interior lamp of the VAZ 2107 does not cope with its purpose well enough, so the question of how to make the illumination in the seven with your own hands remains relevant. In addition to the standard lamp from Priora, there are other options for equipping the VAZ 2107 with internal illumination. Let’s consider the features of the implementation of these options.
Installation of LEDs on the roof canopy
It should be noted right away that not everyone likes the lampshade from Priora for installation as a backlight in the seven, so for those who want to get unique lighting, there is another way. Its essence is that LEDs and buttons must be installed in the roof visor. Moreover, it is not a strip LED that is used, but an ordinary single one located in a plastic socket. Such an LED is cheaper than a lampshade from Priora, so you can even buy several of them.
To implement the idea, you will need to take a drill with a drill, and drill in the removed visor the number of holes required for installing LED lights and power buttons. If you plan to install more than one of these elements, then it is important to ensure that they are located in straight lines, otherwise it will be ugly.
The wires from the LEDs must be connected to the button, and then hidden to connect them. To make lighting in the interior of the seven, you will need a minimum of cost and time, and already tonight you will be able to use the lighting if necessary.
Foot lighting in the VAZ 2107 interior
We've sorted out the main interior lighting, and now it remains to figure out how to implement lighting for the feet. Such lighting is usually more aesthetic than useful, but when something falls from your hands onto the rug, it is very difficult to find it if there is no backlight. In addition, if there is no backlight, then it is very difficult to get the key into the ignition lock hole, and sometimes you have to spend a lot of time to do this.
Location of lamps on the instrument panel of VAZ 2107
The photo shows the reverse side of the vehicle's instrument panel. Light bulbs are marked with numbers. Four of them under No. 2 are backlight lamps, the others are control lamps.
They are placed on the board and are created for visual information to the driver. Any of them shows the operation of certain systems, components and assemblies of the car:
- Alarm for low amount of gasoline in the tank.
- Device lighting.
- Monitoring the operation of direction indicators.
- Signal about lack of battery charging.
- Indicator of included side lights.
- Low oil pressure alarm.
- Indicator of the applied handbrake.
- High beam indicator.
- Alarm about malfunction of the forced injection system on engines.
Circuit breakers
First, check the fuses, they are located in the mounting block under the hood on the right side (pictured under No. 5).
Fuse F10 is responsible for the device panel.
If the fuse link has melted, it means there is a short circuit. It makes sense to examine the part of the electronic circuit for which this fuse is responsible. Perhaps it worked due to the burnout of one of the lamps or the influence of external causes on a section of the circuit. If the fuse is intact, you should investigate further.
Faulty incandescent lamps
If everything you did above did not produce any results, you need to remove the panel and check all the light bulbs.
Failure of incandescent lamps involves burnout of the tungsten filament. In another case, there may be a physical impact on the lighting device, after which it will not be able to work.
You can check it visually, alternately removing it from the sockets of the electrical board and inspecting the integrity of the tungsten filament. Or using a multimeter.
To eliminate all the reasons why lighting and signaling devices may not work, it is worth checking the integrity of the conductive paths marked on the electrical board.
Due to exposure to the environment, they oxidize and destroy. Easy to remove. It needs to be found, cleaned and soldered. It is also worth checking the terminals connecting the wires.
Incandescent lamps
AMN 12-3-1 lamps are installed to illuminate the device panel.
Lamps of brand A 12-1.2 are installed as signal lamps.
Legality of outdoor lighting and fines
In our country, laws are interpreted in favor of the interpreter. The wording is vague and can be interpreted in two ways. What you need to know.
There is no direct ban on installing underbody lighting. But there are a number of points that allow us to find fault with you and, unfortunately, there is nothing to oppose them with.
Making unforeseen changes to the vehicle design
Changes were made to the design of the vehicle without permission from the State Road Safety Inspectorate of the Ministry of Internal Affairs of the Russian Federation.
It is impossible to obtain official permission to install lighting (uncertified element). Punishment for violation: warning or fine of 500 rubles.
This is the most loyal point on which they can find fault with you. You will often get off with a warning.
Violation of the rules for installing lighting devices
You will fall under this clause if you install LED car lighting in prohibited colors.
According to the Russian Federation Traffic Regulations, section 3.6. External lighting devices. Installation is prohibited:
In short, the following is allowed:
Violation of this clause of the traffic rules entails deprivation of a driver's license for a period of 6 months to a year.
Installation without permission of devices for supplying special light signals
Driving a vehicle on which, without appropriate permission, devices are installed to provide special light or sound signals (with the exception of a security alarm).
This is the most dangerous point and, if the evil inspector wishes, any additional lighting of the car can be adjusted to this wording. In practice, it is used very rarely (unless you put a red flashing tape in the radiator, this option will definitely be regarded as a special signal). It is difficult to challenge in court, but it is possible by replacing the punishment with a fine of 500 rubles.
Violation provides for deprivation of rights for a period of one to one and a half years, with confiscation of devices for signaling.
Source
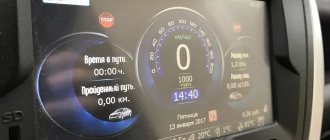
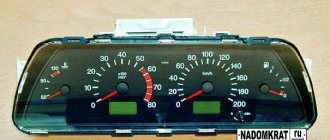
VAZ-2107 instrument panel diagram
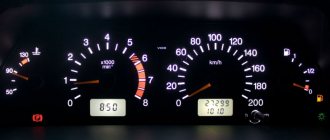
The instrument panel is an important part of every car, and the 2107 is no exception. For visual perception, it is better to look at what the VAZ 2107 “tidy” diagram looks like.
1 — automobile voltmeter;
2 - speed indicator or, more simply put, speedometer;
3—machine trip meter—odometer;
4 - tachometer. It shows the frequency at which the crankshaft rotates. The yellow zone on the scale indicates that the engine is running at high speeds; the red zone indicates unacceptable modes. 6000 rpm is the maximum permissible speed.
5 - coolant temperature indicator. The green zone is the normal coolant temperature. The red zone indicates engine overheating. The vehicle must not be operated at a coolant temperature exceeding 118 °C;
6—econometer. This indicator helps you select the most economical mode for engine operation from all modes (the instrument needle should be in the green zone of its scale).
7 - block (CL) of warning lamps of the VAZ 2107 car:
— turning on the turn indicators (when turning on a left or right turn, it lights up with a flashing green light);
— malfunction of the engine control mechanism (used on a car with an injection power unit. The lamp glows orange if the ignition is on. When the engine starts, it goes out). If there is a malfunction in the system, the lamp flashes or is constantly on. In such a situation, using the car is not prohibited, the system will simply switch to backup mode;
— battery charge lamp. When the ignition is turned on, the lamp on the instrument panel turns red and goes out when the engine starts. If the lamp continues to light, the battery is not charged. There may be several reasons: the generator drive belt is insufficiently tensioned, the control lamp or generator circuit is faulty. If you continue to use the car, this may lead to the battery being completely discharged and the engine stopping. A fire may also occur;
— side light indicator (lights up green if the side lights are on);
— indicator for turning on the high beam of the car’s lighting devices (the lamp lights up blue if you turn on the high beam of the headlights);
— insufficient oil pressure. When the ignition is turned on, the oil pressure lamp begins to glow red and immediately goes out when the engine starts. If the light remains on, there is low oil pressure. To avoid failure of the power unit, you need to turn it off and try to eliminate the cause of the malfunction;
— the parking brake is on (the lamp lights up bright red if the ignition is turned on and the parking brake lever is raised).
8—indicator of the path traveled per day;
9 — (CL) fuel reserve. The yellow light comes on if there is less than 6-4 liters of fuel left in the fuel tank;
10 — fuel level indicator;
Connection.
The diode-type backlight can be connected in two ways, the first of which is to connect directly to the battery. This method is considered more reliable. But it’s worth mentioning the second proposal - connecting to the wires that are located on the dashboard of the car. Despite the higher reliability of the first method, the second is also widespread and often used, due to the possibility of activating the backlight during ignition. You need to start work by disconnecting the battery. This moment is mandatory.
Next, you need to decide on the area where you want to place the luminous elements, if, of course, you haven’t decided yet. We can give advice on the fact that such a ribbon looks simply unique over a torpedo. In this area it will also be perfectly fixed and will not be subject to physical stress, that is, it will not tear or fray. You can also place this object under the seats; it will not only be beautiful, but also useful at the most unlit times of the day. For proper installation, you must prepare a fuse, a switch and two wires that will be connected to the battery in the future. When you get to installing the fuse, make sure it is located closest to the battery, as it must be accessible at all times. If you do everything exactly as we recommend, the type of LED system in the interior of your car will be most correctly arranged. Next, you will need a wire protector tube, which should be used on one of the cables. After soldering the wire, it should be coated well with silicone and a tube should be placed on it. Heat it before it starts to shrink. Now you can connect the second wire to the car battery and start connecting it to the case. If the products you purchase have a controller, you can use it to control the colors while sitting in the car. When you complete all of the above steps, you will be able to enjoy the updated design of your VAZ car.
Lada 2107 PHOENIX › Logbook › Replacing lamps in the dashboard
Perhaps one of the most noticeable tuning steps for the driver is dashboard tuning. There are a lot of recordings of this type on the drive, and it is quite possible that mine will be just another one... However, I will tell you about what I have not seen in other articles.
First you need to buy all the necessary components, in particular: Look at photo No. 3. On the left is what it was. On the right is what was installed.• LED lamps: 4 pcs. (bottom right) white light + 7 pcs. (top right) of which 3 pcs. red light, 2 pcs. green, 1 pc. blue, 1 pc. white.• Base (holder) for a small lamp. (top left)• 25 Volt electrolytic capacitor, 2000 - 4000 Microfarads
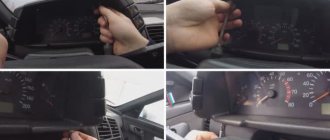
Next, you need to completely remove the dashboard and take it to a place convenient for work. In general, this is not difficult, but you will have to get dirty. You can search for how to do this on the internet, for example here: 2107club.ru.
After we have washed the panel from dirt, we proceed to modernization. For work you will need image No. 1. It shows the polarity for the LEDs using red and blue dots, which you need to know, otherwise the lamps will not work. You can check the polarity on the lamp itself “at random” using a 12-volt DC power supply or at least a 9-volt “crown”
(!ATTENTION: LEDs do not like polarity changes and may fail.). Personally, I used colored LEDs, however this is not necessary and you can use all white
We change everything except one - the low battery indicator, in image No. 9. This lamp cannot be replaced.
And now about the nuances. In several articles I came across the opinion that the green translucent caps in which the backlight lamps are located are not needed, supposedly because of them the light is dimmer. This may be so, but these caps are necessary for sealing so that dust does not get under the “glass” of the panel. I strongly do not recommend touching them. Moreover, the brightness with them is quite normal. True, they give an emerald tint of glow (seen in photo No. 2). Personally, in my case there were problems. The turn indicator lights up for a while after turning off the turn, after which it flickers a little. What this is connected with is not clear. I solved this problem in the wrong way: I soldered and glued the old lamp onto the board, parallel to the LED. I haven’t been able to solve the following glitch yet: the “dimensions/low beam” indicator glows faintly when the switch is in the off position. I tried to connect in parallel a fragment of the LED strip glued to the right side, but the problem remained. But now, when I turn on the headlights/low beam, the space behind the ventilation control levers lights up.
What is the capacitor for? And in order to eliminate the twitching of the fuel level needle. Connection diagram in image No. 1. If you need it, of course. It is worth noting that after this upgrade, when the ignition is turned on, the needle will rise smoothly until the capacitor is fully charged, and when turned off, it will beat to maximum. The severity of these effects depends on the capacity. The larger the capacitance, the better the smoothing, but the stronger the side effect. I do not recommend using a capacity less than 2000 and above 10000 uF.
Also, I soldered a 25 V 10000 uF capacitor in parallel with the dashboard backlight lamps. True, I already doubt its usefulness...
In image No. 2 you can see the areas outlined with a green marker, this is for those whose panel creaks. I applied two layers of adhesive tape to the plastic pins. I taped other contact points with black electrical tape. For example, along the edges of the “glass”, before returning the panel to its black body. And also the body itself, as well as the rim. So that the points of contact with the dashboard are “isolated”. No photos, sorry.
In conclusion, I will say that all the modifications are worth it. The panel looks livelier, newer, more modern.
Floor lighting
One of the popular and modern methods of tuning is to make floor lighting with a 12 V LED strip. Many people wonder where the wires go in this case:
- The tape at the driver’s feet extends from the steering column, and a bundle of wires for connection is also located there.
- If you are lighting the passenger seat, the wires should be at the passenger's feet.
- To illuminate the rear seat, the tape is placed under the shelf.
Car enthusiasts can even place LEDs in the trunk or on the bottom of the car. It looks unusual and beautiful. For the floor, bottom, trunk, it is recommended to choose types of tapes that are protected from moisture and contamination. They cost an order of magnitude more. Don’t try to save money, buy only high-quality LEDs. Carefully insulate the backlight connection points to prevent short circuits and protect the wiring from combustion.
Choose the color of the ribbon yourself. The most advantageous option is to match the color of the car with the shade of the backlight. You can choose exotic combinations. Some drivers of such cars specially repaint the body or cover the interior with leatherette. This requires a significant investment of effort. Large-scale tuning is recommended only for those who are familiar with the intricacies of this work.
When analyzing the connection of an LED strip in a car, the main thing is not to go against the rules of the road and common sense. In the end, we will consider the legality of external LED car lighting and the possible consequences when meeting with traffic police inspectors.
Installing LEDs on a car does not require special knowledge and skills, so drivers do the retrofitting with their own hands, often without taking into account the specifics of LED power supply. An incorrectly connected tape means its short lifespan.
Let's figure out how to properly install the LED strip into the car and how to connect it.
Location of lamps on the instrument panel of VAZ 2107
The photograph shows the reverse side of the car's instrument panel. Light bulbs are marked with numbers. Four of them under No. 2 are backlight lamps, the rest are control lamps.
They are located on the board and are intended for visual information to the driver. Each of them indicates the operation of certain systems, components and assemblies of the car:
- Alarm for low amount of gasoline in the tank.
- Instrument lighting.
- Monitoring the operation of direction indicators.
- Signal about lack of battery charging.
- Indicator of included side lights.
- Low oil pressure alarm.
- Indicator of the applied handbrake.
- High beam indicator.
- Alarm about malfunction of the forced injection system on engines.
Workflow Description
Preparation
If the low beam on a VAZ 2107 has disappeared and as a result of the check it is found that the lamps are to blame, then you should purchase new products. This model uses the AKG12-60+55 modification with an H4 socket; this marking indicates that the product has a power of 60 W for high beam and 55 W for low beam; you can purchase such an element at any store that deals in spare parts for domestic cars.
The working process
A huge advantage of the work is that, unlike modern models, access to the headlights is not limited in any way; this greatly simplifies doing the work yourself and allows you to achieve the best result, since you are in complete control of the process.
Important! To prevent the battery contacts from oxidizing during operation, you should protect them with lubricant; if there is no special composition, then ordinary grease would be an excellent option - it will protect lead from oxidation and ensure excellent contact over a long period of time
- If there is no low beam on a VAZ 2107 on only one side, then you can replace one lamp, although experts advise installing two at once, since the light may vary. One way or another, the work begins with any headlight that is convenient for you, first wipe the inside, since most often it is dirty and debris can get inside later.
- First of all, you need to remove the plug, which covers the installation site of the light bulb and serves as protection against moisture and dirt getting inside the housing. This element is removed very simply: grab it and turn it counterclockwise until it comes off, usually this happens in half or even a quarter of a turn.
Advice! When disconnecting a block, it is better to immediately check how well the wires fit, since long-term use may cause the connection to break.
Next you will see a spring clamp that presses the lamp to the body and ensures its immobility during operation. To release it, you need to press the element on top and carefully move it to the side, everything is very simple and very quickly, when you see this knot, you can easily figure out how this is done.
The light went out in the interior of the VAZ 2107, help
Because You are not logged in. To come in.
Because you are not a trust user. How to become a trustee.
Because The topic is archived.
Because You are not logged in. To come in.
Because you are not a trusted user (phone number is not verified). Enter and confirm your phone number. Read more about trusts.
Because The topic is archived.
Because You are not logged in. To come in.
Because you are not a trusted user (phone number is not verified). Enter and confirm your phone number. Read more about trusts.
Because The topic is archived.
Because You are not logged in. To come in.
Because you are not a trusted user (phone number is not verified). Enter and confirm your phone number. Read more about trusts.
Because The topic is archived.
Because You are not logged in. To come in.
Because you are not a trusted user (phone number is not verified). Enter and confirm your phone number. Read more about trusts.
Because The topic is archived.
Because You are not logged in. To come in.
Because you are not a trusted user (phone number is not verified). Enter and confirm your phone number. Read more about trusts.
Because The topic is archived.
Because You are not logged in. To come in.
Because you are not a trusted user (phone number is not verified). Enter and confirm your phone number. Read more about trusts.
Because The topic is archived.