For an electrochemical reaction to occur in lead-acid batteries, a solution of sulfuric acid and water is required, which gradually loses its characteristics. Replacing the electrolyte in the battery allows you to extend the life of the product. By the appearance of the drained liquid, you can determine the condition of the current source plates and make a decision about the future fate of the battery.
Find out how to replace the electrolyte in a battery.
When to add electrolyte to the battery
The electrolyte poured into the battery jars at the factory does not require periodic replacement during normal operation of the battery. The manufacturer recommends regularly measuring the density with a hydrometer; distilled water is used for topping up. If the battery case is equipped with an inspection window with a charge level indicator, then it should be taken into account that the measurement is carried out only in one bank.
The electrolyte is changed if the following defects are detected:
- cloudiness of the solution due to the ingress of foreign impurities, leading to a decrease in the performance of the power source;
- uneven charge across sections;
- accelerated self-discharge;
- after full charging, the density of the electrolytic composition is lower than required;
- decrease in the liquid level below the upper edge of the electrodes;
- crystallization of the solution occurred at low air temperatures.
Please note that replacing the fluid does not guarantee restoration of the battery's operating parameters. For example, when the positive and negative electrodes are short-circuited, the solution in the jar becomes cloudy. Filling with new electrolyte will not eliminate the problem; such batteries must be recycled.
Possible faults
In most cases, car batteries suffer from a problem such as loss of density. The trouble is due to a variety of reasons, namely:
- Aging.
- Sulfation of plates.
- Incorrect maintenance.
The most common factor is considered to be sulfation of the plates, which is caused by a constant lack of proper charging. To understand the principle of destruction, it is enough to remember school chemistry and evaluate the processes that occur in the device.
As you know, inside the battery there are lead grids, which, in turn, are filled with lead dioxide.
During the discharge, reduction of lead oxide begins at the cathode and oxidation (reverse process) at the anode. In simple words - on the plus and minus. In both the first and second cases, the formation of lead sulfate begins, and the density of sulfuric acid rapidly decreases. Many car owners often make a big mistake - having measured the density indicators, they begin to add electrolyte, increasing the density to the required level. As a result, further sulfation occurs and complete damage to the battery .
Experts advise starting to measure density only on a fully charged device with normal acid quality. Even if the built-in battery indicates 100% charge, it may not be accurate.
How to prepare battery electrolyte
To make an electrolyte of the required density with your own hands at home, you will need to prepare reagents and tools:
- sulfuric acid (to create a solution you will need up to 1 liter of liquid);
- distilled water (4-5 l, depending on the size of the battery case);
- hydrometer to determine the density of the solution;
- rubber gloves and acid-resistant protective apron;
- protective glasses;
- measuring containers;
- reagents for removing spilled acid or electrolyte (soda ash solution or ammonia);
- glass stable container for mixing components;
- glass rod for stirring reagents.
Before starting to prepare the solution, it is necessary to determine the volume of components required to obtain the liquid of the required concentration. For example, to form 1 liter of electrolyte with a density of 1.27 g/cm³, you will need 791 ml of water and 274 ml of sulfuric acid.
The required amount of distilled water is added to the glass container, the acid is poured in portions and stirred with a glass rod.
The resulting solution is kept at room temperature for 12 hours, then the electrolyte density is checked and adjusted.
What you need to know when working with batteries
When operating or servicing a battery, you must follow simple but mandatory rules:
- When making an electrolyte yourself, you need to pour the acid into water, but in no case vice versa. Water has a lower density and splashes from the surface of the acid.
- If electrolyte gets on the skin, it must be washed off with plenty of water and soap and lubricate the affected area with any cream.
- If the solution gets into your eyes, immediately rinse them first with plenty of water, literally placing your open eye under the stream, then with furatsilin solution (1 tablet per glass of water) and be sure to consult a doctor. Under no circumstances should you wash your eyes with boric acid from a car first aid kit - it is used for completely different cases!
- If acid gets on your clothes or shoes, do not be lazy and immediately wash the area with plenty of soap. If you don't do this, after a few hours the fabric and even tarpaulin leather will crumble into dust.
- Do not charge the battery indoors. During charging, hydrogen and oxygen are released from the cans, which will explode at the first spark no worse than a bomb. Be sure to open the garage door or use the hood. And, of course, do not use matches for illumination and do not smoke.
- Do not turn the battery over during transportation, even if you are taking it for recycling. The section plugs are leaky, and sulfuric acid corrodes almost anything.
Complete electrolyte replacement
Battery electrolyte option.
To properly drain the spent solution from a lead-acid battery, you will need to perform the following steps:
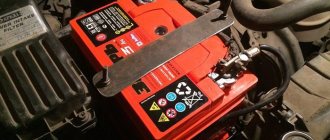
- Remove the battery from the car and install it at your workplace. Wearing safety glasses and gloves and performing manipulations without protective equipment is not recommended.
- Wipe the surface of the battery case from dirt with a rag moistened with ammonia.
- Unscrew the plugs and set the parts aside. Products with a monolithic lid require drilling holes.
- It is prohibited to drain the solution by turning the battery case over, since sediment particles short-circuit the plates and cause accelerated wear of the battery. To drain, use a syringe, a rubber bulb or a hydrometer body, from which the indicator rod with the float has previously been removed. Pumping is carried out sequentially from all banks of the DC source. The liquid is drained into a separate container that is resistant to acids.
- After the upper edges of the plates are exposed, it is necessary to tilt the body 45°. A stand is used to hold the product in an inclined position.
- Collect remaining liquid; distilled water is used to remove residual reagent and dirt, which is then pumped out with a syringe or bulb. To speed up the washing out of the old reagent, it is recommended to rock the body from side to side. The washing is repeated several times; it will not be possible to completely remove the old electrolytic solution, since the liquid remains in the gaps between the plates.
It is prohibited to drain the solution through additional holes drilled in the bottom or side of the housing of maintenance-free batteries. When making channels, there is a risk of damage and short circuiting of the electrodes; it will not be possible to seal the holes hermetically. At the bottom there are additional reinforcing elements that make it difficult to drain the reagent.
What to add to the battery - water or electrolyte
If the procedure for restoring the working fluid level is performed, then distilled water is added to the battery. The level is brought to the marks located on the plastic case. It is not recommended to fill in excess electrolyte, since the liquid during operation of the power source will be thrown onto the body and fall on the body and structural elements of the car, causing corrosion.
Electrolyte is poured into the battery only during the fluid replacement procedure. For filling, a glass or plastic funnel is used; the same volume of solution is filled into the jars. The capacity of the cans depends on the technical parameters of the battery; filling requires from 2 to 6 liters of liquid.
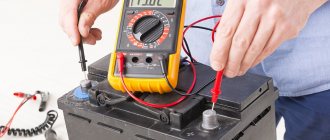
Then the level of the electrolytic solution is checked with a special glass tube; it is necessary to achieve uniformity of the parameter across all banks. The battery is left for 2-3 hours, then the voltage is measured at the terminals of the current source.
Device check
If two days have passed, you can begin charging activities. For the first charge, take a special device that produces a voltage of 12 V. At this stage, it is necessary to remove the protective plugs and connect the charger to the battery. Then cyclic charging begins, which consists of repetitions of the charge-discharge circuit.
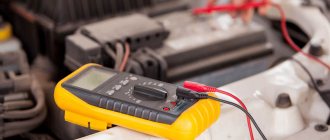
The optimal current should not exceed 0.1 ampere. For the first procedure, such indicators are quite enough. The battery is charged until the charge level reaches 100%. To check, take a voltmeter, which is used to determine the voltage of each section or terminal. It is important to make sure that the voltage at each section is not lower than 2.3 V, and at the terminals - not lower than 13 V.
How to add electrolyte to a maintenance-free battery
Maintenance-free batteries are equipped with a sealed case without additional plugs in the banks. The products are equipped with special lids in which labyrinth channels are located to remove gaseous reaction products.
The owner can change the electrolyte or add liquid to the jars only through additional holes, which must be done independently.
Correctly add electrolyte to the battery.
How to disassemble the battery to add electrolyte
Algorithm of actions required to add water to the electrolytic solution of a maintenance-free power source:
- Remove the sticker located on the top cover of the power source housing.
- Under the label there is a plastic strip that needs to be pryed off from the side with a flat-head screwdriver. Pull the element upwards; plugs of the battery cans are attached to the parts of the batteries on the lid. Centra power supplies have a similar design. Then the owner can begin to determine the level and density of the electrolyte, as well as replace the solution.
- If the plate cannot be removed (for example, on Varta or Bosch products), then you need to visually determine the location of the filler necks of the cans.
- Pierce the lid with a thin awl, then perform circular movements associated with lowering the blade down. Piercing is performed until the tip of the awl begins to contact the battery electrodes.
- Place a mark on the tip to determine the distance from the cover to the top edge of the plates.
- Pull the awl out of the hole and then measure the resulting gap. Since the liquid level should be located 12-15 mm above the upper edge of the electrodes, the owner can calculate the value of the gap between the surface of the electrolyte and the plane of the housing cover.
- To fill the water, use a medical syringe with a volume of 10-15 cm³, equipped with an elongated needle. Then you need to cut the needle to the previously measured distance; the plastic spout should not fall into the holes made.
- Fill the jars with water until the required level is reached. Checking whether the reservoir is full is done by lifting the syringe plunger. If air is drawn into the tank, water continues to be added.
- After filling the cans, you need to rock the body of the power source in different directions, which will allow you to evenly distribute the water in the solution. Shaking the product is prohibited due to the risk of slag getting between the plates. Wait 20-30 minutes, and then carry out a control level measurement. If the volume has dropped, then an additional portion of water is introduced.
- Seal the holes with sealant; the factory label will not stick to the original place. Charge the power supply and then test the performance of the product. It should be taken into account that the technique provides a temporary restoration of battery characteristics.
Acid preparation
It is important to understand that you cannot take any electrolyte and pour it into the reservoir. For this purpose, you need to select a special acid that meets strict specifications
And one of them is density.
It is desirable that the density indicator be 1.28 g per cubic centimeter. To determine accurate data you need to use a hydrometer
It is no secret that many store-bought models have a density of 1.40 g, so it is important to clarify this point at the purchasing stage
Experienced motorists create electrolyte with their own hands, but its quality is far from desirable and is at a low level. As a result, battery performance is compromised.
To avoid risks, it is better to purchase finished products.
After completing the cleaning of the cans and the preparatory steps, you can proceed to filling the electrolyte. During this action the following applies:
In addition, the motorist needs to use a hydrometer, which will allow a preliminary density check. Ideally, it should be at the level of 1.28 g per cubic centimeter. Provided that the displayed indicator corresponds to the norm, you can slowly fill the tank, having previously allocated the required amount of acid for each of them.
Useful recommendation: if the electrodes are coated with sulfate deposits, it can be removed by adding special additives to the liquid.
The tanks should be filled evenly and gradually, removing excess with a rubber bulb. They also need to be wiped with a cloth or napkin. Further filling of the cans is simple and does not require any professional approach. It is enough just to determine the density indicators and gradually fill the empty jars with liquid.
If the tanks are completely full, under no circumstances should you begin working with the battery. It is better to leave it for 24-48 hours in idle mode. This will allow the additives to completely dissolve and the air to escape. Only after this can you begin charging and checking.