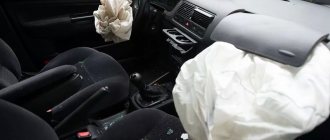
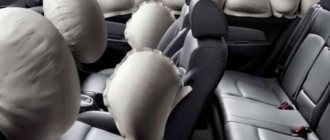
One of the most important differences between Lada Kalina and Lada Granta cars is more advanced safety parameters. One of the most important devices for the safety of the driver and passengers of a car are airbags. These are present in the Lada Granta on the driver’s side. This car model also has side airbags for both the driver and his passengers. There is another airbag for the passenger, who is located next to the driver of the car.
Removing the driver's airbag
In this article we will discuss removing the airbag, as well as installing it in a Lada Granta car. If you decide to buy a new car or take out a car loan for a VAZ, then you should be confident in your safety. Let's start by removing the PB located on the driver's side. Before carrying out the airbag removal procedure, you will need to stop the car and turn off the ignition. Next, you must lift the hood and remove the battery cables from the negative side. One of the main conditions to remember is that your car's wheels must be in a straight-ahead position.
The next step is to unscrew the two bolts that secure the gas generator module assembly to the steering wheel. All these procedures must be carried out while being in a position to the side of the steering wheel. Next, you must disconnect the harness, the plug of which is L-shaped. After this, proceed to remove the gas generator module from the steering wheel. After removal, the module should be placed with the lid facing up on a flat surface.
Payment via PayPal
After selecting payment via PayPal, the PayPal payment system will launch, where you need to select the payment method: bank card or PayPal account.
If you already have a PayPal account, then you need to log into it and make a payment.
If you do not have a PayPal account and you want to pay using a bank card via PayPal, you need to click on the “Create an Account” button - shown with an arrow in the picture.
PayPal will then prompt you to select your country and provide your credit card information.
Why turn signals do not work on a VAZ 2115
After specifying the information required to make the payment, you must click on the “Pay Now” button.
Power off
The next step in our operation will be to remove the upper casing using a Phillips screwdriver, as well as remove the O-ring from the ignition switch. Next, you should proceed to disconnect the wiring harness from the rotator connector, and after this operation, disconnect the steering horn harnesses. The final step in the procedure for removing the airbag from a Lada Granta car will be removing the steering shaft and connecting it to the rotating device using a flat-head screwdriver.
Let's move on to installing an airbag on a Lada Granta car with our own hands.
Technological process for replacing a steering wheel
After the airbag is removed, you can begin to remove the steering wheel. So, let's consider the technological process:
- Using a marker or other available means, we make marks on the steering shaft and wheel. This is necessary in order to return the steering wheel to its previous position.
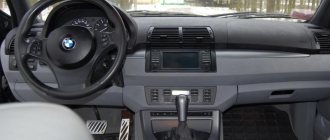
General view of the steering wheel without an airbag
Use a marker or other method to mark the steering wheel position
Hit the steering wheel to knock it off the splines
Removing the steering wheel
If you need to change the position of the steering wheel, then you should align the wheels straight and put the steering wheel on the splines. We drive a few meters and look, if everything is satisfactory, then we assemble it in the reverse order, if not, we remove the steering wheel and set it as needed.
Putting the pillow in its place
We remind you once again that you will need to align the car's wheels in a straight position, and also the car's battery cables must be removed from the negative side. Then you should install the connector of the rotating device with the steering shaft and remove the transport key so that it does not fix the movement of the device. Following these operations, you need to install the washer levers, as well as the alarm. Next, disconnect the connector and connect the on-board power supply connectors. The next step is to connect the car's power wire to the spinner plug and install the O-ring. Next, you need to install the upper shaft casings and begin securing them to the lower shaft. After installing the airbag on a Lada Granta car with your own hands, you will need to turn the steering wheel of the car to check for any jams.
Installation instructions
This manual is intended for those who have minimal skills in working with tools and vehicle systems. It is made as accessible as possible to everyone. But if you doubt your skills and knowledge, it is better to contact a car service.
Required tools and materials
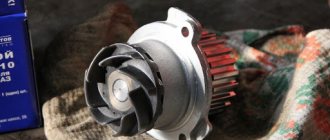
First of all, you will need the EUR itself. Please note its serial number. The last two digits indicate the type and place of production.
So, 00 is a geared amplifier, produced in Makhachkala and has received complaints from drivers. With the numbers 04 - Korean, installed on Grants and Kalinas, a good amplifier, can be found in stores, but there are few of them on sale. Well, 02 - Kaluga, gearless type, also has good reviews.
To connect, you will need common tools such as screwdrivers, wrenches, and an angle grinder.
Installation process
First, you will need to completely remove elements such as the airbag, steering wheel, switches, ignition switch, and finally the steering column along with the bracket and cardan.
Then do everything as follows:
- Taking the old bracket-plate, knock out the bolts from it. Then cut off about 30 mm from the top (where 2 bolts are welded and there are 3 holes).
- Try the plate on the EUR, if the holes do not match (most likely this will happen), drill them.
- Now you need to attach the gimbal to the amplifier.
- You need to put washers under the bracket at the point of attachment to the amplifier. They can be of different thicknesses and have a direct impact on future steering adjustments.
- Now you can attach the EUR. Insert the cardan onto the rack.
After all this you need to connect the wiring. Below is the connection diagram.
Wiring diagram
VanHighlander › Blog › Airbag in Lada Granta.
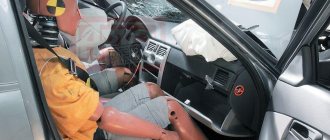
By the way, crash tests were carried out at a speed of 64 km/h. Speedometers on production cars overestimate the readings, so my friend was driving approximately 60-65 km/h. Thus, my friend took part in the crash test without wearing a seat belt! Result: a broken face and knitting needles in your hand.
And it was also possible not to miss a traffic light. I’ll give you some advice if any green drivers are reading me. At first, I also often overshot and could not adequately assess whether I was in time for the flashing green light or not. I came to this rule: if the green light is flashing, and there is a measured distance to the traffic light, it is not an emergency stop, then you need to stop. As a rule, you don’t have time to travel such a distance while the green light is flashing.
READ How to install drivers for a card reader
Source
Lada Granta Automatic Coriander › Logbook › We continue the fight against noise in the car.
So, the continuation of my epic...
1) For a long time I wanted to check the place near the passenger airbag, where the cable should hit the air duct... I finally got to this place. ) (you need to crawl up from below, removing the glove compartment).
And I discovered that the factory had already prudently glued a piece of foam rubber to the air duct at the point of contact with the cable. We also glued foam rubber to the center console in the place of possible contact with the same cable.
Well, it’s not in vain that I sorted this whole thing out...)) I decided that there might be contact between the cable and the airbag box. I covered the cable with as much Madeleine as I could. Then, the joint between the airbag box and the panel cover...I also taped it a little with Madeleine, because... everything hangs out there. Everything came together the same way, without any tension (Madelyn no longer used the joint to seal it, but to avoid any possible clanking of the plastic). I didn’t disconnect the airbag connector - it’s not convenient, and I didn’t understand how to remove this connector. I decided that it wasn’t too much of a bother anyway.
2) on a weekend trip on imperfectly smooth asphalt, I was fed up with the rattling of the panel in front of the driver. Holding the visor, I noticed that there was no rattling noise. Immediately, on the move, he tore off a piece of the pipe insulation (which was used to plug the radiator in winter), and stuck the piece into the spacer between the instrument panel and the edging of this very panel (yes, yes, the gap there is such that it allowed us to stuff the insulation in, squeezing it). And...the clanking disappeared!
READ How to set the time on Steam
This morning I drove along a bad section of the road, the panel rattles much less! Although some incomprehensible sounds can still be heard from both the left and right. But the car, in general, is much less annoying than before the above-mentioned events.
PS: this morning, when I opened the glove compartment, some “stuff” fell off. It turned out to be a plastic part from the glove compartment handle (it broke). Now the glove compartment handle is loose (but opens/closes)…Warranty? )
Source
Let's sum it up
These are some simple and simple ways to fix the problem with the airbag warning light on. But it is important to understand that safety on the road is the most important thing. And it is better to spend money, but restore the functionality of this system, and these methods can be used temporarily, until repair work is carried out.
And even more so, it is necessary to repair the airbags if the car is sold, or at least warn the buyer that the system has already worked and decoys are used on the car.
Replacing the Lada Granta airbag
The condition of the SNAP is monitored by a signaling device located in the instrument cluster, which, after turning on the ignition, in the absence of a malfunction, should turn on for 3–4 seconds and turn off.
If there is a malfunction of the SNBP:
— the indicator turns on again after 3–4 seconds of lighting when the ignition is turned on or while the vehicle is moving and remains on until the malfunction is eliminated;
— when the ignition is turned on, the indicator does not turn on.
Removing the driver's airbag Lada Granta
Tools:
- Open-end wrench 10 mm
- Small Phillips screwdriver or hex key
- Small flat screwdriver
Notes:
Carry out the work when replacing the airbag and when removing the steering wheel.
Before removing the airbag, disconnect the wire terminal from the negative terminal of the battery. After this, you must wait at least 10 minutes for the airbag activator capacitor to discharge.
The airbag is mounted on the steering wheel with two plastic hooks 1 and two plastic clamps 2, which engage respectively with two spring clamps, and the airbag clamps fit into the recesses on the steering wheel.
1. Set the steering wheel to the straight-ahead position of the vehicle and, removing the key from the ignition switch, lock this position.
2. Using a thin screwdriver or hex wrench, make a hole in the location marked on the steering wheel.
3. Pierce a hole in the same way on the other side of the steering wheel.
4. Using two screwdrivers, press out the spring clamps through the holes (for clarity, shown with the airbag removed) and, pulling the airbag towards you, remove the hooks of the airbag from engagement with the clamps on the steering wheel.
5. Pull the airbag towards you and, overcoming the resistance of the plastic airbag clamps, remove them from the recesses of the steering wheel.
6. Disconnect the ends of the two wires from the terminals of the horn switch, and use a screwdriver to pry the small yellow clip on the orange connector of the airbag (indicated by an arrow in the photo) - it will slide forward. You can now disconnect the wiring harness from the airbag connector.
7. Remove the airbag from the steering wheel.
Removing the steering wheel of Grants, Kalinas 2
I decided to share with you detailed instructions for this procedure.
It seems like there is nothing complicated here, but there are several points that I came across after reading various manuals on the Internet. As a result, the mistakes I made hit me pretty hard. Namely, I had to change the block of steering column switches. And it costs not much, not little: 1100 - 1300 rubles. So let's get started. We carry out everything strictly point by point:
1. Disconnect the negative terminal of the battery. After this, you must wait at least 10 minutes. in order for the airbag activator capacitor to discharge. Remove the terminal and wait 10 minutes. !MANDATORY!, if you don’t want to have the consequences of a deployed airbag.
2. You need to release two airbag latches. They are held in place by two spring clips.
In order to compress them, there are two holes on the steering wheel. They are located on the sides of the steering wheel. If the steering wheel has not been removed before, these holes will be sealed (something like a seal).
These “seals” need to be pierced. You can do this carefully with a Phillips screwdriver. Next, take a flat-head screwdriver. We push it into the hole and feel for the spring-loaded stop.
With one hand we squeeze the latch, with the other hand we pull the pillow towards us from the side until it clicks. If, after releasing the screwdriver, the pillow itself does not sit in place, then the latch has been successfully released. The same thing needs to be repeated on the other side, while simultaneously supporting the first side, because it may snap again. 3. After this, you need to remove the lower additional mountings of the pillow. (shown in the photo of the airbag above) The fastenings in the fit are quite tight. You can pull them out only by firmly pulling the pillow towards you from below.
Pay attention here! ATTENTION ! to the following: Without calculating, I pulled the pillow towards me and it abruptly jumped out of the additional fastenings. The wire from the airbag is short, and the L-shaped connector of the airbag shattered due to a strong jerk and tension. It is of such a shape and material that it shatters into pieces from any unnecessary effort. Inside it are not just terminals, but also some kind of inductor (like a coil). This piece of wiring with connectors is not sold separately. Only together with the steering column switch block. So take all of the above into account and don’t repeat the mistakes of others. Do everything carefully and slowly. 4. Having freed the Pillow from all fastenings, carefully move it away from the steering wheel.
Disconnect the two horn wires. Then take a thin flathead screwdriver or knife. Pry the small yellow clip on the orange connector of the pillow. He should move forward a little. Next, remove the connector and set the pillow aside. This will open up:
5. For the correct orientation of the steering wheel, during its subsequent installation, it is necessary to make a mark. Take a core with a hammer or a marker. We make a mark on the shaft exactly opposite the arrow.
Perform further actions in strict sequence so as not to break the latch of the steering column switch block, and the block itself.
6. Use a 24mm socket wrench to loosen the steering wheel nut. Do not unscrew it all the way. Leave it twisted a couple of turns. 7. By rocking the steering wheel to the sides and pulling towards you, pull it out of the seat. It will rest against the nut. 8. Align the car wheels and set the steering wheel straight. 9. Remove the latch from the pocket. Aligning the marks, insert the lock into the block of steering column switches, as shown in the photo.
10. Without any movement of the steering wheel, unscrew the nut completely. ! IMPORTANT! If you move the steering wheel with the red lock, it will break it with the roots of the steering column switch block.
We take out the steering wheel, passing the wiring through the hole.
We perform the assembly in the reverse order, paying attention to the important nuances that I indicated earlier.
Passenger airbag
The passenger airbag module (PAIBP), Figure 13, consists of a gas generator 1, a housing 3, with an airbag folded in it, and a facing cover 7.
The gas generator consists of a housing filled with compressed inert gas and a pyrotechnic substance, and an igniter fuse.
An igniter is a device with electrical resistance and a pyrotechnic substance.
After receiving an electrical signal from the control unit, the electrical resistance heats up and ignites the pyrotechnic substance of the igniter, followed by ignition of the bulk of the pyrotechnic substance of the gas generator.
Removing the passenger airbag
We remove the instrument panel as described in the article - How to remove the instrument panel of a Lada Granta.
Disconnect block 1, Figure 14, of the instrument panel wiring harness from the MNPBP.
Using a 13 socket, unscrew two bolts 4
Press the clamps 5, disconnect and remove the passenger airbag module
Place the failed module on a flat surface with the facing cover facing up.
Installing the airbag module
Before installing the module, you must ensure that there is no damage.
Install the airbag module in reverse order
The tightening torque of the two bolts securing the airbag module is 13 – 15 Nm (1.3 – 1.5 kgcm).
Rear seat overview. Adjustment
In the back of the Lada Granta Liftback it’s already cramped for three, but there’s plenty of space for two. The sofa is flat, without ergonomics. For tall passengers, long trips will be painful.
Adjustment of the sofa is not provided, unless you move up and down around the perimeter yourself. Don't forget about the restrictions on the back of the seat back and roof lining.
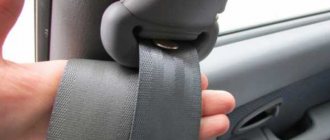
In order to increase safety and reduce the likelihood of injury to passengers, the rear row of seats is equipped with seat belts.
What to do if the airbag deploys?
Car enthusiasts are often lost and don’t know what to do when opening an airbag. On many cars (Lada Granta and Priora, Ford Focus 2, Lada Priora, Opel Astra and others), you will have to perform the following manipulations:
- Install new airbags, replacing those that have already deployed;
- Correct the “brains” of the control system, that is, the unit that is responsible for the SRS. Instead of the error, a dump of the new machine is installed (as if there was no accident);
- Install a special snag (plug).
The problem is that each manufacturer has classified information, which forces car enthusiasts to buy a new control unit for the airbag. In addition, airbags are often tied to the VIN number or model of the vehicle.
If you go to a service station, the cost of restoration work will hit your wallet.
Experienced car enthusiasts copy a security system dump and write it to a remote memory device.
Data is stored until sold. If the car is involved in an accident, it is easier for a specialist to restore the system.
In this situation, a microcircuit and a programmer are purchased, after which the device is flashed. The average cost for such work is from 5-7 thousand rubles.
Professional advice
If a desperate motorist only thinks about how to break the steering lock, he can read the material below. In fact, the ignition switch helps protect any car from the unlawful actions of car thieves. Of course, breakdowns and blockages often cannot be avoided, but there is a more humane method to unlock the ignition switch. To do this, you will have to completely remove it from the car and start the car with a screwdriver or a standard object. At the same time, as long as the car is not equipped with an ignition switch, it is advisable to park it in a paid parking lot.
The device removed from the car, which makes more than one car owner worry about how to unlock the steering wheel without the ignition key, also locks the steering shaft. As a result, the motorist loses the opportunity to start his vehicle without the help of the ignition key. It is worth considering that the device can only be removed in one specific key position.
Removing the steering wheel lock without a key
Sometimes you can’t figure out on your own how to unlock the steering wheel without the ignition key. Often this unit fails due to too much service life, careless handling, or during an attempted theft. In such a situation, you should take the help of professionals.
As practice shows, the actions of the car owner directly depend on what is causing the device to no longer function as before. The easiest way, of course, is to install a newly purchased lock in the car. For a qualified specialist this work will not be difficult.
The cheapest option would be to repair an existing part. However, this will require effort and time. Some manufacturers' ignition switches have about a hundred different components. If, nevertheless, the motorist decides to repair the device himself, he should first disassemble the lock, check its degree of wear or the severity of the damage. Then you should purchase the necessary elements, carry out repairs and give the castle a prime look.
In some cars, the lock can only be repaired without dismantling it. Of course, this is very difficult, but this option will help correct the situation when the steering wheel is locked and the car is located in a relatively narrow yard where a tow truck cannot pass.
It is not difficult to remove the airbag yourself. But if you don’t plan to do this yourself for the rest of your life, service centers rarely charge more than a few thousand rubles for such work.
Issues relating to motorists' rights are often more important than they appear at first glance. A driver may lose his license or suffer other severe penalties due to ignorance or misinterpretation of laws and regulations. Do not be lazy to dive deeply into the essence of the issue being studied, do not hesitate to ask advice from professionals.
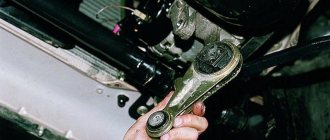
Removing the part
Before you start dismantling any machine, you first need to prepare it a little:
- Align the steering wheel so that the car moves straight;
- Remove the key from the ignition switch and lock the steering wheel;
- Deactivate the negative terminal on the battery.
That's it, all that remains is to wait two or three minutes. The pause is needed so that the capacitor in the control system is completely discharged. The electrical circuit must be de-energized, avoiding short circuits.
Centralized airbag system - turn off.
What you need
Set of torx keys for cars
Some tools will be needed, in particular, keys, screwdrivers. Their specific models depend on what exactly you plan to work with. Different brands of cars require different types of keys.
Step-by-step instruction
Before removing the airbag, it is worth understanding what version of it we are talking about and what model of car you plan to perform the task with.
Remove the airbag from the steering wheel
- Turn the ignition key to the right. It is necessary that the lock opens so that the steering wheel can turn freely left and right. You cannot remove the key from the ignition, otherwise the steering wheel will lock;
- On the Priora-4, the steering wheel is spoked, and to remove the cushion, you need to tighten two countersunk bolts on the sides. A T27 sprocket key is suitable for this. With the steering wheel straight, first tighten the bolt on the left side. We turn the rotor 180 degrees and unscrew the other bolt.
- When both bolts are unscrewed, you need to pull the pillow towards you. It is important to be careful if the bolts are too tight - the plugs may be damaged.
- Moving the pillow aside, holding the airbag with one hand, separate the plug from the middle of the device. You must first unclick the latch upwards, then remove the connector from bottom to top from the base;
- Now the signal wire is removed;
- You can remove the steering wheel itself, but do not forget to put the wheels straight before doing so so that the steering wheel is installed on the spokes in the same position;
- The steering column turn switch is being replaced, we are putting the parts back together.
Remove passenger
First you need to remove the glove compartment, then unscrew the existing protection in the same way with a Phillips screwdriver; when you see two bolts, unscrew them successfully, pry the plug off from above, and remove the wiring.
Then everything is taken out, whatever you want is changed at will - either the pillow block, or just the plug itself.
Remove other pillows
To remove the side airbag, you first need to disconnect the front seat assembly, the seat back. The safety fasteners are unscrewed. In principle, that’s all, you can remove it. And then screw it in and install everything back (if necessary, placing a new one in place of the old pillow).
New fastening nuts must be tightened correctly, it is important to correctly install the seat back upholstery, incorrect installation will interfere with the correct operation of the airbag. When laying the harnesses, you need to make sure that they do not fray or get pinched by any foreign parts. After installing the seat back, you need to check everything properly by moving it back and forth properly. The side airbag wiring harness must not be pinched during such actions.
Replacing knee airbags can be difficult because they come with latches and pins that are in an awkward location. A cardan wrench can get to them. Both nuts are removed, the cushion is removed, and reinstallation is performed.
In general, the pillows are changed according to the general principle - first, they are unscrewed, all latches, bolts, pins, nuts and other protective elements are separated, then everything is disassembled, the pillow is carefully removed, and you can put it back together.