Tuning the headlights on your VAZ-2110 with your own hands will not be difficult if you approach this procedure wisely. In this case, the result will please the owner, and his previously unattractive car will look much more modern. The main thing in this matter is to strictly follow the instructions in order to avoid mistakes.
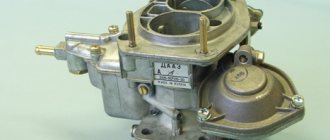
This brand, as a rule, has optics of such types as “Kirzhach” and “Bosch”. The procedure for dismantling old headlights consists of the following steps:
- First you need to disconnect the blocks with wires and remove the upper part from the radiator grille. To do this, take a key of 10.
- After this, you need to remove the boxes with the wires connected to the direction indicators. Immediately after this, the headlight hydraulic corrector is pulled out using a special latch.
- Next, you need to unscrew the headlight mounting bolts and remove the edge from the place where it engages with the wing.
- After completing this work, the headlight of the car is carefully pulled out.
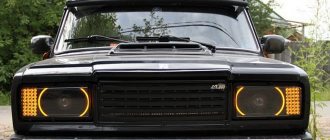
Do-it-yourself options for tuning front and rear headlights on a VAZ 2110 (2112)
Many owners of domestically produced cars are faced with the problem of low quality standard optics. Most often it is necessary to change the lights in the tenth family “LADA 110”, which consists of 4 brands (VAZ 2110, 2111, 2112, 21123 - three-door coupe). As an alternative, in order not to change the factory equipment, they use VAZ 2112 headlight tuning, which allows you to increase the light output of the optics by 25 - 30%.
Most car owners try to correct incorrect lighting themselves and replace parts. Tuning VAZ 2110 headlights allows you to save on reinstalling standard optics.
Rear optics
When tuning optics, do not forget about the rear lights of the VAZ 2110. For them, using an LED strip or ring . It's amazing how much one small element can really change the perception of a car.
In addition to the already discussed option with angel eyes, which can also be installed on the rear lights, some resort to alternative solutions. We offer you one of them.
- LED strip or finished ring;
- Round reflectors, suitable in size for VAZ 2110 headlights;
- High-quality glue or silicone sealant;
- Cylinders for LED rings.
To give a more elegant appearance, reflectors are inserted into the rear light wells. They can play the role of illumination for the rear optics. For example, reverse is illuminated in white, fog lights in red, and turn signals in yellow. Well, or to your taste.
Reflectors are trimmed if necessary, so do not be afraid to take large products. But this is only if the idea of reflectors appeals to you. If not, then follow the analogy of tuning the front optics with angel eyes, and mount the same solution at the rear.
The procedure for tuning the front and rear optics on a VAZ 2110 is not an easy task. This kind of work requires precision, sometimes pinpoint precision. If you have the patience for this, do it yourself. But if you doubt your abilities, there are many tuning studios where your VAZ 2110 will be transformed beyond recognition.
Owners of VAZ cars often make various changes to their design to improve performance and appearance. Along with improving the engine, chassis and body, tuning VAZ headlights is quite common among car enthusiasts.
To improve the front and rear lights on models 2110-2112, you can contact any car service center - specialists will help solve this problem.
However, if you wish, you can do this work yourself - you just need to carefully study the instructions, which explain how this is done.
Lighting market offers for VAZ 2110 - 2112
Finding high quality headlights is not easy. Spare parts often come to markets from China and Taiwan. According to the results of inspections, the durability and quality of such copies is 5-6 times inferior to standard factory ones. The only way out is to convert to headlights from well-known manufacturers.
The most popular brands:
- Kirzhach.
- Bosch.
Kirzhach headlights from Avtosvet cost 2,700 rubles. have high warranty characteristics and are designed for installation of standard halogen lamps. For low beam, a lens is installed in the headlamp unit, which provides soft, even light and good illumination of roadsides.
Bosch headlights do not have such advantages. Provide a standard beam of light in a strictly limited area. Cost - from 3000 rubles. In the low beam the roadsides are poorly illuminated. The advantage of the configuration is the high quality of lighting in rainy weather due to the glass seal
If you can’t afford to pay for new optics, you can improve the old one. You can do headlight tuning on a VAZ 2110 yourself. There is an option to contact the service station.
Good optics improve driving safety; tuning a VAZ does not have any difficult aspects and does not require the purchase of expensive equipment.
How to disassemble and improve headlights
Tuning of optics is carried out in specific cases:
- Improving the appearance of the car.
- Improving the quality of lighting.
To dismantle the headlight unit, you will need a standard set of tools: a screwdriver, a wrench, and a rag. The work is carried out in stages:
- Disconnect the terminals from the battery.
- Unscrew the bolts from the radiator grille.
- Unsnap the hydraulic corrector cylinder and turn it clockwise until it stops.
- Unscrew the 3 fastening nuts, move the trim to the center, and move the headlight unit back.
- Unscrew the buffer bolts.
- Remove the bottom bolt and remove the lighting.
- Disconnect the turn signal from the power supply.
- Unscrew the fastening bolts or remove the sealant, depending on the model and configuration.
Installation of the headlight unit is carried out in the reverse order, after tuning or other modernization has been carried out.
Replacing the H1 lamp in Bosch headlights model 2110 with H7
Many VAZ 2110 owners are faced with the fact that the Bosch lights on their car do not illuminate the road well enough at night. They have a standard H1 lamp installed.
Experts say that if you replace the Bosch with an H7, the situation will improve significantly.
The process of replacing a standard H1 lamp with an H7 in VAZ 2110 lighting sources is quite simple - it consists of the following steps:
- Disconnect all headlight connections.
- We remove the radiator grille - to do this you need to unscrew the bolts that secure it.
- We disconnect the blocks with wires from the turn signals.
- We remove the hydraulic corrector - to do this, press the latch and turn it ninety degrees.
- We unscrew the 3 bolts that secure the flashlight and move it back. We move the eyelash to the center, getting rid of the engagement with the wing.
- Loosen the 2 bolts securing the buffer and remove the eyelash.
- Unscrew another nut and remove the light source.
- We heat the sealant and use a knife to open the headlight.
- The hole for the H1 lamp will need to be drilled. It is smaller in diameter than needed for H
- You will also need to remove the terminals and install those that are suitable for the lamps that we installed - there will be 4 of them.
- After drilling, insert the lamp into the hole and fix it with standard fasteners.
- The fixation of the reflector will need to be adjusted so that it stays in place properly.
- Instead of lamps, we can install LEDs in side lights.
- Next, we assemble the lights back, install them on the car and adjust them.
By installing other lamps, you can make sure that the lighting will be of better quality - there will no longer be problems with visibility during night driving.
Tuning headlights - main options
Some motorists call the reinstallation of standard halogen lamps to xenon and higher-power halogen lamps the main type of tuning. Factory optics provide minimal light flow and quickly burn out, so many motorists are considering replacing headlights with alternative light sources.
When choosing, it is important to install lamps of the appropriate base and optimal color temperature:
- The Nord YADA “Clear” lamp is a budget option, costs approx. 100 rub. a piece. Service life - 2 - 3 months.
- Beacon H1 12V 55W Super Light +50% “ULTRA” - 240 rub. The optics provide increased brightness, the service life does not exceed the factory one.
- Bosch P1+90. Price - 1000 rub. Durable, suitable for low and high beam. The maximum service life is up to 12 - 18 months.
- OSRAM ULTRA LIFE 12V 55W H1 - inexpensive but good lamps. They last longer than standard ones.
- Osram H1 Night Breaker + 90% is ideal for rainy weather.
- Philips X-treme Vision +130% H1 12V 55W. 130 percent increased brightness. Good glow effect and long service life.
When replacing the lamp in one headlight, it is recommended to change the second one, since the service life of the optics is the same.
Advantages of modern diodes
Recently, diodes have been increasingly used in the production of optics. These light sources have the following advantages:
1. Service life is at least 5-10 years. The design of the diodes is quite simple, and the features of their operation determine the possibility of operation for more than 5 years. 2. Low energy consumption. The design of the car determines that by reducing the amount of energy consumed, fuel consumption is significantly reduced. Also, do not forget that when the internal combustion engine is not running, the lights are powered by a battery. The less energy they consume, the longer the battery will last. 3. Resistant to environmental influences. If ordinary lamps are quite susceptible to high humidity, then LEDs are not 4. When creating complex structures from several LEDs, a rather beautiful look is created.
In general, we can say that there are quite a lot of advantages of diodes. That is why they are used to create modern structures.
Table with technical characteristics
| Brand and modification | Body type | Volume | Power | Release |
| Lada (VAZ) 2110 | sedan (4 doors) | 1499 cm3 | 71 hp | 1996 — 01.1999 |
| Lada (VAZ) 21101 | sedan (4 doors) | 1596 cm3 | 80 hp | 09.1999 — 2007 |
| Lada (VAZ) 21102 | sedan (4 doors) | 1499 cm3 | 79 hp | 01.1996 — 2007 |
Tinting and replacing factory lamps
You can replace the factory headlights on a VAZ 2110 in the garage; the operation takes 20 minutes and does not require any special tools.
Replacing standard lamps is carried out in the following steps:
- Remove the negative terminal from the battery.
- Remove the plug located near the wing.
- Unfasten the spring clip that holds the lamp.
- Disconnect the fastener and remove the lamp.
- Install the new light element in reverse order.
On a VAZ 2110, tuning often involves tinting the headlight housing. Film, painting, and tinting varnishes are used. Tinting of lighting equipment is carried out by tuning studios; the question of whether the procedure is legal or illegal remains open.
According to the rules for operating lighting devices on cars in the Russian Federation, shading of individual parts of the lens can only be carried out by the manufacturer. Set luminous flux color:
- for low and high beams – white, selective yellow;
- all turn lamps are orange;
- rear lights – red.
When tinting the headlight unit, it is not allowed to radically change the color of the lampshade. There is no separate regulatory act that regulates the degree of tinting. There is an official document GOST R 51709–2001 - “Safety requirements for technical. condition of the vehicle and methods of verification.” In 2009, the document removed the ban on installing any type of tinting, film, or additional optical elements on the lens, but did not provide additional clarification as to what type of tuning is allowed to be used for commercial optics. Motorists modernize headlights, adhering to general recommendations - do not change the main lighting parameters of headlights and additional lights.
Installing bi-xenon lenses
Installing bi-xenon headlights is one way to improve road lighting. With their help, visibility in low and high beams in the dark is improved, without blinding oncoming drivers. The difficulty of reinstalling the headlight unit from standard halogen to bi-xenon lies in the different operating principle of xenon lamps.
It is necessary to install ignition units, adapters, and change the headlight design. DIY algorithm for replacing bi-xenon lenses in VAZ 2110 headlights:
- Disconnect the wires from the battery.
- Disassemble the headlight.
- Remove the reflector and old lens.
- Make an adapter from a rigid metal plate, which will be adjusted to the place where the bolts are attached to the module.
- Screw the lamp into the module, connect it to the ignition blocks and screw the block to the frame.
- To connect the ignition unit, follow the instructions that come with the lamp.
- Reassemble and replace the unit in reverse order.
- Reconnect the battery terminals.
- Check functionality and make adjustments.
Installing xenon is not difficult, the main thing is to do it correctly. Installation of bi-xenon on any generation of VAZ is technically possible, but requires permission and legalization from the traffic police with a mark in the technical passport.
An administrative offense for illegally re-equipping a car's optical devices is a fine of 2,500 rubles or deprivation of the right to drive a vehicle for a period of 6 months to 1 year. Prohibited devices will be confiscated.
Preliminary preparation for adjusting the luminous flux of headlights
Read
Headlights need to be adjusted not so much for good illumination, but so that the luminous flux does not cause discomfort to oncoming drivers, in other words, does not blind them, especially at night. Both low and high beams are adjusted in a car service center, under the supervision of experts. If you have, albeit small, unfortunately, the ability to repair cars, you can actually perform this process independently in your garage, performing it step by step:
- Checking serviceability. First you need to check whether the car headlight range control is working properly. What exists is that this mechanism plays an important role, one might say, in lighting. In order for the light flux to be adjusted correctly, you should make sure that it is in good working order and is functioning normally.
- Choosing the right site. The headlights are adjusted on a completely level area. Having chosen a suitable place, you should check how even it is using a special level; if there is no skew, you can safely park the car on the site.
- Having measured approximately 6 meters from the car, it is necessary to free up space on the wall in order to use it for a typical screen where you can make notes with ordinary chalk.
- Of course, the headlights can be adjusted correctly only in such a situation if the car’s tank is filled, the tire pressure is normal, and a person in the same weight category as the driver sits in the driver’s seat.
Tuning taillights - main options
Tuning tail lights on a VAZ is most often:
- painting rear lights;
- use of tint film;
- installation of LEDs.
The surface is covered with glossy or matte vinyl film. It can be applied completely, partially in a certain place on the glass and removed at any time. Tinting material is produced in different colors and shades. The film has a protective function and can be used to protect the element from mechanical impacts of small stones.
The film is applied to the outer surface of the headlight in stages:
- Wash and dry the headlight unit.
- Wet the surface with soapy water.
- Cut the film to the required size.
- Remove the backing and apply it to the surface of the lampshade.
- Carefully smooth out from the center to the edges.
- Dry with a hairdryer.
- Remove excess film.
Varnish or paint is an economical option, but not always effective if you apply it yourself. To use, you need to wash and dry the lanterns well, then degrease and varnish.
Tinting should not reduce the brightness of lights by more than 15%. Although the traffic rules do not contain clear instructions on tuning rear optics, questions from the inspector may arise.
Tuning LED headlights have increased brightness and clearly define the dimensions of the car. More often, diode strips are used, which are installed around the perimeter of the rear stop.
Using LEDs
To tune the rear lights of the VAZ 2110, installing LEDs and painting the lampshade are most often used. LEDs are mounted in plastic reflectors after dismantling the headlight unit. For the VAZ 2110 it is recommended to choose two colors: red and yellow. The tapes are soldered and placed on the base inside the headlight unit.
To make the light as bright as possible, the base of the headlight is painted black. Tuning procedure step by step.
- Dismantle the headlight, remove the glass, remove the lamps.
- Fill the inside of the block with a thin layer of polyurethane foam.
- Give the foam the desired shape by determining the areas for installing the LED strip.
- Glue the LEDs onto the base inside the headlight.
- Install glass, connect wiring.
When installing LEDs at 6 Volt dimensions, stops and turns at 12 Volt, capacitors are installed, this prevents overheating of the optics.
LED characteristics
Modern single LEDs, matrix blocks, diode strips produced by well-known companies are distinguished by their high service life and reliability. Technical characteristics of LED blocks:
- service life more than 4000 hours;
- operate at minimum on-board voltage;
- good light data;
- no overheating occurs;
- are not subject to vibration and mechanical effects;
- variety of colors.
The luminous flux of such lamps does not dazzle the eyes and is visible from a great distance. Availability allows for inexpensive and high-quality repairs.
DIY LED tuning of rear lights
To perform LED tuning of rear lights you will need a minimum set of tools and an LED strip of the required length. Do-it-yourself tuning of rear lights on a VAZ 2110 step by step:
- Disassemble the headlight.
- Pull out the diffuser.
- Paint the reflectors black.
- Prepare the site and glue the LEDs.
- Solder stabilizers and wires from old lamps to the tape.
- Place the reflector on top of the diodes.
- Assemble the tuned spotlights and install in the reverse order.
LED pinout
Before connecting the wires, you need to pinout the LEDs. To make them glow, you need to pass an electric current through them in the direction from the anode to the cathode. To do this, a positive charge must be applied to the anode, and a minus charge must be directed to the cathode.
It is recommended to check the LED strip before installing it on the car.
Available offers
Unfortunately, you cannot find LED rings that are suitable for the VAZ 2110 to create the angel eyes effect in regular auto parts stores. But they are available in numerous online stores. Therefore, there should be no problems with the search.
Just remember that the inner diameter of the ring is 54 millimeters, and the diameter of the outer ring is 70 millimeters. These parameters are suitable specifically for installation in Kirzhach.
Although you may well go the other way - make your own rings from LEDs. You will need a transparent rod filled with LEDs. You will find similar components...in a building materials store. Just keep in mind that they need to be bent into a ring. To do this, use a hair dryer. It will soften the rod. The procedure requires precision handling, but it is quite possible to do it yourself.
The third option is to purchase at least 8 LEDs for each headlight and buy a plastic rod separately. This is the most complex approach and will require bending the rod, connecting the LEDs evenly and getting them to work.
The choice is yours. Go for it! And if you don’t want to take risks or waste time making your own LED rings a la angel eyes, then order them online. There are more than enough offers there now.
You happen to have LED rings in stock. Therefore, it’s time to start tuning directly, that is, installing LED rings in the headlights. If you have tinted optics, paint the rings black. But don't touch the LEDs themselves. The effect of such modernization will be more impressive.
The installation procedure is as follows.
- Remove the Kirzhach headlights. You will need to remove the glass. To do this, insert a flat screwdriver into the corner of the glass, and insert a sharp stationery knife into this gap with your other hand. This will remove the layer of sealant, allowing the glass to be removed. If you can't, just break the glass and buy a new one. It's quite cheap.
- Handle the optics carefully, do not touch the reflectors, and remove any remaining debris. If this is not done, you will soon have to completely change your headlights. And these are already significant expenses.
- Let's try out the tuning option. To do this, attach an LED ring to the lens.
- We correct inaccuracies. Decorative inserts can interfere with, or rather partially block, the glow from the LEDs. They can be trimmed and filed a little. A completely natural procedure for such tuning.
- Installing angel eyes. They are usually glued to the lens. Use super glue or high quality silicone caulk.
- Connect the power. Power to the LEDs must come from the side lights. Another option is to use a fuse and a separate switch.
- Reinstall the headlights. We put the glass back, just use a simple silicone sealant or liquid nails. The main thing here is to prevent the presence of cracks, due to which the inside of the glass will begin to fog up and condensation will be deposited on it. Over time, this leads to a short circuit.
- There is another option for mounting LEDs - not around the lens, but on the mask using silicone. Then the tape needs to provide the shape of a ring. For this, available means are suitable - a bottle, a glass. You just need to fill it with silicone in the selected place on the mask. The connection is similar to the previous installation option.
How to disassemble and improve headlights on a VAZ-2110: tuning
Tuning the headlights on your VAZ-2110 with your own hands will not be difficult if you approach this procedure wisely. In this case, the result will please the owner, and his previously unattractive car will look much more modern. The main thing in this matter is to strictly follow the instructions in order to avoid mistakes.
This brand, as a rule, has optics of such types as “Kirzhach” and “Bosch”. The procedure for dismantling old headlights consists of the following steps:
- First you need to disconnect the blocks with wires and remove the upper part from the radiator grille. To do this, take a key of 10.
- After this, you need to remove the boxes with the wires connected to the direction indicators. Immediately after this, the headlight hydraulic corrector is pulled out using a special latch.
- Next, you need to unscrew the headlight mounting bolts and remove the edge from the place where it engages with the wing.
- After completing this work, the headlight of the car is carefully pulled out.
We looked at the procedure for removing a Bosch headlight. Now let’s find out how to remove the Kirzhach optics. This work consists of the following stages:
- A flat screwdriver is inserted into the corner of the headlight, as well as a utility knife, which is used to cut off the sealant. If you can’t cut with this tool, you can use a hair dryer;
- then we proceed to remove the reflector. This is done like this: unscrew 3 bolts around the perimeter and unfasten 4 latches;
- then the headlights are carefully removed.
As we can see, removing the headlights on a VAZ-2110 car is absolutely easy.
The situation is different with the modernization of optics. It is very important to understand what is suitable in a particular case and what is not. Let's try to understand this issue.
Website about joints
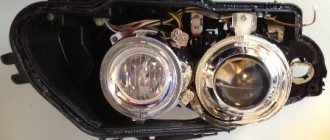
Everyone knows that Bosch headlights do not illuminate the road well at night.
When driving in the near one, it’s hard to see - the road runs away, but when driving in the far one, you interfere with oncoming cars. I invite you to go with me on an unforgettable journey of tuning Bosch VAZ 2110 headlights. Let's start with the fact that we need to remove and disassemble the headlight. I won’t tell you how to remove and disassemble the headlight. There are many posts on this topic on the Internet, step by step. We need to slightly change the design of the headlights, namely, replace the H1 lamps with H7 ones. In my opinion, the H7 lamp fits perfectly into this headlight. The dimensions of the lamp H1 and H7 are the same both in height and in the location of the chrome thread. Look at the photo: You can drill the required hole with a circular saw like this.
We disassemble and remove all the saws we don’t need. The one closest to the center is our saw, which will drill a hole in the headlight reflector. You need to drill a hole so that the H7 lamp is completely immersed in the hole and rests only on the collar. Taking my son as an assistant (he held the reflector), armed with a drill and loading our saw into the chuck, I drilled a hole. The smell from drilling is not very pleasant, so it is better to drill outside. This is what happened.
By the way, you can drill with another tool. For example, I have this thing. In our store it costs 30 rubles!
Let's try on our H7 Lamps. They fit perfectly and are locked with the same clamps that held the H1 lamps. That's basically all there is to drilling. Now we take a soldering iron and plug it into a socket, and in the meantime we cut off the “+” and “–” terminals that supply the H1 lamp with electricity. We strip the wires, solder other terminals (mothers). We will need 4 of them per headlight. We also need heat shrink casing. Taking advantage of the moment, I inserted LEDs into the dimensions in place of the lamps. This is what happened.
I don’t know about others, but my reflector kept falling off. Here's how I solved this problem:
I simply drilled a hole in advance and screwed in the screw and washer without fully tightening it. Now it's not going anywhere. As for the lamps, I took “Novator” and “Narva” at 55 w each.
Having installed the headlights on the car and adjusted them (by the way, I installed the lamp with the beads facing up), I drove out into the dark on an unlit section of the road. I was very surprised by my result. Now everything is very clearly visible at close-up - not only the road itself, but also the edges of the side of the road. The headlights do not shine 10 meters from the bumper, but further and better. Here's a photo from the car. This is the neighbor.
In the photo the high beam is on, about 35 steps from the car.
I called a friend - he also has a “ten” with Bosch headlights. We compared my headlights and his on the same section of the road. This is what happened. This is the low beam on a friend's car.
I took this photo standing between the cars. There is a difference and what a difference!
This photo is also from about 35 steps closer. On the right is a friend's car, on the left is mine!
Maybe many will start to judge me for ruining the headlights, etc. I'll tell you honestly: before tuning, I tried to install lamps from Osram, Philips, and many others - the result did not suit me. If you find the same article on the Internet, you should know that I wrote it. I received a fee for it, but it was small. And I’m just posting it here because it’s not here. And finally, I want to say (well, just food for thought): now you can insert H4 instead of H7 lamps. But that's a completely different story! Good luck to everyone on the roads! Not a nail or a rod!
Do-it-yourself headlight tuning on a VAZ-2110: tinting
After dismantling the old headlights, it is necessary to remove the spring in the hydraulic corrector hole. Next, the adjusting screw is unscrewed, after which the optics module with reflector is removed. Before you start painting the part, you need to clean it thoroughly. A degreasing primer is suitable for this. It is not advisable to paint with enamel, since the temperature inside the headlight is always very high. In this case, heat-resistant paint is perfect. It is advisable to carry out the painting procedure itself in a dry room, very carefully, keeping this part at a distance from you.
“Angel Eyes” - a new type of tuning
Installing “angel eyes” on a car yourself is not at all difficult. There are several options for this procedure:
- buy finished products;
- make them yourself using LED strip;
- make it yourself using a transparent tube.
As practice shows, it is much better to make “angel eyes” yourself, since stores sell very low-quality and short-lived products. You can buy a ready-made LED strip and glue it to the inside of the optics with special glue or sealant. But it will still be more effective and brighter if you use an LED ring made of a plastic tube.
The work in this case consists of the following stages:
- To begin with, the plastic tube is heated using a hair dryer. This must be done so that it bends well. However, you also need to understand that if the product is overheated, it will become deformed.
- After this, use pliers to bend the tube around the can, so you get an even circle.
- When the part has cooled, the edges are sawed off.
- Resistors and LEDs are assembled using the same scheme. It is important to sand the ends thoroughly.
- Then, using a hacksaw, notches are made around the perimeter at approximately a distance of 2-2.5 mm. The ends are covered with foil and a special tube.
- Next, the made ring is attached with glue around the optic lens. It is important that the notches are on the inside.
If you clearly follow the instructions and correctly carry out all stages of the work, the updated headlight will have a very presentable appearance and will be able to last about 7 years without replacement.
Sources
- ladaautos.ru/vaz-2110/kak-razobrat-i-uluchshit-fary-na-vaz-2110-tyuning.html
- infokuzov.ru/tuning/tyuning-fary-vaz-2110
- drive2.ru/l/458665674647048737/
Independent design modernization
You should pay attention to the fact that you can independently change the original optics, make it more effective and beautiful. Headlights on VAZ 2110 tuning are quite often painted or covered with a special film. Let's look at the features of optics coloring:
1. You can use paint that does not react to environmental influences. 2. Work should be carried out at positive temperatures. 3. First, you need to decide on the color of the paint - as a rule, it is selected according to the color of the car body. 4. Painting of the protective glass can only be done when the optics are dismantled. Dismantling work can be completed quite quickly: the design of the 2110 car is quite simple; to remove the optics, minor dismantling must be performed. 5. After the optics have been removed, they should be disassembled. First you need to remove the protective glass, which will be painted. 6. The next step can be called covering with masking tape those elements that should not be painted. 7. When applying paint, remember that the protective glass must transmit quite a lot of light. Therefore, paint is usually applied in a small layer. 8. After completing the painting work, you can assemble the optics and install them.
The above points should be taken into account in order to carry out the work efficiently and quickly.