The electric fuel pump (EFP) is connected via a 4-pin relay to the following devices:
- with a battery from which the EBN receives power;
- with an ignition switch through which it is started.
The EBN must start almost simultaneously with the starter, since the starter gives the engine an impulse to start, and the fuel pump supplies fuel to the engine. If the fuel pump does not turn on in time and starts pumping gasoline, the car will not start. How to check the fuel pump on a VAZ 2114, why doesn’t the EBL turn on when you turn the ignition key? What problems arise in the electrical circuit, you will learn about this from our article.
Signs of a fuel pump malfunction
- The car won't start. A possible reason could be a non-working or semi-working pump. It must create a certain pressure in the fuel system for normal operation. But the cause of the malfunction may lie elsewhere. In any case, you need to measure the pressure in the rail, check the spark and then draw the appropriate conclusions. More detailed information can be found here.
- The fuel pump does not buzz after turning the ignition key. Here, most likely, the issue lies in the wiring to the pump. A separate article is devoted to this problem.
- Interruptions in engine operation.
- The car jerks at low speed. Again, the fuel pump itself may be fine. The problem here is the small filter (mesh) underneath it.
Tips for motorists
VAZ-2109 passenger cars of the last years of production had injection engines, so on these “nines” an electric fuel pump was installed in the fuel tank. And on a small part of the VAZ-2109 with a carburetor engine still in use today, mechanical fuel pumps were installed.
Failure to operate the fuel pump on VAZ-2109i injection engines is determined quite simply, since when the ignition key is turned to the “ignition on” position, the driver simply will not hear the characteristic noise that the running electric motor of the fuel pump makes. Typically, drivers of “nines” begin their search for the cause of a fuel pump failure by checking the condition of the fuse that protects this electrical circuit.
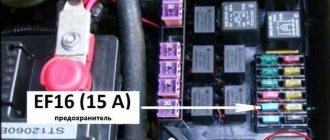
It is located under the front panel shelf, which is located below the glove compartment. When you unscrew the fastening screws, the block of three relays and three fuses on the wires will move lower, so it will be more convenient to work with it. You will need to check the rightmost fuse and the condition of its contacts. If a blown fuse is detected, it will have to be replaced with a new one. And also find the reason why he burned out.
If the fuse is intact and the contacts are not oxidized, then the next step in troubleshooting is to check the functionality of the fuel pump relay. It is located in the same block as the fuse and is located on the far right. Drivers usually check it by replacing it with a known-good relay. If after such a replacement the fuel pump starts working, then you will have to purchase and install a new relay.
But when the fuel pump still continues to be “silent”, then you will need two wires four meters long. They are needed to check the condition of the fuel pump itself by connecting it to power directly from the battery. To do this you will need to: lift the rear seat cushion, remove the hatch cover, disconnect the plug block and connect the wires from the battery to the fuel pump terminals. There are three terminals in the block: one for ground, the negative one from the battery is connected to it, two more positive ones, for the fuel pump and the fuel level indicator in the tank.
VAZ 2110 fuel pump: signs of malfunction
If the fuel pump, when connected directly, works, then you will have to ring the wires going from it to the fuel pump relay, and if it does not work, then either replace it with a new one, or you will have to disassemble it and look for a fault inside the fuel pump.
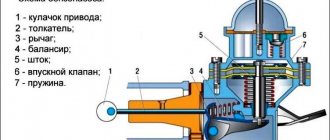
On “nines” with a mechanical fuel pump, the most common malfunction is wear of the fuel pump diaphragm, as a result of which gasoline will leak through the drainage hole in the housing when it operates. The second reason for the failure of such a fuel pump is wear of the pusher, which transmits force from the camshaft cam to the fuel pump drive lever.
How to check the fuel pump on a VAZ 2114 - 4 ways
The electric fuel pump (EFP) is connected via a 4-pin relay to the following devices:
- with a battery from which the EBN receives power;
- with an ignition switch through which it is started.
The EBN must start almost simultaneously with the starter, since the starter gives the engine an impulse to start, and the fuel pump supplies fuel to the engine. If the fuel pump does not turn on in time and starts pumping gasoline, the car will not start. How to check the fuel pump on a VAZ 2114, why doesn’t the EBL turn on when you turn the ignition key? What problems arise in the electrical circuit, you will learn about this from our article.
Motor
We checked the pressure and wiring, everything works like clockwork, but the engine stalls. The fuel pump may not pump due to a breakdown of the motor - the main element that drives fuel. We check its functionality with the same light bulb: attach its wires to any terminal of the motor, turn the ignition. The lamp blinked - it was time to throw out the motor. And again, run to the store for a brand new motor.
The terminals may oxidize and not make contact, as a result of which the fuel pump will not pump. The motor in this case may be normal. And the terminals just need cleaning (possibly re-soldering). There is an opinion that the terminals are oxidized due to low-quality fuel (the octane number does not match the declared one).
Checking the fuse
Blown EBN fuses are a common occurrence in the circuit of a submersible fuel pump. There are several reasons that render this protective device unusable, and before installing a new fuse, they must be eliminated:
- A short circuit in the electrical circuit occurs due to chafing of the wire insulation (rarely), and due to burnout of the wiring due to weak contacts. This happens much more often;
- Failure of the fuel pump relay increases the load on the fuse;
- Poor quality of the fuse itself. You should not skimp on switching devices. These little parts are inexpensive and the savings will be negligible. Therefore, when choosing fuses, you should give preference to well-known and trusted manufacturers. You should also not install fuses with a lower current strength than prescribed by the car manufacturer. The current strength is indicated on the mounting block box. For the fuel pump, select a 15A fuse.
Relay test
We continue checking the VAZ 2114 fuel pump. The module in which the fuse and EBN relay are located is located in the dashboard, below, on the passenger seat side. To check the relay, remove the side panel and listen to how the relay behaves when the ignition key is turned.
There should be a click after which the fuel pump starts. The absence of a characteristic click indicates that the relay has failed or there is no contact with this device. What could be the reasons for this? The serviceability of the relay is checked as follows: take a piece of wire and close the contacts with it. If the pump starts working, then the problem should be looked for in the relay. It should be replaced.
Please note that the ends of the thick wire are inserted into the sockets where the gray and pink wires go. When the pump is operating normally, the sound of its motor should be audible in the cabin.
You can also check the relay by installing a device that is known to work.
Wiring
If the fuel pump fails, first of all, you need to make sure that the circuit was installed correctly. Three wires lead to its electric drive:
- one - to the fuel sensor;
- two - to the contacts of the motor itself.
A regular 12 volt light bulb will help you figure this out. It is connected to the power wires. When you turn on the ignition, it will light up - this means that the electrics are supplied correctly.
The lamp also checks the performance of the motor itself. In this case, it is connected to the protruding terminals of the drive, and its short-term flashing will indicate in this case a malfunction of this element.
Checking the power supply on the chip
If no problems are found in the fuse and relay block, then you need to move on. In general, most electricians start checking the power supply to the fuel pump from here - from the gas tank hatch.
To do this, we lift the seat, move the backing, and under it we find the gas tank hatch. Having unscrewed two screws, we open it. It contains three terminals, two of which are positive (black and gray), and the third goes to ground. Both wires are checked one by one, connecting the ends of the test lamp wires with one end to positive and the other to minus (ground). We check the presence of power at the terminals with a test lamp. If the light is on, but the pump still does not pump, use a tester to check the voltage in the network. In order for the EBN to start, the voltage must be at least 10V. If it turns out that the voltage is lower and you are sure that the battery is sufficiently charged, inspect the condition of the connectors to see if they are acidified. Low voltage can also occur if there is a break in the wiring. Now that we have checked the entire electrical circuit and made sure that it is in order, that the wires are intact, the relay is working, the fuse has been replaced for prevention, the cause of the problem should be looked for in the pump itself. Next, you will learn how to check the operation of the fuel pump on a VAZ 2114 by measuring its pressure.
Pump replacement
Most modern cars are equipped with fuel pumps, which are located inside the fuel tank itself. Because of this, getting to it is quite difficult and such placement raises a lot of questions.
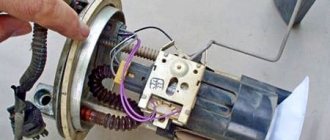
In the case of the VAZ 2114, you can raise the rear seat, under which there is a rectangular hatch. By opening it, you will have access to the pump, a sensor with a float and a coarse filter - a mesh. That is, if necessary, you can easily replace a filter or other element.
There are two fuel wires going to the fuel pump:
- The server. With its help, passing through a fine filter, the ramp and injectors are fed;
- Back. Fuel is returned through the pressure regulator to provide continuous power to the engine.
Now let's talk directly about how to remove and replace a failed fuel pump.
- Be sure to disconnect the negative terminal from your car's battery.
- It is advisable to empty the fuel tank.
- When removing the fuel module, you will be able to get to the bottom of the fuel tank, and therefore have a chance to clean it of all kinds of sediment.
- Release the pressure inside the fuel line. This will prevent a whole jet of fuel from hitting your face or inside the car. To do this, use the measuring nipple on the fuel rail and a thin screwdriver.
- Remove the rear seat to gain access to the hatch that leads us to the fuel module.
- Unscrew the two fasteners holding the hatch cover.
- Disconnect the electrical connector from the module.
- Using a 17mm wrench, unscrew the fuel lines that are connected to the pump. Do this carefully so as not to lose the O-ring. Then move the pipes to the side so that they do not interfere with you.
- Using a 7 mm socket, you need to unscrew the 8 fastening nuts. They hold the pressure plate that holds the entire module in place.
- Remove it carefully through the hole in the fuel tank, but before doing this, do not forget to release the fuel level sensor float.
- If there is a new module, install it in the exact reverse order.
- If only one of the elements needs to be replaced, then you will have to disassemble the fuel module into elements.
- Even a beginner will not have any problems disassembling the module, since the assembly can be disassembled into elements quite easily.
- Perform the reassembly procedure, fill with fuel and check the system for operation.
Replacement process
Pay attention to the type of pump installed. On the new pumps, the mounting system is slightly different. Therefore, for work you will need a ratchet and a 10 mm socket. With their help, the ring is dismantled in a circle and the clamps provided on the fuel line are pressed out.
The procedure for replacing the fuel pump should not cause serious problems. But still be careful, careful and consistent. You work with fuel, and therefore must follow all safety precautions.
Checking fuel pressure
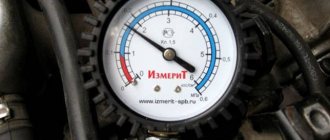
Gasoline pressure in the fuel system is a significant parameter that affects the operation of the internal combustion engine. This indicator will allow you to check the fuel pump on the VAZ 2114 injector for stability. If the pressure is low, there will be no high-quality injection of the fuel-air mixture. At elevated pressure, fuel can flood the spark plugs and engine compartment, in the latter case a fire may occur. Fuel pressure is checked with a special device - a pressure gauge.
Before measuring pressure, you must do the following:
- Turn off the internal combustion engine;
- Unscrew the cap on the ramp and relieve the pressure inside it by slightly opening the valve with a screwdriver;
- Using a special valve cap, unscrew the spool with the valve;
- Secure the pressure gauge fitting to the fuel rail.
Now that all the preparatory operations have been completed, you can start the engine and measure the pressure in the ramp. Don't forget to have a rag ready in case the fuel splashes a little. This sometimes happens with high blood pressure. During normal operation of the fuel pump, the pressure should be 3 atm at the start, and during engine operation and at idle, the pressure decreases and settles to 2.5 atmospheres.
OPERATING PRINCIPLE AND DESIGN FEATURES
The VAZ 2114 fuel pump is located inside the car’s gas tank, which is why access to it can be problematic if you don’t know which side to approach. To free up access to the fuel pump, you need to remove the rear seat from the fourteenth, under which you will find a rectangular hatch hiding access to the fuel module.
Just recline the back seat and see for yourself
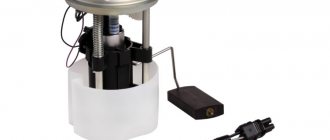
In addition to the pump itself, the VAZ 2114 fuel module includes:
- A float sensor that monitors the fuel level in the gas tank;
- Chamber for fuel intake;
- Mesh filter for coarse cleaning.
The gasoline pump has a built-in electric motor, which pumps up the pressure of the pumped fuel. The motor itself is powered from the vehicle's on-board network. The VAZ 2114 gasoline pump is located so that even with a minimum level of fuel in the tank, it is constantly washed with gasoline, as this is necessary for normal cooling of the unit, which gets very hot during operation.
The main working element of a gasoline pump is a membrane, which during operation performs reciprocating movements. During normal operation, when the device is fully operational, the following pressure levels must be maintained in the fuel rail:
- For 1.5 l engine. – from 285 to 326 kPa;
- For 1.6 liter engine. – from 375 to 390 kPa.
As evidenced by reviews from owners of fourteenth VAZs, in practice BOSCH pumps have proven themselves to be the best.
Unlike domestically produced units, they cost almost 20-30% more, but at the same time they have an order of magnitude better build quality and reliability. The estimated cost of the fuel module for a 1.5 liter engine of the fourteenth is 2.5 thousand rubles, for 1.6 liters. – 2.6 thousand
However, rational savings are possible here - in most cases it makes sense to purchase a fuel pump separately, rather than the entire module, since, as a rule, the pump itself “dies”, and the remaining parts of the module remain in working order. Its cost, if taken separately, is 1-1.5 tr.
Missing mass or plus?
The 4's fuel pump runs on electricity. Therefore, if there is no power to the VAZ 2114 fuel pump, you need to determine where exactly the circuit is broken. After all, both mass and plus may be missing.
Car enthusiasts sometimes have a question about how to check the power supply to the VAZ 2114 fuel pump. You need to start with something simple. To do this, you need to turn the ignition key and listen for a characteristic click. It is familiar to every driver. The fuel pump always starts with this sound.
If there is no sound, you need to check the relay and fuse. They are located on the passenger side, under the side panel. To get to the electrical components, remove the plastic trim on the passenger side.
To check the fuse, you need to take a known good fuse element and put it in its place. If everything worked, then that was the reason. A faulty relay can be indicated by the absence of a click when turning the key. These electrical elements sometimes exhibit external damage that is visible to the naked eye. But, if replacing the relay did not help, then you should look for the reason further.
Yuri Petrovich 12/10/2009 - 15:45
(Cat 302 @ December 10, 2009, 1:42 pm)
The crankshaft position sensor has died, and if there is no signal from this sensor, the controller blocks the fuel pump circuit!
(Cat 302 @ December 10, 2009, 4:13 pm)
It happens Yuri Petrovich. So, on the highway to NG, I’m going out of town to celebrate, I stop for a little emergency, smoke the car in the wilderness, don’t start, I listened to the pump, it’s not making noise, and purely by chance a friend was driving by and it saved me, they brought services, no tools, no tools in the cottage, we went for the DPKV, it didn’t help, we hooked it up directly with wires it works, on holidays we took it to a local service center, where the controller immediately gave an error: a short circuit in the fuel pump network, they replaced the relay, everything rang smoothly, the error remained, the technician came to the conclusion that the controller had burned out and, purely for the sake of experiment, they tried to fix it and lo and behold, the pump started working.
a friend on a new fourteenth car died after six months on the highway, it was cured by replacing the relay, first the relay should be changed Post edited by Rino: 12/10/2009 - 19:33
Missing mass
Mass may be missing for various reasons. It needs to be checked this way:
- Remove the protective cover near the handbrake;
- Remove the mass and clean the contacts;
- Put.
The mass is often damaged or moved out of place by the driver himself when using the handbrake. It may also disappear due to vibrations. You need to unscrew the ground wire, clean the contacts and tighten it tightly.
It would be a good idea to clean the contacts near the gas tank flap as well. If after this the pump does not work, you need to look for a break in the wiring by ringing with a tester. Sometimes the break point is visible even upon inspection. In order for the pump to work again, the wiring damage must be repaired.
Missing plus
The main reasons for the lack of a plus may be:
- Fuse or relay faulty. How to check was described above. If these parts fail, it is enough to simply replace them;
- Contacts are oxidized or damaged. You can see this with the naked eye. After cleaning from contaminants, the fuel pump should start working;
- Broken wiring. It is necessary to find the location of the break and eliminate it;
- The engine control unit blocks the fuel pump. There may be various errors on the on-board computer or during diagnostics with a scanner, as well as other symptoms of incorrect operation;
- The car alarm is not working properly and blocks the pump.
Most problems are easy to detect and fix yourself. But the last two require the intervention of a competent auto electrician. DIY repairs will only make the problem worse.
Source of the article: https://vaz-2114.info/vaz-2114-net-pitaniya-na-benzonasos/
Device
In the VAZ-2115, the fuel supply system contains the following components:
- ramp;
- fuel line;
- filter;
- Control block;
- fuel injectors.
The fuel module itself includes:
- gasoline level sensor;
- gasoline pump;
- float;
- primary filter.
The latter's mesh is located directly at the suction port of the pump. It quite well rids the fuel of contaminants, the presence of which significantly reduces the service life of the entire system as a whole.
In addition, the gas line also has a filter that provides fine cleaning of the fuel.
As practice has shown, the VAZ engine injector itself is quite reliable and very rarely fails. In addition to individual elements of the fuel system, its operation also involves:
- ECU;
- sensors that monitor various parameters.


