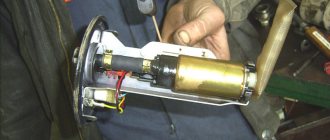
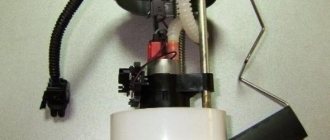
Lada cars of the 2112 family were equipped with injection engines. The fuel pump in these cars is responsible for supplying fuel. We are talking about a plastic module containing a pump and a level sensor. Similar modules were produced by several companies, and the products varied in quality. If there is a suspicion that the fuel pump is not working, you need to turn on the ignition on the VAZ-2112 - the pump should pump fuel for the first 1.5 seconds. But the sound of a running motor may not be heard. It would be better to measure the voltage at the terminals.
The fuel pump relay does not turn on.
If the fuel pump does not work, then first of all you need to check the attraction of the main relay and the fuel pump relay.
If the main relay does not click, then it is necessary to check its switching circuit and its serviceability. How to do this is described in the article the main relay does not turn on. In the case when the main relay turns on, but there is no fuel pump relay, you need to check the power at terminals 85 and 86. When using a test lamp, its current consumption should not exceed 0.25A., otherwise the controller may be damaged. If the control lamp does not light up on any terminal, then the relay is not receiving power. This may be caused by a blown fuse or a broken power cord.
In the case when the lamp burns brightly on one terminal, and at half-glow on the second, and the relay may be activated, you should remove the relay from the socket and connect terminals 85 and 86 with a test lamp. When the ignition is turned on, the control lamp should light up and go out after approximately 20 - 30 seconds. If the lamp lights up and there is poor contact in the connection between the block and the fuel pump relay. If the lamp does not light up, there may be a break in the wire connecting the relay to the controller or the controller itself may be faulty.
No power supplied
As the pinout indicates, there are 4 wires going to the pump:
- in the center - plus and minus;
- at the edges – fuel level control.
To check whether current is flowing, connect a light bulb (12 V) to the negative and positive contacts and turn on the ignition. If everything is in order, it will flare up. If there is no result, the plus and minus removed from the pump connector are connected in turn to its ground, and then to the relay block.
Next, when:
- the lamp (when the negative wire is connected to ground and the ignition is turned on) blinks, then this contact is damaged;
- the improvised indicator did not flash - there are problems with the plus.
If the wire is installed on the relay and the lamp lights up, there is a break between it and the pump. Disassemble the harness and replace the faulty wire. You don’t need pinouts in this situation either.
When it turns out that it was the pump motor that burned out, it will have to be replaced - it cannot be repaired.
Signs of fuel pump wear
The fuel pump on the VAZ 2114 does not pump.
A faulty fuel pump either works intermittently, that is, incorrectly, or does not function at all. Problems may occur due to severe wear or failure of other system elements.
Signs of a fuel pump malfunction that require checking its functionality are:
- engine failure to start;
- uneven operation of the power unit, it stalls and loses power;
- extraneous noises in the operation of the fuel pump or their complete absence.
Without diagnostics, it will not be possible to determine the nature of the malfunction, and during the test you must always move from the simplest to the most complex.
Step-by-step process for replacing the fuel pump mesh on a VAZ-2112
Why the fuel pump on the VAZ-2114 does not pump, and what to do
In order to dismantle the mesh on the fuel pump, it is necessary to remove the fuel pump from the tank, and to do this we do the following:
- We place the car on a flat surface, ensure it is in a stable position and put on the handbrake.
- Disconnect the negative terminal from the battery.
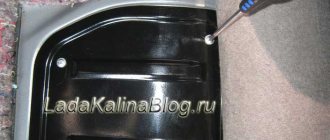
- Removing the back seat. It can be completely dismantled by unscrewing just two bolts, or simply moved to the side.
- Unscrew the bolts that secure the fuel pump hatch.
First, turn off the fuel pump!
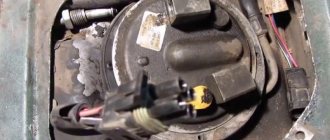
- When access to it is open, you can see the power and fuel supply connectors.
- First of all, disconnect the power supply block.
- Next, we disconnect the fitting through which fuel is supplied to the system and take it to the side.
Please note - the power is turned off here!
We do the same with the fuel drain line.
Please note that when dismantling the fuel pipes, there may be a release of pressure in the system, so cover the pipes with an old rag in advance
- When the lines are removed, remove the rubber gaskets and seals from each of them, and then replace them with new ones.
The rubber seal is indicated by the arrow.
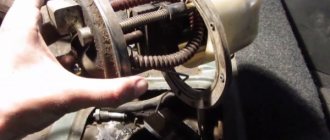
When nothing is in the way, unscrew the 8 bolts located around the fuel pump cover.
The nuts are marked with a red marker.
Remove the unscrewed ring and gasket.
If the gasket is damaged, replace it.
When access to the fuel pump is open, remove it from the gas tank
During these actions, be careful, since the float located on its body is a very sensitive element.
We remove the fuel pump on a rag.
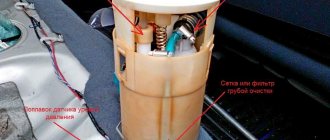
When the fuel pump is removed, you will notice a mesh underneath it, which is a kind of coarse filter.
Dirty fuel pump screen.
Replace it with a new one and do all the work in the reverse order of removal. At the same time, do not forget to replace the o-rings on the fuel line and check the gasket on the o-ring of the fuel pump itself.
The difference between the old grid and the new one.
If any parts and elements in this system show signs of damage or wear, they must be replaced.
Cleaning the fuel pump mesh
If it happens that you do not have the opportunity to purchase a new mesh, and the old one has become unusable, you can simply clean it and below we will tell you how to do this.
There are several ways to carry out this procedure and here are some of them:
The mesh is cleaned by soaking it in a solution of detergents or bath cleaners. To do this, mix them with water at a ratio of 1 to 10 and then leave it there for one hour. When the soaking time is over, simply rinse the mesh under running water. Using the same solution, rinse an old toothbrush in it and clean the mesh with rotational movements. If you have a compressor, then it can also be useful during such work.
Please note that after performing such mechanical work on the mesh, inspect it for damage, since the presence of defects makes it impossible to use it in a gas pump
Gasoline pump: the main reason for poor performance is the mesh
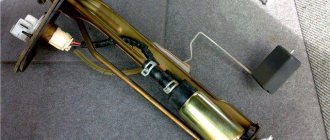
The electric fuel pump is installed in the gas tank.
Its fundamental operation is based on the operation of an electric motor. The electric motor tends to heat up during operation. And since gasoline has a lower temperature in relation to water, it compensates for the heating of the gasoline pump engine. Therefore, a lack of fuel causes overheating of the electric engine and premature failure. To replace the grid you need to:
- recline the rear seat;
- remove the rug;
- open the lid;
- remove the fuel grid.
Based on the condition of the grid, you can judge the operation of the car. If the mesh is heavily soiled and there are visible deformations, it is best to change the mesh (see). When replacing, you must use a repair kit.
On the latest VAZ-2110 models, the hatch is made at the manufacturer. The first models were produced without hatches. Therefore, to repair or replace the gas pump, it was necessary to remove the gas tank, which caused inconvenience and required additional time.
The design of the fuel pump is as follows:
- electric motor;
- supercharger;
- they are connected into one body.
The supercharger has two valves, the first relieves excess pressure, the second returns excess gasoline to the tank.
Therefore, for good and trouble-free operation of the car, it is necessary to regularly clean or replace the fuel grid, since when it becomes dirty, interruptions in the flow of gasoline to the carburetor begin. The engine does not start to operate at full power and does not develop full speed.
Other reasons for the fuel pump not working
So:
- The main problem is that the supercharger fails. The first reason is refueling at suspicious gas stations and the quality of the fuel itself. Gasoline contains microparticles of all kinds of impurities. They gradually settle on the mesh. For this reason, the pump wears out faster.
- It is also necessary to check the working clearances in the supercharger. With increased gaps, the pump operates under load. In winter, condensed water contained in the fuel begins to crystallize. This causes the formation of gouges and scratches on the pump body. In hot summer weather, the density of the fuel decreases. Due to this, the cooling and lubrication of the pump itself is reduced. When the supercharger wears out, engine power drops and speed is difficult to pick up during acceleration.
- When the supercharger jams, the fuse blows, so the plug connecting the shafts of the electric motor and the supercharger breaks down. This design prevents failure of the electric motor. To prevent this, you must immediately turn off the ignition switch. Since when the pump stops, the electric motor increases the temperature in the gas tank with increased current flow, this leads to ignition of the fuel.
Also, when the season changes, it is necessary to remove the gas tank and wash it. If a motorist does not have free time to carry out preventive maintenance of a vehicle, then at the first sign of interruptions in the car’s operation, it is necessary to contact specialists at a car service center. Regularly, especially in the fall before the onset of frost or in the spring, undergo vehicle maintenance. To familiarize yourself with the operation of an electric fuel pump, you need to carefully watch the video clips. Also study the photos, which show the principles of repair. This will be required for independent preventative car care. Instructions for replacing the fuel pump and its parts with your own hands will also come in handy. It’s never too late to learn something new, especially since it gives you the opportunity to save a lot of money, because the price for services of this kind in service stations is not low.
One of the most important elements is the electric fuel pump, which is located in the fuel tank of the car. The fuel pump pumps fuel into the system from, creating a certain pressure.
Auto repair experts identify the following common fuel system problems that are related to the fuel pump:
- The fuel pump pumps poorly and does not create the required pressure;
- the fuel pump does not pump when the ignition is turned on;
Considering that the fuel pump is an electromechanical device, the most common fuel pump malfunctions are related to both the mechanical and electrical parts. Next, we will look at what signs indicate a breakdown of the fuel pump and why the fuel pump stops pumping partially or completely.
Symptoms of a fuel pump malfunction and methods for diagnosing them on an injection engine
Fuel pump gazelle 405 injector does not work reasons
The power systems of modern fuel-injected internal combustion engines use an electric fuel pump. Depending on the installation location, there are submersible (installed in the tank) and flow-through fuel pumps (cut into the fuel supply line).
Main components of an electric fuel pump:
- two-piece body;
- DC motor;
- pumping section.
According to its design, the section can be rotary, blade, gear or turbine type. The latter option, due to its simplicity of design, has earned the greatest popularity. The rotation of the impeller attached to the electric motor shaft creates zones of high and low pressure, due to which fuel is taken and pumped from the tank into the pipelines.
Motor power circuit
In addition to the submersible fuel pump, the fuel module located in the tank includes:
- float type fuel level indicator sensor;
- critical gasoline level sensor;
- coarse filter;
- built-in fuel pressure regulator (RDT). This type of RTD is found on returnless power systems. Another type of design involves the presence of a fuel return line and a regulator mounted in the fuel rail;
- inlet and outlet fuel lines;
- electrical connectors.
Symptoms of a worn fuel pump motor:
- uncertain engine start;
- failures when sharply pressing the accelerator pedal;
- insufficient power at high speeds;
- The engine periodically stalls and refuses to start for some time. Often in such cases, several blows to the tank help bring the fuel pump back to life.
The cause of the described symptoms is worn brushes and the electric motor commutator. When the brushes are worn out, they do not press well against the lamellas of the commutator, which is why the current in the circuit drops, which leads to a decrease in the performance of the fuel pump.
Wear of electric motor components is the most common reason why the fuel pump does not pump gasoline well.
If power comes to the connector, but fuel does not flow from the pump, the reason may be melting of the plastic housing due to overheating or critical wear of the brushes/commutator. In this case, when you turn on the ignition, you will not hear a characteristic buzzing sound from the fuel module. Sometimes a situation in which the fuel pump pumps, but no gasoline comes out, occurs due to poor fixation of the corrugation going from the pump to the outlet fittings of the fuel section. Due to the pressure created by the pump, the corrugation jumps off the fitting.
If the gas pump works but does not pump enough gasoline, first of all pay attention to the coarse and fine filters. Clogged filters can be identified by the fact that the fuel pump hums louder than usual
Please note that operation under load reduces the service life of the transformer. The cause of insufficient pressure may also be a faulty fuel pressure regulator, which discharges too much fuel into the return line.
Failure of the fuel pump due to wear of the elements of the pump section occurs only in the case of low-quality components. You are more likely to replace the fuel pump due to worn brushes than to face mechanical wear on the pump section components.
Tips and tricks
If it is necessary to replace the VAZ 2110 pump or after removing the pump for preventative replacement/cleaning of the mesh, after completing the reassembly and installation of the pump, do not immediately install the rear sofa and the pump cover.
Additional verification will be required before doing this. To do this, you need to turn on the ignition and determine whether gasoline is leaking from the fuel pipes. Also, the smell of gasoline in the car interior, etc. is not allowed. If this is the case, then you need to determine the cause of the leak and replace the problematic elements, tighten the tube nuts, etc.
As for the fuel pump itself, the VAZ pump does not have to be replaced as a whole module. You can replace only the pump part, which will be cheaper. In this case, you only need to install the pump that came from the factory. You can also try to choose an analogue that matches the characteristics, but in the case of a VAZ, it is often optimal to use original parts.
To make the selection accurate, the existing module must be removed from the car and purchased a similar one. Also, when choosing, you need to take into account the type of engine, since the pumps are different. Before purchasing, the fuel pump itself should also be inspected, its housing should be checked (cracks, dents, and defects are not allowed).
If everything has been checked, but the fuel pump does not work - article numbers
In general, the pump article number for VAZ-2112 engines looks like this: 21102-1139009-XX. Instead of the letters XX there are numbers, for example 02 or 03. They indicate the manufacturer. So, modules from different factories are not interchangeable! The resistance of the FLS resistor is different in them. However, when replacing the FLS sensor, you can borrow it from the “old” module. That's what they usually do.
Until April 2002, article numbers of the type 2112-1139009 were used.
Almost every module available for purchase contains a built-in pressure regulator. There are also exceptions - KSZC-A243, for example. The meaning is as follows:
- All internal combustion engines with a volume of 1.5 liters are equipped with a ramp with an “external” regulator (2112-1160010);
- The 21124 or 21114 motor requires a built-in regulator.
In conjunction with 1.5 liter engines, you can use any module – both with and without a built-in regulator.
Designations of analogues
- 21102-062213.0XX – instead of the letters XX there will be a plant designation (07, 13, etc.);
- KSZC-A233 or A243 – KSZC brand. No pressure regulator .
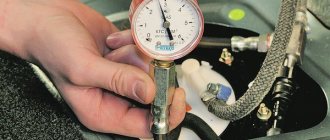
Pressure check
To check the pressure of the fuel pump, you will need a pressure gauge. It will need to be connected to the fuel system, which is located under the hood of the VAZ 2110/2112. A pressure gauge is connected to the fitting of the fuel pipe that goes to the engine. If at idle the device shows a pressure of more than 3.3 kg/cm3, then the fuel pump is clearly faulty.
When connecting, be careful not to damage the adjacent hoses and wires. If the pressure gauge reading is less than 2.3 kgcm, then the problem in the fuel system lies not in the pump, but in another element - the filter.
Based on these indicators, you can immediately identify the nature of the problems in the fuel system.
Fuel check valve
The electric fuel pump of the VAZ “Ten” has good performance, but it creates too much pressure in the fuel system. In order to bring the pressure back to normal, a VAZ 2110 fuel pump valve is built into the fuel line; it is located in the “outlet” fitting of the BN housing. On the “tens”, a pressure regulator is also installed, which is located behind the fuel rail.
A valve malfunction involves a ball sticking in the open position, and the fuel pressure in the system may drop to zero. If such a problem occurs, the car is very difficult to start, since all the gasoline from the fuel lines goes back into the gas tank when the ignition is turned off. Is it possible to somehow repair the valve?
Drivers of 2110 cars claim that you can try knocking on the fitting in the BN flask so that the shut-off ball falls into place. If the malfunction cannot be eliminated in this way, the electric fuel pump bulb must be replaced, since this housing itself is non-separable.
Causes: fuse, relay, connector
The pump power circuit includes many elements: closed relay contacts 5, fuse 3 (15 A), “+” wire, “pump-to-ground” wire. The most “difficult” defect is a short circuit of the “+” wire to ground. By the way, the cord itself is laid on metal, so such a defect cannot be ruled out.
Mounting block for dashboard
Both the relay and the fuse are located in a block located under the dashboard on the right. A fuse can blow in two cases:
- The “+” cord makes contact with ground;
- The motor resistance decreases due to overheating.
The first defect may be “floating”, and then it will be difficult to identify. But before calling an electrician, try checking everything else:
- Relay 5 should click twice: when the ignition is turned on and after 1.5 s. If this does not happen, replace the relay;
- Check fuse 3. If it is blown, you need to look for the cause.
Consider the situation: the relay is working, but the fuse is blown. Then we do this: disconnect the pump connector, install a new fuse and measure the voltage at the terminals. Details are below.
Connectors under the hatch, disconnecting them
You need to remove the hatch under the rear seat: two screws are unscrewed with a Phillips screwdriver. Next you need to disconnect the connector on the module, and then move on to the block under the dashboard.
First, turn off the fuel pump!
Replace the fuse. Let's move on to the fuel pump: connect the probe (zero cord) to any of the mounting studs. Voltage should appear on the “gray” wire when the ignition is turned on. And also check the potential difference between the “gray” and “black” wires - it should be equal to 12 volts, and also at the moment the ignition is turned on. Wiring:
- The two outer cords are the FLS sensor;
- “Black” – minus power supply;
- "Grey" is a plus.
The "black wire" sometimes loses contact with ground. At the last step, we checked exactly this version.
There are reviews from owners that say: the fuel pump on a VAZ-2112 does not work if the electric motor is working properly and there is voltage in the connector. This happens when the contacts of the internal terminal block oxidize (see photo).
Internal connector - yellow
Getting to the connector on the motor is not easy - you need to remove the fuel pump module by unscrewing 8 nuts around the perimeter.
Safety precautions
Before unscrewing the nuts, you need to disconnect the two hoses. But first try starting the engine. The power supply to the fuel pump is not connected.
Please note - the power is turned off here!
Everything is ready for dismantling if:
- External connector is disabled;
- It is impossible to start the engine, although the on-board network is not de-energized;
- It is better if the tank is filled less than 50%.
You need to unscrew two fittings from the module cover (top photo). Then use a socket wrench to unscrew the nuts from the studs and remove the retaining ring.
There is very little left to the internal connector
Having gained access to the internal connector, you need to clean its contacts. Assembly is carried out in reverse order. Good luck!
Oxidation of the terminals of the internal connector is a typical disease of the VAZ-2112 fuel pump, and only one of the contacts does not work. The “+” terminal is more often oxidized.
Fuel pump VAZ 2110 injector, fault diagnosis
The fuel pump for Lada-110 is the heart of your car; when the pressure supplied to the fuel injector drops, the car’s power is inevitably lost, the car periodically stalls at idle or has difficulty starting. In this case, most likely, the fuel pump mesh is clogged and repairs should begin with replacing it.
Diagnostics of the fuel pump VAZ 2110
By measuring the pressure in the fuel rail with a pressure gauge, you can also speak with a high degree of probability about the causes of the malfunction. So, a clogged filter will cause a low pressure reading at the output of the regulator, and high values hint at problems directly in the regulator itself.
Normal pressure on the injector from the Lada-110 fuel pump depending on the engine type, ranges:
If you have insufficient skills in measuring pressure, you can very tentatively conclude that the VAZ 2110 fuel pump is working properly, having pumped gasoline into the container through the main fuel supply hose. A working fuel pump will pump at least 1.5 liters in a minute. gasoline.
Replacing the fuel pump
If on a VAZ 2110 the fuel pump does not turn on at all, then you should first pay attention to the electrical power supply circuit according to which the VAZ 2110 fuel pump operates, namely:
- serviceability of the fuse in the fuel pump circuit;
- sticking of the fuel pump relay contacts;
- presence of voltage on the terminal block by turning off the “tens” fuel pump and connecting an ordinary 12 V test light to the corresponding power connectors;
- burnout of the electric pump motor windings.
Common mistakes
You can use our instructions in one case: when the fuel pump does not work, but other systems are working properly. Sometimes the engine does not start for several reasons at once. And then you need to reduce the pressure like this: wait 5-6 hours, and do not turn on the ignition.
You can find out about the presence of pressure in the standard way:
- Open the hood;
- There is a fitting on the fuel rail, closed with a plastic cap. It is turned away (photo 1);
- Using the nipple cap (photo 2) you can unscrew the fitting plug. This action is performed carefully: the residual pressure has not disappeared anywhere.
Even if gasoline starts to gush out, do not try to tighten the fitting right away. Let the pressure drop a little. Diagnostic fitting and plugTrying to repair the fuel pump is commendable.
It will be possible to change its mesh. But the cause of the problem may also be a clogged fine filter. The replacement filter (“can” 2112-1117010) fails gradually. On all fuel-injected cars, including the VAZ-2112, the fuel pump will not stop working even if the filter is completely clogged. Fuel is not pumped, but the engine does not burn out.
Fuel pump VAZ-2110: characteristics
The fuel pump (VAZ-2110) is the main structural element of the fuel system of a gasoline internal combustion engine, which functions to supply fuel to the injectors or carburetor under high pressure. Depending on the type of drive, there are electronic and mechanical units. And now we will look at the structure of this part using the example of an element installed on a VAZ 10-ku.
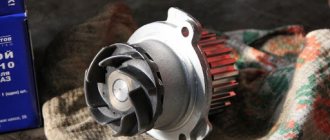
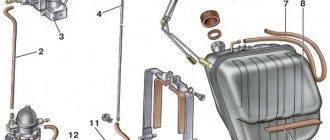
Mechanical fuel pump VAZ-2110 - properties and design
This type of mechanism is used only on cars with carburetor engines. This VAZ-2110 fuel pump has its own mechanical drive from the camshaft, and it is located on the internal combustion engine.
According to its design, this element is one of the types of piston and contains the following parts:
- 2-piece housing with a lid on top.
- Diaphragm. It is installed between the lower and upper parts of the body.
- Return spring.
- Stock. It connects aggressively to the diaphragm.
- Discharge and absorption valve. It is located in the upper part of the pump.
- Mechanical drive.
- Mesh filter.
The drive of this device, as we said earlier, is carried out from the camshaft eccentric. When this element rotates, the part moves the rod with the diaphragm down, and the spring force is overcome. The volume of space above it increases, and gasoline, due to the resulting vacuum, seeps into the pump through a separate valve from the gas tank. The discharge valve is still closed.
The main operating mechanism of the pump is the diaphragm. It consists of two membranes, between each of which there is its own gasket. The diaphragm is connected to the rod. The latter interacts with the mechanical drive parts. There are various pump drive schemes. For example, on Russian “10s” a design is used that consists of a pusher and a lever with a balancer. On imported cars, they use their own design with a two-arm “rocker arm”.
Fuel pump for VAZ-2110 - properties
The main properties of this device are the pressure level and housing dimensions. The most popular units today are German-made Bosch units. The pressure of the VAZ-2110 fuel pump is about 2.8-3.8 Bar. The very feature of the fuel pump is sometimes determined by the diameter of the body; in most cases, it is the length.
The dimensions of this part can be very different. Depending on the model and brand of the manufacturer, this parameter is 65, 90 or 105 mm. And these are not all the sizes of VAZ fuel pumps.
Apart from the length, these devices differ in the location of the terminal chips. The mesh itself, in terms of its seats, actually does not differ by brand. By the way, the quality of operation when the fuel level in the tank is low depends on the length of the gasoline pump itself.
In other words, when choosing, you need to pay attention to longer elements. By the way, the diameter of the body can be varied using a gasket made of gas-resistant rubber
Electronic analogues
What is special about the fuel pump? The VAZ-2110 (injector) is equipped with specifically such devices in the fuel system. The electronic pump is used on gasoline engines with distributed fuel injection. In turbodiesel and diesel engines, this element is used in the low-pressure circuit for the preparatory passage of fuel to the high-pressure pump. By the way, electronic pumps on gasoline engines with direct injection of Common Rail fuel operate on the same principle. The electronic mechanism makes the pressure about 0.3 MPa (in power plants with direct injection - about 0.7 MPa). The use of mechanical pumps in such systems is not recommended due to the low pressure when supplying gasoline.
Where is he located?
This device is located in the fuel line or in the fuel tank. Thanks to this placement, the risk of losses is significantly reduced due to the absence of absorbing mains.
The design of the electronic pump implies the presence of the following parts:
- Electric motor.
- Pump housed in an iron casing.
In other words, this device consists of an electric drive and a pump part. All its components are in direct contact with the fuel. In addition to the parts listed above, the module of this device also includes a fuel flow sensor, a fuel intake and a strainer.
And the part we are considering operates thanks to the presence of two valves - a reversible valve and a pressure reducing valve. The first one locks the system when the internal combustion engine stops. The second one performs the function of maintaining pressure in the system, while part of the fuel is bypassed to the rear inlet.
By design, there are a number of types of electric pumps:
Causes: fuse, relay, connector
The pump power circuit includes many elements: closed relay contacts 5, fuse 3 (15 A), “+” wire, “pump-to-ground” wire. The most “difficult” defect is a short circuit of the “+” wire to ground. By the way, the cord itself is laid on metal, so such a defect cannot be ruled out.
Mounting block for dashboard
Both the relay and the fuse are located in a block located under the dashboard on the right. A fuse can blow in two cases:
- The “+” cord makes contact with ground;
- The motor resistance decreases due to overheating.
The first defect may be “floating”, and then it will be difficult to identify. But before calling an electrician, try checking everything else:
- Relay 5 should click twice: when the ignition is turned on and after 1.5 s. If this does not happen, replace the relay;
- Check fuse 3. If it is blown, you need to look for the cause.
Consider the situation: the relay is working, but the fuse is blown. Then we do this: disconnect the pump connector, install a new fuse and measure the voltage at the terminals. Details are below.
Connectors under the hatch, disconnecting them
You need to remove the hatch under the rear seat: two screws are unscrewed with a Phillips screwdriver. Next you need to disconnect the connector on the module, and then move on to the block under the dashboard.
First, turn off the fuel pump!
Replace the fuse. Let's move on to the fuel pump: connect the probe (zero cord) to any of the mounting studs. Voltage should appear on the “gray” wire when the ignition is turned on. And also check the potential difference between the “gray” and “black” wires - it should be equal to 12 volts, and also at the moment the ignition is turned on. Wiring:
- The two outer cords are the FLS sensor;
- “Black” – minus power supply;
- "Grey" is a plus.
The "black wire" sometimes loses contact with ground. At the last step, we checked exactly this version.
There are reviews from owners that say: the fuel pump on a VAZ-2112 does not work if the electric motor is working properly and there is voltage in the connector. This happens when the contacts of the internal terminal block oxidize (see photo).
Internal connector - yellow
Getting to the connector on the motor is not easy - you need to remove the fuel pump module by unscrewing 8 nuts around the perimeter.
Safety precautions
Before unscrewing the nuts, you need to disconnect the two hoses. But first try starting the engine. The power supply to the fuel pump is not connected.
Please note - the power is turned off here!
Everything is ready for dismantling if:
- External connector is disabled;
- It is impossible to start the engine, although the on-board network is not de-energized;
- It is better if the tank is filled less than 50%.
You need to unscrew two fittings from the module cover (top photo). Then use a socket wrench to unscrew the nuts from the studs and remove the retaining ring.
There is very little left to the internal connector
Having gained access to the internal connector, you need to clean its contacts. Assembly is carried out in reverse order. Good luck!
Oxidation of the terminals of the internal connector is a typical disease of the VAZ-2112 fuel pump, and only one of the contacts does not work. The “+” terminal is more often oxidized.
Where is the fuse and fuel pump relay on the VAZ 2110
It’s worth saying right away that the fuse and relay for the VAZ 2110 injector fuel pump are located in the same place. They are both located in the center console on the passenger side below. The main task of a relay in an electrical circuit is to close and open a circuit. Thanks to this, the circuit is protected from high inrush current.
| F1 - 5A | License plate lamps. Instrument lighting lamps. Side light indicator lamp. Trunk light. Left side marker lamps. |
| F2 - 7.5A | Left headlight (low beam). |
| F3 - 10A | Left headlight (high beam). |
| F4 - 10A | Right fog lamp. |
| F5 - 30A | Electric door window motors. |
| F6 - 15A | Portable lamp. |
| F7 - 20A | Engine cooling fan electric motor. Sound signal. |
| F8 - 20A | Rear window heating element. Relay (contacts) for turning on the heated rear window. |
| F9 - 20A | Recirculation valve. Windshield and headlight cleaners and washers. Relay (coil) for switching on the heated rear window. |
| F10 - 20A | Spare. |
| F11 - 5A | Starboard side marker lamps. |
| F12 - 7.5A | Right headlight (low beam). |
| F13 - 10A | Right headlight (high beam). Indicator lamp for turning on the high beam. |
| F14 - 10A | Left fog lamp. |
| F15 - 20A | Electrically heated seats. Locking the trunk lock. |
| F16 - 10A | Relay-breaker for direction indicators and hazard warning lights (in hazard warning mode). Hazard warning lamp. |
| F17 - 7.5A | Interior lighting lamp. Individual backlight lamp. Ignition switch illumination lamp. Brake light bulbs. Clock (or trip computer). |
| F18 - 25A | Glove box lighting lamp. Heater controller. Cigarette lighter. |
| F19 - 10A | Locking door locks. Relay for monitoring the health of brake light lamps and side lights. Direction indicators with warning lamps. Reversing lamps. Generator excitation winding. On-board control system display unit. Instrument cluster. Clock (or trip computer). |
| F20 - 7.5A | Rear fog lamps. |
| K1 | relay for monitoring the health of light bulbs; |
| K2 | front wiper relay; |
| K3 | repeater and alarm relay interrupter; |
| K4 | low beam relay; |
| K5 | high beam relay; |
| K6 | additional relay; |
| K7 | rear window heating relay; |
| K8 | backup relay |
A similar type of relay is installed on the fuel pump, protecting the circuit when the engine starts. It consists of a plastic housing that houses an electromagnetic coil with a core. The incoming voltage allows the core contacts to close. The operating current of the relay is 30 Amperes.
Where is the fuel pump relay located on a VAZ 2110?
People often wonder where the fuel pump relay is located on a VAZ 2110; this photo will help you answer this question ↓
Where is the fuel pump relay located on a VAZ 2110?
Location of the relay and fuse for the fuel pump VAZ 2110 injector
If during repairs or diagnostics, the fault indicates a relay and fuse, then they must be removed and replaced with new parts. You should prepare a Phillips screwdriver and position yourself on the passenger side. At the bottom of the center console there is a cover secured with two screws. You need to unscrew them. It is there that the panel is located where the VAZ 2110 injector fuel pump relay is located and where the fuse for the VAZ 2110 fuel pump is located.
Rice. 2 Removing the side cover
After removing the protective cover, access to the power fuses and relays of the car appears. The required parts responsible for the operation of the fuel pump are marked with numbers 5 and 2 in the center of the photograph.
Fig.3 Power fuses and relays
Why does the VAZ 2110 fuel pump fuse blow out?
Fuse failure is a fairly common occurrence. Burnout indicates one thing - there is a short circuit in the fuel pump power system. In this case, you can change the fuse, drive away for several days without problems, and the situation will repeat again. So it is necessary to look for the reason.
The most common culprits are:
- the wiring harness above the exhaust manifold melted;
- wires under the carpet are damaged or melted;
- interturn short circuit in the pump motor;
- The positive wire going to the pump is damaged (current leakage to ground).
To identify the cause, you should disconnect the power supply from the fuel pump and turn on the ignition. If the fuse is blown, then the problem is in the wiring. Remained intact - short circuit in the electric motor. In the first case, you have to inspect the entire harness, looking for contact of the “plus” with the ground. As a rule, this is a gray wire running from the relay to the tank. The harness runs along the central tunnel, and not from the left threshold.
Why is it acting up?
Let's look at the main faults.
- The main, most common reason that the fuel pump makes a loud noise and does not cope with its functions is the filtration system, which includes fuel filters, as well as a special mesh that is located inside the fuel pump. You can suspect that the culprits are here based on the following signs: • your fuel pump is buzzing much louder than usual. Moreover, you need to listen to it exactly when it starts, immediately after turning the ignition key. When the engine starts, you are unlikely to hear the pump humming, because it will be joined by the sounds of a running engine. In addition, you should know that the VAZ 2110 fuel pump hums loudly on its own, and its noise is drowned out by the fuel in the tank where it is located. Therefore, when getting into a car, you should not immediately turn on the music, but listen to how all its systems work; • failures occur in engine operation, which also indicates that fuel is supplied intermittently due to contamination of the filtration system; • These same faults are indicated by a drop in power. Most likely, the mesh is clogged with microparticles of various dirt, which enter the gas tank along with the fuel, or are formed there due to condensation and corrosion processes.
- The clearances available in the supercharger have been increased. A strained sound may indicate this malfunction. You can hear it working under load. In addition, power drops; the VAZ 2110 (injector) has poor throttle response. Gaps increase for several reasons. In winter, condensation may crystallize; in summer, the density of the fuel decreases, causing the fuel pump to cool and lubricate less well. Both provoke the formation of scratches, cavities, and grooves, due to which the gaps increase;
- The fuel pump suddenly stops due to the supercharger wedge, as a result of which the fork that connects the supercharger and electric motor shafts breaks. This blows the fuse. The ignition should be turned off immediately. There is a concern that when the pump stops and the current increases, the gasoline may ignite;
- In addition, a malfunction of the electronics transmitting signals to the fuel pump cannot be ruled out. Before you begin repairing it, you should check the reliability of all connections and wiring.
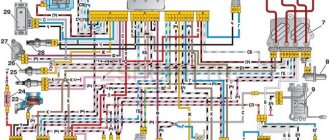
Fuel pump circuit (electric)
The design of the electric fuel pump 2110 itself is quite simple - the unit is an electric motor, which is supplied with 12 Volt power. The BN is mounted in a housing, and a mesh is installed at its inlet - a coarse filter. The filter element prevents dirt particles from penetrating into the pump housing, thereby protecting the device from clogging and possible breakdown.
The electrical circuit of the VAZ fuel pump contains the following elements:
- ignition;
- fuse;
- relay;
- wiring;
- the engine control unit.
When you turn the ignition key, power is supplied through the relay to the BN terminals, and the pump begins to pump gasoline. After the input line of the fuel line is filled with gasoline, the ECU (control unit) through a relay gives a command to turn off the voltage - the fuel system is ready to start the engine, all that remains is to crank the engine with the starter.