Changing car gears is a standard process that every driver has brought to automaticity. Therefore, every step of this process should not be spoiled: the gears should be engaged the first time, and the lever should lie comfortably in the hand. Comfort will largely depend on the gearshift lever, which the driver holds most of the time behind the wheel. Replacing the gearshift knob itself is not difficult, but you need to know how to do it.
The gear shift mechanism on a Priora car changes not only due to wear: it is considered an important element of the interior. Therefore, it can be replaced with something else. For example, remove the gear knob from Priora 1 and install a part from Priora 2. Any tuning is possible - instead of a standard part, you can put any one. It can be supplied from a new car, or from any other car - modern capabilities will allow you to make an “adapter” for any lever.
Standard gear knob - article number and price
The gear knob on a Priora, the price of which is quite reasonable, differs for different generations of the car. After restyling, the internal appearance of the Priora really changed, and even the gear shift lever changed in appearance. It has become a small detail against the backdrop of all the changes, but for many the part from Lada priora 2 remains more preferable when the time comes to replace the gear shift mechanism.
Dorestyling
The pre-styling mechanism consists of the following main parts
- Gear shift lever – 2110-01703088-00, price – 200 rubles;
- Pressure plate – 2110-01703238-00, price – 30 rubles;
- Protective cover – 1111-01703200-00, price – 200 rubles.
Restyling
The restyled gear shift mechanism consists of spare parts included in the following list:
- Handle overlay – 2170-01703124-00, cost – 50 rubles;
- Gear shift lever - 2170-01703088-00, cost - 250 rubles;
- Protective cover – 1111-01703200-00, cost – 200 rubles.
Replacing the clutch and release bearing of a VAZ 2114 without removing the box
Clutch replacement
and release bearing VAZ 2114 (VAZ 2108, 2109) without removing the box
, drives (grenade) and drain.
It is noteworthy that when installing new parts, the length of the lower threaded part of the cable tip is usually not enough to restore its original position.
Therefore, it is necessary to restore the wear compensation mechanism to its original position. To do this, size L must be installed between the leash and the clutch release fork lever.
The clutch pedal should be raised all the way up. Replacing the VAZ 2110 clutch without removing the box. Replacing the Lada Priora clutch with and without removal. Then the spring will automatically return the slider to its original position. After this, all that remains is to check the result of the work and, if necessary, adjust the clutch.
See:
Do you know about the main malfunctions of the manual transmission knob?
The device, together with the gear shift mount, is quite simple. There are several basic faults that can be corrected or simply repaired part of the box drive. Malfunctions of the gear shift knob include the following:
- External signs of wear. The part itself can wear out quite well, lose its color and become “greasy”. This is unpleasant, because this appearance ages the interior, and the lever itself becomes unpleasant to hold in your hand.
- Torn cover. The cover will collect all the dust along with small grains of sand so that they do not get inside. If the cover breaks in at least one place, all the dust will fall down. It will interfere with the standard operation of the Priora gearbox mechanism, so that over time, signs of a malfunction of the large mechanism will appear.
- The gearshift knob dangles like a play. First of all, such play interferes with correct and quiet gear shifting.
How to set up the rocker on a VAZ 2112
I once found out while driving why the rear one was switched on instead of the first one.
The solution was proposed to be simple and effective: replacing the lining with a stop (which blocks the reverse gear from being engaged without pressing the lever). Yes, the old lining and axle were ground off and definitely needed replacement. But it did not help. The lever rested against the pad and the rear one still turned on. Adjusting the backstage helped. It can be done by two people if there is a hole in 5-10 minutes. It was necessary to loosen the screw that holds together part of the rod coming out of the passenger compartment into the box. Move the lever slightly to the left 1-2 centimeters. Tighten again. And that’s it, the gears engage as they should, from stop to first and second. From pressing and then to the left - back.
We also pumped up the tires and replaced the left rear nipple (it was leaking). Included in the amount.
The gearbox on the VAZ-2110 sometimes starts to act up. If you neglect the care and maintenance of this part of the car, you can get many problems with the operation of the gearbox. As a rule, these are inaccuracies in gear shifting, characteristic “knocking out” of the gear, crunching and clanging when manipulating the gearbox lever. Some car owners believe that all these symptoms indicate a gearbox failure.
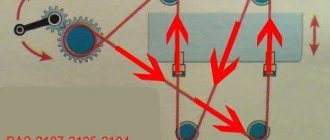
Why do you need a gearbox slide?
In fact, most often the gearbox is in good condition, but the rocker may fail.
You can replace the unit with a new one, or you can get by with proper adjustment of the rocker. Adjusting this element will help troubleshoot problems and make sure that the problem is related specifically to the gearbox linkage. It happens that a car owner simply begins to change one component after another without understanding the problem, wasting money and time to no avail.
The gearbox itself is designed to prevent gears from switching spontaneously . It happens that due to incorrect or erroneous adjustments, the entire transmission system begins to work incorrectly and may even fail. Therefore, you need to be able to adjust the gearbox rocker with your own hands, especially since this procedure is not complicated.
When does the rocker need adjustment?
Gear shift mechanism.
The procedure for adjusting the gearbox linkage is recommended in the following cases:
- After the transmission on the car has been replaced or removed.
- When loosening the fixing clamps.
- If the cardan was changed.
- If the link starts to rotate on its hinge.
Although visually it may seem that the rocker is in place, even the slightest movement of the rocker can lead to incorrect operation of the gearbox. It happens that it is enough to tighten the link to the cardan by 1 mm, after which all functions of the gearbox will be restored.
Preparing to adjust the rocker
On an old car, it is better to lubricate the linkage mounting assembly with a penetrating compound in advance.
Before starting adjustment work, you need to prepare the place and carry out the following preparatory measures:
- The car needs to be parked in a pit.
- The handbrake must be tightened all the way.
- It is mandatory to install wheel chocks.
For a faster and better adjustment process, it is better to perform all work with an assistant. The process itself can occur in several ways.
First adjustment method
To adjust, you need to loosen the clamp connecting the rocker drive to the cardan.
This method is the simplest. In this case, the gearbox linkage is adjusted according to the reverse speed . First of all, you need to loosen the clamp, after which the reverse gear is engaged. Then you need to position the lever in the position you need. After this, the clamp is tightened and the operation of the entire mechanism is checked.
Manufacturers and prices of analogues
Gear shift levers are also produced by other manufacturers:
- Sphere AutoBra 2138-K (together with a leatherette cover, with red inserts) – 390 rubles;
- Sphere AutoBra 2138-SR (together with a leatherette cover, completely black) – 390 rubles;
- Sphere AutoBra 2140-CH (together with a leatherette cover, black, perforated surface) – 450 rubles;
- Sphere AutoBra 2141-Sr (together with a leatherette cover, the lever itself is gray) – 400 rubles;
- Azard KPP-00132 (black set with genuine leather frame) – 480 rubles.
How to change the gear knob on a Priora
In order to remove the gearshift knob on a Priora, as well as to carry out any replacement or modification operations with it, it is necessary to dismantle the control system. So, for example, you can change a part by installing the version developed for Vesta. But the easiest way is to replace it with a standard part: you don’t have to make any modifications.
We remove the Priora gearshift knob, following the standard algorithm:
- Tighten the handbrake so that the Priora is locked in place;
- Remove the cover - just lift it to the top;
- It is better to heat the plastic part with a hairdryer and use a screwdriver to remove the sign with the painted speeds;
- Having rested a piece of a pre-prepared square at the bottom of the lever, use an adjustable wrench to make a stop so that the part goes up.
Watch this video for more details:
Video eliminating bouncing of the VAZ 2110 gearbox lever
You can view the entire process described above in the video by following the link
Of course, all the methods described are good, but only for masking the negative consequences of a rattling gearshift knob. It is worth looking for the reason for the rattling of the gearbox lever deeper, in the gearbox linkage or in the engine - only by eliminating the main cause of the rattling can you no longer worry about the condition of your VAZ 2110.
Gentlemen, tell me, what could be the problem? Suddenly (as if something broke) the lever began to dangle sharply to the right and left. Now it does not return from the right position to the left at all. If in neutral. That is, I switched the first or second one to neutral and stayed there. A little inconvenient. What could come off? What kind of traction or elastic band? One person said that some screw could have come loose near the box where the drawstring goes in. Should I look there?
Life hack: how the gearshift knob rattles (oscillates) on a Priora
Rattling occurs due to the fact that there are too large gaps inside. The amplitude of vibrations of the internal parts increases, a knock appears along with vibration - this is how the Priora gearbox knob rattles. The remote bushing of the lever is the source of vibration. You can fix this problem in the following ways:
- Installing the washer - place an additional plastic washer between the rocker and the gear shift knob. Its parameters are an internal radius of 9 mm, an external radius of 13.5 mm. Select the plastic so that it is soft enough. This is necessary so that frosty temperatures do not destroy the bushing;
- Replacing the bushing with a fluoroplastic one. Standard – metal;
- Shortening the bushing means sharpening the gearbox remote bushing by 2 mm on both sides, and then coating the part with lubricant before reinstalling it;
- A short-stroke rocker will eliminate vibrations - the alteration will be quite serious, but switching on the desired speed will be easier, but you will have to make a lot of effort to move the lever.
Often rattling is removed using a repair kit. It will get rid of rattling if there was none before.
VAZ 2110 replacement of the ball joint cage of the gearshift knob
Replacing the gearshift pad on VAZ-2110, VAZ-2111, VAZ-2112 cars
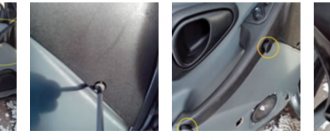
On VAZ-2110, VAZ-2111, VAZ-2112 cars, when unpleasant rattling, vibration and increased play in the gearshift knob appear, the happy owners of these vehicles should pay attention to the condition of the ball joint race of the gear shift link or as it is also called in common parlance gear shift pad. There is another option - butterfly wings But, I personally like the second option)))
Due to the fault of this very pillow (ball joint cage) being completely broken, the clarity of gear shifting may also disappear. Yes, I know that all the listed symptoms also include a broken cardan (joint) of the gear selection rod. What kind of cardan is this and how to replace it you can find out from this article. But we’re not talking about him now and let’s assume that everything is ok with him. Or, as another option, the cardan was replaced, but the rattling and play of the rocker did not disappear. This also happens; not everyone immediately pays attention to the backstage cushion. But, it exists and it periodically fails (breakage of rubber “ears”, flying out of metal bushings, breaking of a plastic bushing or spring). The destruction of the rubber part of the cushion (ball joint race) of the rocker is not difficult to replace (see photos 1 and 15). And if you find them, then it’s time for you to get ready for work. Let me reassure you right away, it’s not complicated. But for everything to go smoothly, you need to be thoroughly prepared. That is, buy the necessary spare parts, decide on the location of the work, assemble the necessary tools and, of course, familiarize yourself with and remember in what sequence you should replace the cushion (ball joint race) of the gear shift lever on VAZ-2110, VAZ-2111, VAZ- 2112. And I will try to help you with this, and I invite you to further read this material.
Spare parts. Here the choice is obvious. I recommend choosing the ball joint bracket for the gearshift mechanism of VAZ 2110-2112 cars - BRT (Balakovo). As they say, time-tested quality. Photo 2.
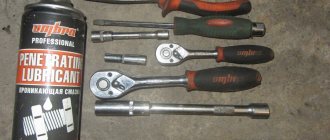
List of tools that you will need to replace the cushion (ball joint race) of the gearshift gates of VAZ-2110, VAZ-2111, VAZ-2112 cars: a 13-socket and socket wrench, a 10-size combination wrench, pliers, a flat-head screwdriver and a small ratchet with with a cross attachment (photos 3 and 4). The need for a ratchet with an attachment will be shown a little later. And you should immediately decide on the location of the work. It is advisable to replace the cushion in an inspection pit, overpass or lift. Why is it desirable? Because this work can be done “from the ground”, but believe me, it will take more time and effort. And it will still be a pleasure.
And so, into battle! Let's proceed to independently replacing the cushion (ball joint cage) of the gearshift slides of VAZ-2110, VAZ-2111, VAZ-2112 cars:
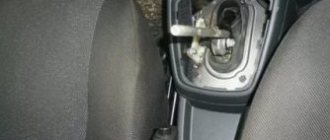
Let's start working inside the car. Use a screwdriver to pry up the frame of the decorative cover of the gearshift slide (photo 5). Pull the lever handle up and remove it along with the cover.
Using a 10 mm spanner, unscrew the two fastening nuts and the bolt of the reverse locking bracket lining and remove it (photos 6 and 7).
Using a 13mm wrench, unscrew the lever axle nut (photo 8). After this, use a wrench with an attachment (in my case it’s a ratchet) to unscrew the axle locking screw (photo 9). Without such a key, this screw will be difficult to unscrew. We take out the axle (photo 10). We remove the set of bushings from the lever, otherwise we risk losing them (photo 11). All. Now the work inside the car is finished, let's climb under the car.
Using a 13 mm socket wrench, unscrew the two nuts of the rocker pad bracket (photo 12). And remove the bracket.
Next, you should disconnect the reaction rod from the cushion (ball joint cage) of the rocker. We use a spanner wrench (hold the nut on top with it) and a 13mm socket wrench (photo 13).
We manufacture and replace short-stroke gearbox shifter for VAZ 2112
We pull down the pillow along with the lever (photos 14 and 15). Remove the retaining ring (photo 16) and remove the lever along with the plastic bushing (photos 17 and 18).
All. We clean the lever hinge from dirt, lubricate it, and put on a plastic bushing. We place this whole thing in the pillow body and secure it with a locking ring (photos 19 and 20). We return this entire structure to its place (photo 21). Don't forget to put a cover on the pillow (photo 22).
Ready. We carry out the rest of the assembly in reverse order. The work on replacing the butterfly cushion (ball joint cage) of the gearshift gates of VAZ-2110, VAZ-2111, VAZ-2112 cars has been completed. I hope it's successful)))
If you find an error, please select a piece of text and press Ctrl+Enter.
Gearbox cover: price and manufacturers
Even a malfunction of such an insignificant part as the gearshift lever cover can cause quite a lot of trouble. There are several options for a box cover that can be installed instead of a torn standard one:
Autobra 2183-CH. Black, made of genuine leather – 400 rubles.
Universal options. Manufacturers often present a cover (boot) for Lada Priora along with a lever. It can be completely different: black, two-color, with or without edging. You don't always want to change everything at once, so searching for a new boot may take some time.
Repair
Replacing the cabin filter on a Priora
Regardless of what exactly you do with the rocker - repair, adjust or change, you will still need to disassemble this unit.
Disassembly is performed as follows.
- Remove the cover from your gear shift knob.
- Place the car on a pit, or raise the front end with a jack.
- Remove the front console. It is held in place by mounting bolts.
- Now remove the curtain itself. To fix it, AvtoVAZ used 6 bolts in the case of the VAZ 2110 model.
- When carrying out dismantling work, be sure to examine the condition of all elements.
- By bending the boot, you will gain access to the support, oil seal and cardan shaft.
Changing the boot
Now regarding the repairs. There may be several recommendations in this regard, depending on the current state of the node and its components.
- At best, repairs will require the use of a repair kit for the backstage. It doesn't cost much.
- If the bushing is deformed, it will need to be replaced with a new one.
- Check the lever shaft bore for wear.
- Make sure there is no play in the driveshaft. Otherwise, a regular repair kit will no longer be enough, that is, a complete replacement of the entire backstage will be required.
- Often the culprit of extraneous noise and rattling when shifting gears in gearboxes is the rocker pad. Changing it is quite simple, and even a beginner can perform the operation.
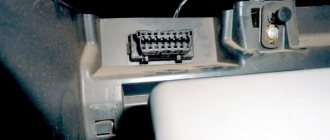
Replacing the oil seal
Quite often, VAZ 2110 owners are faced with a situation where, after parking under the car, they find traces of oil. There are two options here - the oil filter has worn out or there are problems with the oil seal.
As you replace the oil seal, you will be able to simultaneously inspect and change such elements as the cushion, cardan shaft, and boot.
Dismantling works
But let's talk about everything in order. First of all, check whether it is really an oil seal and not a filter. If everything is fine with the filter, then we drive the car into a pit or find another way to end up under the bottom of your VAZ 2110. Beforehand, it would be a good idea to watch video materials regarding your current situation.
- Carefully inspect the boot. If oil leaks from the gearbox through the oil seal on your car, traces of it will definitely remain on the boot.
- Bend back the boot. This way you can get to the cardan, disconnect it and gain access to the cuff.
- You first need to dismantle the cardan from the lever, and only then from the rocker itself. Not the other way around.
- The cardan has been removed, so we move to the oil seal.
- The cuff is removed from the gearbox using a hook and an awl. Therefore, make sure you have these tools at hand in advance.
- Now a new one is installed in place of the old oil seal. Craftsmen have adapted to using ordinary plastic bottle caps. If you get used to it, it turns out to be very easy to change the oil seal.
- After replacing the element, return all dismantled components to their places. If some of them need replacing or signs of wear are already visible, it is better to replace them immediately. It is unlikely that you will want to repeat the same operation in a couple of weeks and lie under your own car.
Repair will not give the desired result if the adjustment was carried out with errors. To do everything carefully and competently, use the help of a partner. One will work under the car, the second will help from inside.
The gearbox is one of the most complex components of a vehicle. However, this does not mean that its repair cannot be done at home on your own. Now we will tell you what the VAZ 2110 rocker is, what may be the reasons for its malfunction and how to repair the mechanism.
Handle from Vesta to Priora
A detail from Vesta on Priora attracts the attention of many VAZ-2170 owners. Even analogs cannot compete with it. The insert on the gearshift lever itself is made of high-quality black mirror plastic with a silver edging. The catalog number of the standard part for the VAZ 2170 assembly is 8200-379945. Cost with dust cover – 2,000 rubles.
It is important to note that there will be no problems with installing the gear shift part - the mounting is similar. Completion of minor tuning should be indicated by a thorough check of the lever's functionality. It is better to detect the lack of “response” of the box while the car is standing still. Carry out a little diagnostics, then hit the road.
Short-stroke link for Priora PrioraPRO
Before we consider how to properly install a short-throw rocker on a Priora with our own hands, let’s remember why this is being done.
The essence of a short-stroke rocker is that it reduces the travel of the gearbox lever when switching gears off or on. Moreover, gear shifting in the car becomes clearer.
Unlike the factory standard lever, the short-stroke rocker has slightly different bending angles. Thanks to improved geometry, the gear shifting process brings pleasure to sports driving enthusiasts.
As already mentioned, installing a Priora short-stroke rocker results in the gearshift lever reacting to your movement faster and more responsively, while the actual rocker travel will be less.
If you are a fan of sporty style and want to accelerate the car as quickly as possible, then you will need to change gears quickly. Again, here too a short-throw slide will come in handy.
Installation process
Let's analyze the installation of the Priora short-stroke rocker with our own hands step by step.
First you need to pull the knob and cover off the box lever. The knob on the lever is not fixed, so it is enough to apply a certain force to remove it.
Using a key set to “13”, loosen the clamp and separate the gearbox lever rod from the cardan.
To release the lever, we release the ball from the spring mechanism, which is necessary to activate the reverse gear with locking. To do this, remove the locking ring.
It is strictly forbidden to sharply pull the lever upward when trying to release it.
Slowly, carefully remove the retaining ring.
We take out the spring and then the lever with the ball inserted into the plastic frame, as well as the locking ring.
The plastic mandrel includes two parts: the lower one, located on the right and the upper one, located on the left, cylindrical in shape. There is a slit at the top. This component fits onto the gearshift lever. At the bottom there is a lever ball. The upper part wraps around the lower part so that the grooves match.
We take out the lever and rod from the interior. For convenience, you can separate the lever from the rod, although this is not at all necessary.
Using a “10” wrench, unscrew the left bolt on the cardan and pull off the rubber boot.
The driveshaft from the Priora differs in length from the driveshaft of the Viburnum. It is necessary to shorten the stem of the viburnum, depending on its type.
We insert the cardan from the viburnum. Lightly lubricate it with lithol from the inside. When screwing in the bolt, you do not need to tighten it.
We insert the rod through the interior. It is advisable to do this not alone, but to take someone as an assistant. Let one hold the elastic band in the cabin, through which the thrust passes, while the second gradually stretches the thrust.
Next we assemble the lever:
— We put the rod back on the cardan shaft. — We equip the spring mechanism again (we also lubricate the ball with lithol). — We center the lever (we fix it in a comfortable position). — We tighten the clamp on the rod.
It is quite possible that the lever will not immediately center itself as it should. In this case, perform steps 3-4 again.
Please note that if you first assemble the spring mechanism, then due to the greater length of the rod it will be impossible to put the rod on the cardan (the problem can be solved if the cardan is shortened)
Don't forget to put the boot on the driveshaft
After completing the above steps, we will be able to correctly install the short-throw rocker on the Priora.
It will also be necessary to adjust the mechanism that blocks reverse gear engagement. Due to the fact that we customize the Priora short-stroke rocker to suit ourselves, the following problem may arise. The locking mechanism does not align with the plate it engages. We solve the problem by removing the plate and carefully adjusting the engagement.
In the end, all that remains is to put the knob and cover on the gearshift lever. Keep in mind that after assembly the gearshift lever will be tilted to the right.
Advantages of a short-stroke rocker
After we bought a short-throw rocker for a Priora and installed it manually, we can see the following improvements:
— the lever stroke becomes 3 times shorter, resulting in a much faster transition from gear to gear. You can feel as if you are driving a sports car;
— you need to get used to switching, because the lever itself is not in its original position. To stick gears you now need to put in more effort;
The irritating rattling noise, which is inherent in driveshafts of Ladder models from Nines to Prior at high speeds, disappears.