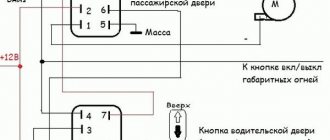
Window lifter handles are most often found on older or budget car models. Almost all domestic cars (except for later models designed by Steve Mattin) are equipped with a mechanical window lift drive. The handle can also be found on older models of foreign cars. Some modern car models (for example, Renault Logan 2) are available with a push-button window regulator for the driver and passenger sitting in the front, and window lifter handles in the rear seats. If the handle breaks, you should not immediately contact a car service center. Everyone can independently figure out how to remove the window lifter handle. As an example, we will give the process of removing the handle on Russian cars.
How to remove the window lifter handle on a VAZ-2114?
On a VAZ-2114 car, window lifter handles are present on the rear doors. Handles have the advantage that such a window lifter mechanism is easier to repair. Of course, automatic window lifting is more convenient, but if it fails, you cannot do without a service station.
In general, it is not difficult to break the handle. It is enough not to calculate the effort when raising/lowering the glass. Therefore, the problem occurs quite often. To install and dismantle the new window lifter handle, you will need: a flat-head screwdriver and a purchased new handle, sold complete with a latch and washer.
Handles with a set are sold in specialized stores. If we are talking about how to remove the window lifter handle on a Lada Kalina or any other modern Russian car, then the kit can be easily purchased in stores. There are also a lot of spare parts left for older models. You can search on trading platforms or flea markets.
Removing the old handle
No pullers or other tools are needed. To remove the handle, follow these steps:
- A flathead screwdriver must be placed between the latch and the washer. The latch must be pryed and unfastened in such a way that you can easily remove it by pulling it towards you.
- Remove the damaged old handle.
- Remove the handle washer.
As you can see, the operation is quite simple, but the problem does not always lie in the handle itself. If the window lifting mechanism jams, moves with tension, or does not work at all, the problem may be in the cable that raises and lowers the window. Alternatively, the gear splines of the window lift system may be worn out. In this case, you will have to change the entire mechanism.
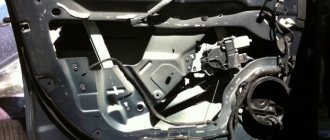
What to do if the problem is in the window lifting mechanism?
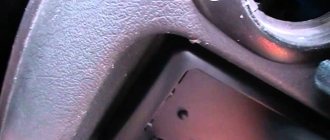
It is necessary to disassemble the car door. It is imperative to remove the door handles and armrest. To do this, you need to pry off the decorative plugs with a screwdriver. Next, take a Phillips screwdriver and unscrew the screws holding the armrest handle. To remove the door pocket, you need to unscrew the screws holding it. There is a pad on the handle that opens the door. It needs to be pryed up and also removed. This is done in order to unscrew the button blocking the door. Next, use a flat-head screwdriver to pry off the upholstery. The upholstery is held in place by eight pins. By removing the pistons, you can easily remove the upholstery.
The glass is attached to the window lifter using two bolts. You can remove them using a 10 mm nozzle. The glass rises up. Using the same head, you need to unscrew the nuts with which the window lifter mechanism is attached. The parts are removed through the door panel window. After replacing the window regulator, it is necessary to reinstall all components. After installing the new window lift mechanism, you need to secure the glass by installing a new handle. After installation, check whether the glass goes up and down. Until you are sure that the system works, do not replace the upholstery, lock button, armrest, handle pad and pocket.
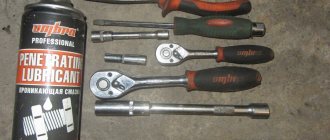
Door Removal Tools
The window lifter handle cannot be repaired. That’s why they simply replace it with a new one, since the latter costs from 30 to 70 rubles.
Read more: Changing the oil in a VAZ 2106 engine, which oil filter is better than flushing the system, instructions with photos and videos
Dismantling is carried out in the following order:
- take a flathead screwdriver;
- use it to pry the plastic base retainer with the U-shaped slot;
- push it towards you and it will jump off;
- Use the same screwdriver to press out the handle itself;
- remove the decorative cap.
Now all that remains is to install the new element by performing all the described steps in reverse order.
It often happens that replacing the window lifter handle turns out to be in vain, because after that the side door glass is very difficult to lower and raise by the mechanism, and this requires some effort.
This indicates a malfunction of the window lift mechanism and the need to install a new one. The most common cause of its breakdown is worn out gear splines and an exhausted cable that is no longer able to perform its functions as it should.
Remove the trim
To install a new window regulator, which does not involve removing the glass, you need to disassemble the car door in the following sequence:
- remove the window handle and door card armrest, for which you need to carefully pry off the decorative plugs using a flat screwdriver;
- Using a Phillips screwdriver, unscrew the screws that secure the armrest;
- remove the screws of the door card pocket and dismantle it;
- without much effort, pry up the handle cover that opens the door from the inside and release it;
- unscrew the door lock button;
- unfasten from the door by prying up the casing, which is mounted on several pistons, with a screwdriver;
- Use a 10 mm wrench to unscrew the bolts that secure the glass to the window lift mechanism. Then you need to lift the glass up with your hands and use the same key to unscrew the nuts that secure the window lift mechanism to the door;
- After this, you can dismantle the entire structure of the window regulator through the door hole, which was hidden under the trim.
Replace the window lift mechanism
Installation of a new element is carried out in the reverse order. The glass is fixed in special holders. The window lifter handle is put in place. The functionality of the entire mechanism is checked by lowering and raising the side window. After making sure that all the parts are installed properly and function perfectly, all that remains is to remove the handle and reattach the door trim and all its components.
Before starting the manipulations, you need to prepare the tools. To work you will need:
- heads for 10 and 13;
key - “ratchet”;
head extension;
Torx T20 bit;
adapter for nozzle;
Phillips screwdriver.
Trim Removal Tools
This is a highly specialized tool, not every car owner has it. In this case, you may have to purchase new upholstery fasteners, since the old ones may break if they are exposed to inappropriate tools. You can try replacing the blades with a shoe knife or similar tool, but a good result is not guaranteed, since you can, again, break the fasteners or scratch the upholstery.
Rear window lifter handle.
If a motorist needs to remove the window lifter handle, then it is not necessary to contact a car service center and pay money. This process is quite simple and takes 10 minutes, and therefore there is no point in wasting money and time visiting a service station.
So, let's look at what the process itself looks like:
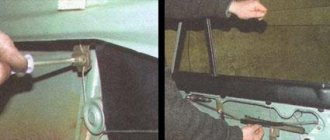
- We insert a flat-head screwdriver between the washer and the window regulator handle.
Insert a screwdriver and loosen the thrust washer and handle.
- We press the handle and remove the thrust washer.
- Pull the handle towards you and remove it from the grooves.
Remove the window handle from the VAZ-2107 door. The VAZ-2114 is similar.
- The assembly process is carried out in the opposite order.
Window lifter handle.
Replacing such an important element as the window lifter handle is necessary when dismantling the door card, carrying out repair operations, or replacing the handle itself due to a breakdown.
How to remove the window lifter handle of a VAZ-2107?
The removal process is practically no different from that on the VAZ-2114. The exception is older parts, which may be much more difficult to remove. In addition, the VAZ-2107 has window lifter handles on both the rear and front doors, since the model is older. In the event of a breakdown, you can replace the handle for both the driver and passengers. Spare parts for the model can be purchased at the aftermarket. Since the VAZ-2107 has long been out of production, new spare parts are no longer produced. You can always take kits for more modern models, since they are generally universal. The kit for Kalina or Priora may well be suitable.
Replacement
In any case, any replacement of the window regulator occurs by removing the handle of the device. In addition, this part may become unusable. It most often fails in the driver's seat because it is used more often.
Important! Many car owners advise immediately changing the handle without doing any repairs. It will be cheaper and faster than constantly repairing it.
The process of removing or replacing the handle goes like this:
- The first step is to remove the plastic retainer (circlip). To do this, use a flat screwdriver to move the outer ring away from the inner ring and remove the part.
- Next, remove the handle itself.
The process of removing the mechanism
To dismantle the window regulator, you will need to do the following:
- Lower the window to its lowest position.
- Remove the handle, having first unscrewed the fasteners and clamps.
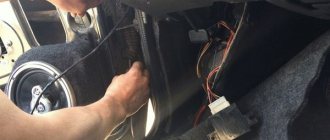
- Remove all door panels with trim, this will allow you to get to the necessary mechanism.
- If the device later needs to be returned to its place, it is recommended to tie the cable with wire so that it does not come off the guide gutters.
- Loosen the lower roller lock.
- By moving the roller, release the tension on the cable.
- Remove the cable from the rollers.
- Unscrew the mechanism securing the device to the door, which is held on by three mounting bolts.
- Remove the device from the door.
The dismantling process is completed.
After this, you can carry out repairs on the removed lift or install a new one in its place.
Installing a new
Steps to install a new window regulator:
- You need to start by applying lubricant to the cable.
- Place the mechanism in its proper place and secure it with three mounting bolts.
- Place the cable on the rollers.
- Pull the cable and secure the lower roller.
- Check the operation of the entire mechanism.
- If everything works as it should, the trim and door panels should be installed.
- Secure the door handle.
- Reinstall the window handle and lock.
Adjusting the cable tension
conclusions
Replacing the window lifter handle is a simple operation that any car enthusiast can do. When purchasing a kit in the markets, you risk receiving a defective product. In this case, it is better to purchase a kit for a later model in a specialized store. Experts also recommend checking the mechanism itself during replacement, since there are parts that fail over time.
Especially if a problem is found in the glass lifting mechanism. To extend the life of the mechanism, you should not make sudden movements when raising and lowering the glass and you should not pull the handle. The entry of foreign objects into the mechanism is unacceptable. Good luck and easy travels!
Despite the simple design of fastening the window lifter handle on traditional Zhiguli models, dismantling this handle causes many difficulties for many car owners.
If you are reading this article, it means that it is most likely too late to break this unit; usually, during the first dismantling, this handle simply breaks. What you will need, here we will carefully tell you what it really is, how to remove the window lifter handle of a VAZ 2107
It happens that suddenly the window handle in a VAZ car burns out. In the hot summer, this may turn out to be especially nasty, but nevertheless, there is no need to immediately rush to call a special car service center to remove the old broken window lifter handle and install a new one.
There is a fact that virtually any car enthusiast can deal with a similar problem without the help of others; in other words, everyone can repair a window lifter handle in a makeshift setting. For this purpose, the driver only needs to find out exactly how to correctly change the window lifter handle and actually apply this knowledge. In reality, this is not so difficult to do. The easiest way to see the process of changing a given auto element is with an example. Specifically, if you set a goal to carefully remove the handle of the mechanical window lifter of a VAZ 2107 car, the motorist will need a flat-head screwdriver and, of course, a brand new working handle, complete with a latch and washer.
- Insert a flathead screwdriver between the latch and the washer of the broken window handle. Next, using this tool, you need to try to carefully press out the jammed handle latch. Next, you should carefully pull the latch towards you only and pull out such an element out.
When, if you set a goal to install a handle, you need to act in reverse order. Next, insert the new washer, which should go into the set with the new handle. Holding the new washer lightly with your hand, you need to carefully install the new window lifter handle on the mechanism. Experts recommend turning the new handle a little. This is done so that the new handle will “catch” perfectly onto the splines of the window lifter gears. Now there is an option to secure the installed handle with a latch from that kit. It will be useful to check at the bottom how the new window lifter handle works. It is enough just to raise and lower the door glass a couple of times in order. What is needed, repairing the window lifter handle yourself is quite simple. But this popular rumor method may not solve the problem every time. Namely, certain difficulties arise with removing a broken handle and installing a new analogue, provided that the glass on the vehicle door itself is very difficult to lift and release.
In addition, it is likely that replacing an old pen with a new one may not solve the problem at all. In most cases, for which the design is intended, if the window does not rise and fall poorly, the fault lies not in the handle, but in the window lift mechanism itself.
There is also the possibility that the lifting/lowering cable is not working correctly or that the splines of the window lift gear have worn out their life. If this is the reason, then only changing the window lifter mechanism itself helps.
For greater clarity, a video clip is attached to the article, which will help you better understand the issue. how to remove the window lifter handle of a VAZ 2107.
Window regulators are an integral part of driving a car. The driver should be aware of the main malfunctions of this unit and how to fix them independently, and also know what to do if the glass jams, falls, or there is a need to remove/install the power window lift. Of practical interest is also the choice and independent installation of electric windows on the VAZ 2107.
Types of fastenings
How to remove the window handle? Drivers are afraid of dismantling this element. This is due to the minimal amount of information on the Internet, as well as stories from experienced drivers about a large number of broken handles. To properly dismantle the unit, you need to know its design, in this case the method of fastening. All types of fasteners 3:
- Plastic latch;
- Retaining ring;
- Splined fastening.
The first option was most often used on VAZs, and also on some European cars. The retaining ring can be found on the vast majority of modern foreign cars. Renault cars are equipped with handles with slotted fastening.
Window lifter malfunctions and ways to eliminate them
The operation of the window lifter is configured and adjusted by the manufacturer, so you should interfere with it extremely carefully and carefully, otherwise the mechanism may jam, crackle and crackle.
From personal experience, I advise you to carefully study the device and read the detailed troubleshooting instructions before starting to independently repair the window lifter mechanism. Even though many of them seem quite possible to fix with a screwdriver and a wrench, in some cases it may be necessary to completely replace the window regulator.
Window lift creaking
At first glance, the creaking of the window regulator does not seem to be a serious malfunction, but you should pay attention to this signal, since this is the first sign that the mechanism is wearing out and may soon break. Methods to combat this symptom are extremely simple, accessible to everyone and do not take much time:
- lubricate the window lifter - lubricants from any manufacturer, widely available in car dealerships, are suitable for these purposes;
Window lifter jammed
The main reasons that the VAZ 2107 window lifter is jammed are as follows:
- failure of the welded joint connecting the cable bracket and the glass strip to which it is attached. In this case, you need to disconnect the window lift cable and weld the bracket;
- The cable is tangled or twisted inside the window lift mechanism. You can try simply removing and reinstalling the cable. In case of failure, the entire mechanism will have to be replaced;
- wear of the window lifter gears indicates a clear need to replace them.
Glass falls
It happens that the glass falls and does not stay up. The reason for this may lie in the weakening of the tension roller, which creates the proper tension in the cable. To fix the damage, it is necessary to restore this mount. Another cause of the malfunction may be that the end of the cable has come out of the fastener. Then you need to remove the window regulator and try to wind the cable again.
It’s easy to check whether you carried out the repairs properly: in good condition, the window lifter handle rotates freely and effortlessly, the glass rises easily, without getting stuck and without any extraneous sounds.
Plastic latch
This method of fastening raises the least number of questions among car enthusiasts. At first glance, everything is simple here. You need to press and pull out the latch, this is enough for dismantling. But, strangely, these are the handles that are broken most often. Therefore, let us pay attention to some of the nuances of this work:
- Take a slotted screwdriver and insert it between the latch and the washer. Your task is to move the latch back a little. Often a crunching sound is heard in this place, this means the handle is broken. In this case, you can skip the next point;
- Using the same screwdriver, the latch is pulled out entirely;
- The handle itself is removed from the slots and the washer is removed.
Assembly occurs in reverse order. It is advisable to place the handle in the most comfortable position for yourself. Also, before installing the latch, twist the handle a little, this will allow it to fit perfectly into the slots.
Similar articles:
- How to remove and check the starter of a VAZ 2106 repair with your own hands why it clicks and does not turn, replacing the relay instructions with video and photos
- VAZ 2106 steering wheel: which one is suitable, how to remove and disassemble, instructions with photos and videos
- Replacing the window regulator VAZ 2106 and 2105: how to supply and install the mechanism, repair and diagram
- How to remove and replace the VAZ 2107 gear shift lever yourself: description and instructions with video
Repairing a VAZ 2107 window lifter: step-by-step instructions
Most window lifter breakdowns in a VAZ 2107 car are not difficult to fix. In most cases, regardless of the design and mechanism, it is the teeth of the rotating gear that break. To begin the repair, first remove the trim and card of the car door with all the elements placed on it. Then the window lifter itself is removed, after which the necessary work is carried out.
Removing the window lifter handle
One of the most common malfunctions is the breakage of the handle, which occurs on both front and rear window lifters due to careless use or simply over time.
Over several years of owning a VAZ 2107, we became convinced that if the handle breaks down, it is better to immediately change it, since repairing it only helps for a short time and is not economically feasible. The cost of the window lifter handle for the “seven” ranges from 20 to 80 rubles in different auto stores, so you can replace all four handles at the same time, choosing their appearance to suit your taste. You can even choose and install beautiful handles from other cars.
Replacing the handle is easy, it happens in the following order:
- Release the handle from the plastic retainer called the locking ring. For this purpose, using a flat-tipped screwdriver, the outer ring is moved away from the inner ring and then the retaining ring is removed.
- Remove and install a new one in its place.
Removing the window regulator
To remove the window lifter, you must perform the following steps in sequence:
- Lower the window all the way and remove the window lifter handle.
- Unscrew the bolts securing the door handle and remove it.
Installing a new mechanism
To replace the mechanical window lifter, you need to do the following:
- Lubricate the window lift cable.
Replacing the cable
It happens that the window lifter mechanism is working properly, but the cable is broken or twisted. Replacing it is easy, but you need to consider the following features:
- Before installation, be sure to generously coat the cable with lubricant;
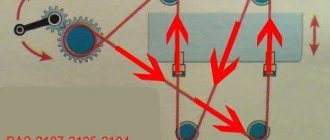
- The lower branch of the cable is fed to the upper roller of the mechanism, and the upper branch is directed downwards. To prevent the branches from getting tangled, it is recommended to tie them with wire, which should be removed after the window lifter mechanism is finally secured and the necessary adjustment procedures are carried out;
- The VAZ-2107 window lifter has an upper hidden roller. On the first try, it is almost impossible to put the cable on it. Let's use a little trick - we twist a loop at the top of the cable and lead it to the place where this “invisible” roller is located. We move the loop alternately up and down and after several unsuccessful attempts it catches on the roller.
Mechanism design
The window regulator is a fairly simple mechanism, but it is important to know that the design for the front and rear doors is somewhat different. However, in both cases their equipment is exactly the same. So inside the cabin are located:
- the handle itself;
- protective cap;
- socket.
The window lifting mechanism consists of:
- brackets;
- lower and tension rollers;
- bolt;
- star winding mechanism;
- cable traction.
And the last part is the glass fastening system. It includes:
- pressure plates;
- fixing screws.
The 2107 differs from earlier classic VAZ models in the shape of its front windows - they are pentagonal. The old ones, as many remember, had a separate window, which the manufacturer, striving to optimize work processes, abandoned. Because of this decision, it was necessary to change the layout of the cable and its feeding, so the seven has an additional (tension) roller. You need to know this nuance in order to remove the window regulator without difficulty.
Anyone can replace any structural element independently, without going to a service station. However, it is important to complete all work carefully and without errors.
How to dismantle the casing in Grant yourself?
The tools are the same, since the very essence of the process is not much different from the previous one. Your actions:
- Using a flat tool, press out the window handle retaining element.
- Move the lock to the side and remove the handle completely.
- Remove the second part of the handle and the socket.
- Unscrew the locking element of the lock.
- Use a flat tool or a metal spatula to pry off the top of the handle. Take it off.
- Remove the two screws inside the handle.
- Use a long, flat tool to pry up the trim underneath, pushing it between the metal of the door and the card.
- During the removal process, snap off the pistons, trying as much as possible not to damage them. There are more clips on the back door than on the front - 10 pieces.
- That's all, now you can completely remove the trim from the rear door of the Lada Granta.
Installing the casing is slightly different from dismantling it, not only in the sequence of actions, but also in why exactly the old one was removed. Therefore, this issue will be considered separately.
The procedure is slightly different from removing the front passenger door trim, but the removal process is even easier.
The work must be performed in the following sequence:
- The door lock button is unscrewed.
- The handle of a mechanical window lifter is removed in the manner described above - first the hook is removed, and then the handle (for electric windows, the steps are also described above).
- Use a flat tool to pry up and remove the handle cover.
- Unscrew the two screws located under the removed cover.
- The rear door trim does not have the two lower bolts that were previously seen, as these doors do not have pockets. Therefore, all that remains is to remove the trim from the clips.
How to remove the casing correctly and with your own hands? The first step is to disconnect the negative terminal from the power battery of the Lada Grant. This action is not necessary if the stern doors are not equipped with power windows. When dismantling the trim from the front door panel, disconnecting the terminal is a mandatory measure!
To securely fit the casing in its place, you will need to acquire new clips. It is possible that these fasteners may break during the removal procedure.
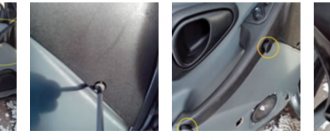
Next, on the decorative door panel of the Lada Granta, using a flat-profile screwdriver, pry up the plug and remove it. We act carefully to avoid breaking off its fasteners. Use a Phillips screwdriver to unscrew the fixing screw. We perform a similar procedure with a bolt located in a plastic socket.
The only action left is to unscrew the remaining pair of trim fixing bolts, which are located at the bottom of the door card. To remove the locking button, you will need to perform a simple manipulation - turn it to the left and slowly pull it up. If the car is equipped with a manual drive of the mirror mechanism, then use a screwdriver to pry up the sealing gasket of the mirror hinge lever and remove it.
Read more: Do-it-yourself muffler repair without welding: sealant, tape
Based on the photo, it is recommended to first familiarize yourself with the locations of the clips in the Lada Granta. This will reduce the risk of damage and save time on work.
How to remove manual or power windows?
Mechanical defects
What can interfere with the proper operation of an electric motor? It is recommended to inspect the drive panel.
If, when pressing the button, the driver hears a characteristic growl, but the windows do not move, it means that the plastic gear of the gearbox is badly worn. Repair is not possible here - only replacement.
Another reason why the window regulator (Kalina station wagon is no exception) does not work is moisture getting inside the door and oxidation of the moving systems. As a result of oxidation, the mechanisms jam.
If a very loud noise is heard while the glass is moving, then the gearbox bearing needs to be replaced. If the glass twitches when you try to close the window, it means it is warped or foreign objects have gotten into the roller.
It also happens that the mechanism does not work even after replacing the electric motor. Then the problem is hidden in the cable. It should be replaced. For a Lada Kalina car, the replacement price will be approximately 300-400 rubles, since this cable is not sold separately.
Eurasia today
Automotive industry on the continent
Logan window lifter handle
— Keys TORX 20 and TORX 25
— Knife with a wide blade
The procedure for removing the front door trim on a Renault Logan 1 car
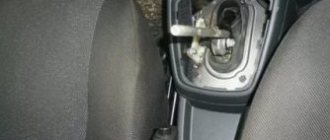
— Remove the window handle (if the car is equipped with mechanical windows)
We press the round pad against the handle. Grasping the base of the handle with your fingers, forcefully pull it towards you. Or we tear it off with a sharp movement. The point of the procedure is to overcome the resistance of the plastic handle latches, which with their protrusions fit into the groove on the window lifter shaft.
- Remove the inside door handle
Using a TORX 25 wrench, unscrew the screw securing the inner handle. Remove the handle from the mounting hole. We remove the hook of the drive rod from the hole in the handle lever. We remove the handle.
Using a slotted screwdriver, remove the speaker cover. Using a TORX 20 wrench, unscrew the four screws securing the speaker. We remove it from the mounting socket and disconnect the wires going to it and remove it. The wire ends are of different thicknesses, so it will be difficult to make a mistake during subsequent connections.
— Unscrew the screws securing the upholstery to the front door of the car
Using a TORX 20 wrench, unscrew one screw securing the upholstery in the armrest and another screw from the end of the door.
— Detach the trim from the front door
Carefully, alternately from different sides, using a wide knife to pry up the upholstery, overcoming the resistance of the latches (pistons), we disconnect it from the door. There are eleven latches in total. They are located around the perimeter of the door. You can place a piece of cardboard under the knife so as not to damage the paintwork of the door. Having disconnected a couple of clamps using a knife, the rest can be separated by pulling the door trim towards you with your hands. Damaged plastic clips will need to be replaced with new ones.
Remove the front door trim, removing the lock button from the hole. The plastic cover of the button should be removed by prying it with a screwdriver.
That's it, the front door trim of the Renault Logan 1 car has been completely removed.
Notes and additions
— The armrest is attached to the upholstery with seven TORX 20 screws; if necessary, we remove it too.
— Install the front door trim in the reverse order.
More articles on the body of the Renault Logan 1 car
— Replacing the front door opening limiter of a Renault Logan car
— Installing a hood seal on a Renault Logan 1 car
— Self-replacement of the windshield on a Renault Logan 1 car
A small characteristic of the node
Replacing power windows on a VAZ-2106, as many experienced car owners know, is a fairly simple operation, but fraught with some pitfalls. As almost all experienced car enthusiasts know, the design of the VAZ-2106 is not much different from the design of the very first VAZ model, which, in turn, is in many ways a copy of the Fiat-124
, introduced almost half a century ago.
Cars of that time were distinguished by a simple and unsophisticated design of all components, which means that the VAZ-2106 window lifters have a simple and understandable design, which is quite easy to disassemble. In this article we will tell you in detail how to change the window regulator on a VAZ-2106 with a description of each step
.
Installing a new window regulator
The new mechanism must necessarily have a bracket that secures two branches of cables. It cannot be removed until a full installation has been completed.
In general, the installation process looks like this:
- Installing and fixing the case in its “own” place.
- Installing cables around the rollers.
- Fastening the glass clips with a cable. It is fixed with screws using 2 brackets.
- Installation of the guide groove.
- Cable tension.
- Now the bracket that secures the branches of the cable is removed.
- Installation of door trim and handles.
The cable can be routed around the rollers in two ways through the rolling support (upper or lower). If the line goes through the lower roller, then the cable is routed as follows:
- Left guide roller (lower).
- Left guide support (top).
- Central tension reel (bottom).
- The guide element is at the top right.
If the front window regulator is being replaced, then you can loop it through the upper coil in the reverse order.
- Lower the glass to the down position.
- Turn the handle all the way in the direction of lowering the window.
- Adjust the cable tension by moving the required roller.
- The bolt clamp that secures the roller.
Please note that the tension should be sensitive. The cable should not be overtightened, but it should not be allowed to dangle either.
If a creaking noise appears after installing the new mechanism, then do the following:
- Loosen and remove the cable from under the rollers.
- Cross the lower and upper branches that come out of the mechanism drum.
- Repeat the installation and tensioning procedure.