Lada Granta. Be careful, checkpoint!
Yandex pictures
Hello! In this article we will talk about the #Lada Granta gearbox.
A gearbox in a car is not this:
The gearbox is a gearbox and on Grant it looks like this:
Three types of gearboxes are installed on #VAZ cars. These include a traditional manual transmission, a robotic transmission and an automatic transmission. The first two transmissions are made by VAZ, and the automatic transmission is made by the Japanese manufacturer Jatco. Vesta, Largus and XRAY are equipped with Renault-Nissan JH3, JR5 manual transmissions, but I will focus on the gearboxes that are installed on the Grant.
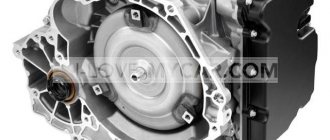
#automatic transmission Jatco
This transmission is installed only in conjunction with a 98 horsepower VAZ-21126 engine. Four-speed automatic transmission with torque converter. Automatic transmissions of this type are installed in Nissan, Mitsubishi and other passenger cars. This transmission is time-tested and quite reliable. Most malfunctions, as a rule, arise from the fault of drivers. Among the minuses, it is worth noting increased fuel consumption, sluggish acceleration of the car, twitching during gear changes during dynamic driving. Whether this is true or not, honestly, I don’t know, because I am a supporter of manual transmission.
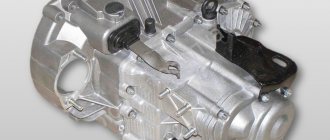
#robotic gearbox
The robot box is, in the mechanical part, box 2181. Instead of a pedal and clutch unit, an electromechanical gearbox drive is installed here. By the way, produced by the German company ZF. updated Grant, the robot was also updated. The changes are reported on the Lada website. Online:
Material selection
Every driver wants the material with which the interior elements of his car are covered to be not only strong and durable, but also pleasant to the touch. In addition, it must meet the tastes of the owner and be combined with the interior design. The financial issue is also important. So how to choose a coating that will meet all these characteristics? The following materials are most often used to cover the gearshift knob:
- Genuine Leather;
- artificial leather (or eco-leather);
- Alcantara (artificial suede).
All of them have good performance. The coating will not tear at the most unexpected moment, and with proper care it will last a long time. But each of these materials has features that distinguish it from the rest. This could be price, softness, or even the ability to cause allergies. To make the right choice, let’s look at the characteristics of each of them.
Genuine leather for upholstery
Genuine automobile leather is the highest quality, but at the same time the most expensive material that can be used in upholstery. Leather seats, ceiling, control panel - it all looks solid and stylish. Having covered the gearshift knob with leather, you will not only enjoy its appearance, but also experience a pleasant sensation when touching it to change gears.
the use of genuine leather in the decoration of the car gives it a stylish and solid look
Leather is highly wear-resistant. Thanks to special processing, it is less susceptible to mechanical and chemical damage. In addition, this material is resistant to ultraviolet radiation, which means it will practically not fade in the bright sun. Another advantage is moisture resistance.
On sale you can find a special type - perforated genuine leather. It differs from the usual one in the large number of barely noticeable through holes throughout the entire area of the material. In addition to all the above positive properties, it has increased elasticity, softness and vapor permeability. You need to choose perforated leather carefully: if the holes have too large a diameter, a lot of dust will accumulate in them. This means you will have to clean it much more often and more thoroughly.
perforated leather has many small through holes, which increases its performance properties
It is not surprising that the cost of leather is much higher than any other material. But despite this, its use will be much more favorable in terms of price and quality ratio, because its service life without loss of properties can reach 7 years. But, besides the price, genuine leather has one significant drawback: the chemicals involved in the leather tanning process can cause a severe allergic reaction in some people
If you are one of them, pay attention to eco-leather
Artificial leather (eco leather)
Eco-leather does not emit harmful chemicals, which allows it to be considered a completely hypoallergenic material. Temperature changes do not have a negative effect on it, so we can confidently speak about the high wear resistance of the material.
As for the appearance, it is almost completely identical to natural leather: the artificial material retains its softness and texture. But the price of eco-leather is much lower, which makes it attractive to most car owners.
eco-leather looks identical to natural leather, but costs much less
Alcantara
Alcantara is otherwise called artificial suede. And if real suede is specially processed and tanned leather, then Alcantara is a synthetic material that has the same soft and velvety surface. In terms of its properties, Alcantara is in no way inferior to genuine leather. It is just as strong, elastic and wear-resistant. It does not fade when exposed to direct sunlight for a long time. In addition, Alcantara is difficult to burn: if a cigarette ash falls on it or a spark bounces off a cigarette lighter, the material will almost certainly remain in its original form. Another pleasant advantage is the ability to retain heat. When you sit in a frozen car in winter, you will touch warm fabric, not cold skin.
Alcantara looks similar to suede, but has better performance properties
Alcantara has a low cost and is easy to find in automotive stores. Working with it, especially at home, is much easier than with natural or eco-leather. This is a good choice for motorists who prefer practicality.
AMT or "robot"
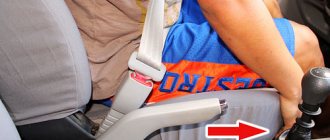
In March 2015, AvtoVAZ began producing cars with robotic transmissions. Here the action scheme is the same as on the old “mechanics” - we pull the handle up strongly. By the way, the books also don’t write how to remove the tunnel lining near the AMT lever.
Let us remind you that recently many LADA car enthusiasts have been installing a gear knob from Vesta on their Grants, Kalinas and Prioras.
Automatic transmission Jatco
In August 2012, sales of LADA cars with Jatco automatic transmission began. To remove the handle, you must first lift the casing up and remove the two screws securing the mount to the rod. Then, on the bottom right side, disconnect the white wire that goes to the O/D button. By the way, the automatic transmission handle can be shortened.
New - well forgotten old
The modernized gearbox received the index 2181 and the same gearbox. The volume of oil poured has decreased by almost a third. “Mineral water” was exchanged for semi-synthetics, which retains its properties in cold temperatures down to -42 0 C, and does not require replacement for almost 200 thousand km. Suddenly.
Multi-cone synchronizers appeared on first and second speeds for good reason: their mission is to extend the life of the constantly loaded second gear and reduce the effort when changing gears.
The gear change mechanism has become a separate module. To dismantle it, it is not necessary to remove the Lada Granta box. A special lock prevents erroneous start of the reverse mode when turning off fifth gear. Innovation – selector grid: sets the lever stroke when selecting gears, repeating the shift pattern.
Removing and disassembling the gearbox control mechanism
We remove and disassemble the gearbox control mechanism to replace the plastic washers of the gear lever shaft and ball joint.
We carry out the work on an inspection ditch or overpass. Remove the middle mudguard (see “Removing the engine compartment mudguards”). Inside the car... ...overcoming the resistance of the clamps, we remove the frame for fastening the gear lever cover from the hole in the floor tunnel.
We slide the cover along with the frame along the gear shift lever.
Turning the cover inside out, unwind or cut the insulating tape covering the lever cover (during subsequent assembly, the insulating tape can be replaced with a plastic clamp).
We pull the cover together with the frame from the gear shift lever and from the lever handle. Below the car...
. Use a marker to mark the position of the gear selector rod hinge shank relative to the control rod (this will help with subsequent assembly of the parts).
Using a 13mm spanner, loosen the nut of the coupling bolt of the clamp securing the control rod to the shank, holding the bolt from turning with a wrench of the same size.
Using a slotted screwdriver, we open the clamp and move it along the rod.
Remove the control rod from the shank of the gear selector rod hinge. To remove jet thrust...
...using a 13mm spanner, loosen the tightening of the coupling bolt nut of the clamp securing the reaction rod to the tip... ...and remove the rod from the tip.
Using a 13mm socket, unscrew the three nuts securing the base of the gear shift lever (there is an installation bolt in the front of the base, shown by the arrow).
Remove the gearbox control mechanism downwards.
Using the “13” socket, unscrew the nut securing the gear shift lever axis (which is also the stop for locking the reverse gear).
We take out the gear shift lever shaft.
Pull the gear shift lever out of the control rod.
We remove two inner plastic and two outer metal washers, as well as a metal spacer sleeve.
Shift Lever Parts:
1 – gear shift lever axis; 2 – metal washer; 3 – plastic washer; 4 – spacer sleeve; 5 – spring washer; 6 – nut. Each of the plastic washers has one protrusion that fits into the corresponding grooves in the lever.
Use a slotted screwdriver to pry up the retaining ring of the plastic insert of the gear shift lever...
...and remove the gear shift lever together with the bushing from the ball joint cage.
Remove the spring from the cage.
Using a 13mm socket, unscrew the two nuts securing the bracket for securing the ball joint of the gear shift lever...
We separate the base of the gearbox control mechanism from the cover and the lever cage.
Using a 13mm socket, unscrew the two bolts securing the torque rod to the base of the ball joint, holding the nuts from turning with a spanner of the same size...
...and remove the jet thrust.
Holding the control rod fork with your hand, pull it through the gear shift lever base cover... ...and remove it.
Remove the cover from the gear shift lever cage.
Parts of the gear lever joint cage
: 1 – gear shift lever assembly with liner; 2 – retaining ring; 3 – spring; 4 – ball joint cage. If you need to replace the plastic bushings and torque tip damper...
What tends to break down in a mechanism?
Sometimes disassembly occurs only to tighten the fasteners. It is also necessary to dismantle the opening mechanism if it does not work correctly. Main causes and options for breakdowns:
- A defect appeared after an accident.
- The part does not close or open the door well. There is insufficient adhesion to the body part.
- Microcracks, scratches, and abrasions appeared on the product.
- Damage to internal components has been detected. If no defects are found during a visual inspection, you will have to unscrew the handle to make sure that the whole problem is in the fastenings.
- In the case of the driver's door, where there is a lock in the handle, the reason for dismantling is an attempt to break into it.
An equally compelling reason: failure of the external door opening manipulator. It is important to understand that the plastic from which the products are made is not as durable as other elements. It may simply crack due to strong pressure on the handle.
Adjusting the front left (right) door lock on the Lada Granta
In the process of systematic use of the door, its frequent opening and closing, the lock and adjacent elements wear out. As a result, the door closes with a distinct knocking sound.
Often knocking occurs after an accident due to changes in body geometry. The functionality of the lock can be restored by partially repairing it, and in case of deformation, by completely replacing it with a new one.
- screwdrivers, set of auto tools;
- lubricant;
- liquid WD-40.
Sequencing
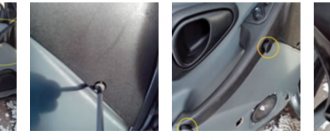
- We inspect the gaps around the entire perimeter of the door. We mark areas with deviations. The factory standard is 2–3 mm, anything higher or lower is a defect.
- Using a screwdriver, unscrew the screws securing the hinge to the body. If necessary, use an impact screwdriver.
- Move the hinge a few millimeters up and down and check the tight fit of the door to the body. If you hear a rumble when closing, lower the hinge; if you hear a dull knock, raise it.
- We carry out a control measurement and tighten the bolts.
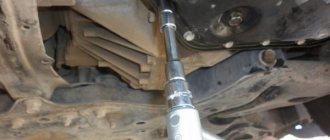
Method number 1 - simple
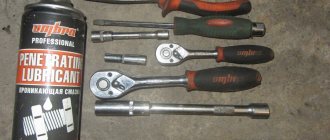
This method is the fastest and easiest. For this work you will need about 20 minutes of free time and the following tools:
- key for 13
- pliers
- sharpener
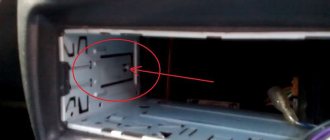
So, first lift the casing and twist the securing nut. carefully and take it out and fold it, so as not to lose it, the bolt and washer together with the bushing. And we immediately find the reason for this - the rattling design was designed with a small gap between the connections, which is the reason for.
In order to get rid of the vibration as much as possible, you will need to grind off the metal sleeve, which will allow you to compress the washers more tightly. There will be two bushings, and you need to grind off the one that is smaller in size. You need to be very involved in doing this, and not carefully, you need to grind down to 1 mm, no more. If you move it, it will be extremely difficult to overdo the lever.
Now we coat the parts with auto plasticine and assemble all the parts. You should also connect it back together carefully, as if you squeeze it too hard, it will be difficult to change gears, and if you don’t squeeze it too hard, the structure will wobble and also rattle. After we get into the car and do a short test drive, the noise and vibration should disappear, if the result is not completely satisfactory, then you can do everything again, as the whole procedure will take a maximum of 20 Methods.
How to remove the gear knob on a VAZ 2110
Even ardent supporters of the Russian automobile industry cannot help but be annoyed when the gearshift lever on a VAZ 2110 dangles; moreover, it also produces the most unpleasant rattling sound. Those with stronger nerves put up with it as an inevitable “side effect”; some even got used to constantly holding the gear shift knob with their own hand.
However, this cannot continue forever, especially if the vibration gets to the point that the lever begins to miss when shifting gears, confusing second with fourth and third with fifth. But in order not to take the situation to an extreme, let's talk about what to do to avoid rattling the gearbox handle.
Determining the cause
So, while accelerating or idling, your gear lever is shaking like crazy, making an annoying rattling noise. But no other faults related to the gearbox were found. What could be causing this?
- An engineering miscalculation by the creators of the VAZ 2110. They simply forgot to think about the fact that the metal bushing for connecting the lever to the rod “clings” to the edge of the rod while driving, which is why rattling occurs;
- You have tuned the lever using a Lada Kalina. This replacement brought you several positive aspects, and one that was not very pleasing. When the car is in motion, vibration occurs in the driveshaft from Kalina, which transmits rattling through the traction of the entire mechanism. Many who have carried out such tuning claim that even if the lever is removed altogether, it still does not eliminate rattling;
- The retaining spring could have broken, or it might not have been there at all. In this case, rattling is inevitable;
- Often the VAZ 2110 gearshift knob rattles due to wear on the engine and gearbox mounts. It is also possible that other parts responsible for eliminating chatter (damping vibrations) have worn out.
But what if you turn to professionals?
Since the gearbox installed on the Lada Grant is cable driven, the only solution offered at the service station is to replace the cable.
The procedure is quite expensive, since workers will need a lot of time to replace. In addition, replacing the cable is not very effective - only the rattling disappears, but the vibration remains. And one more thing - a new cable will last for about 3-4 thousand kilometers, and then again you will have to go to a service station, which will lead to new expenses and another loss of time.
How does AVTOVAZ comment on this problem?
It is worth noting that the AVTOVAZ plant constantly holds so-called “Quality Days”, which you can visit and contact management with your complaints and suggestions. On one of these days, members of the Lada car lovers club expressed their complaints about the rattling gearbox. In response, it was stated that a more ergonomic cable drive is currently being developed. The design will use flexible cables, which will make it virtually impossible to transfer vibrations to the gearbox itself, so we will wait for the new product. Until then, we will fight the problem ourselves.
Change frequency and types of oil used
According to the manufacturer's instructions, transmission oil in old Grants should be changed approximately every 70,000 kilometers, or once every five years (whichever comes first). In the case of gearbox 2181, the oil will have to be changed almost three times less often - once every 200,000 kilometers. Another important aspect regarding gearbox maintenance is checking the oil level and its consistency. For older boxes, a period of 15,000 kilometers between checks is set, and they have a special dipstick for checking the level. Box 2181 does not provide for oil level control, so there is no dipstick in the design.
In addition, in boxes 2181 and 2190 the volume of the transmission oil sump is significantly different - in old boxes it is 3.3 liters, in new ones it is 2.2. Be sure to remember this when changing the oil - an insufficient oil level (as well as an excessive one) will definitely not benefit the gearbox.
As a rule, the factory oil that is poured into Grant boxes is semi-synthetic and belongs to the GL-4 class. Below is information about the types of factory oil being poured (this does not mean that this is what you should fill in - there are better options on the market, but this information may be useful if you decide to add oil rather than make a complete replacement):
— For box 2190: LukOil TM-4 and ROSNEFT KINETIC 80W85 (these brands of oils were used for a short time, for several months from the start of production of the Lada Grant), TATNEFT TRANSLUX markings TM-4-12, 75W85 (used since 2012);
— For box 2181: TATNEFT TRANSLUX and ROSNEFT KINETIC marking 75W85.