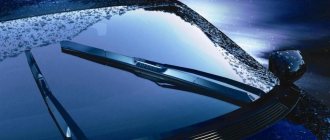
Correctly adjusting headlights does not always ensure safe driving. This is due to the fact that any change in the vehicle's suspension height, which may be caused by loading the trunk or the presence of passengers, leads to a change in the trajectory of the light flux. This in turn may reduce road illumination or dazzle oncoming drivers. To constantly adjust the position of the optics axis in the vertical plane, depending on the degree of vehicle load, special devices are used - headlight correctors; do not confuse them with automatic headlight switching sensors.
Today, various types of autocorrectors are produced that maintain a given vertical position of the axis of the head optics relative to the angle formed between the axes of the car frame (floor, body) and suspension. Depending on the design features and operating principle, headlight range control units can be quasi-static or dynamic.
Automatic headlight leveling
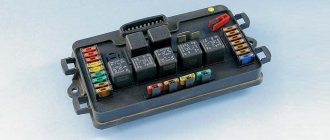
Automatic headlight leveling or automatic headlight leveling system is a system that includes an ECU, body position sensors, an electric drive, and also rods, with the help of which the low beam of the headlights is automatically corrected.
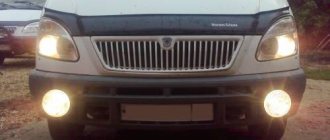
Automatic headlight corrector must be installed on cars that are already equipped with xenon bulbs on the production line; in addition, the corrector can be used together with conventional halogen lamps. The automatic headlight leveler for xenon light is considered more advanced because it adjusts the light beam to the “correct” position under any circumstances. For example, if the load on the chassis increases (when passengers sit in the back or a heavy load is transported), during acceleration or braking (it is no secret that during sharp acceleration/braking a “peck” occurs, and headlights without auto-corrector follow the body) , as well as when driving on uneven roads. In the case of halogen lights, in principle, nothing bad will happen if the headlights shine a little “into the sky” or vice versa “into the asphalt”, although this is also extremely undesirable. However, if this happens with xenon, the consequences can be very serious, precisely because the intensity of xenon is several times higher than the light emitted by halogen headlights. If desired, automatic headlight leveling can be installed on almost any car.
What is it needed for
Probably every driver has found himself in a situation where an oncoming car is blinding and it is impossible to see anything. Vision is restored only after some time. To prevent this from happening, headlight spotters are installed on cars. The device maintains the position of the optical axis during changes in the position of the vehicle body. The light generated by the optics should be adjusted when the machine is not yet loaded. After loading, the light flux changes direction, moving relative to the optical axis. To correct the situation, a correction system is needed.
If the trunk of the car is heavily loaded, the front part of the body necessarily rises a little. The light from the headlights goes up and can blind the driver of an oncoming car. The auto-corrector adjusts the tilt of the light - the beam remains at the same level when the trunk of the car is overloaded or for some reason its front part is raised.
Where is
Control is carried out from the dashboard - using a switch. As a rule, it is placed on the left side of the steering column. The mechanism itself is located under the reflector. After pressing the button, the rod moves the headlight, which is mounted on hinges. The design is equipped with three connectors:
- for sensors;
- for power supply;
- for electronic adjustment of the reflector angle.
Types of correctors
Car owners often wonder what a headlight range control is and whether they can install it themselves. Depending on the device, there are several types of systems:
- electromechanical;
- hydromechanical;
- mechanical;
- automatic.
Automatic technology is the most expensive and effective. Such a system reads the body position data and independently adjusts the light beam. Other types are controlled manually using a washer or wheel located in the cabin.
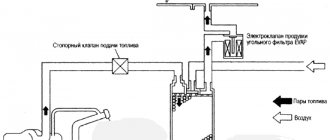
All configurations with gas-discharge lamps are necessarily equipped with a system for automatically adjusting low-beam headlights and high-pressure washer nozzles.
Electromechanical
The electric headlight corrector allows you to adjust the angle of light from the interior. The driver independently selects the position of the washer depending on the load on the car.
The system does not have additional sensors on the vehicle's levers, so if the angle is chosen incorrectly, the light may be adjusted incorrectly. In this case, the low beam lamps will dazzle another vehicle when driving in the dark.
In the electric corrector, the motors change the position of the rod depending on the selected key indication in the cabin.
Components:
- electrical control element;
- tilt angle regulator;
- motors.
Most often, this type of adjustment is used on modern cars with halogen lamps. The system is very reliable and has been working properly for decades.
Hydromechanical
Hydrocorrector headlights are rare nowadays. A handle is installed in the cabin, which is directly connected to lines filled with liquid. When the lever is turned, pressure appears and is transmitted to the hydraulic pistons. Next, the force is transmitted to the rod, and parts of the reflector body are set in motion.
The system is fully controlled by the driver from inside the cabin. In winter, the liquid freezes and becomes noticeably thicker. It takes more effort to control the rod that affects the angle of the light.
The lines are constantly under pressure and eventually fail. The channels begin to leak, and the system does not gain the required traction when turning the knob.
This is interesting: Why there is no charge for the battery in the car: reasons, diagnosis and repair
If you choose the wrong angle, you may be exposed to light and dazzle other road users.
Mechanical
A mechanical corrector with cables that move the rod to adjust the angle of the reflector in the headlight was installed only on older cars. The system turned out to be unreliable and often failed after water got into the cable jacket. This effect leads to souring of the device.
A manual mechanical corrector should be used at least 2-3 times a month and the system should be periodically lubricated with oil. In winter, the system often soured and did not allow adjusting the headlight beam angle. Full lubrication of the cables helped restore functionality.
The corrector consists of the following components:
- power cables;
- control handle;
- gearbox with rod.
Currently, this type of corrector, which requires constant attention, is not used due to the expensive maintenance of the system.
Auto
Auto-corrector of headlights is most accurate in selecting the angle of light. The option is installed only in cars with xenon lamps and provides the best visibility at night.
There are no additional adjustment keys installed in the cabin; the system does everything independently in automatic mode.
The service life of the option is 10-15 years depending on operating conditions. Only the headlight range control sensor, which is installed on the car's arm and transmits a signal to the unit, may require repair.
Also among the components that require special attention is the chassis position linkage. Load control parts are installed from 1 to 3 depending on the complexity of the chassis. Over time, the moving balls sour and break off under load. To prevent breakdowns, it is necessary to lubricate the ball joints with copper grease every 40-50 thousand kilometers. This is not regulated in the vehicle operating literature, but it will help preserve the corrector components and avoid unpleasant incidents.
Hydrocorrector
In the article “Why the headlight range control does not work,” we examined the main malfunctions of the system, as well as the repair method by completely replacing all components of the system. However, in most cases the hydraulic corrector is perfectly repairable. In order for the hydraulic corrector to stop working normally, the loss of even a small amount of working fluid is sufficient. You can make up for the loss with regular antifreeze.
6 – knob for adjusting the light beam; 1 – main adjustment mechanism; 2 – working cylinders with a rod acting on the headlight reflector.
Barbaric repair method
Many drivers do not burden themselves with either repair or replacement of the hydraulic corrector. When the headlights begin to shine downwards, they simply screw in screws from the back of the working cylinder. Adjustment of the position of the rod and the level of the headlights is carried out by screwing in and unscrewing screws. After such a repair, the concept of a headlight range control is no longer applicable to the system, since the possibility of quickly adjusting the angle of the headlight reflector from the interior disappears. But such repairs have a right to life if the malfunction caught you on the road and there is simply no other way to raise the headlights.
Recovery without removal
- Pull the actuators out of the headlight assembly.
- Remove the tubes from their seats, and then secure the tubes so that the remaining working fluid does not leak out of them. It is better to preheat the landing site, but you can simply cut the tubes at the edge of the landing sites. Check the stroke of the actuator cylinders by moving them by the rod using pliers. The pistons should move without jamming.
- Each actuator has a plug for bleeding the system, which must first be pulled out.
- Turn the switch on the dashboard to position O. Fill the tubes with antifreeze so that a small drop remains on top, then put them on the fittings of the actuators.
- Position the slave cylinder bodies so that the bleeder hole is the highest point.
- Holding the rod in the maximum retracted position, fill the working cylinder with liquid until a small “hill” forms above the bleeder hole.
- Close the plug.
The system should work, but since the seals of the connections at the main cylinder, the regulator at the dashboard and the seals of the working cylinders were not checked, one cannot be sure of the long service life of the hydraulic corrector after such repairs. This restoration method will not work if the system is airy at the master cylinder in the cabin.
Restoration of headlight hydraulic corrector
You need to know where the headlight hydraulic corrector is located and how to remove it, since for a complete troubleshooting you will need to dismantle the working cylinders and the main adjustment mechanism. Take 2 small pieces of tube to connect the working cylinders to the main mechanism after removal, fill the system with water. If the device is operational, set the switch to the maximum headlight raise mode and leave the mechanisms in this position for several hours. If no leaks have appeared during this time, the system can be filled with antifreeze and installed on the car. If the leak does not appear in the pipe connections, it is better to replace the hydraulic corrector with a new one or install an electric corrector instead.
Only new coolant should be used so that dirt particles do not interfere with the normal movement of the pistons. Remember that the system must be completely filled with working fluid. To restore, you will need a syringe and a blunt needle so as not to damage the cylinder seals. Do-it-yourself repairs, the assembly and disassembly process are perfectly shown in the video.
Principle of operation
The purpose of the mechanism is to adjust the degree of illumination limit in low beam. When the far mode is turned on, this option is not necessary to use, because the device is not able to accurately indicate the line of light and shadow. Headlights must create high-quality illumination of the road, without blinding oncoming drivers.
The shadow line depends on how the reflector is positioned. The tilt needs to be adjusted, because it depends on how loaded the car is and which parts of it have the greatest load pressure. The headlights of an unloaded car emit a luminous flux that illuminates the area of the road in front of the car. If the tilt angle is adjusted as a result of loading, the direction of the light flux also changes. Using a spotter allows you to maintain the direction of light rays after changing the angle of the car body.
All correctors work on approximately the same principle. They differ only in the type of setting, which can be manual or automatic. The first type of device is equipped with a regulator, which is located inside the car. The driver rotates it manually, thus adjusting the degree of inclination of the reflector. In the second case, the system adjusts to the angle of inclination of the car automatically.
Forced adjustment
With this approach, the light flux is controlled manually, for which a special switch is used in the car interior. Changing its position leads to a change in the position of the lighting fixtures.
Depending on the type of drive used in such a device, there are:
- electromechanical headlight range control;
- mechanical headlight range control;
- hydraulic;
- pneumatic, etc.
As an example of how any of the devices mentioned works, consider an electric headlight range control unit. It would be more correct to call it not electrical, but electromechanical. It includes:
- position switch;
- electric gear motor located on each headlight;
- connecting wires.
The principle by which such a device works is quite simple. When the position of the switch in the car is changed, an electrical signal (voltage) is supplied to the gearmotor. Its rod, one end of which is located on the headlight reflector, moves. This movement of the rod leads to a change in the position of the associated reflector and, ultimately, in the luminous flux.
Automatic luminous flux correction
When an automatic headlight leveler is installed on a car, the driver does not need to do anything additional; in this case, the automation works for him. It includes:
- device control unit;
- ride height sensors;
- actuators.
As already mentioned, its operation can occur in static and dynamic mode. In static mode, the automation controls the vehicle's ground clearance, and when it changes, due to additional loading of the vehicle, the control unit sends an electrical signal to the actuators to adjust the position of the lighting fixtures.
However, this mode of operation, with the beginning of the use of xenon lamps, turned out to be insufficient. The light flux they generate is so powerful that even its short-term exposure can blind oncoming drivers. Therefore, to prevent such a phenomenon, a dynamic corrector appeared.
Its main difference is speed. The operation of such a corrector is capable of changing the direction of the light flux in a fraction of a second. This allows you to keep the luminous flux within specified limits when accelerating the car, braking it, cornering and on uneven roads. Thanks to this, when adjusted correctly, even bright headlights do not blind oncoming drivers when making maneuvers.
This is interesting: Car DVR
Headlight range control has become a mandatory element of car design. Its use improves driving safety at night by ensuring constant illumination of the road surface and reducing the possibility of dazzling other drivers.
General information about car exterior lighting
The lighting system of a modern car combines many lighting devices. In addition to external lighting, the system also provides lighting for the interior, hood and even the luggage compartment (in some cars). Exterior lighting includes front-mounted low and high beam headlights, fog lights, turn signals, parking lights, brake lights, and license plate lights.
Headlights
Headlights located at the front provide good visibility of the road in conditions where there is no natural or artificial lighting or its insufficiency. These lights are also designed to make oncoming drivers aware of oncoming traffic. On most modern cars, the headlights have a single design, which includes a high and low beam headlight.
The low beam headlights are asymmetrical and provide better illumination on the sides of the road. High beam headlights, on the contrary, provide better illumination ahead, in the direction of travel, but it is not recommended to use it in the presence of oncoming traffic, since such light is very bright and can blind other drivers. Moreover, the use of high beams after other drivers have given special signals asking them to switch to low beams is considered a gross violation of traffic rules and can lead to an accident and administrative liability.
Turning lights
Turning lights are often built into the design along with low and high beam headlights. They are controlled by a lever located on the left side of the steering wheel. This lever, when moved, turns on one of the turn signals, then, when the steering wheel is turned, it fixes the position with a characteristic click and, after completing the maneuver, automatically returns to its original position. Turning lights are installed both at the front and rear of the car. And some vehicles also have these headlights on the sides (usually heavy-duty and route vehicles). Some redundant turn signals are installed in the rear of the rear view mirrors.
Side and daytime running lights
Side lights provide information about the vehicle's size to other drivers. They are located in both the front and rear headlights. The lights automatically turn on when the car is braking, as well as when the car engine is running at a stop or in a parking lot.
Daytime running lights significantly improve the visibility of the vehicle to other road users. They differ from standard ones in that they have more intense light.
Fog lights
Fog lights are optional and can be installed, at the request of the car owner, after purchasing the car. The light from these headlights is quite specific and defocused. When driving in fog, it seems to “cut through” the haze, illuminating various obstacles ahead, in the form of other vehicles, fallen trees, stones, etc. Fog lights are usually installed in front, below the main lighting fixtures.
Other lighting devices
Special external lighting devices are flashing beacons. These devices are installed on special service vehicles (Ministry of Internal Affairs, FSB, Ministry of Emergency Situations, emergency medical services, etc.) and are designed to attract the attention of other road users so that they are ready to give way to such a vehicle at the right time. These devices consist of two beacons rotating around their axis.
Beacons are usually blue and red. In addition to the above-mentioned vehicles, flashing beacons are also installed on vehicles transporting dangerous goods and drivers of special engineering vehicles.
But such beacons do not give them an advantage in traffic, but only inform drivers about the need to be careful
This is interesting: Where to buy a used Korean car?
A separate category of external lighting devices are retroreflective elements (warning triangle, cargo size indications, etc.). But their adjustment does not cause much difficulty, since they are always installed manually and temporarily.
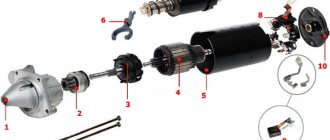
Installing headlight corrector
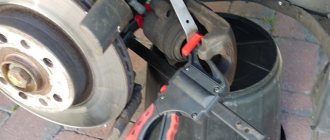
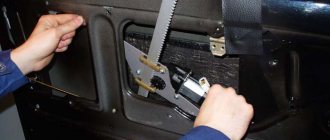
First, remove the right rear wheel. Next, we dismantle the mudguard and locker. We pull the cable through the rubber seal into the cabin, leaving a reserve under the arch. In the area of the right seat trim, unscrew the bolt securing the luggage net and seat belt. We take out the threshold trim and the pistons securing it. We remove the decorative threshold under the front door.
Next we proceed like this:
- Now we prepare the sensor.
- Bend the plate on it at an angle of 90 degrees.
- We insert a pin into the mounting hole on the sensor lever, which is located on the trailing arm of the right rear wheel. Screw a suitable size nut onto the stud. To strengthen this connection we use a lock nut.
- We position the device so that it is coaxial with the trailing arm. The mounting plate must be in tight contact with the body. The device lever should point down.
- We select a convenient place to fix the device on the body and secure it.
- We lay the cable to the sensor and secure it. It is desirable that it passes through a corrugated pipe.
- We install the wheel, mudguard and locker. We stretch the cable along the sills to the front pillar - as a result, it should be brought out in the area of the ignition switch. After laying the cable, we put the threshold pads in place.
The electrical corrector connection diagram looks like this (the Lada Kalina diagram is shown as an example):
We connect the wiring to the connector. We insert the connector into the autocorrector socket. This must be done according to the instructions for the device. After this, the installation can be considered complete.
The headlight leveler is not the most important part in a car, but traffic safety largely depends on how it works. It is especially important to use a corrector with xenon - otherwise you can get into an accident in no time.
How to make automatic headlight leveling with your own hands
If it is almost impossible to make a dynamic auto-corrector with your own hands, then an electromechanical corrector (EMKF) can be made independently. Such a device can replace the hydraulic corrector on all models of domestic cars for which this is provided for by the design of the head optics.
The typical design of an electromechanical corrector consists of gear motors installed on each headlight and a control unit. The corresponding components can be purchased freely. Plus you will need a soldering iron, wires, fasteners, terminals, pads, casing, PVC tube or other insulating material.
It is necessary to select components for the EMKF in such a way that their dimensions correspond to the dimensions of the standard hydraulic corrector installed on your car.
Revision cost
The price of an electric headlight corrector is considerable - the simplest ones can be purchased for 1500-3000 rubles. It is quite possible that it will be easier to install a standard hydraulic corrector on a VAZ, which costs several times less - 300-500 rubles, but its service life is also not very long.
- How to install parking sensors on a VAZ 2110 2111 with your own hands Instructions for installing parking sensors on a ten
- Replacement of antifreeze Lada 2101 (VAZ 2101)
- Adjusting the clutch on a VAZ 2106 How to set the correct clutch pedal travel on a VAZ 2106
- Replacing headlight glass on a VAZ 2110 Photo instructions on how to remove a headlight on a VAZ 2110
DETAILS: Do-it-yourself replacement of the VAZ 2105 cardan shaft crosspiece
How to check functionality
Body position sensors may be different. For example, the service life of potentiometric sensors is 10-15 years. The electromechanical drive may also fail. If there is automatic adjustment, you can hear the characteristic buzzing of the adjustment drive when you turn on the ignition and low beam. If you cannot hear it, then this is a malfunction signal.
The performance of the system can also be checked by mechanically changing the position of the car body. If the luminous flux changes, then the system works. The cause of the breakdown may be electrical wiring. In this case, service diagnostics are necessary.
Headlight range control is an important safety element. Many drivers do not attach much importance to this. But you need to understand that the wrong or blinding light can lead to dire consequences. This is especially true for cars with xenon headlights. You shouldn't put others in danger.
Electric corrector
If, using methods for searching for defects in power wiring, you still cannot solve the problem of a faulty electromechanical corrector, you should start by diagnosing the gearmotor.
By assembling the circuit shown in the figure, you can check the smooth operation of the servo drive. If the gear motor does not respond to power supply, you can safely proceed to replacing or disassembling it. In most cases, the housing is secured with plastic latches. If the latches cannot be snapped off, they can be carefully cut off, and when installing part of the body, they can be joined with dichloroethane (special glue for plastic). The electric motors themselves fail extremely rarely, but they are also sold separately.
Sensors, controls
The control board inside the case will also be secured with latches. Armed with a magnifying glass, carefully inspect the board for microcracks in the solder joints - this is the most common cause of failure. To eliminate the defect you will need a soldering iron, rosin and some solder. It is also possible for the resistive layer of the rod position sensor to wear out. Due to the appearance of a constant mismatch error, the electronic control unit overheats and fails. If desired, the microcircuit can be replaced separately. For example, the tda3619 microcircuit is the basis for controlling the electric headlight leveler on a Daewoo Lanos car. It's worth looking for it separately on eBay or just buying a used spare part at a disassembly site - it's up to you.
On systems with automatic headlight control, the body position sensor most often fails. Typical faults: broken tie rod attachment points, souring of rods inside silent blocks, oxidation of connector contacts and sensor insides.
The most common problems with headlight range control
Quite often, various troubles and problems arise with such mechanisms. Let's look at why a car headlight range control may not work.
Sensors are considered the most vulnerable point of any modern electronics. This is also inherent in such a device as a headlight range control. Here the sensor, based on the ground clearance, adjusts the headlight range. Car enthusiasts often complain that the headlight range control malfunction indicator lights up on the car’s dashboard. Typically, this occurs due to a break in the bracket that holds the sensor. As a result, the sensor sends incorrect information, and an error appears in the operation of the corrector itself.
Sometimes the problem may lie in the contact connection. Due to frequent souring of contacts, their conductivity also decreases. As a result, similar troubles appear when the corrector stops working normally.
Another problem may also arise that is directly related to the configuration mechanism itself. But this is not some kind of malfunction, but simply the specifics of its operation on individual cars. For example, Kalina's headlight corrector (the downside of which is considered to be a small adjustment angle) works in such a way that the beam of light from the low-beam headlights is excessively lowered down, and this noticeably reduces the lighting efficiency of conventional lamps.
This is interesting: Two simple ways to replace power steering fluid for all cars
Correct operation of the headlight range control has a positive effect on your safety and the safety of other road users. Therefore, take all problems with this device very seriously.
Trouble-shooting
Repairing a corrector yourself is not an easy task. In the case of an automatic device, the instrument panel will display an error, which can be considered a scanner and can be used to detect a breakdown.
Repairing the headlight hydraulic corrector will require replacing the fluid tubes that are connected to the handle on the control panel. If, when adjusting the position of the rod, only one headlight changes the angle, then diagnostics and replacement of one of the pistons transmitting force is required.
If the electrically controlled headlight range control does not work, the instrument panel will also show an error, reading which you can understand the reason.
To avoid causing damage to equipment and units, diagnostics should be carried out only with a certified device.
Malfunctions and why it breaks
- Loss of tightness in tubes, places where they are attached to the cylinders, leaks in the cuffs of the main or working cylinders;
- Jamming of working pistons
The main problem in the system of hydraulic adjustment of the reflector position is depressurization. Since it uses liquid as a working medium, its leaks lead to the fact that pressure is not transmitted from the master cylinder in the car interior to the workers on the headlights. No matter how much you turn the regulator, the position of the light beam will not change.
The second reason is souring of the pistons of the hydraulic corrector cylinders in certain positions. For example, if the piston is “stuck” in the maximally extended position, then the light will shine upward, while in a recessed position it will shine downward. When rotating the handle of the regulator, a lot of tension will be felt and when it is released, it will return to its original position and will not be fixed as necessary.
This happens because the pressure changes as the regulator rotates and the pistons cannot move. When you release the handle, the system tries to return to its initial state, equalize the pressure, the handle returns to the position from which you started turning it.
The listed types of breakdowns are prone only to the hydraulic drive of the corrector. Let the manufacturer claim that it is not repairable, but this is not so. There are examples of self-repair of a hydraulic corrector, which we will discuss in the following articles. In order not to bother with restoring it or replacing it with a new one, it is recommended to install alternative types of headlight range control units.
Video about the device and main breakdowns of the VAZ headlight hydraulic corrector:
Price for headlight correctors: large selection
Headlight correctors can be a standard system, or they can be installed independently. Also, the driver, if desired, can replace the corrector on his car with a more advanced one. Today, trading enterprises offer their customers these devices from various manufacturers of various classes. Prices for headlight correctors vary, depending on their type, over a very wide range. Thus, a VAZ driver can purchase a hydraulic corrector at a very reasonable price - from 280 rubles. up to 450 rub. And an electromechanical corrector will cost 1,700 - 1,900 rubles.
As for the universal Hella headlight auto-corrector, which can be installed on almost any car, you will have to pay 13,900 - 14,200 rubles for it. Devices of the same class differ in cost from other manufacturers, both downward and upward. A headlight range control for GEELY CK can be purchased, for example, for an average of 1 thousand rubles; prices for this device for Lanos fluctuate in the same range. The main thing is that when purchasing, we must not forget that for xenon headlights, regardless of the car model, the installation of an automatic leveler is mandatory. Video: Video - installation of electric headlight corrector for an Opel Omega A with xenon:
Automatic headlight leveler Hella
Among the many companies that produce this module, the German company Hella is currently leading. You will receive a quality product that is thought out to the smallest detail, with it you will forever forget about such a problem as the dissatisfaction of oncoming drivers. In addition, you will know that your car will always pass a technical inspection. Hella headlight leveler can be installed on any make and model of car. It can be used as a stand-alone device or to complement a manual corrector. The kit comes with instructions so you can install it yourself. The calibration process is very simple. The built-in indicator displays all information about angles and projections of change, both automatically and manually. Modes are switched independently as needed.
Features of the Hella autocorrector
- Automatic headlight angle correction;
- The programmable angle of the optics depends on the machine load;
- An ultrasonic sensor calculates the position of the car body relative to the road surface;
- Powered by 12 V car, there are kits designed for 24 V;
- If you have standard xenon, autocorrectors are required for maintenance.
Autocorrector SmartEye
This model of autocorrector (additional option) is intended mainly for re-equipment of factory machine systems that are equipped with an electromechanical device. The kit includes:
- Electronic unit with position sensor;
- The monitor with which the adjustment is made;
- Wiring;
- Two types of plugs for connecting to a device monitor.
The module is not equipped with its own activators for changing the headlight angle. The operating principle of this device is to determine the position of the car body in relation to the plane of the road. The sensor reads information and is installed on the housing. Then a command is sent to change the angle of the headlights in relation to the vehicle load.
Replacement procedure
For inexperienced drivers, replacing the corrector often causes difficulties, as evidenced by numerous discussions on VAZ owner forums. And yet, changing the hydraulic corrector is not so difficult. This is done in this order:
- Fastenings. First you need to disconnect all the clamps securing the hydraulic corrector tubes to the body;
- Cabin management. Remove the corrector switch handle located on the panel in the passenger compartment. To do this, just pull it towards you;
- Space for renovation. In the VAZ 2110, repairing the headlight hydraulic corrector is difficult precisely because of the inconvenient location of the hole through which the corrector tubes are threaded. At this stage, the whole process “slows down” for many. To get to the hole, you need to somehow remove the antifreeze reservoir. You just need to clear the “approach” from above so that you can work;
- We take out the cylinder. Further repairs take place from the interior. On the panel you need to sharply pull the switch towards you (pull it off), it will come off. Then unscrew the cylinder using the “22” socket. Open the cover with the fuses located there and, pulling, pull out the cylinder so that it hangs on the hoses;
- We take out the hydraulic corrector. The hydraulic corrector has a latch for the actuator cylinder; you need to press it. Then turn clockwise until it stops (90°) and remove it from the socket. Do the same steps with the other headlight;
- Push it inside the cabin and remove the hydraulic corrector;
- The new corrector is installed in the reverse order;
- Control. Check how the new hydraulic corrector works. Be sure to test whether the new device changes the angle of the headlights. If the repair is successful, then the luminous flux will be optimal and obedient to your adjustments.
Results
Automatic headlight leveling is required for cars equipped with standard lighting. This module will have a positive effect on the quality and direction of lighting, even if your car is loaded to the maximum. With autocorrector, you don’t have to worry about the fact that your car’s light can negatively affect the comfort of oncoming drivers. If the car is equipped with an auto-corrector, then you are guaranteed an easy and unhindered passage of the next technical inspection. Let the light in your car be correct.