Perhaps one of the most critical systems in the design of any car is the brakes. The safety of the driver, passengers and other road users depends on their quality of work and condition. Just half a century ago, all cars were equipped with drum brakes. This design is very ancient and today is gradually becoming a thing of the past. Nowadays, most cars use disc mechanisms. And if in the 90s they were installed only on the front axle, now they are often found on the rear axle. It is this mechanism that we will talk about in our article today. How is a brake caliper constructed? The design, operating principle and maintenance process will be described below.
Purpose
The caliper is one of the most important mechanisms in the braking system of a car. It is this that performs the function of uniformly pressing the pads against the disc, which helps reduce the speed of the car. This process is carried out due to the force of friction. As a result, the vehicle speed is reduced to a certain point.
Interesting fact: when a truck brakes from 80 to 0 kilometers per hour, this system generates the same amount of thermal energy as would be enough to boil 35 liters of water.
The disks heat up to incredibly high temperatures - 500-600 degrees. Moreover, this applies to the mechanisms of both trucks and passenger cars. Therefore, to prevent the caliper from overheating, it is in constant contact with the external environment. Thanks to airflow, its temperature on average does not exceed 150 degrees Celsius during active braking.
Replacing the boot - we try to do it ourselves
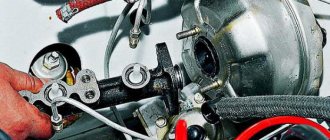
In what order should I get to the boot and replace it? Remove the cap from the caliper that protects the guide head (also called the “finger”). We take a suitable hexagon, turn it out and take it out. Now we have access to the boot itself, we remove it too. If there is dirt underneath, it needs to be washed thoroughly, preferably not only from the visible part of the caliper surface. If possible, press in the piston; usually a special tool is used for this. This will prevent damage to the system inside, where sand will scratch the inner surface of the caliper and the outer piston.
If you find rust in the areas being washed, it needs to be restored with special liquids; under no circumstances leave it when installing a new boot, this will very soon lead to problems.
When you have washed everything well, you can return the piston to its usual place and check its progress. If it now moves smoothly and there is no sand grinding inside, then you have achieved your goal, you can install the boot and assemble the system. But once you are under the car and look into the caliper, you can remove it and check it completely for defects. To do this, you should disconnect it from the hose with the brake fluid, while squeezing it so that all the fluid does not drain from the reservoir, if you do not want to change it completely and pump it yet.
Clamp the hose with a clamp and unscrew the bolt that secures the hose to the caliper. Place a container for brake fluid first. Now that the last drops have fallen, you can remove the caliper, which is fixed in the guide. To examine it further, you need to squeeze out the piston. This is done with the help of yews. Let's move on to the cylinder; its surface can be washed and wiped. Now we inspect the piston; there should be no rust or dents on its surface.
Where is it located?
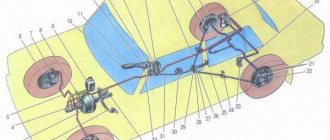
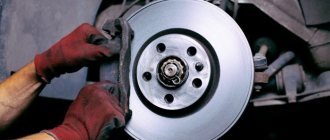
Based on the name, it is not difficult to guess that the rear brake caliper of Opel and other cars is located on the rear axle. This element is attached to the hub using bolted connections. There are pads inside it (both on the left and right sides). The Chevrolet Lacetti rear brake caliper is driven by a hydraulic drive. The same scheme is used on other passenger cars.
But as for trucks, here the rear brake caliper (left and right as well) is driven by a pneumatic system. Not long ago, trucks used a combined drive system. So, the rear right and left brake calipers worked first from hydraulics, and then from pneumatics. But now this design is no longer used. If we talk about minibuses and SUVs, hydraulic drive is also used here.
Rear calipers with mechanical handbrake
Hello everyone, today I need your help, I still can’t decide on TDT. I am considering the following options: 1) Lucas from Audi-WV with a mechanical handbrake2) Calipers from 2108 with a hydraulic handbrake3) Calipers from OKI with a hydraulic handbrake
4) Lucas from Audi-WV with two handbrake levers, mechanical and hydraulic.
I live in Novorossiysk, anyone who has been knows that the terrain here is mountainous.
A little bit about the city...
Some streets have a hellish slope, in connection with this I really want to have a reliable handbrake, so that it would not be scary to leave the car and not look for places where you can rest your wheel, etc., but at the same time you want to drive the car sideways.
1) Lucas - An excellent option, it doesn’t over-braking, there is a mechanical handbrake, but the problem is that it stretches and is not particularly effective in terms of jerking in corners.
2) 2108 - cheap and cheerful, minus that you can’t use them without a regulator, plus a hydraulic handbrake is required
ATTENTION. Our stock is replenished daily, so not all stock may be displayed. For complete information, please contact our consultants by toll-free number.
Manufacturer: Autogur73
Description of the spare part
Found a product cheaper in another store? Let us know, we will quickly check the information and compensate for the difference when purchasing online. Conditions
Article: 3163-3502010/11-30 (soup VAZ-2112 with handbrake)
Product size in packaging (mm): 225x500x420 Weight, kg: 29 kg
- The kits use only original components. No refurbished parts!
- GAZ and VAZ disc brake kits with calipers are inexpensive, reliable, easy to install and maintain.
Device
How is the rear brake caliper constructed? Its design is practically no different from the front one, with the exception of the presence of a parking brake in the first mechanism. A cable mechanism is connected to the caliper, thanks to which the piston is compressed mechanically.
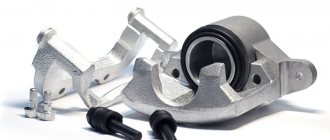
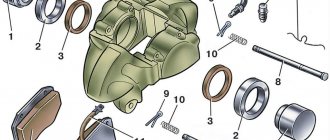
The caliper design includes:
- Metal body.
- Piston.
- Guides.
- Piston boot.
- Caliper boot.
- O-ring and fastening ring.
- Guide boot.
- Brake hoses.
- Bracket (not on all models).
- Fastening elements.
Thus, the rear brake caliper of the Lacetti (as well as other modern cars) consists of a system of pistons that are connected to a hydraulic drive (brake cylinder) and pads that are clamped when pressure is created in the system. Please note that the methods of attaching the pads to the mechanism may differ. But the following scheme is usually practiced: two pads for each wheel. The rear brake caliper itself is attached to the hub in two places (top and bottom).
An important detail for this element is the boot. It is this that protects the inside of the caliper from dirt, water and dust that tends to get in from the street. The main working element in the mechanism is a piston with a cylinder. There is a valve inside it that removes excess air. Its presence in the system is extremely dangerous. Due to pressure, the air temperature may increase, and the liquid will simply boil. Braking will be ineffective and sometimes impossible. Therefore, the rear caliper always has an air outlet hole. It must be opened when bleeding the brakes. If the system is in order, the fluid will put full pressure on the pistons, which extend from the cylinders and press the pads against the disc. When the brake is released back, the element returns to its original position thanks to the elastic rings.
Replacement
Before any work is carried out to replace components, the vehicle should be placed on a level and solid surface. A garage with a concrete floor is ideal for this. The example will use the right side of the car.
- The first thing to do is raise the car and place something under the car sills in order to add stability. It should be noted that when replacing the rear brake mechanism, you need to remove the car from the handbrake.
- Having secured the car in place, you need to remove the wheels, this is necessary so that you can easily inspect all the units for functionality. To make it easier to remove the wheels, loosen each bolt no more than one turn, then lift the car and unscrew the bolts completely. By putting all the bolts in one place, you will speed up the assembly process significantly.
- After the right wheel has been removed from the car, and all the bolts from it are in one place, you need to open the system bleeding valve. This can be done with a regular key, its blind side. The hose from which the liquid flows must be directed into a previously prepared container so that the liquid flows there.
- Then you need to press the pistons back into the caliper. You need to squeeze out until the pads are pressed tightly against the rotor. During squeezing, the brake fluid will drain.
The important fact is that if the handbrake does not work, then it is the rear calipers that should be checked. Replacing rear calipers is not particularly difficult on most cars. The main thing to do before replacing the rear brake system is to study the diagram of your car and learn how the rear caliper or pads are attached so as not to break anything.
Perhaps one of the most critical systems in the design of any car is the brakes. The safety of the driver, passengers and other road users depends on their quality of work and condition. Just half a century ago, all cars were equipped with drum brakes. This design is very ancient and today is gradually becoming a thing of the past. Nowadays, most cars use disc mechanisms. And if in the 90s they were installed only on the front axle, now they are often found on the rear axle. It is this mechanism that we will talk about in our article today. How is a brake caliper constructed? The design, operating principle and maintenance process will be described below.
Types
There are several types of rear brake calipers:
- With fixed design.
- With bracket.
The first type is the very first. It was these calipers that were first used on the front of the Zhiguli. Now they are widely used by Korean and Japanese manufacturers on budget cars as the main braking element of the rear axle. The design of such mechanisms is quite simple. The caliper is a metal body with two cylinders. The latter are located opposite each other. The body is always stationary due to its special suspension mounting. As soon as the driver presses the appropriate pedal, the GTZ creates the necessary pressure in the system and the pads begin to act on the disc from their side. If they are not used, a special spring is activated. It keeps the pads at a short distance from the discs (so that when the latter rotates they do not come into contact with the metal surface).
The cars also use a rear caliper with a floating caliper. Its peculiarity is that only one of the pads has a fixed position. The caliper has its own bracket. The brake element housing is installed on the inside of the wheel. There is one piston inside the caliper. As soon as the driver presses the pedal, pressure is generated in the system, and this piston begins to press the pad against the disc. But that is not all. At the same time, the second block is also activated. It moves along special guides. This is how the car slows down. Among the advantages of this design, it is worth noting the compact size of the caliper. Because of this, the mechanism is installed on small cars.
Caliper Lubricant
Is it possible to lubricate the “fingers” with any available lubricant? Unfortunately no. The reason is that the caliper operates at high temperatures, especially if the car is heavy or the driver likes to drive. In this case, both the caliper, the guides, and the lubricant on them heat up.
For this reason, the most common lubricants are no longer needed: they are based on mineral oils and, when heated, liquefy and flow off the metal.
The second reason why you cannot use lithol, grease, or even higher-quality ceramic and copper lubricants is their interaction with rubber boots. Most lubricants damage the rubber, the boots slip out of their places, and the fingers are left without protection.
What to lubricate with?
Only what the manufacturer calls guide lubricant. Bosch, Liqui Moly and other auto chemical manufacturers have such products. One of the indicators that a lubricant is suitable is high-temperature stability, maintaining properties when heated to at least 200 degrees.
Why can the store offer the wrong thing? Simply because there are other lubricants for calipers, such as ceramic and copper anti-squeak lubricants, which are applied to the metal plate of the pads. Yes, they do their job perfectly, but they are not suitable for fingers!
Care
In order for the mechanism to serve for a long time and properly, the condition of the caliper should be regularly monitored. Below are some useful tips:
- Once every six months, inspect the visual condition of the caliper. Pay special attention to drips. They should not be on the hoses or at the connections. If there are any, you need to urgently look for the source of the problem. This is usually a frayed or worn hose. It has a two-layer design, but even if the first layer is damaged, such an element must be replaced. Why is this dangerous? Due to leaks, the fluid level in the system constantly drops. This will make it impossible for the piston to work, as it will not have enough pressure.
- Check how freely the piston moves. If you do not change the brake fluid for a long time, it may turn sour due to rust. At best, you will experience poor braking performance. At worst, you will have to replace the entire cylinder.
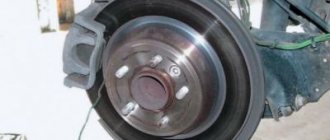
- Keep an eye on the remaining friction material on the pads. Modern manufacturers equip them with mechanical sensors. When the thickness of the pads approaches two millimeters, the metal plate begins to touch the edges of the disc when braking. As a result, the driver hears a characteristic squeak. This indicates that the pads have become unusable. If they are not replaced in time, the metal itself – the pad lining – or even the caliper will rub against the disc. This leads to increased wear of both elements. If significant scuffing occurs, such mechanisms can no longer be used.
Signs of trouble
A common symptom of brake problems is a decrease in braking efficiency.
This shows up:
- the car pulls to the side when braking - one of the calipers is faulty;
- an increase in pedal effort at the same deceleration intensity;
- shaking of the pedal during braking;
- increasing the free play of the pedal until a noticeable deceleration begins;
- jerking the car until it stops;
- jamming of the pads, the wheel does not release the brakes and the caliper gets very hot;
- brake fluid leaks;
- uneven wear of pads and discs.
After removing the wheel and checking the pedal, you may notice that the pads do not move smoothly enough, the pistons move jerkily, and may even make clicking sounds or squeaks.
You need to know: How a Vacuum Brake Booster works
This can be caused by either corrosion of the pistons or cylinders, or a violation of the geometry of the guides.
The reasons are almost always the penetration of moisture, leaching of lubricant, destruction of rubber parts and neglect of the timing of brake fluid replacement.
Problems
One of the common problems that arises when using rear brake calipers is squeaking pads. Moreover, they can be new and from a trusted manufacturer. The creaking occurs due to the fact that the elements are installed skewed. It only takes a small deviation for new pads to cause a terrible squeak. How is this problem solved? This problem is usually solved by installing anti-creaking metal plates. They are placed in the cavity between the pad and the caliper.
Professional diagnostics
The most effective way to avoid the problems listed above is professional diagnostics performed by highly qualified specialists using specialized tools and equipment. The diagnostic process usually includes two stages of work:
- Checking the brake performance of each wheel. It is carried out on a special computer stand under the supervision of qualified experts.
- Visual inspection of calipers. This operation requires the removal of the rear wheels. The condition of the brackets, housing, cylinders and anthers is checked. If damage is detected, parts must be replaced immediately.
About the piston
The next problem is the rear brake caliper piston. It can become unusable if there is no lubrication. Why is this happening? The most popular reason is the destruction of the rubber boot. It is through this that dust and water will get inside, which provokes corrosion processes. The lubricant dries out or is simply washed away. As a result, the piston runs dry. Why is this phenomenon dangerous? At one point, the piston may simply jam and not return to its original position. This will cause the wheel to completely lock at speed. The higher it is, the more dangerous the consequences will be. The way out of the situation is to purchase a rear brake caliper repair kit. This piston is not subject to further use. But if the problem is detected in time, you can limit yourself to just replacing the rubber boot. How much does it cost to repair a rear brake caliper? The cost of restoration in this situation ranges from five hundred to a thousand rubles.
Caliper repair
If the caliper is not damaged by wear or corrosion, it can be repaired and continue driving. As a rule, repairs are made in two cases: when the pads jam or when the repair kit needs to be replaced.
How to fix jammed pads?
The outer metal plates of the pads can rust from constant moisture, salt and other chemicals from the road. Even the paint with which they are covered does not help. When there is a lot of rust, the pads move poorly and can jam.
If the problem does not affect the caliper itself, the pads can be cleaned, lubricated (you need to use high-temperature lubricant and make sure that it does not get on the friction surfaces), and then put in place.
If wear, even a small one, is visible on the adjacent surfaces of the caliper, cleaning the pads will not help. Here you can only replace the part itself. Below is a video on the topic of what to do to prevent the mechanism from jamming.
How to replace the repair kit?
Buying a replacement set of rubber for a caliper is not a difficult task, the principle is the same as when buying the caliper itself (search by car VIN code or make/model/year of manufacture, etc.) When doing your own repairs, you need to prepare a place where you can disassemble caliper so that dust and sand do not get inside the mechanism, then we do everything step by step.
- Removing the caliper.
- Complete disassembly and cleaning.
- Check for corrosion and wear.
- Lubrication of guides.
- Installation of repair kit: guide seals, cylinder seals, bleeder nipple seal, guide boots, piston boots.
- Assembly and installation in place.
- Bleeding the brake system.
The video below clearly shows how to make the replacement. We advise you to turn the volume down, otherwise the music is a little annoying.
note
The usual “graphite” or “Litol” is not suitable as a lubricant for the caliper. The material for calipers must meet high requirements, in particular, be resistant to temperature changes. Conventional lubricant, even in a boot, dries out quickly. Therefore, you only need to purchase a specialized product. Typically, this caliper lubricant is sold in 45 gram bags. They are enough to completely process the mechanism.
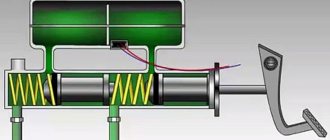
How does it work
The operating principle of the brake caliper is based on hydraulic pressure. The force causes the piston to move in the master cylinder. The property of a fluid is that it does not compress under pressure, so the pressure is transferred to the brake unit. Since the caliper also has a piston, it moves outward under pressure. The disc is clamped on both sides by pads, they rub against it, and the speed is reduced by friction. The return of the piston to its place occurs as a result of the action of the elastic rings.
Note! Since friction releases thermal energy, the discs heat up to 500-600 degrees on any type of car. The design provides constant airflow, so it does not heat up to more than 250 degrees.
The dimensions of the assembly body may vary depending on the size of the pads. Both the rear and front calipers work the same way.
- fixed;
- floating;
- enlarged floating.
The fixed system is fixed to the steering knuckle, and the pistons are located on both sides of the disc, the pads compress the disc. In the inactive position, the pistons are held in place by springs. Brake fluid is supplied through branched pipes to the cylinders from different sides. This system works efficiently and is used for vehicles where the load is especially high - trucks.
Let's get started
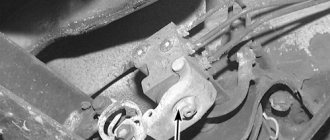
To service the caliper, you need to jack up the car, remove the wheel and disassemble the body itself. The latter is usually mounted on hex head bolts (you need to unscrew the bottom one). Since we are servicing the rear caliper, it is also necessary to remove the cotter pin connecting the handbrake cable. It is not present on the front gears. After this, fold back the upper bracket of the element and remove the pads. Then we unscrew the upper bolt of the housing and hang the caliper on some wire. Be careful not to damage the rubber tube containing the brake fluid. And you can hang it from the rear spring. Next, unscrew the clamp fixing bolts. We remove it together with the pins and pad rails outwards. We take out the piston and clean the guides of old grease. If the piston is soured, we replace it with a new one from the repair kit. But most often the guides become sour.
Because of this, the car may pull to the side when braking. We wipe the guides dry and treat them with new lubricant. If the caliper is old, you can use repair rubber bands to seal (this action will reduce vibrations of the caliper on rough roads). After servicing, the element must be reassembled and secured in place in the reverse order. This completes the maintenance procedure. By the way, if the pads are too thin, they can also be replaced.
How to remove a brake caliper
To remove the brake caliper, lift the rear of the vehicle as described above. Remove the wheel, then disconnect the handbrake drive. On cars with an electric handbrake, various devices and techniques are used to remove the caliper, which are described in detail in the car repair instructions.
Remove the protective caps from the guides, then unscrew them using the appropriate hex key. After this, remove the caliper, it may need a little help with a screwdriver, but in most cases just pulling with both hands is enough.
To avoid losing the brake pads, remove them and store them separately. Hang the caliper using rope or wire, attaching it to the body or shock absorber. If necessary, unscrew the bolts securing the bracket and remove it. If you need to completely remove the caliper, unscrew the brake hose end from it. After unscrewing the hose, plug it with a piece of rubber or cellophane to prevent brake fluid from leaking. Some mechanics pinch the brake hose, but this reduces its life and can lead to cracks and weakening of the walls. If the circumstances are unfortunate, such a hose may burst during sudden and strong braking, as a result of which the effectiveness of the brakes on all wheels will drop tens of times. Also cover the caliper inlet hole with a piece of rubber, cellophane or a bolt with a suitable thread.