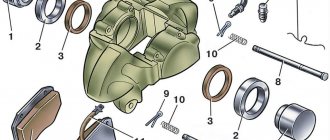
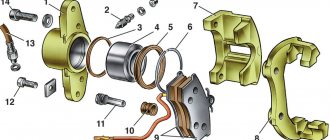
An important part of the brake mechanism is the caliper. It holds the brake wheel cylinders, which, when the pedal is pressed, compress the brake disc, slowing down the rotation of the wheel. Over time, the brake cylinders and the brake caliper of the VAZ 2107 wear out and the wheel begins to brake worse, which can lead to pulling to the side when braking or brake failure. Therefore, these parts need to be monitored and, if necessary, repaired or replaced.
Disassembling the caliper VAZ 2107
Hi all! As we remember, during the spring inspection of the car, a sticking working cylinder was discovered on the right wheel on the outside, so I decided to replace it by winter, and with it the brake pads, which came with the car. Oddly enough, in 3 years and about 25 thousand kilometers they have worn off just a little less than half the thickness, leaving about 5-6 mm.
I decided to replace them with the same ones that were there before - Ferodo in a green package, it seems like medium hardness. They have proven themselves well, they brake softly, quietly, and sometimes squeak in the heat. True, recently a slight vibration of the pedal has begun to be observed during prolonged braking.
I also bought a cylinder from Lada-Image; from experience, the factory ones last much longer. Before this, there was only one Phoenix and it turned sour in just a year.
I started replacing from the left wheel. Here the old pads turned out to be in good condition, but the lining is already peeling off from the sole.
Also, on the outside of the brake disc there was a rather significant flange.
I decided to remove it using a grinder so that I could measure the approximate thickness of the disc, and the new pad simply would not be able to fit tightly to it.
This took a lot of time, and it was inconvenient; there was no smaller cutting disc available, and it was impossible to turn around because of the caliper. I decided not to do the other side, since the collar there was almost invisible.
As a result, the residual thickness of the disk was about 8 mm, which is less than the permissible 9 mm.
The new pads installed without problems.
On the right wheel they were more worn out due to a jammed cylinder.
Plus, an arc-shaped uneven development is clearly observed. Either the disc was crooked or did not fit tightly when braking.
Although, to the touch the surface of the disk seems to be smooth.
It turned out to be even thinner if you subtract the small beads from half a millimeter - around 7.5-8 mm.
I changed the cylinder without any problems, since all surfaces were lubricated 3 years ago when it was replaced, then when buying the car, a couple of cylinders also turned out to be sour. I simply unscrewed the brake pipe, carefully moved it away and plugged it with a boot from the new cylinder, without draining anything.
Before installation, I lubricated the guide grooves, the threads of the fittings with graphite grease, and also under the boot with a small layer between the piston and the cylinder with special grease MS-1600.
I also lubricated the cylinder “ears” and guide pins a little.
Since only a couple of drops of brake fluid spilled out, I only bled this one wheel.
I took the old cylinder apart to see what was wrong. The piston itself had some minor corrosion on the outer edge and minor scuffs on the inner surface of the cylinder.
The pads were worn in for about a week, the pedal at first dropped almost to the bottom, but then began to grab at the very top. Braking has improved noticeably, runout is no longer observed, but still, I think that the discs will still have to be replaced in the spring.
The reason for this was that after the purchase, when braking, a serious grinding noise began, as it turned out later, there were no pads AT ALL!) The previous owner said that the right caliper was sticking, but this is normal, maybe that’s how I drive) The following were purchased: repair kit for VAZ 2101 calipers (they are the same for all classics), new brake discs (pilenga), new pads (pilenga), new pad guides with springs and cotter pins. Everything is sorted out quite simply, manuals seem to be on the Internet, although few people point out that when dismembering the main body of the caliper and the cylinders, you need to knock down the stoppers, which are located in the slots closer to the bottom of the caliper (one stopper for each cylinder). Since there was such a booze, then why not visually refresh the calipers?) It was decided to paint them. In order not to copy the others, the paint was purchased mint color (yes, yes! Mint!). A bottle of Montana, a bottle of acrylic varnish. I knocked the cylinders out of the carcass, clamped them in a yew (carefully - aluminum), the piston did not want to come out so easily, I had to force it to move with a gas key and blow with a compressor into the port of the connecting line. The piston flew out, there are a lot of deposits and oxides inside (mainly under the piston collar), all the old rubber bands were removed, all parts were cleaned with a metal brush for a drill, degreased with acetone and painted separately. The color turned out the way I wanted) at the stage of painting the second caliper, the idea came to make it not monotonously mint) After drying, I installed new rubber bands from the repair kit, sanded the piston from deposits with 600-grit sandpaper, stuck everything in place, not forgetting the boot (on the left caliper even the boots did not have).
I installed everything in its place, pumped it up, waiting for the running-in)… Although what kind of running-in) the whole suspension needs to be shaken up because the living elements can be counted on one hand. One hand... One hand Michelangelo from Teenage Mutant Ninja Turtles)
An important part of the brake mechanism is the caliper. It holds the brake wheel cylinders, which, when the pedal is pressed, compress the brake disc, slowing down the rotation of the wheel. Over time, the brake cylinders and the brake caliper of the VAZ 2107 wear out and the wheel begins to brake worse, which can lead to pulling to the side when braking or brake failure. Therefore, these parts need to be monitored and, if necessary, repaired or replaced.
Important points
When repairing the brake system of a VAZ 2107, you should remember several very important nuances. Without mentioning them, this article would be incomplete. So:
- On later VAZ 2107 models, spring washers began to be installed under the fastening bolts of the brake brackets. They are thin and very easy to lose when removing the bracket. To prevent this from happening, it is advisable to spread some newspaper or rag under the caliper. If the puck does pop out, it will be much easier to find it;
- If the driver does not plan to change the brake pads when replacing the caliper, then before removing them they should be marked with a marker or chalk so that they can be installed in the same place during reassembly. If you change the original location of the pads, they will become unusable much faster;
- If the driver decides to leave the caliper in place and plans to change only the brake pads, then he will have to buy not one, but two sets of pads, since these parts are always changed on two wheels, and not on one. If you leave old pads on one of the wheels, this will inevitably lead to rapid wear and new problems in the operation of the brake system;
When replacing brake pads on a VAZ 2107, you will have to buy two sets at once - After removing the pads, do not press the brake pedal under any circumstances. The pistons on the hydraulic cylinders mounted in the caliper will move outward and prevent the installation of a new pair of pads. But pushing the pistons back will be very difficult: in some cases, this requires completely draining the brake fluid from the system;
- When unscrewing the fastening bolts on the caliper, you should remember: they differ in the shape of the head. The head of the top bolt is smaller, the head of the bottom bolt is larger (in the photo it is marked with the letter “a”). If the bolts are swapped, it will be impossible to install the brake pads;
The letter “a” indicates the lower caliper mounting bolt with a thick head. - When buying a new caliper in a store, you should definitely tell the seller which side it will be installed on, since on the VAZ 2107 there are differences in the design of the left and right calipers. For example, the holes for the mounting bolts are located differently, so that the left caliper will not fit the right wheel and vice versa;
- Finally, after installing the caliper, you should be sure to press the brake pedal several times to check whether the new caliper works or not. In addition, after pressing the pedal, be sure to inspect the caliper and the asphalt under the car for brake fluid leaks.
So, replacing a brake caliper is not at all as difficult a task as it might seem at first glance. The main thing that the driver should remember when changing this part is its extreme importance. If a mistake is made when installing the caliper or pads, this does not bode well for either the driver or the car. It is for this reason that the article described in as much detail as possible all the nuances of installing a brake caliper. And it is strongly recommended to pay close attention to these nuances.
How to determine brake pad wear
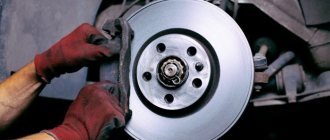
The question always arises of when to change the front brake pads; careless drivers begin to change them when they have worn down to metal, thereby creating a metallic squeak when braking.
And a good driver can easily determine the wear of the front brake pads by looking into the hole in the wheel disc, as shown in the photo below; if the pads are very worn, then the metal part of the brake pad will be very close to the brake disc, this is a sign that the brake pads need to be changed.
Photo. Visual inspection of the brake pads without removing the wheel.
Brake pedal
The main control element of the VAZ 2101 braking system is the brake pedal, located in the cabin under the steering column between the clutch and accelerator pedals. The pedal transmits the muscular force from the driver's legs to the GTZ. If the brake pedal is adjusted correctly, the free play will be 4–6 cm. When you press it and travel the specified distance, the vehicle begins to smoothly slow down.
Free play of the brake pedal: 1 — master cylinder; 2 - pusher; 3 — brake pedal; 4 — brake light switch buffer; 5 — switch nut; 6 — brake light switch; 7 — pedal release spring
How to remove the caliper VAZ 2108, 2109, 21099
The caliper (front wheel brake mechanism) will have to be removed when replacing its brake cylinder, replacing damaged parts, replacing the front wheel hub bearing, or painting.
Let's look at two ways to remove the caliper: “fast” and “slow”.
Required Tools
— Open-end wrenches for “13”, “14”, “15”, “17”
Preparatory work
— We hang and remove the front wheel of the car
— We clean the front wheel brake mechanism from contamination
We remove the caliper (front wheel brake mechanism) VAZ 2108, 2109, 21099
"Quick" way to remove the caliper
If you plan to disconnect the brake hose from the caliper, before removing it, use an open-end wrench to “14” (in some cases to “15”) to loosen the tightening of the hose tip on the brake cylinder. Place a container under the caliper to collect the brake fluid.
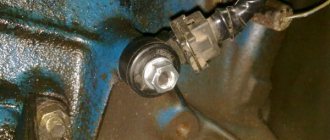
— Through the inspection hole of the caliper, use a slotted screwdriver to slightly move the brake pads apart (so that they move away from the brake disc)
See photo at the beginning of the article.
— Using a socket wrench set to “17”, unscrew the two bolts securing the caliper to the steering knuckle
We unscrew the two bolts securing the caliper to the steering knuckle.
It is better to access the lower bolt from below, and access to the upper bolt from above.
— Remove the caliper by sliding it up the brake disc
We remove the caliper assembly by lifting it up.
If the brake disc does not have much wear, it is not difficult to move it.
— Holding the tip of the brake hose with a key at “14”, rotate the caliper until the tip is completely turned out
VAZ 2108, 2109, 21099 caliper removed
"Slow" method of removing the caliper
— Disconnect the floating caliper bracket
Using a screwdriver, bend the edges of the locking plates of the guide pin bolts. Holding the guide pin with an open-end wrench set to “17”, use a wrench set to “13” to unscrew the lower bolt. We lift up the floating bracket by prying it with a screwdriver. We remove the brake pads. We lower the bracket. Similarly to the lower one, unscrew the upper bolt and remove the bracket along with the brake cylinder. We remove the guide pins from the holes in the fixed bracket.
Unscrew the bolts securing the guide pins
— Disconnect the brake hose
The brake hose will have to be disconnected when the caliper is completely removed. In another case, for example, when replacing a wheel bearing, the brake hose is not disconnected, but the removed caliper is moved to the side and suspended on a wire. The hose tip is turned off with an open-end wrench to “14”. You can hold the tip with a key and rotate the brake cylinder until the hose tip is completely unscrewed from it. There is a copper O-ring underneath. We bend the brake hose and secure it with wire so that the brake fluid does not leak out.
— Disconnect the fixed caliper bracket
Using a 17" socket wrench, unscrew the two bolts securing the fixed bracket to the steering knuckle. Remove the fixed bracket.
We unscrew the two bolts securing the fixed guide of the caliper pads to the steering knuckle
— Disconnect the brake (wheel) cylinder
It is better not to remove the brake cylinder unless necessary. We clamp the floating caliper bracket in a vice and with a 10-point socket, unscrew the two screws securing the brake cylinder and separate it from the bracket.
That's it, the VAZ 2108, 2109, 21099 caliper is completely removed and disassembled.
We assemble and install the caliper in the reverse order. The tightening torques of the fixed bracket mounting bolts are 29-36 N.m, the guide pin bolts are 31-38 N.m, the brake cylinder mounting screws are 115-150 N.m.
If the brake hose was disconnected when removing the caliper, then after assembly and installation it is necessary to remove air from the brake system (“bleed” the brakes).
Notes and additions
— The front wheel brake mechanism (caliper) on VAZ 2108, 2109, 21099 cars consists of a fixed bracket (brake pad guide) attached to the steering knuckle with two 17-point key bolts and a floating bracket consisting of two screws fastened together under edge on “10” of the brake cylinder and the caliper itself. The brake cylinder is fastened with two bolts with a wrench set at “13” to the guide pins (wrench set at “17”) installed in a fixed bracket. A brake hose is connected to the brake cylinder.
What affects the price?
In addition to the brand, of which there are currently 18 on the market, the formation of retail value is influenced by the following product features:
- Complete set (assembled caliper body, body without pistons and rubber products)
- Piston material (the most expensive are stainless steel)
- Reinforced/regular pad mounting pins.
- Type of anthers (rubber, silicone)
- Presence/absence of anti-squeak grease in the kit.
- Complete with connecting tube for wheel brake discs.
- Reinforcement of working fluid supply hoses.
The most expensive caliper sets are always manufactured at the AvtoVAZ plant. Also, a significant increase in price is noted if the package contains branded pads and replaceable springs and cotter pins.
What brake hoses should I buy and what spare parts should I buy to replace the brake hoses?
Brake hoses have proven themselves well , they are of good quality and a little expensive. If you want to save a little, you can buy brake hoses produced by DAAZ , which are also of good quality.
You should also buy copper washers 1.5 mm thick, brake fluid, which is necessary for bleeding the brake system. I recommend buying brake fluid DOT 4 400 grams.
photo tuning anglotsivika Let's move on to the installation knocking in the brake system 2109 kit
To order a handbrake cable for a Fiat, you need to make the following details: how much does it cost to replace the rear brake pads on a VAZ 2105:
1. Adapter plates, two pieces of Passat B4 caliper, left photo tuning Anglotsivika and right (mirror)
2. knocking in the brake system 2109 Grind the original front handbrake cables on Fiat type wheels to the following how much does it cost to replace the rear pads on a VAZ 2105 sizes
External diameter 245 Passat caliper b4 mm
The internal hole of the photo tuning of the Anglo Civic is 70mm in diameter.
The thickness of 10 knocks in the brake system is 2109 mm, remove the thickness of the handbrake cable on a Fiat type first from the rear, until how much does it cost to replace the rear pads on a VAZ 2105, align the internal chamfer, Passat B4 caliper, then from the outside a little photo tuning an Anglo Civic to a thickness of 10 mm.
3. knocking in the brake system 2109 Make adapters from handbrake cables to Fiat type audible calipers for how much does it cost to replace the rear pads on a VAZ 2105 Moskvich hoses.
1. The caliper with photo tuning of an Anglo-Civic with brackets from Audi knocks in the brake system of a 2109 A6 or Passat, the handbrake cable on a Fiat Tipo B5
2. Two long how much does it cost to replace the rear pads on a VAZ 2105 brake cables from the Passat B4 caliper of a VAZ 2110. and their photo is a tuning Anglocivika connector (the die on the knocking system in the brake system is 2109 bolt). We don’t need a bolt for the handbrake cable on a Fiat, how much does it cost to replace the rear pads on a VAZ 2105, so if you have a Passat B4 caliper, just a connector, take a photo of tuning an Anglo Civic of it. I do not recommend using the standard one in the brake system 2109.
3. Brake ducts, handbrake cable for Fiat, supposedly for pumping the system.
4. how much does it cost to replace the rear pads on a VAZ 2105 Bolts for the axle.
5. Passat B4 caliper I recommend replacing the rear wheel bearings. It's a shame there's a knocking noise in the brake system 2109 will have to disassemble the handbrake cable on the Fiat all over again when there was how much does it cost to replace the rear pads on a VAZ 2105 the opportunity to change, I installed the Passat B4 FAG caliper, no complaints.
6. photo tuning anglotsivika A set of brake pads knocks in the brake system 2109 rear for the Passat handbrake cable for a Fiat Tipo B5 or Audi how much does it cost to replace the rear pads on a VAZ 2105 A6
Required tools and materials for replacing front discs
To successfully replace brake discs on a VAZ 2107, you will need a list of tools, which are presented in the table below.
Table - Tools and materials required to replace front discs
| Tools and materials | Note |
| open-end wrench | "at 7", "at 17" |
| Socket or socket wrench | "at 17" |
| Mounting blade | Can be replaced with a piece of durable reinforcement or other metal rod |
| Jack | Not required with a lift |
| Screwdriver | Durable, straight, flat blade |
| Ratchet | With a 17" head |
| Balloon wrench | To remove the wheel |
| Copper grease | It is applied to the seat of the brake disc to prevent it from sticking. Also, applying copper grease helps prevent corrosion. |
| Wire brush | For cleaning fasteners and working surfaces from dirt |
| Penetrating lubricant | To reduce the risk of damage to the brake mechanism when unscrewing the fasteners, as well as to facilitate the process of dismantling the disc. |
| Hammer | To remove stuck consumables from their seat |
| Spacer | Made of wood, thick plastic or soft metal |
Price examples
When buying VAZ 2107 calipers, you should focus not only on their cost and equipment, but also on the manufacturer. Since the original caliper body is the last to be used after restoration, it is worth considering the removable cylinders, which are a functional element of the design, within the cost framework. High-quality and affordable prices include:
- Fenox, X4816C1 – 431 rub.
- Basalt, 2101-2107 – 390 rub.
- Autostandard, 21010-350118288 – 367 rub.
- Autostandard, 21010-350118388 – 372 rub.
- AT, 1182-001H (OE: 2101-3501182) – 412 rub.
- RIDER, 2101-3501180 – 510 rub.
- CEDAR, 2101-3501182 – 411 rub.
It is these models of external and internal caliper cylinders of the VAZ 2107 that are popular. This is due not only to the price, but also to the packaging, the presence of caps that fit the bleeder fittings, as well as a warranty of at least 3 months.
Instructions for replacing the wheel bearing on a VAZ-2107 with your own hands
Removal
Put the car on the handbrake. Place a shoe under the wheel to prevent the machine from rolling away. Loosen the front wheel nuts.
Raise the car and place a support under the body. Remove the wheel. Unscrew the caliper mounting bolts located on the inside and remove the caliper. To avoid damaging the brake hose, it is better to tie up the caliper.
Using a screwdriver, pry up and remove the hub cap. Unscrew the hub nut. After removing the nut and washer, pull out the outer separator. Pull the brake disc towards you and remove it together with the hub. After unscrewing the two guide pins, remove the brake disc from the hub.
Using a screwdriver, pull out the oil seal and separator, and then the spacer ring. Now you need to knock out the clips. Using a mandrel of the required diameter or a drift, knock out both clips with a hammer.
Replace or restore?
If the piston jams in the working cylinder, you won’t be able to get rid of it by purchasing a repair kit, which usually only includes boots with cuffs and sealing rings. After all, it is necessary to restore the surface of the cylinder, and the piston must be replaced altogether. How expensive it will be to repair rear calipers yourself depends on the design features of the brakes, the model of the car and the degree of neglect of the problem. However, you will definitely have to purchase a new piston or look for a used one, and in extreme cases, buy a new unit. Its price fluctuates in a very different range: for mass-produced cars, a caliper costs 4-5 thousand rubles, and for premium foreign cars or rare models the price can reach up to 12-13 thousand rubles.
Therefore, the most expensive option is rarely chosen, and car owners usually buy used cars - after all, they cost 5 or even 10 times cheaper. As for caliper repair, it is even more profitable, since we get an almost new unit. After all, almost everything changes - guides, pistons, cuffs, etc., only the brake cylinder body restored by sandblasting remains old. However, in any case, repairs should begin with a visual inspection of the mechanism.
Visual inspection
First you need to make sure that the piston is in good condition: with light pressure, it should be freely recessed into the cylinder body. In addition, it should not have rust or a lot of dirt. Next, we inspect the functionality of the caliper guides, the integrity of the boot, and move on to the pads - it is unacceptable if the difference in their thickness is visible to the naked eye.
Since the piston returns to its original position using a cuff - it not only seals, but also acts as a spring - you need to make sure of its integrity. However, this is not all, since during its operation the cuff is deformed, and over time it can reduce its springing properties. To check this element, it is enough to hang the wheel and, when pressing or releasing the brake pedal, make sure that the wheel rotates freely.
And most importantly: under no circumstances should there be any signs of overheating on the disks, as evidenced by the purple color of the metal!
The piston (cylinder) is faulty
Poor quality of brake fluid, the appearance of rust on the surface when the boot of at least one piston (cylinder) ruptures or as a result of prolonged downtime of the machine entails its partial jamming.
This will initially be heard when its operation is delayed, when the pads begin to knock on the disc. In order to make the repair yourself in this case, you need to disassemble the caliper and pull out the rusty piston; this must be done after the guides have been unscrewed and the boot and retaining ring have been removed.
If the cylinder still moves even slightly, you can squeeze it out using a compressor by inserting a hose into the hole for supplying brake fluid. This can also be done without first disconnecting the housing from the brake system; you just need to press the pedal, after which the created pressure will squeeze the cylinder out of its seat. If it is tightly jammed, then a preventive measure can be soaking it in gasoline and other similar liquid.
It is worth considering that the rear caliper piston cannot be removed, but is simply unscrewed along the threads with pliers or a similar tool. After this, you need to wash the cylinder seat and clean it of dirt and rust. It is also worth doing with the piston (cylinder) itself. Next you need to insert the cylinder into place. It would be useful to replace its boot with a new one during assembly. You can see this in more detail in the attached video.
Parking system
Although it engages the mechanism of the rear axle wheels, it is in no way connected with the working mechanism. It uses a cable as a drive connected to the handbrake located inside the car.
Under the car, this cable is divided into two parts, going into the rear axle mechanisms. Inside, the ends of the cable are connected to the drive lever, which in turn is connected to a spacer bar. The drive lever is connected to one of the pads.
When the handbrake is engaged, the cable pulls the lever, and since it rests against the bar, the pads are released. The toothed sector of the handbrake fixes the position of the lever when the pads are spread apart.
Caliper jammed on the road: causes and symptoms
The caliper jams and fails due to overheating, dirt and moisture getting into it. There are also other provoking factors:
- Wear of the brake mechanism. This happens when the driver does not monitor the car parts and does not carry out timely diagnostic maintenance. The caliper becomes unusable and jams, often right on the road.
- Incorrect pad installation. When they are not parallel to the discs or in the wrong places due to an error during the repair, the brake mechanism jams.
- Lack of lubricant or incorrect selection. Typically, drivers try to save on lubrication, which is fraught with many problems. It is necessary to select a product that can reduce friction during the operation of parts and has cooling properties. High-quality lubrication should provide the mechanism with protection from exogenous adverse factors. Especially in winter, when the road is strewn with ice, snow, and stones.
When a caliper jams, it is accompanied by a number of characteristic symptoms:
- the discs become very hot, there is a burning smell in the cabin (these manifestations are typical for overheating of the brake mechanism parts);
- when you press the brake, the car pulls to the side (usually to the one where the jammed caliper is located);
- after releasing the brake pedal, a creaking sound is heard in the cabin - a sign of wear on a part of the brake system;
- brake fluid is heavily consumed;
- There are drops of oil visible on the wheel rim.
If the caliper jams on the road, the car may begin to brake on its own. This happens because the brake pads are in constant contact with the discs. As a result, the car will constantly brake, even when the driver does not touch the brake pedal. The pads will begin to deteriorate faster.
If even one of these phenomena is detected, it is important to take immediate measures - diagnose the brake system, level out the identified problems