Much has been said about the importance of uninterrupted operation of all elements responsible for applying the brake. This article will talk about repairing the components of the caliper: the piston (cylinder), guides and replacing their boot - with your own hands, you can also learn about this clearly from the attached video.
To fully understand how to easily repair and replace these parts, it is worth understanding the structure of the front and rear calipers and the reasons for their failure, and what repair kit may be required for this.
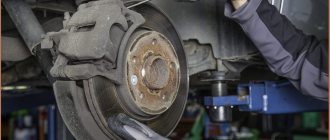
The design of this brake element
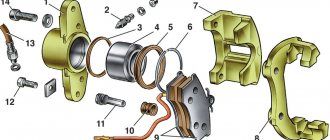
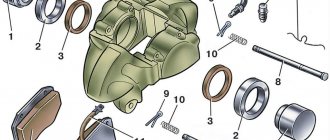
There are two types of disc calipers - front and rear, their design and repair method are slightly different, but their main elements are the same:
- The housing in which the piston (cylinder) is mounted.
- Bypass valve.
- Sealing ring.
- Piston (cylinder).
- Cylinder boot.
- Retaining ring.
- Frame.
- Pressure bar.
- Pads.
- Guide boot.
- Guides.
- 14. Fastening bolt.
- Brake hose.
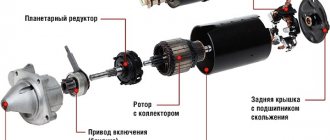
The difference between the rear disc caliper is the presence of a parking brake.
Therefore, the piston (4) has a special thread through which it is screwed onto the parking brake rod (1). Thanks to this, it can operate under the influence of two drives - mechanical (parking) and hydraulic.
How to minimize brake fluid loss
- Open the hood and use a rag to thoroughly clean the brake master cylinder. The master cylinder is attached to the booster, a drum-like component mounted on the driver's side called the brake booster.
- Unscrew the cap of the master cylinder reservoir and place a piece of clean plastic elastic sheet over the hole, I usually just put a thick bag and tighten it well with the lid, so that there is a vacuum in the reservoir and when removing the brake hose, the fluid does not flow onto the floor.
- Then place the cap on the top of the plastic sheet and tighten the cap. This will create a vacuum and help prevent significant fluid loss when the brake line is disconnected.
Causes of failure
The caliper as an element of disc brakes is subjected to significant temperature loads, as well as exposure to external adverse factors: dirt, dust, moisture, chemicals. All this happens due to the fact that his device does not allow him to be protected from these negative phenomena. If there is significant overheating, as well as if the boot ruptures, the lubrication of the guides may disappear.
Improper maintenance of the guides, in which some craftsmen manage to stuff inappropriate lubricant into their boots: graphite or similar, leads to their swelling and souring, after which they jam or knock when suddenly activated.
A rupture of the piston boot causes dirt and moisture to enter it. After which it stops working - it starts to jam or, conversely, knock.
Deformation of the sealing ring contributes to brake fluid leakage and oiling of the pads.
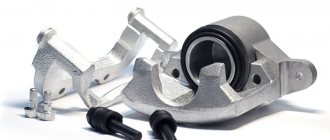
Caliper repair
The most reliable and manufacturer-approved way to solve the problem is to replace the caliper assembly, and symmetrically, on both sides of the car. It is impossible to stop the processes of corrosion and wear that have begun.
However, the high price pushes car owners towards intermediate partial repairs. For this purpose, many aftermarket parts companies produce repair kits.
Typically, the repair kit includes guide rods or bushings along which the bracket moves, their rubber seals, as well as repair pistons with cuffs and boots.
If the inner surface of the cylinder is still in working condition, that is, there are no deep marks or craters on it, then installing a repair kit is quite capable of extending the life of the caliper. Of course, the pads, which by this point are already unevenly worn, must also be replaced.
If the repair kit does not contain a special high-temperature lubricant for brake mechanisms, it must be purchased separately. The guides and the reverse side of the pads must be lubricated. The use of general purpose lubricants is unacceptable due to the high operating temperature.
After the rebuild, the brake fluid is replaced and the system is bled. On cars with ABS, this must be done using a special scanner program, otherwise it will not be possible to completely replace the fluid, and the accumulated moisture will again get into the working cylinders.
Repair kit
Replacing a caliper is a drastic measure; often you can limit yourself to repairing and replacing its components. Basically, the standard repair kit includes rubber elements:
- cuffs,
- anthers,
- protective rubber bands of the fitting,
- piston sealing rings.
But depending on the necessary repairs, they may include:
- retaining rings,
- clamping brackets,
- guides,
- directly the pistons themselves.
Thanks to the repair kit, you can significantly save and improve the operation of this brake system unit.
Signs of trouble
The breakdown of the caliper components and their impending repair can be understood by some signs that occur during braking:
- The car pulls and pulls to the side when braking.
- It feels like when braking you have to put more force on the pedal or, conversely, less.
- The brakes rattle or knock when driving over bumps or when stopping.
- The brakes are jamming, which will be indicated by possible skidding.
- The appearance of brake fluid leaks on the wheel.
- Feedback in the pedal, expressed in a strong pulsation when pressing the brake.
If these symptoms appear, you should not delay repairing faulty caliper elements. You must first figure out why this happened and make repairs immediately. You can learn more about the signs and causes in the attached videos at the end of the article.
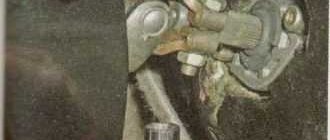
How to dismantle correctly
The task is divided into two parts - to preserve the edges of the nut as much as possible and not allow it to be cut off, leaving a fragment in the body of the mating part.
If the whole faces
While the edges of the nut are still intact, you should use the correct loosening tool. The use of a spanner or even more so an open-end wrench is inappropriate here.
For brake pipes, special spanners are produced that are of considerable width, equipped with a slot for the pipe and a clamp with a power screw. The key is put on the nut with the tube passing into the slot and securely fixed with a threaded clamp. In this case, it will no longer be possible to tear off the edges.
There remains a danger of shearing the nut due to excessive applied torque. The part is thin-walled and weak, and is damaged by very moderate force on the short lever of the key, so the soured connection should be loosened as much as possible.
There are several methods that must be applied sequentially to avoid troubles:
- the connection must be flushed with a penetrating compound such as a “liquid wrench”; usually a universal lubricant such as WD40 or the like is sufficient; it will take about half an hour to obtain the effect of wetting the thread;
- the nut must be carefully tapped in the lateral and axial directions; it is convenient to do this along the axis using the same special wrench, but smaller, placed on the tube and placed firmly on the nut; the blows are applied with a small hammer close to the head of the wrench, sharply and abruptly;
- from the side you should hit through the blunt beard along the edges of the nut with the same hammer, it is not strength that is important, but sharpness and repeated repetition, between attempts you should try to unscrew the nut without applying excess force, skill and a sense of proportion play a big role;
- An extreme but effective measure would be to repeatedly heat the part with a gas burner with a thin point nozzle; when heated and cooled, the expanding porous products will be crushed; you should not twist the hot nut, since it is expanded and clamped even tighter; you can cool it with the same penetrating liquid.
Of course, when working with heat, the brake fluid must be completely drained and fire safety measures must be taken.
If the edges are torn off
It happens that illiterate attempts at turning away have already led to damage to the edges. At a certain stage, this will not prevent you from reliably hooking with the same special key; it will tightly embrace and clamp everything that is still left.
Alternatively, you can cut off the tube and use a reduced-size socket head that grips the middle of the edges. But the special key is still more effective.
Sometimes a welding machine is used for dismantling, welding another, larger diameter, to the protruding part of the nut. The main effect with this method is the extreme heating of the part, after which it turns away surprisingly easily with a little effort.
The last option is to drill out the remaining nut and remove the threads. Work carefully so as not to damage the mating part.
Even if the tube was removed, it would be better to replace it. After dealing with soured threads, the connection will lose properties such as strength, reliability and tightness. You can use standard parts or make a new copper tube yourself, using repair technologies for flaring it on the side of contact with the caliper or hose.
Copper is much less corrosive, which will ensure increased safety in the operation of the braking system. Factories do not use it to save money in mass production.
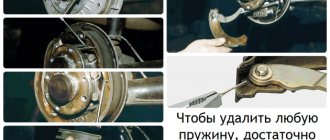
If the brakes rattle
This type of brake has pressure springs or floating calipers.
They are responsible for securing the pads to the caliper body. The reason for their failure is metal fatigue or poor quality. As a result, they lose their elasticity and stop pressing the pads against the body. Because of this, the pads rattle at the slightest passage of irregularities and may come into uneven contact with the disc, which will lead to the appearance of a shoulder or grooves on it. Also in this case, the staples themselves may rattle.
What should you do when your brake calipers or pads rattle? If it is not possible to replace them, then you should try to loosen them with your own hands using pliers to make them more rigid. To do this, you need to pull them out of their seats, unclench them and insert them into place, after which they will stop rattling for a while.
About the reasons for caliper failure
This brake system component can break down due to improper maintenance or due to insufficient quality. The main reasons why caliper repair may be required are as follows:
- improper operation, which is associated with filling the guides with poor-quality lubricant - because of this, the boot swells and later “sours”;
- in the future, repair of the brake calipers may be necessary due to moisture getting on the guide, which leads to a breakthrough of the boot;
- Another reason is the piston itself, the body of which is also vulnerable to moisture getting inside;
- low-quality working fluid (brake) can corrode the piston from the inside if the concentration of water in it exceeds the norm.
Video tip for DIY caliper repair:
The piston (cylinder) is faulty
Poor quality of brake fluid, the appearance of rust on the surface when the boot of at least one piston (cylinder) ruptures or as a result of prolonged downtime of the machine entails its partial jamming.
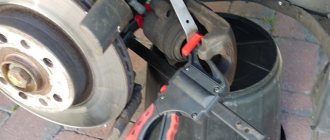
This will initially be heard when its operation is delayed, when the pads begin to knock on the disc. In order to make the repair yourself in this case, you need to disassemble the caliper and pull out the rusty piston; this must be done after the guides have been unscrewed and the boot and retaining ring have been removed.
If the cylinder still moves even slightly, you can squeeze it out using a compressor by inserting a hose into the hole for supplying brake fluid. This can also be done without first disconnecting the housing from the brake system; you just need to press the pedal, after which the created pressure will squeeze the cylinder out of its seat. If it is tightly jammed, then a preventive measure can be soaking it in gasoline and other similar liquid.
It is worth considering that the rear caliper piston cannot be removed, but is simply unscrewed along the threads with pliers or a similar tool. After this, you need to wash the cylinder seat and clean it of dirt and rust. It is also worth doing with the piston (cylinder) itself. Next you need to insert the cylinder into place. It would be useful to replace its boot with a new one during assembly. You can see this in more detail in the attached video.
How to bleed the brake system
After replacing your brake caliper, this next procedure will help you remove air from the brake line, even if you are working with the ABS system.
However, if you believe there is air in the brake master cylinder or hydraulic control unit (HCU) and your vehicle has ABS, you may need to take your vehicle to the dealer or workshop and have them bleed the system. If necessary, consult your vehicle's repair manual.
- Without starting the engine, depress the brake pedal approximately five times at normal stopping pressure to remove any residual vacuum from the brake booster.
- Check the master cylinder reservoir. Add new fluid to bring the level to the MAX mark if necessary, and tighten the reservoir cap.
- Place one end of a piece of clear rubber hose onto the drain screw of the new caliper. The hose should fit snugly against the bleeder screw. You can find a clear hose at an auto supply store.
- Insert the other end of the clear hose into a plastic container and add a small amount of brake fluid to the container, large enough to submerge the end of the hose.
- Have a helper press the brake pedal five times and then hold the pedal firmly down.
- Next, loosen the bleeder screw about 1/4 or 1/2 turn, just enough to allow brake fluid to flow through the clear hose for about 2 seconds, and then tighten the bleeder screw again. Watch for air bubbles entering the brake fluid in the reservoir.
- Ask your assistant to release the brake pedal.
- Repeat steps 5 through 7 until you see no air bubbles draining into the brake fluid in the reservoir. When bleeding, be sure to keep the level above the MIN mark on the master cylinder reservoir.
- Correctly tighten the bleeder screw after bleeding the caliper or brake line.
- If necessary, add brake fluid to the master cylinder reservoir.
- Make sure the pedal feels firm and operates properly. Drive at a slow speed to make sure the brakes slow down and stop the car properly.
- Back in the garage, check the brake hose and bleeder screw on the new caliper for leaks. And continue checking for leaks over the next week.
You can remove air from your ABS system by bleeding the brake caliper and connecting line. To bleed the master cylinder, refer to your vehicle's repair manual.
Guide faulty
The main problem if the brake does not work can be jamming and souring of the caliper guides.
Repairing this malfunction with your own hands will not be difficult. By the way, in this case there is no difference when disassembling both the front and rear calipers. To do this, you need to unscrew and pull out both guides. Clean them from dirt or poor-quality lubricant, remove and replace the torn boots with new ones, after filling them with special grease for calipers.
Then put them in place, insert and screw the guides back. Then you should try how freely the pressure bar moves along them. This can be seen visually in the attached video at the end of the article.
We should not forget about the housing of this brake element. If significant rust, dents, sagging or other mechanical damage is found on it, it should be replaced completely.
If the repair had to be done on a removed caliper, then after installing it in place, the brake system should be bled.
Related publications:
- When should you replace brake pads?
- Why do brake pads squeak and whistle when braking?
- Types of brake pad wear sensors and how they work
- How to change brake fluid?
- Do-it-yourself grooving of brake discs, can it be done without removal or is it still necessary to remove it?
Wedge, overheating, corrosion: everything you need to know about brake caliper maintenance
What is a brake caliper?
The caliper is the thing that holds the brake pads and presses them against the brake disc when you press the pedal. In appearance it is a harsh piece of iron, but deep down it is a rather delicate mechanism that requires care and affection. More precisely, lubricants. It works quite simply: when we press the brake pedal, brake fluid is supplied to the caliper through lines (tubes and hoses). It presses on the piston, which comes out of the caliper body and presses on the pads. Depending on the design of the caliper, there may be one piston, or perhaps two or more. If the piston is located only on the inside of the disc, then they speak of a caliper with a floating caliper. In this case, the piston presses only on the inner pad. Under its influence, the pad is pressed against the disc, and the bracket moves along the guides and presses the second pad (outer). This is the simplest design that is used on most budget cars. And the features of this design explain the fact that the inner pad usually wears out faster than the outer one: it is pressed against the disc faster and spends more time in contact with it than the outer one. If the pistons are on both sides of the disc, then the design is called fixed. The principle of operation is exactly the same as that of a floating caliper, but the pads are pressed against the disc equally on both sides. The brakes in this case are more effective, but most car enthusiasts will not notice the difference. However, on heavy machines, a fixed caliper is very common. Well, how do the pads move away from the disc after the driver releases the brake pedal? Usually, under the action of a rubber seal (cuff), the piston simply moves slightly away from the disk. This movement is very small - tenths of a millimeter. On the one hand, this is good: the closer the pads remain to the disc, the faster they can start braking when you press the pedal. But on the other hand, if the caliper is not completely working, the pads remain in contact with the disc. We will talk about this situation a little lower. Some calipers use special springs to spread the pads. But again: only not the cheapest cars are lucky with them. Budget cars with a floating caliper in the caliper have a simpler mechanism - the same as described just above. So what can go wrong with the caliper? To find out, let's go to the well-known company Volk Brake Performance, whose specialists not only repair and service brakes, but also build real tuning brake systems. There they will tell us everything about calipers.
Corrosion of metal
Our main question:
What problems could the caliper have?
In principle, there is only one main malfunction here: loss of mobility of the piston or caliper bracket guides. But the reasons for this malfunction may differ. Of course, the glands stop moving solely due to rust. Why does she appear? The first reason
is the natural ingress of dirt, water and dust under the anthers of the piston and guide bracket during operation. Theoretically, there should be a lubricant there, but in practice, over time it turns out to be an abrasive. In megacities, where roads are generously treated with reagents in winter, the abrasive is especially aggressive. As a result, the mobility of the parts is lost and the caliper becomes sour.
Somehow, out of curiosity, the service specialists decided to check under what pressure it was possible to move a piston that could not be pushed out with compressed air. We placed the caliper under a hydraulic press and pressed it firmly. It’s hard to believe, but a force of 150 kg could not move the piston. Well, brake fluid won’t move such a piston, even less so.
Now let's move on to the second question:
What are the dangers of a rusted piston and guides?
In the easiest situation - a skewed brake pad. The purpose of the caliper bracket is not only to bring the pad to the disc, but also to align the position of the pad relative to the disc. The block should be pressed evenly over the entire surface. If the mobility of the bracket guides is impaired, the block stands at an angle. In this case, the uneven wear of the pad will be very noticeable. And, of course, it will wear out faster than it should. In addition, the braking efficiency on a wheel with soured guides will be lower. The driver may not always notice this, but on a slippery road the effect will be unexpectedly unpleasant.
Uneven pad wear
The consequences of a soured caliper piston are much more serious. The force that presses the pad to the disc under brake fluid pressure is much greater than that applied to the pad from the rubber seal or spring. Therefore, a rusty piston may still be able to press the pad to the disc, but the pad will no longer be able to move away from the disc. And the driver has no choice but to drive on the braked wheel. What does this mean? Nothing good.
Firstly, this can be noticed by a sudden increase in fuel consumption. Everything is simple here: the free run becomes smaller, the car drives poorly when coasting, and it no longer reacts so readily to the gas. You have to press the pedal more, the consumption increases. But that's not the worst thing. What’s worse is that both the pads and the disc fail due to constant friction. The pads seem to be consumables, and to hell with them, but I feel sorry for them too. Good pads cost money, and replacing them at a service center is also not free. During constant friction against the disc, the pads are literally fried. Then they begin to crumble: the binding plastic material burns out, and the pads begin to “dust” with solid fractions. Particles land on the disc and scratch it. Sometimes it gets to such a state that the disc has to be changed, or at best, sharpened.
Consequences of pad overheating
The disk also overheats. Sometimes traces of local overheating are even visible on the disk. And this overheating is much more dangerous than it seems. We are used to thinking that the worst thing is the possibility of turning an overheated disk into a figure eight. Yes, driving with a driven disc is below average pleasure. At high speeds, the brake pedal hits your foot, and unpleasant wave-like braking appears at low speeds. In fact, the consequences are even more serious: the composition of a chronically overheated disc changes, which negatively affects its adhesion to the pad. The block simply begins to slide along it, practically without slowing down the car.
Local disk overheating
If you chronically neglect caliper maintenance, over time you will have to not only change the lubricant and rubber bands, but also the entire body and piston: corrosion appears on them, which prevents the sealing rings and the piston itself from ensuring a tight fit. And in this case, the brake system can only be saved by replacing the caliper. This will cost significantly more than servicing.
Service specialists also recalled the most dangerous consequences they had to face. Three times we encountered broken discs (this is the most serious consequence), and in some situations the brake fluid boiled. The new brake fluid, of course, will not boil. But if it is not changed for many years, the water content in it increases over time (brake fluid is very hygroscopic), and when the amount of water approaches approximately 4%, the fluid may boil. Well, a vapor lock in the brake line is almost a crime: you can kill yourself. And another interesting consequence of severe overheating is grease leakage from the wheel bearing. The case is rare, but quite probable: the lubricant becomes too liquid and simply flows out of the hub. There is a chance to do not only repair the caliper, but also replace the bearing. And for those on whose cars the bearing is replaced as an assembly with the hub - also by replacing the hub. This is where the purely theoretical part can end. I'm not sure I said anything new, but I had to say it. Now let's move on to the more practical part: what and how to do to brake correctly.
The main thing is lubrication!
A minute from the “Obvious - Incredible” section: the most useful thing for caliper health is lubricant. It performs several functions. The first is obvious: it ensures the mobility of the caliper structural elements. The second is not so obvious, but also not very incredible: the lubricant prevents dust, dirt and water from getting inside the caliper body. Therefore, when rebuilding a caliper, they try to use the best lubricant that has proven itself well. Thank God, gone are the days when there was nothing better than solid oil or lithol. There is a large selection of lubricants on the market now, so there is plenty to experiment with. At Volk Brake Performance, experiments with lubrication ended about eight years ago, when the craftsmen switched to products from the domestic company VMPAUTO.
For mounting the cuff and installing the piston, MC 1600 lubricant is usually used.
According to service specialists, it not only works well, but is also easy to use: its white color allows you to control the uniform application of lubricant without skipping. The same lubricant is used for the threads of the fitting.
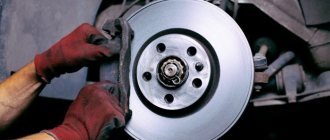
If corrosion has not yet eaten up the caliper body, then it can be cleaned, lubricated and installed on the car. Sandblasting is used for cleaning, otherwise it is very problematic to remove all dirt and rust from it.
But the O-rings and anthers cannot be reinstalled in any case. It’s good that there are repair kits for sale for almost any calipers. Volk Brake Performance tried different kits, but ultimately settled on Frenkit products. It sounds like an advertisement, but if the reviews are good, then why not.
When assembling the caliper and installing the pads, you simply need to use the appropriate lubricants. It is highly desirable that they be good. As I already said, this service loves VMPAUTO products, and there are no complaints about the quality. You just need to understand what to lubricate and with what. You can, of course, get by with one universal lubricant MC 1600; it has been used in service for years, and it is suitable for the caliper guides, the piston, and even the back side of the pads.
But there are those who prefer to use specialized lubricants. For example, PAG is a polyalkylene glycol based lubricant designed specifically for caliper and brake piston guides. Its main feature is its wear resistance during small movements, which is why it is so suitable for caliper guides. This lubricant does not coke and does not cause deformation or destruction of rubber boots.
The most important thing in assembly is to do everything carefully. Cuffs that are distorted during installation, torn anthers - all this will reduce the results of the work to zero. And a simply poorly cleaned caliper cannot be assembled so thoroughly that it will survive until the next maintenance.
By the way, how often should the calipers be serviced?
Cherish and protect
The frequency of maintenance of calipers is a complex issue. It is best to carry out their prevention every time you replace the pads. But it’s difficult to navigate by mileage. Someone manages to finish off the pads in 15-20 thousand kilometers, others drive a set of 50 thousand. It is difficult to somehow calculate a normal interval with such a spread. But there is a time guideline - one year. The caliper needs to be cleaned and lubricated once a year. Of course, it will drive without this operation, but its service life will be noticeably shorter. In addition, the frequency of maintenance depends on many other factors. As I already said, if reagents are abused in your city in winter, it is better to shorten the interval. And it would be a good idea when washing a car to wash the brake mechanisms, if possible, at least from the outside. Reagents shorten the life not only of calipers, but also, for example, of brake pipes, which corrode faster. An extra wash won't hurt them. Of course, the calipers of cars that often drive through mud will require increased attention. Do you like fishing, hunting or mushrooms? Don't forget to keep your brakes clean. Experts have noticed another interesting factor that affects the service life of calipers - the type of wheel rims. On the same cars, calipers last much longer if the car rides on alloy or forged wheels. It turns out that stamped disks reduce their service life. They cannot explain this fact unambiguously. There is an assumption that with stamps it is more difficult to reach the calipers when washing. Or their cooling is worse. There is no definite answer, but it is a proven fact. So if you drive a stamping machine, check your calipers more often. Well, one last thing: to service calipers, you should not use repair kits and lubricants of unknown origin. The products of Frenkit and VMPAUTO were recommended to us in a specialized workshop that we trust, and the names of these manufacturers sounded to us solely out of great love for cars. And to the brakes, without which we cannot survive.