A technically sound, well-maintained car is the key to reliable, uninterrupted operation. Every detail responsible for the safety of the driver and passengers requires close attention. This is especially true for the brake system, the maintenance rules of which include caring for the calipers. The performance of the entire mechanism depends on them. Painting calipers is an important maintenance rule, and thanks to a well-chosen color, you can highlight the individuality of the car, make it fashionable and impressive.
Why do you need to paint calipers?
Most often, owners of sports cars resort to this procedure. After all, these cars are equipped with alloy wheels. All parts of the brake system are clearly visible through them.
If it is painted in the same color as the body or another bright shade, the car takes on a stylish look. In a word, this car looks even more luxurious and is somewhat reminiscent of a racing shootout.
Also, painting the caliper has functional significance. They have an uncovered porous surface that is constantly in contact with the environment. Because of this, dust and dirt accumulate on them all the time.
And since it is difficult to get into it during dry cleaning and car washing, this leads to the following consequences:
- Car parts cool down more slowly;
- Heat transfer in the brake system deteriorates;
- Rust appears on the metal surface.
By applying paint to brake discs and calipers, they are covered with a thin, durable film that can not only repel dirt, but also prevent it from entering the pores of the product. This makes it much easier to maintain cleanliness, and heat exchange returns to normal.
Among other things, the paint provides protection against corrosion and minor mechanical damage from pebbles on the road.
For painting, only high-quality, heat-resistant paint is selected, since when the calipers heat up, it will simply crack and peel off in just two to three months.
How to choose heat-resistant paint
Heat resistance is the main requirement for brake paint. The energy released when decelerating from high speed is so great and the braking time is short that the brake power, defined as the ratio of energy to time, is many times greater than the engine power. In this case, all the kinetic energy of a heavy machine goes exclusively into heat.
This is interesting: How to find out how much it will cost to paint a car, price calculation
During fast driving and frequent braking, the discs and surface of the pads can heat up to a thousand degrees; this is clearly visible by their glow in the dark. Due to heat dissipation, the temperature of the calipers is much lower, but several hundred degrees can be expected here too.
Ordinary paint will instantly burn, so you can only cover the calipers with heat-resistant paint, and since it is difficult to think of any other use for it in a car, the labels of such products directly indicate its intended use for brakes. When applied correctly, it does not burn, does not fade, and retains its decorative properties for a long time.
There are many manufacturers of such paint; it is made by almost all chemical concerns that produce repair materials for car bodies. And not only paint, but the entire range of consumables needed using proprietary technology.
Tool for painting calipers
In order to dismantle the product, you will need:
- Jack;
- Screwdriver;
- Balloon wrench.
For painting work you need to prepare:
- Paint;
- Scotch tape (painting);
- Newspapers;
- Solvent, degreaser;
- Fine-grain sandpaper;
- Brush with metal bristles;
- Old rags;
- Gloves;
- Respirator;
- Rust converter.
Materials and tools
Actually, as usual, we need to clean the surface to be painted, degrease it, then prime it and then paint it. That's why:
- We need a metal brush (regular with a handle) or a drill attachment
- We most likely won’t need a solvent or “white spirit” for degreasing or a rust converter here, because various aluminum alloys are used.
- PREFERABLY a primer that is also heat-resistant.
- Special heat-resistant paint that can withstand temperatures of 120 - 150 degrees Celsius.
- Paper tape, or cellophane or newspaper, to cover the untreated surface, as well as studs or bolt holes.
- Tools for removing the caliper if we decide that it needs to be removed. If we paint without removing, then we don’t need them.
Actually, all the tools, it is advisable to prepare them before the process. What else I would like to note is that it is advisable to paint indoors, where there are no gusts of wind and dust (it is advisable to clean up before the process). Because when painting, dust can settle on the surface, which we don’t want.
Is it worth removing the calipers?
In each individual case, the car enthusiast himself decides what to do: remove or not remove the caliper from the car before painting.
- For better painting, of course, it is better to remove the part from the car.
- This will make the caliper easier to clean, and you can paint it on all sides.
- During complete removal, the brake hoses must be disconnected.
- This action will cause air to enter the brake system.
- Consequently, after installing the painted part in place, you will still have to bleed the brakes.
That is why most car enthusiasts choose the option of painting the product without removing it from the car. To do this, you just need to cover all the parts that are adjacent to the caliper.
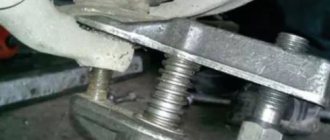
You can also try another option - removing the calipers without disconnecting the brake hoses. To prevent the hoses from hanging in the air, it is necessary to place the product on some kind of support.
Is it necessary to remove all parts before painting?
There are two methods of painting spare parts - with and without removal. The first option has many advantages, so experts use only it.
Here are its main advantages:
- It is more convenient to work;
- The parts are painted evenly on both sides;
- The parts located next to the caliper (fender, disc) are not smeared.
If you do not remove the spare parts, the paint may lie unevenly, and it will not be possible to paint it at all on the sides, bottom and back. And if the painting is not done well, the coating will not be able to reliably and efficiently protect the part at a high level.
But this option also has disadvantages - dismantling is more difficult, it will take longer, besides, certain tools will be needed, and after all the parts are installed in their places, it is necessary to bleed the system.
Color for painting, which one to choose
The product can be painted in any tone - this is the decision of the car owner. Thanks to the wide selection of paints and varnishes, this will not be a problem. Many people opt for classic options (black, gray, brown and dark blue), others prefer something unusual (red, light green, yellow, orange, green).
However, do not forget about the main shade of the car, otherwise you can make a mistake when choosing a color. For example, the car is red, but it was decided to paint the caliper green.
This solution will not be appropriate in this case. When choosing, you should focus on a monochrome palette or choose a beautiful contrasting color combination.
Color options using BMW as an example. Video
Many car owners are wondering how to paint their calipers in an interesting, unusual color scheme, trying to make their car stand out from the crowd, make it noticeable and recognizable. Along with this, owners of BMWs and black cars try to give the calipers a sedate and noble appearance. Black calipers on it will “get lost”, red ones will look vulgar. Painting BMW calipers in silver or titanium colors will improve the appearance of the car, it will look advantageous, harmonious and, at the same time, stand out.
What to look for when choosing paint
Before you go buy paint, you need to clarify what qualities it should have. First of all, it must correspond to the operating characteristics of the calipers. Due to constant temperature changes, the usual one will not work here.
Powder cannot be used either because of the same high temperature. Only a four-word application can preserve the durability of the coating on the product, but it will cost a lot of money.
To give the calipers a beautiful, stylish look, it is necessary to use heat-resistant paints. It has a number of advantages:
- Easy to apply;
- High-quality and even application without streaks;
- A varied palette of both matte and glossy shades;
- High quality anti-corrosion properties;
- Resistant to mechanical damage and reagents;
- Reduces thermal conductivity;
- Increases the service life of the product.
All this is possible thanks to acrylic resins, organic solvents, plasticizers and other additives included in the composition. To increase resistance to high temperatures, organosilicon components and silicates are added to the paint composition.
Paints and varnishes are produced in bottles, aerosols and cans. Aerosol ones are considered the most convenient, since even beginners can paint with them.
The disadvantage of such paint will be its high cost, as well as consumption. So you will need to buy it with a reserve. Among other things, when painting a caliper from a balloon, you should better cover other products located nearby, otherwise splashes will fly on them.
Heat-resistant acrylic coatings not only protect the surface of the product, but also preserve it for five years or more without repainting.
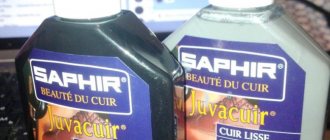
The best paints for painting calipers are:
- Foliatec. Premium paint, heat resistant. Available in various colors, both glossy and matte, and sometimes with a metallic tint. A fairly durable material, resistant to chemicals, wear-resistant, and makes it possible to obtain a durable coating. Produced as an aerosol and in cans.
- Motip. The most affordable option. Available only in aerosols. The paint can withstand heat up to 650 degrees Celsius. It applies well, adheres well to the surface, and has excellent dirt-repellent qualities.
Instructions for use
The Foliatec paint packaging contains the following elements:
- 1 bottle of cleaner with a capacity of 400 ml;
- 1 can (metal) of paint and varnish material for brake calipers with a capacity of 150 grams;
- 1 metal can of specialized hardener with a capacity of 50 grams.
For proper paint application, manufacturers recommend having:
- container where the hardener will be mixed with paint. It doesn't have to be plastic;
- a stick with which to mix two materials (hardener and paint);
- a brush with which to paint. It is recommended to select a model with a width of less than 15 mm;
- masking adhesive tape, which will be used to cover the unpainted surface to prevent paint from getting in;
- a brush with steel bristles to clean the surface from dirt and rust;
- a piece of clean cotton cloth for wiping the cleaned surface.
The manufacturer recommends opening the cans immediately before starting painting. In this case, the room temperature should be no less than +15 degrees. Calipers should be painted in a room with good ventilation and minimal dust.
For the painting process it is not necessary to dismantle the calipers along with the brake discs. You just need to remove the wheel rims of your car. Although, if you are going to paint both the outside and inside of the caliper with Foliatec, you will still have to dismantle it.
Before applying the paint, you need to prepare the surface (clean off dirt, rust using a steel brush, as well as the cleaner provided in the kit). You also need to cover with tape the surfaces that will not be painted. Only after this work has been completed can you begin painting the calipers by mixing the paint with the hardener.
Surface preparation before painting
Once all the materials are prepared, you can begin preparing the product for painting.
To do this you need to do the following:
- Remove rust using a wire brush, sandpaper and rust converter;
- Cleaning the caliper from accumulated dust and dirt;
- The pistons are cleaned using fine-grain sandpaper;
- After cleaning, they are wiped with a degreaser;
- Using tape, film, or newspapers, cover all moving elements that do not need to be painted.
It is also necessary to cover conductive hoses and other parts that do not need painting with tape.
How to paint calipers: operating technology
1. In order to paint the calipers as accurately as possible, you need to open access to them by removing the wheels. It will be convenient to first remove two wheels on one side of the car, and then carry out the work on the other. Use a wrench and a jack, as well as special stands, to securely support the car. After removing the wheels, access to the calipers is open and you can begin processing them.
2. First of all, the caliper must be thoroughly cleaned of a layer of dirt and chemical reagents, as well as traces of corrosion, using a wire brush. You can use a drill with special attachments. Then clean the surface with sandpaper. Special attention should be paid to hard-to-reach places. After all, high-quality cleaning is crucial in how to paint calipers and preserve the result for a long time.
3. Now you need to cover the area around the calipers, which should not get paint. To do this, we use masking paper or regular film, and fasten everything with masking tape. We especially protect the surface of the rotor and brake pads - they are prohibited from being painted!
4. Then the surface of the caliper must be degreased. Remember: all stages of cleaning from dirt and grease must be carried out as thoroughly as possible. After all, the quality and durability of the painting will depend on this.
5. Now we’ll find out how to paint the calipers. To do this, take a bottle of Motip Caliper Enamel and shake it thoroughly. We begin to apply layers of paint, drying each of them a little for a few minutes. In total, you need to apply 4 layers, making the first two light, and the third and fourth thick. Try not to overdo it, otherwise smudges will appear. The paint dries quickly - already 20 minutes after applying all the layers, you can remove the protective paper and put on the wheel.
6. We process the remaining calipers in the same way and admire the result!
Motip caliper enamel will make the surface of the parts resistant to aggressive substances and minor damage. In addition, the paint is heat resistant up to 120°C and will last on the calipers for a long time. By the way, no preliminary priming is required before applying Motip paint!
Painting the caliper with your own hands (step-by-step instructions)
The process itself is not complicated; before you start, you should coat the part with a primer. This will allow the paint to adhere better to the surface. After this you can start painting.
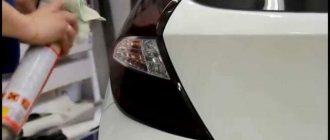
This can be done with a brush or with a spray can.
- In the first case, you can carefully paint the parts without gluing bolts and holes. However, such painting will not look very good. But this method is perfect for those who decide not to remove the calipers from the car, i.e. paint directly on it.
- The second option will give a beautiful, even color, but you will only need to apply at least two or three layers. But most likely in this case it is better to remove the parts from the car, since the paint will be sprayed in all directions.
The painting process will be as follows:
- The wheel is removed, having previously secured the car on the safety elements.
- The caliper is protected by a brush. If it is not removable, then this is done right on the spot, but if it is removed, then you can say goodbye to the entire product.
- After cleaning, anything that requires painting is wiped down with solvent or degreaser.
- Primer is applied. This should be done with confident, sweeping movements so that no smudges form. The primer is applied in two layers, between which you need to wait about half an hour, sometimes a little more.
- Paint is being applied. The application algorithm is the same as for primers. Only in this case it is necessary to make three layers, no more.
- After the paint has completely dried, the calipers are installed in place, the wheels are put on and everything is ready to go. As you can see, there is nothing complicated about this.
You can paint the calipers yourself. There is no need to pay extra money.
After all, this procedure will not be cheap at a service station or in a specialized salon. Every car enthusiast can do this; all that is needed is patience and accuracy.
Preparatory stage
Painting calipers with your own hands requires careful preparation of materials, as well as preliminary manipulations. Only following all stages one by one will give a good result. First of all, you need to prepare:
- protective material (newspaper, paper, tape, etc.);
- dismantling tools (jack, wrench);
- surface cleaning products (sandpaper, wire brush, electric drill);
- degreaser, primer, enamel;
- mask, gloves, overalls.
Preparatory activities:
- We provide access to the surface of the calipers. We remove the wheels. To do this, we use a jack, a wrench, and a special car holder. Professionals advise first dismantling the front wheels, then the rear wheels. To work with the outside, just remove the wheel rims.
- We clean the coating from dust, dirt, corrosive plaques, and chemical residues. Using appropriate tools.
- We protect non-paintable areas. Using film or paper, we cover the places where the elements of the coloring matter should not get into. It is strictly forbidden to touch brake pads, hoses, or rotor parts.
- Degrease the area prepared for painting. Apply a layer of primer to the part and let it dry.
As a result of following the preliminary manipulation technique, following the advice of professionals, we prepare the coating for applying the paint and varnish substance. The quality of work is embedded in primary activities.
First you need to remove the wheel
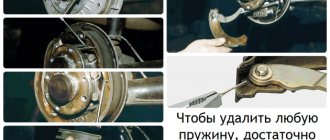
Cleaning the caliper
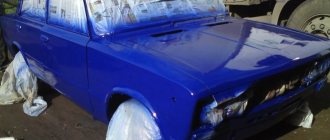
Photos before and after painting the calipers
To come in
Already have an account? Sign in.
Latest Visitors 0 users online
No registered user is viewing this page
In an article about aluminum and cast iron rear drum brakes
, we noted that the big disadvantages of cast iron are their gradual oxidation and, as a result, rust. It should be noted that this applies to almost all machines. Sooner or later they bloom and after three to four years they are simply all covered with “rusty spots”, which, of course, does not look very neat. Therefore, the question very often arises: what and how to paint the drums? So that they don't rust as much as possible? Let's find out...
To be honest, painting wheels is not that difficult, but it is almost impossible to completely protect them from rust. Cast iron, of course, prevents this phenomenon for a long time, but still it is not a non-ferrous metal and rust is a completely understandable process of its life, and under the wheels of a car, especially in winter, we can observe a salt-sand mixture that fights ice, but also makes cars rust and rot faster, and drums are no exception. So you won’t be able to protect 100%, but you can try for a long enough period.
Caliper mood color: how and why to paint brake calipers
04/22/2019 Author: Master Service 1996
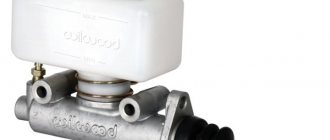
The brake caliper is the mechanism in the braking system that presses the brake pads against the wheel. To explain it quite simply, the caliper and the pads work like a crab claw, clamping the disc. Got it? Amazing. Why paint them?
What does a brake caliper look like?
Initial data
Well, there is an ordinary car, and now “drums” are installed on many models. Starting with our AVTOVAZ, ending with the popular RIO, SOLARIS, POLO, ALMERA, AVEO. Often they are, of course, cast iron, and therefore will rust in two to three years. We need to restore them with our own hands. What exactly are we going to do today?
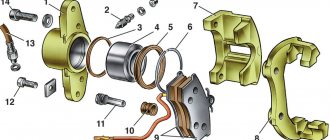
Materiel: what is a caliper in a car and its role when driving
Calipers on a car are needed to reduce the speed of movement when you press the pedal. In essence, this is a transformable transmission of force to the pads, all the mechanisms of this system - when you press the brake pedal. Bypassing all the electronic impulses, it all comes down to the caliper piston system and the pressure on the pistons. With the development of the automotive industry and the increase in vehicle power, a number of requirements are placed on the braking system, including ABS, in order to stop a powerful car at any time in a short period of time. Because the braking system is one of the main safety systems for the driver and passenger. The more powerful the car, the harder it is to stop it.
The caliper is the penultimate link when you press the brake pedal. After that comes only the pads and brake disc. If the brake is applied, the caliper's job is to press the pads onto the brake disc. If the pedal is released, then its task is to keep the pads at a distance from the disc. The caliper design can be fixed or floating. It is connected to the hydraulic system and when you press the pedal, the pressure causes the pistons to move, which pushes the pads towards the brake disc. The more powerful the car, the larger this part is on it, the larger the area the pads themselves occupy.