Print this article Font size 16
Today we will get acquainted with the stove and its structure on a VAZ 2110 car.
As you know, the heating system has a direct impact on the level of comfort. If in summer there is no special need for interior heating, then in autumn and winter it is problematic to imagine traveling without it. Theoretically, you can drive, but lower temperatures are unlikely to benefit your health.
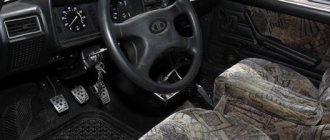
Dismantling the heater
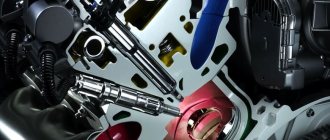
Device
Periodic malfunctions in the operation of the heating system for the VAZ 2110 are an ordinary and common thing. Therefore, the owners of this model from the Russian automaker have to dig around in their own garage every now and then or send the car for repairs to specialists from service stations.
Heater circuit diagram
To understand exactly how to carry out repair and preventative measures, you first need to familiarize yourself with the diagram of the stove and its components.
| Element | Peculiarities |
| Electric motor | A fan is mounted on it. Both elements contribute to the injection of heated air into the cabin |
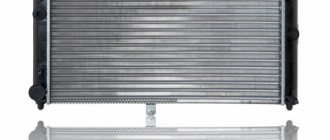
| Radiator | The entire operation of the heating system is based on this component. Remove the radiator and the heater will not work. Interestingly, the new model stove does not have a valve that shut off the flow of coolant through the radiator. Older devices have a faucet. The faucet was removed in order to avoid leaks, which were common on old stoves. Plus, they got rid of the tap for faster and more efficient heating of the interior. Although many owners of new tens do not agree with this decision, therefore, during repairs, they install a faucet on the stove |
| Dampers | In total, the stove has three of them. The first is responsible for air intake recirculation, the second is for opening and closing the heater duct, and the third is intended for control and is considered the most important |
| Resistor | This element is responsible for the speed of blowing hot air into the cabin. |
All elements, including additional valves, shields, fittings, are combined into a single unit. It, enclosed in a housing, is located in the engine compartment near the dashboard.
Air ducts
Air ducts are another block of the heating system. They come from the stove and perform several different functions at once:
- The interior is ventilated through central nozzles;
- Distribute the air through an appropriate distributor that supplies heat or air for ventilation;
- Another pair of air ducts serve to heat the rear row of seats;
- The system, which includes five nozzles at once, warms the feet;
- A pair of side air ducts take over the functions of heating the glass and partially heat the interior. This makes heating more efficient;
- A pair of nozzles are used for ventilation.
Electronic stove control
This electronic control unit operates directly from the passenger compartment. It consists of two main elements.
- Pen. Using the controller knob, the user sets the required temperature, which the stove then generates. Control is carried out by turning the knob in one direction or another, depending on what degree of heating you require at the moment.
- Temperature sensor. It is responsible for activating the stove when the temperature drops by more than 2 degrees compared to the value set on the controller. The sensor is equipped with a micro motor. When the handle is in position A, the micromotor in the stove block turns on, the damper is activated, thereby causing proper heating.
Control block
Before starting repairs of the entire stove, it is strongly recommended to check the condition of the sensor. You can find it near the heater lamp on the ceiling of the car. The device cannot be repaired. Replacement only.
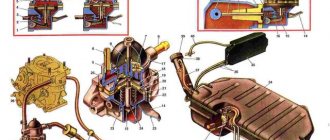
Heater (stove) control circuit for VAZ-2110, 2111 and 2112
Heater (stove) control circuit for VAZ-2110, 2111 and 2112
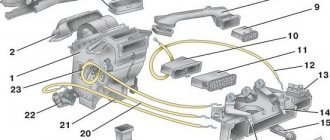
The VAZ-2110, 2111 and 2112 are equipped with an automatic heater control system (AHCS), which itself creates the temperature in the car set by the driver. A kind of climate control without air conditioning, winter version. The brains of the system are controller 3 on a diagram of type 13.3854 with two control knobs. With the left knob we adjust the temperature in the cabin (from 16 to 30 °C), with the right knob we adjust the fan: 0 - off; I - average rotation speed; II - low rotation speed; A - automatically. So, here is a breakdown of the VAZ-2110 heater circuit
1 — fan electric motor; 2 - additional resistor; 3 - controller; 4 — mounting block; 5 — ignition switch; 6 — cabin air temperature sensor; 7 — recirculation switch; 8 — recirculation valve; 9 — micromotor gearbox for heater damper drive; A - to the instrument lighting switch; B - to power supplies
If the heater motor stops working, you should check fuse F18 in the mounting block
SAUO controllers (automatic heater control system). The one on the left - with automatic mode - is a primitive climate (it is tied to a temperature sensor under the ceiling). On the right is the more common 4-speed. When connected, they are compatible with the standard wiring of the VAZ 2110, with the exception of the misalignment of the MMR sensor (you just need to transfer + - on it).
Design Features
For the VAZ 2110, it is possible to install two types of stoves - new and old. Regardless of the engine used (injection or carburetor), there are no fundamental differences in the designs of the stoves.
But what is the difference between the new and old type stoves? Let's try to figure it out.
- Radiator design. This is the main difference between the devices. Therefore, when replacing a radiator from an old one to a new one, be sure to take into account the installation nuances;
- The controller knob on stoves is slightly different. Old-style heaters have a main problem - they have been discontinued. They cannot be an analogue for 4 and 5 position controllers, which began to be equipped with dozens of them in the fall of 2003;
- The micro-gear motors for the stoves are different, starting in September of the same 2003. The difference lies in the shaft position sensors (resistors). Therefore, when making repairs, make sure that the devices are truly interchangeable and that you bought old-style resistors for your old stove, not new ones. Otherwise the gearmotor will not work.
Device diagram with all explanations
The operation diagram of the VAZ-2110 stove can tell the motorist about the presence of recirculation in it, in other words, moving air flows circulate inside the car without taking new volumes of air from the street. Thanks to this, dust and unpleasant odors, which are present in large quantities in the street air, do not enter the unit. However, it is worth noting the main drawback of such a system - the windows fog up too quickly. Experts recommend opening windows often (at a comfortable temperature outside). Otherwise, the stagnant air will negatively affect the health of everyone involved in driving this car. Due to the complexity of repair, the gearmotor must be completely replaced in case of malfunctions.
Repair
As we have already noted, the design of stoves on dozens with carburetor and injection engines has practically no differences. Therefore, the repair instructions below are suitable for owners of a VAZ 2110 with both types of power units.
If you are planning to overhaul your old-style stove, we recommend starting with the purchase of a radiator. Use copper as it is more efficient and helps the heater work better.
To carry out repairs correctly, strictly follow the points presented in our instructions and rely on video materials.
- There is a plug on the engine block through which coolant is drained into any container. If you plan to use the same antifreeze or antifreeze again, choose clean containers.
- Next you need to move the frill forward. This process will take quite a long time, so be patient.
- Next, you need to remove the windshield wipers and get rid of as much as possible of everything that could interfere with the repair process.
- Remove the body of your stove. It is divided into two parts, which is important to know in advance. The front part of the stove body is removed directly along with the fan.
- After this comes the stage of dismantling the cabin filter. Check its current status. If the filter is dirty, this is an excellent reason to replace it.
- The next stage involves removing the second part of the housing.
- Loosen the clamps used on the hoses a little. This will allow you to easily remove the hoses.
- Having applied some effort, you can now finally remove the radiator from its seat.
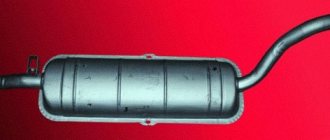
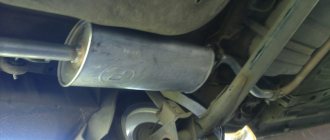
VAZ 2110 heater blows cold, why?
Many owners of “ten” complain that at some point the stove constantly blows cold air and no amount of turning the handles of the automatic heater control system can save the situation. There can be a lot of problems and malfunctions. For example, the ACS controller itself is faulty, the ceiling sensor or micro-geared motor is faulty and simply does not open or close the damper. Another reason is the air (air lock) in the heater radiator, which is simply not capable of heating the air passing through it. Below is a schematic representation of the VAZ 2110 heater device .
Heater dampers VAZ 2110
Often the cause of poor performance of the “tens” heater is the damper of the VAZ 2110 heater . The damper may not close tightly or open poorly. The heater flap itself is made of plastic, which can become warped and perform poorly over time. Many car owners buy a metal damper and change it themselves. How to check the functionality and evaluate the condition of the heater damper? Everything is quite simple, remove the central air duct deflector and there you have it - a damper! Let's look at the photo.
Next, carefully inspect the damper, turn on the stove, turn the controls on the ACS unit and see if the damper works at all. How does it move, does it fit tightly. If she does not respond to commands, then the problem may not be her at all. For one thing, you can see if the lever for redirecting the air flow from the glass to the feet works.
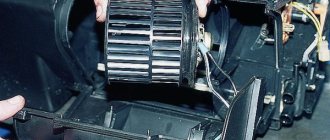
Heater fan VAZ 2110
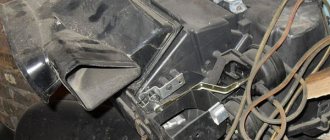
It is quite simple to determine the performance of a stove fan by looking at the noise. If the fan motor burns out, then it naturally will no longer work. However, before rushing to change the stove fan, you need to make sure that the fuse has not blown. As we already wrote above, the fan of the VAZ 2110 stove is located not in the cabin, but in the engine compartment. To get to it, you will need to remove a special apron that separates the engine compartment from the heater housing, vacuum brake booster and windshield wiper mechanism. The actual photo is below for clarity.
So we got to the stove fan, removing the apron and heater casing. By the way, next to you you will see the cabin filter, in the housing a little to the left. It needs to be pulled out and cleaned. If no one has changed the filter before you, over many years of operation it is seriously clogged with debris and interferes with the normal circulation of air, which is sucked into the cabin of the VAZ 2110.
Heater radiator VAZ 2110
The radiator of the “tens” heater is located in the same place as the fan, that is, under the hood (see photo above). To remove it, you must first remove the fan from the heater casing. If you notice a strange smell in the cabin, lift the floor mats; if there are puddles of antifreeze or antifreeze, then the radiator of the VAZ 2110 heater is leaking. Although the clamps may no longer hold... in any case, you will have to disassemble and find out the cause of the leak. Next, we offer a couple of videos demonstrating the process of disassembling, removing the apron, stove fan, cabin filter and heater radiator.
Heater prevention
To prevent damage to the heating unit, it is necessary to follow the preventive measures of the system:
- The refrigerant level in the expansion tank is periodically checked. If there is a shortage, antifreeze is added, the causes of the leak must be eliminated.
- To ensure high-quality operation of the cooling system, only high-quality antifreeze is used.
- The engine temperature must not be allowed to increase. You can monitor this parameter using a sensor located on the instrument panel.
- Water is not used instead of refrigerant, since this liquid has a lower boiling point compared to antifreeze. Using tap water will cause rust and rapid wear of system components. Filling with water is allowed only as a last resort - if a leak occurs, the problem is discovered on the road, and there are no car shops nearby.
Replacing the pipe
I went to the store, bought a set of pipes (in reserve), clamps, and antifreeze to top up. I returned to the garage and began to disassemble. This was my first time replacing this pipe. I knew that it was going to the stove and I also knew that I would have to take a lot of disassembly, plus drain the antifreeze.
First things first. First, I unscrewed several screws and removed the left trim (aka sound insulation). Then I removed the air pipe, loosening two clamps, and also disconnecting the crankcase ventilation pipe.
Next, I proceeded to dismantle the front window trim and removed the wiper arms.
After all the operations performed, I finally saw where the damaged pipe ends. But it is blocked by the heater fan housing.
So we’ll remove it too. It is held on by three screws and two top latches. There were no problems with withdrawal. In one step I cleaned the fan of debris.
I didn’t take out the fan itself, I just moved it a little to the left. And now I had access to the clamp and pipe.