Print this article Font size 16
There is no need to worry; replacing a muffler on a VAZ 2110 is not at all a regular job that will have to be done systematically. Replacing the exhaust system is performed in several situations:
- The muffler begins to make a loud noise;
- Muffler elements burn out;
- Connecting pipes break.
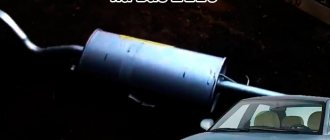
The sound of a burnt out muffler.
On a VAZ 2110, you can replace the muffler with your own hands, which will allow you to significantly save on the services of a service station.
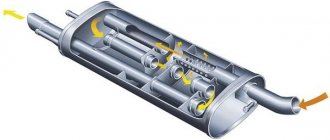
The exhaust system of the VAZ 2110 includes a downpipe (pants), a neutralizer, a resonator and a main muffler.
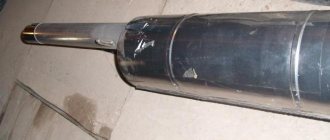
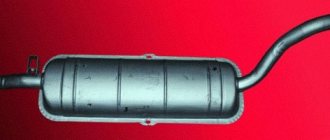
Photo of the new muffler on the VAZ 2110
Today we will tell you about replacing the muffler, as well as the resonator.
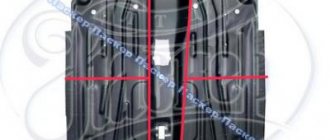
Exhaust system VAZ 2110
Replacing the muffler on a VAZ 2110
VAZ 2110 owners are quite lucky, since replacing the muffler is quite simple and does not require special skills or extensive experience. But you definitely need an inspection hole.
The replacement procedure sequence is as follows:
- The muffler is connected to the resonator through an O-ring on the pipe flare. Plus, the connection is compressed with a clamp, which consists of two parts.
- The clamp must be dismantled, so remove the ring. Since the O-rings used here are graphite, they should not stick to the metal.
- Now the old muffler can be dismantled quite easily.
- Be sure to check the condition of the suspension rubber bands located on different sides of the muffler body. They often end up stretched or covered with cracks. Rubber bands are quite cheap, so buy new ones and replace the old ones with them.
- The new muffler is first mounted on rubber bands, after which it is inserted into the same new graphite sealing ring between the flares. Use a clamp to compress the connection. Ready!
Installing a new exhaust pipe
All work is done in reverse order. But there are several features that you definitely need to know:
- Install a new exhaust pipe.
- A new gasket needs to be installed between the exhaust manifold and the pants.
- Be sure to install a new O-ring between the neutralizer and the pants.
- Tighten the nuts on the exhaust manifold studs. Tighten them evenly in a crisscross pattern.
- Tighten the bolts that are on the spring-loaded connection to the converter.
This completes the repair of the exhaust system. The sound will be muffled as much as possible, the car will become almost silent. It is advisable to lubricate the new gasket with a CV joint type compound. This will improve the seal.
The exhaust system of any car constantly suffers from hot caustic gases, dust, dirt, moisture, impacts, and the VAZ 2110 muffler is no exception. Attempts to repair by applying to through holes help only for a short time, and therefore, you have to think about a major overhaul with replacement.
Muffler device for VAZ 2110
On the “ten” the entire exhaust system consists of separate components:
- exhaust pipe (“pants”);
- neutralizer;
- Lambda probe;
- additional muffler (resonator);
- main muffler.
The most vulnerable and most often in need of repair are. It is not difficult even for a novice car enthusiast to understand the procedure for replacing these parts. Let's try to figure it out together how to gain experience in auto repair and save money.
Replacing the main muffler VAZ 2110
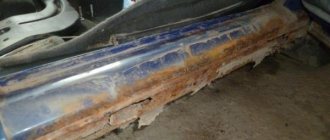
The main signs indicating the need to replace the muffler “can” are the appearance of pockets of through corrosion, fractures of the body and pipes, and severe deformation from impacts. Work should begin when the car is installed on the inspection hole. For a successful start and completion of the operation, a standard set and overalls are sufficient, since the bottom of the car is not the cleanest place.
Muffler 2110 is attached to the bottom of the car on brackets through hanging rubber bands, and to the resonator pipe by means of a bolted connection of two halves of clamps, tightening the flared ends.
Dismantling and installation of the device is carried out in the following sequence:
- the bolts that tighten the clamp are unscrewed (often, due to severe corrosion, the bolts cannot be unscrewed and then they are cut off with a grinder. It is recommended to install a new clamp and bolts each time during repairs);
- the graphite sealing ring is removed;
- the muffler is removed from the suspension rubber bands;
- if necessary, the rubber bands are replaced with new ones (experts recommend doing this);
- the new muffler is suspended;
- a graphite seal is installed at the junction of the pipes;
- a clamp is put on, the parts of which are tightened with bolts.
Changing the resonator
It is also advisable to replace the resonator on a VAZ 2110. This is done after changing the muffler.
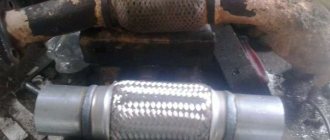
New resonator for VAZ 2110
The work of replacing the resonator is performed in the following sequence:
- The resonator is secured to the muffler with a crimp clamp with an O-ring.
- It is attached to the neutralizer using a floating flange consisting of two bolts and a flare.
- On the opposite side of the element there is a so-called fist.
- Removing bolts is often quite difficult. So that you don't have to suffer, just cut them off with a grinder and buy new bolts. This is the simplest solution to the problem.
- If you couldn’t get a grinder, use a liquid key. This is a popular product among motorists - WD40 or its analogues. Treat the bolt attachment points with this compound, wait a while, after which the bolts should come off.
- After removing the bolts, remove the muffler clamp.
- Remove the resonator from the suspension rubber bands. Check the condition of the rubber bands. If they are worn out, replace them with new ones.
- Take a new resonator, secure them to rubber and connect them to the muffler so that the pipe leading to the muffler from the resonator is parallel to the ground.
- If you notice wear, burrs, or traces of rust on the neutralizer fist, be sure to coat the connection with sealant. Moreover, it must be a high-temperature sealant.
- Armed with new bolts and nuts, tighten the catalytic converter and resonator flanges.
- The neutralizer is fixed to the resonator with two bolts using a flange connection. The fastening occurs to the states, but there is a receiving pipe, using a spring-loaded connection and two flares. The space between them contains a sealing ring made of graphite or metal asbestos.
How can I fix the problem?
So, the place of gas breakthrough through the muffler has been detected, you just need to make a decision about replacement or try to repair the unit. Often the holes in the body are small, and in this case it is not always advisable to buy a new muffler. It is necessary to remove the unit from the car and show it to a welding specialist, who will tell you whether it can be repaired.
The craftsman will cut out the rotten part of the body, shake out the remains of the burnt partitions from the inside and apply a patch of new metal. Fistulas that occur at the points where the pipe is connected to the body must also be eliminated by welding. The only caveat is that these repairs solve the problem only temporarily. Such a muffler will not serve for a long time, and it may perform its function poorly; due to the lack of partitions, the sound will break through.
If it is decided that the muffler needs to be replaced, then you need to select and purchase it. New elements are made of black or stainless steel, so the choice is limited. The latter last much longer than black ones, but their cost is higher. In addition, welding work in case of repair of a stainless steel body will be more expensive. When purchasing a new muffler, it is worth purchasing a new set of suspension rubber bands, as well as a graphite O-ring. It is installed at the junction of the resonator and muffler pipes.
Replacing the neutralizer
As you can see, the exhaust system of the VAZ 2110 car is designed quite standardly, its repair is not difficult even for a motorist with little experience.
When changing the muffler and resonator, it is likely that you may need to replace the converter. This operation is simple and can be done in a few steps.
The neutralizer serves to dampen vibrations from the engine and prevent them from occurring in the exhaust system of the domestically produced VAZ 2110 car.
If it needs to be replaced, it is done like this:
- If the old springs and bolts are intact and have no obvious damage, you can continue to use them. They show characteristic signs of wear, be sure to buy new elements.
- The ring should be replaced in any case, no matter how well the old one is preserved. If gases begin to leak through the old ring, this will lead to very rapid wear and damage to the converter flare and the exhaust pipe.
- After installing the neutralizer, new bolts are put on, they are carefully but firmly tightened. Moreover, the first thing you need to do is tighten the bolts that secure the resonator.
Typical exhaust system faults
Be sure to verify that there are any problems with the exhaust system before starting any repairs. And identify the node that has become unusable. Any breakdown reveals itself with the following signs:
- Broken connecting pipes. As a result, the integrity of the entire system is compromised and exhaust gases are not properly purified.
- Burnouts on the elements of the main muffler and resonator. This leads to the fact that the exhaust gases are not cleaned, and an extraneous sound appears when the engine is running.
- Strong noises appear from the exhaust system and the main muffler, indicating that there is damage.
If small cracks appear in the VAZ-2110 exhaust system (8-valve injector), then in the early stages they can be healed using sealants. This measure will increase the service life of the elements slightly, by no more than one year.
Replacing pants
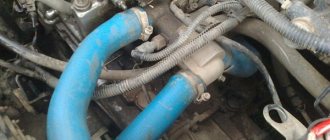
Trousers
The exhaust pipe, also called pants (due to its appearance), is attached to the manifold using studs and nuts. Its fixation with the neutralizer is carried out by a spring-loaded connection.
- Remove the exhaust pipe, paying special attention to its attachment to the manifold. Studs are used here, not bolts. They are screwed into the manifold, and connecting nuts are screwed onto them.
- If the pin is damaged, it will be extremely difficult to replace it. Therefore, it is important to try to keep the old one intact and safe.
- Treat the nuts with WD40, a product we all know. This will allow you to avoid using excessive force and keep the studs intact. If that doesn't work, the studs are drilled out. The process is complex, lengthy, and requires experience and skill.
- There is a gasket between the manifold and the pants that needs to be replaced. Also install a new converter o-ring.
- Now firmly press the exhaust pipe using the nuts. To do this you will need to compress the gasket.
- Then tighten the bolts of the spring-loaded connection with the neutralizer of your VAZ 2110.
As you noticed, there is nothing complicated in this work. Each element is quite easily dismantled and a new one is installed in its place. Just be careful, act carefully and consistently. Plus, of course, do not forget about the importance of the quality of new parts. Buy only good spare parts that will ensure long-term and efficient service of the exhaust system on your VAZ 2110.
Removing the exhaust pipe
Most drivers call the exhaust pipe “pants”, since the element is very similar to this item of clothing. It is secured to the exhaust manifold using bronze nuts and studs. The trousers are attached to the neutralizer using a spring-loaded connection. There is a gasket between the exhaust manifold and the pants to prevent gases from leaking.
Dismantling the intake pipe is carried out as follows:
- Using a 13mm wrench, you need to unscrew the nuts that secure it to the exhaust manifold. If there are metal plates with bent edges under the nuts, they must be bent. Please note that the connection uses studs that are screwed directly into the manifold.
- If the stud is damaged, replacement is quite problematic. Therefore, it is necessary to carry out all work carefully to keep the threaded connection intact.
- Be sure to allow the engine to cool before starting work, then apply penetrating lubricant to all threaded connections. With these simple steps, you won't have to use too much force, which will save your studs. If you break a pin, it will need to be drilled out. Before this, the exhaust manifold must be removed. Moreover, if you damage the exhaust manifold, replacing it will cost you a pretty penny. The cost of a new one is more than 2000 rubles.
- After unscrewing all the nuts, it is necessary to move the exhaust pipe to the side and remove the gasket.
- Unscrew the bolts that connect the exhaust pipe to the converter.
This completes the dismantling of the exhaust pipe of the VAZ-2110 exhaust system.
Composition of the output unit
The exhaust system for a VAZ 2110 car consists of the following elements:
- Exhaust manifold;
- Lambda probe;
- Receiving type pipes;
- Neutralizer;
- Two mufflers: main type and additional.
Not all exhaust components are disassembled; some parts, such as the converter, as well as both mufflers, are replaced entirely.
Description of individual components
To make the structure of such an element as the discharge system clearer, it is necessary to give a detailed description of all components:
- Neutralizer. A unit designed for effective purification and suppression of emissions of harmful substances into the environment. When driving, a car produces substances such as non-combustible hydrocarbons, oxide compounds of nitrogen and carbon. The work of this system is aimed at eliminating them. The design itself is a combination of two ceramic-type components. The surface of these components is coated with special afterburning catalysts, which include rhodium, palladium and platinum. These substances make it possible to purify exhaust gases emitted into the environment by almost 100%;
- Lambda probe. It is a special sensor whose task is to control the composition and amount of fuel that enters the engine. The lambda probe thereby controls the purifier. If the lambda probe does not work properly, then the entire output assembly will quickly become unusable, after which it will have to be replaced;
- Reception pipe. Designed for forced removal of exhaust gases from the cylinders of a power unit. The pipe is made of stainless steel, and its fastening to the collector is carried out using special pins, of which there are four in total. The studs guarantee reliable fastening of the two outlet pipes and the element. In order to combine the exhaust pipe and the neutralizer, as well as an additional muffler, hinged fasteners are used;
- An exhaust manifold. A component that is cast from pure cast iron. The manifold is secured with four studs in the exhaust pipe. Heat-resistant gaskets reinforced with metal are installed between the manifold and cylinder heads.
- Silencers. Necessary for effectively suppressing the exhaust rate of burnt gases. This is necessary in order to significantly reduce the noise level in a type of transport such as the VAZ 2110. The distribution device in this part of the unit is carried out as follows: the additional one is followed by the main one. These two components are connected to each other by clamps and sealing rings and are covered with a special casing on top.
Nuances of operation
There are some points that need to be taken into account when operating the VAZ 2110 system:
- Under no circumstances should the vehicle be refueled with leaded fuel, as this will cause damage. It is very sensitive to lead compounds;
- When operating a VAZ 2110 car, you also need to monitor the proper, precise operation of the ignition, since its poor-quality operation leads to the neutralizing part being removed from its working condition. Fuel that does not burn when a spark passes during ignition enters the converter and burns out there. For this reason, the ceramic coating of the component quickly deteriorates;
- Frequent malfunctions will sooner or later lead to complete or partial blockage of the output system, in turn to the failure of the engine and its repair or replacement will be required.