Sometimes, during long-term operation of a car, its owner is faced with the fact that there is no charging for the VAZ 2114, that is, the battery does not charge when the generator is running. This situation is quite unpleasant, because the battery may be completely discharged, as a result of which the car simply will not start at the right time. Why this can happen and how to get out of this situation will be discussed below.
VAZ 2114 battery charging lamp
Theory of the issue
While the car is moving, a dead battery receives a charge voltage of 13.6 to 14.2 V. For the correct and stable operation of all systems in the car, these voltages must be maintained until the engine starts and the crankshaft rotates. Together with the motor, torque is supplied to the generator through the drive belt. At this moment, an amount of energy is generated that will be sufficient for the stable functioning of all systems and to maintain a charge on the battery.
The internal combustion engine can operate in different modes. At the same time, the number of revolutions on the crankshaft changes. The number of revolutions of the pulley also changes, this leads to an increase in the voltage produced by the generator.
To maintain a level of 13.6-14.6 V in the on-board network, there is a special relay in the excitation circuit. It regulates the voltage level. When the rise exceeds the normal value, then the current supplied to the winding will decrease.
At the same time, the magnetizing force of the rotor also decreases. This leads to a decrease in output voltages.
If the generator does not charge, then in most cases the reasons must be sought in the excitation circuits, as well as in the output voltage circuits from the generator to the battery. But this is not always the case. Sometimes problems are related to the generator itself.
When the driver turns the key in the lock, the relay in the ignition system also starts at the same time. “Plus” flows through the relay and fuse in the mounting block. Next, the voltage passes through the on-board network, reaching the battery charge lamp and charge sensors.
It then passes through diodes, relays, elements in the mounting block and finally to the connector in the generator. There, electricity comes to the relay-regulator and, passing through brushes and slip rings, enters the exciting winding.
As the crankshaft speed increases, the phase stresses increase. Then, through a diode block, they increase the voltage on the excitation winding and on the diode of the control lamp. When the output phase voltage reaches 12 V on both terminals, the voltage will be equalized. Due to the lack of voltage difference, the control lamp will go out. In this case, the generator produces a voltage that is higher than 12 V.
[custom_ads_shortcode1]
Troubleshooting - where to start
The first thing you should check is whether there is an overload in the on-board network. Of course, if your car has nothing installed other than a standard radio, then you don’t need to do this, but if you are a tuning enthusiast, then you should start checking with this option.
In order to check the load on the network, you will need to at least visually estimate the number of additionally installed light and sound devices, as well as compare their total power with the power of the generator.
If it ultimately turns out that these two values are approximately equal or the power consumption even exceeds the generated power, then you will need to remove some devices (what exactly to “sacrifice” is up to you).
After this procedure, you will need to start the car and check the operation of the generator. If the battery starts to charge, then the reason was precisely the overload.
The fact that the power generated by the generator is not unlimited should always be remembered when connecting new electronic devices to the vehicle’s on-board network.
The second thing you will need to check is the compliance of the generator and battery installed in the car. Thus, some motorists who install additional equipment on their cars also install batteries with increased power, thinking that they will be able to provide energy to all newly installed devices.
In fact, this is far from the case. If the power of the battery exceeds the power of the generator, then the latter simply will not be able to fully charge it, which will only increase energy losses in the on-board network. This should always be kept in mind.
How to determine that the generator is not charging the battery
The easiest way to check that the generator is not charging (VAZ-2110 is no exception) is by looking at the dashboard. There is a control lamp on it. Classic VAZ models also have a voltmeter.
The arrow should be in the green zone, and the control lamp should be in normal mode (when everything is in order, it does not light up). If this is not the case, then charging does not occur. It is worth considering the problem in detail.
A better and more accurate way to help determine that the generator is not charging is to check the voltage at the battery terminal with a multimeter. If there is a charge, then the device will show from 13.6 V to 14.6 V. If there is no charge, then the readings will be from 12 V and below.
[custom_ads_shortcode2]
Why does the battery sensor light up on a VAZ-2114?
The lack of charging indicated by the indicator can occur for various reasons, so the problem of identifying the fault is not as simple as it might seem. In such cases, inexperienced car owners rush to visit a service station, and some even go to the store, confident that the battery has served its purpose and it’s time to replace it with a new one.
Both the first and second cases cannot be called the right decision - the battery is not always the culprit for the battery light on the VAZ-2114. Well, a visit to a service center or service station is guaranteed to cost you a pretty penny, even if it’s a blown fuse.
Knowing the main reasons for the appearance of a non-extinguishing indicator with a picture of a battery will help even novice drivers fix the problem on their own, thereby avoiding time and financial losses.
Fuse
We have already mentioned that the culprit may be a blown fuse that protects the charging circuit from short circuits and power surges. On the VAZ-2114 this is the F16 PP, which is responsible for all the light indicators on the dashboard. Solving the problem, as you understand, does not require high qualifications.
Break of "zero"
A break or short circuit in the neutral wire, like any other section of the wiring in the generator-battery circuit, can also cause the battery to not charge. So if the battery icon is lit on the instrument panel of a VAZ-2114, and checking fuse F16 did not give any results, make sure that the wiring is intact through a visual inspection, or even better, by testing it. As in the previous case, high qualifications from the performer are not required to perform this operation.
Weight
Lack of normal contact with ground is another common reason for the low battery warning light to come on. The contact may simply weaken due to vibration, and rust, which is a dielectric, may form on it, so when inspecting the condition of the wiring, be sure to evaluate the contact group as well. The problem is eliminated by stripping and tightening the connection, which can also be done using a simple plumbing tool.
Oxidation of contacts
Since we are already talking about wiring, it should be noted that not only wire contacts can oxidize - battery terminals are no less susceptible to this, even though they are lead. The reason here is obvious - if the battery is removed quite often (for example, for charging), then when installing it in its original place, drivers do not always tighten the contact clamp as expected. As a result, moisture accumulates in the cracks, which leads to rapid oxidation. Regardless of where the contacts have oxidized, they must be cleaned with sandpaper, and if it is missing, with a knife or even a flat screwdriver, but the highest quality and most effective way to get rid of corrosion is a special liquid WD-40.
Egnition lock
So far we have looked at causes related solely to wiring problems. The ignition switch is also a link in the electrical circuit between the battery and the generator. So simple wear and tear of the ignition switch is another reason why the battery indicator lights up on the instrument panel of the VAZ-2114. But, unlike previous cases, diagnosing this breakdown is much more difficult.
Problems with the generator
The second group of faults that cause the battery sensor to light up is related to the operation of the generator itself.
It is he who is responsible for supplying electricity to all consumers, while part of the generated electricity goes to recharging the battery.
The most common reason leading to undercharging of the battery is a weakening of the belt tension, as a result of which it begins to slip. The efficiency of the generator decreases, regardless of the engine speed. The problem is solved by tightening the belt, and if defects are detected, by replacing it.
In second place you can put brush wear. Checking their sizes requires the appropriate skills, not to mention replacing them, so this operation cannot always be performed independently.
Wear of the generator bearings can also cause a drop in its output power and a constant undercharging of the battery. Typically, this malfunction is indicated by the appearance of extraneous sounds in the area where the generator is located. Replacing bearings requires dismantling this unit.
But a broken winding is more difficult to detect, and this problem will most likely require replacement of the generator.
Voltage regulator
The battery is charged while the car is moving, not constantly, but as needed. The voltage regulator is responsible for controlling the charge level, and if it breaks down, either an increased current will be supplied to the battery, which can lead to boiling of the electrolyte and rapid wear of the battery, or charging will not occur at all.
So if the fuel-injected VAZ-2114 is not charging the battery, you should make sure that the relay regulator is working properly.
The battery does not hold a charge
Finally, a constant light or flashing of the indicator may be a consequence of the poor condition of the battery itself, which, due to old age, is simply not able to hold a charge. In this case, the voltage at its terminals will not rise above the level that is perceived as normal.
As you can see, the lack of battery charge can occur for various reasons, not all of which can be identified quickly and eliminated just as quickly. In any case, ignoring a malfunction signal can result in complete failure of the battery, even a relatively new one. Considering the high cost of car batteries, this scenario can hardly be called desirable.
Generator overload
If the battery is charging, but the voltage is insufficient, it means the generator is overloaded. This is facilitated by the installation and connection, in addition to standard electrical equipment, of various gadgets that require electricity. The generator is operating at the limit of its capabilities.
Modern drivers love various car tunings. Thus, serious music systems, powerful lighting and other equipment are installed. Someone also increases the battery power.
So, with a 70 Ah battery, the standard VAZ generator cannot fully charge it. It just doesn't have enough power. As a result, the generator provides little charge.
[custom_ads_shortcode1]
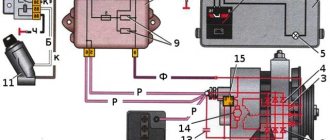
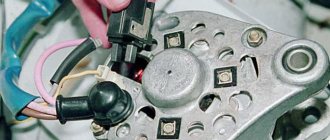
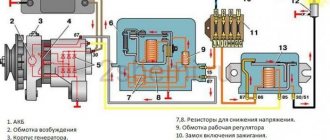
Charge circuit design and diagram
The technical condition of the main components of the car is displayed on the instrument panel. Thus, the performance of the vehicle depends on the reliable operation in any weather of the electrical equipment power system. It consists of a generator, battery, fuse F16, terminals, connecting wires and a control light. A defect in one of these elements is the reason why the VAZ 2114 injector lost charging.
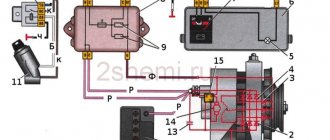
Functional diagram of the VAZ 2114 car charging circuit
At the initial moment after turning on the ignition key, sufficient voltage is supplied through the light bulb and the isolation diode (terminal D) to excite the generator. Further, during rotation, mechanical energy is converted into electrical energy.
Poor or weak contact
Contact is weakened if the brushes and slip rings on the rotor are covered with dirt and oil. The culprit is also considered to be the shrinkage of the spring, which puts pressure on the brushes. Often the brushes get stuck. All this causes an increase in excitation resistance, and sometimes even a circuit break.
It helps to cope with this problem by cleaning dirty elements with a rag pre-moistened with gasoline. If the brushes are very worn, they are replaced. Oxidized rings are cleaned with glass sandpaper.
[custom_ads_shortcode2]
Causes of malfunction and ways to eliminate them
And finally, everyone should definitely remember that batteries are equally afraid of both overcharging and fairly deep discharge. In this case, in the first option, intensive oxidation, shedding, and destruction of the material of the positive plates begins. In another case, the paste floats off their negative lattices.
The recharging of the batteries itself can begin while the car is running, if the electrical systems were faulty, or during ordinary stationary charging, when you slightly missed the moment when it had already begun to intensively decompose water. So be very careful!
Breaks in the winding
If there is a break in the excitation winding, then the generator does not charge. This is determined simply. It is enough to touch the generator with your hand.
If the winding breaks, the device will heat up. To diagnose more accurately, the end of the excitation winding is disconnected from the brush and connected to a terminal on the generator. The measurement is carried out using a multimeter from the battery.
If there are breaks, the multimeter will not show anything. If a signal lamp is used instead of the device, it will not light up. In order to find the problematic coil, wires from the battery are connected to each of them in turn.
If the break is inside, the coil is replaced. External breaks are removed using a soldering iron.
[custom_ads_shortcode3]
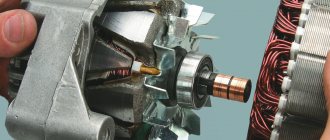
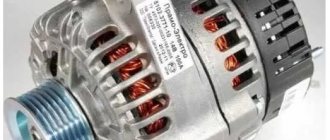
The operating principle of the VAZ 2109 - 2114 generator.
In order to understand why on the VAZ 2109 - 2114 the generator gives little charge or does not charge at all, you need to understand how it works and know the principle of its operation.
The generator consists of five main parts shown in the figure below: armature - 5, stator - 6, relay-regulator paired with brushes - 10, diode bridge - 9, housing - 3.7.
The operating principle is as follows:
- a positive wire goes from the battery to the diode bridge (9) and the diode bridge (9) is connected to ground through the housing (3.7) of the generator
- voltage through the diode bridge (9) is supplied to the stator (6) of the generator and a magnetic field appears in the stator
- when the car starts, the engine, using a belt drive, turns the generator rotor (5)
- in the rotor (5), rotating in the magnetic field of the generator (6), a current appears
- The current is removed from the rotor by brushes (10) and through a relay-controller (10) is supplied to the car battery.
Failure to comply with any of the points leads to a malfunction of the VAZ 2109 - 2114 generator.
Short circuit to the rotor housing
In the event of this malfunction, the entire field winding will be closed and the generator will not be able to operate. Often, short circuits to the frame occur in places where the ends of the winding are connected to the slip rings on the rotor. You can check this using a 5 V lamp.
To check, the wire should be connected to one of the slip rings, and the second to the rotor core or its shaft. In the event of a short circuit, the lamp will light up. This generator is faulty.
[custom_ads_shortcode1]
Failure of the control relay
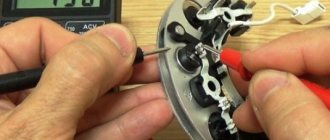
If during the check it turns out that the load on the on-board network is normal, and the generator itself is fully operational, then you should pay close attention to the VAZ 2114 generator relay. Failure of this device very often leads to problems with the mains voltage and lack of charging to the battery. In order to check the functionality of the relay (which, by the way, is located on the back of the generator and is painted black) you will need a multimeter.
The check itself is performed as follows:
- Set the tester to voltmeter mode.
- Measure the voltage at the battery outputs with the engine not running - it should be between 12.5 and 13 volts.
- Start the engine and re-measure the voltage on the battery - now it should be around 14 volts, and sometimes even a little more.
- Turn on the consumers (for example, high beam) and measure the voltage at the battery for the third time. It should now be less than 13.2V, and ideally around 13.9V.
You can also check the functionality of the removed relay.
This is done like this:
- connect the negative of the relay to the negative of the battery;
- We connect outputs B and B of the relay to the battery positive;
- We connect a 3 Watt light bulb to the brushes installed in the relay block using wires. If it lights up, then the relay is working properly.
If during the test it turns out that the relay is faulty, it should be replaced.
The whole procedure is performed as follows:
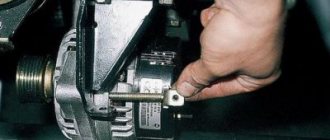
- Disconnect the terminals from the battery.
- Unscrew terminals 10 with a wrench and remove the positive wires going to the generator.
- Pull off the “chip” with a thin wire.
- Remove the back cover of the generator by unbending the 3 clips.
- Remove the 2 screws holding the relay.
- Unplug the plug from the relay and remove it.
- Install the new relay in the same order, but in reverse order.
This option for removing the relay is the most convenient, although in some cases it can be removed together with the generator. How it will be more convenient to carry out this procedure in each specific situation is up to the driver to decide.
VOLTAGE REGULATOR
It is not difficult to find where the VAZ 2114 generator relay is located. This device is located at the back of the generator itself under a plastic cover. Where is the charging relay located on the VAZ 2114 - a question for backfilling. The fact is that the charging relay, generator relay and voltage regulator on the VAZ 14th are generally one and the same single device. It is also called a relay regulator.
What happens if the voltage in an electrical circuit drops below 13.2 Volts? The battery will stop charging, and after a fairly short period of time the starter will no longer have enough power to crank the engine to start. What if it is over 14.7 Volts? Then elements of the electrical circuit may fail, for example, the radio or one of the engine sensors (mass air flow sensor, phase sensor, etc.) will burn out.
The charging relay on the VAZ 2114 looks like a large black tablet, at the end of which there are two graphite brushes (brush assembly). If there is little or no charging, the voltage regulator is checked.
DIAGNOSTICS OF RELAY REGULATOR
Checking the functionality of the generator on a VAZ 2114 always begins by measuring the voltage of the on-board circuit with the engine running. The most convenient way to measure is with a digital multimeter:
Checking the generator voltage regulator can also be carried out on a removed device. The device assembled with the brush assembly is checked. For this:
There is another way to check the operation of the voltage regulator - when you need to check what the regulator's response threshold is at the upper limit. To do this, we increase the voltage in the circuit, for example, in parallel we add two or three 1.5 V AA batteries to the circuit. We need to increase the voltage to more than 16 volts, we connect everything else according to the same circuit. In this case, if the charging relay is working properly, the lamp should no longer light up.
Summarizing the results of both checks, we draw the following conclusions:
REPLACEMENT
The convenient location of the VAZ 2114 voltage regulator makes it quite easy to change without removing the generator itself.
We proceed as follows:
You can replace the relay regulator by removing the generator; here everyone chooses the method that will be most convenient.
OTHER REASONS FOR NO CHARGING
If the battery is not charged or is insufficiently charged, in addition to a faulty voltage regulator, there may be other reasons related to the generator:
- The belt is poorly tensioned;
- Poor contact or break in the wires supplying power;
- Faulty rotor or stator winding;
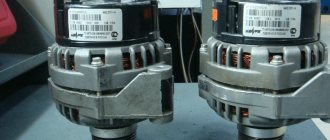
- Poor contact of the brushes with the rotor commutator, the brushes are simply worn out.
New and worn alternator brushes
should the charging rate be 13.7-14.8 correct?
Good evening. 14.8 is a lot. It will be fine for winter and short trips, but over long distances the battery will boil out. The norm is 14.2. And the fact that it drops to 13.3, you need to measure what it gives directly at the generator. If it differs from what is on the battery, then the problem is still in the contacts. And if it doesn’t differ, then the problem is in the generator. And additional a diode is not a solution, it will raise too much.
The generator itself shows 14.1 to 14.2 when measured with a multimeter. The battery shows more, 14.5.
How can this be? In any case, the generator produces more than what reaches the battery. Maybe you're not measuring correctly? You measure between the generator terminal and the battery positive, then between the generator housing and the battery negative. Then turn on a load such as headlights and heated rear window and check again. What indications will there be? Ideally it should be zero.
The generator itself shows 14.1 to 14.2 when measured with a multimeter. The battery shows more, 14.5.