Many car owners are faced with a situation where, after starting the engine, the on-board computer or one of the devices begins to show that the battery is being recharged.
The consequences of this situation are very different and depend on how much the voltage in the on-board network exceeds the nominal one.
Slightly increased parameters will only negatively affect the battery (boiling of the electrolyte followed by its evaporation), but if the voltage coming from the generator greatly exceeds the norm, then electrical consumers may fail.
In any case, overcharging is a phenomenon that must be eliminated, otherwise it will not have the best effect on the service life of the battery and electrical appliances.
Next we will look at why the generator produces a higher voltage of 16, 17 volts into the car’s on-board network, the reason why U jumps and how to eliminate them.
We make a backup wire from the generator to the battery with our own hands. NO to waste!
This article will be of interest not only to car audio enthusiasts, but also to ordinary amateur motorists. Many people are faced with this problem when, when they turn on the stove, headlights, air conditioning and other electrical consumers, the voltage in the network is loaded, the voltage decreases and there is a “drawdown”. The generator begins to wear out.
There is one very good way to help the generator - to power the backup wire from the generator to the battery. For some unknown reason, the original wires are thin, especially on domestic cars. When the load is high, these wires cannot supply a large amount of energy to the battery.
A wire with a cross-section of 25 squares is perfect.
KG markings (aka welding)
and PV3 (comes in different colors, usually yellow and blue)
Also, to the positive wire, as safety against short circuit (short circuit), you need to install an 80A fuse (with a cross section of 25 square meters)
If we duplicate the positive wire, then the negative wire requires similar duplication from the battery to the car body.
Sometimes such an installation increases the voltage by 0.7 volts
This will make the generator's work much easier.
Turned on the heater, headlights, heated rear window:
It would be nice to protect the wires with cable corrugation.
Source
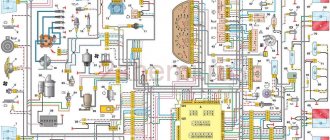
Electrical equipment VAZ-21074
- 1- block headlights;
- 2- side direction indicators;
- 3- rechargeable battery;
- 4- starter activation relay;
- 5- carburetor electro-pneumatic valve;
- 6- carburetor microswitch;
- 7- generator 37.3701;
- 8- gearmotors for headlight cleaners*;
- 9- fan motor activation sensor;
- 10- electric motor of the engine cooling system fan;
- 11- sound signals;
- 12- ignition distributor;
- 13- spark plugs;
- 14- starter VAZ-21074;
- 15- coolant temperature indicator sensor;
- 16- engine compartment lighting lamp;
- 17- low oil pressure indicator sensor;
- 18- low brake fluid level indicator sensor;
- 19- windshield wiper gearmotor;
- 20- carburetor electro-pneumatic valve control unit;
- 21- ignition coil;
- 22- electric motor of the headlight washer pump*;
- 23- electric motor of the windshield washer pump;
- 24- mounting block;
- 25- windshield wiper relay;
- 26- hazard warning and direction indicator relays;
- 27- brake light switch;
- 28- reversing light switch;
- 29- ignition relay;
- 30- ignition switch;
- 31- three-lever switch;
- 32- alarm switch;
- 33-plug socket for a portable lamp**;
- 34- heater fan switch;
- 35 - additional resistor of the heater electric motor;
- 36 - indicator lamp for turning on the heated rear window;
- 37 - indicator lamp for insufficient brake fluid level;
- 38 - signaling unit;
- 39- heater fan electric motor;
- 40 - glove box lighting lamp;
- 41 - lamp switch on the front door pillars;
- 42- switch for alarm lights of open front doors***;
- 43- alarm lights for open front doors***;
- 44- connecting block;
- 45- cigarette lighter;
- 46- watch VAZ-21074;
- 47- switch for instrument lighting lamps;
- 48- diode for checking the serviceability of the warning lamp for insufficient brake fluid level;
- 49 - fuel level indicator;
- 50 - fuel reserve indicator lamp;
- 51- speedometer;
- 52 - turn signal indicator lamp;
- 53- indicator lamp for closing the carburetor air damper;
- 54 - battery charging indicator lamp;
- 55- carburetor air damper closed warning switch;
- 56 - instrument cluster;
- 57- econometrician;
- 58- courtesy light switches on the rear door pillars;
- 59 - coolant temperature indicator;
- 60 - tachometer 21074;
- 61- parking brake indicator lamp;
- 62 - low oil pressure indicator lamp;
- 63- high beam indicator lamp;
- 64- indicator lamp for turning on external lighting;
- 65-voltmeter;
- 66- parking brake indicator switch;
- 67- switch for external lighting lamps;
- 68- rear window heating element switch with backlight;
- 69- switch for rear fog lights with on/off indicator*;
- 70 - fog light circuit fuse;
- 71- lampshade;
- 72 - rear lights VAZ 21074;
- 73 - level indicator and fuel reserve sensor;
- 74- pads for connecting to the rear window heating element*;
- 75 - license plate lights.
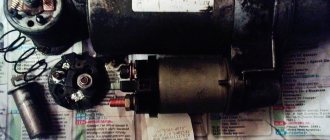
Generator set design
The VAZ-2112 generator consists of covers - front and rear. They are made of aluminum alloy and have special sockets where bearings are installed. On the back cover there is a terminal that is used to connect the battery. It also has a connector. Through it, voltage is supplied to the excitation winding. There is a capacitor on the back cover - it serves to suppress electromagnetic interference. There are places on the device for installing and securing brushes.
The core cylinder in this generator is made of transformer iron. Inside it there are special grooves in which the winding is neatly laid. Also on the cylinder there are leads for connection to the rectifier unit. The covers are screwed to the stator using bolts. The shaft, which acts as a rotor, has an excitation winding. It is connected to copper rings. A special groove is made at the front end of the shaft, which serves to install the drive pulley. The brushes are made in one piece, which is combined with the generator relay. It is housed in a durable metal case and securely attached to the brush holder. The back cover inside holds the diode unit - it includes 6 main elements and three additional ones. They are mounted on aluminum semicircular plates, due to which the diodes are cooled more efficiently. In the car's operating manual there is a diagram with which you can figure out how the VAZ-2112 generator works.
It is also used for repair work.
Method number 1. Minimizing losses
On the path of electric current from the generator to consumers, the greatest losses occur in places of poor contacts. We are talking about the terminals and spots with which the wires are connected. If in such places the contact has deteriorated due to oxide or other dirt, this means that the cross-section here has decreased. And as the cross-section of the conductor decreases, its electrical resistance increases in direct proportion.
Through such contacts, the current flows “worse”; accordingly, the voltage also drops (Ohm’s law works for a section of the circuit). If, for example, on the way from the generator to the battery, all connecting contacts are in poor condition, then low voltage in the on-board network is guaranteed.
In addition to where the conductors connect to automotive equipment, you should also be aware of the conductors themselves. They must have a cross-section sufficient for their section of the chain. Otherwise, there will also be losses on the wires, which, according to the Joule-Lenz law, will be spent on heating them.
How to reduce wire resistance? This is affected by their length and cross-section. We will not consider the material, since today all the wires are copper. If the car's wiring has been repaired and replaced, it is necessary to check whether there are any uselessly long wires that can easily be shortened. As for the cross-section, it is not always possible to judge it by its thickness. And that's why.
The fact is that the wires of the car on-board network are made multi-core. Each of them consists of many thin veins twisted into one conductor. This is done so that the wire has a larger cross-section and, at the same time, remains flexible. During long-term operation, copper strands can break, which is why the cross-section decreases, and the resistance with losses in this area increases. Most often, fractures can be seen at the ends of the conductors, where the protective insulation has been removed from them (in front of the terminals).
As practice shows, all the factors described in this subsection together are capable of reducing the on-board voltage by up to 1 volt. Accordingly, if shortcomings of this kind are eliminated, then on the voltmeter, instead of a sluggish 13.2 V, you can see the optimal 14.2 V. Such an increase will be observed if the case is completely advanced. And so, you can count on an increase in the voltage of the on-board network by several fractions of a volt (which is often not enough).
However, that's not all. In addition to the reduction in voltage, due to the problems described, it drops significantly under heavy loads. For example, when everything is turned off, the voltmeter shows 14.2 V (order). And after turning on the lights, headlights, stove and music, the readings drop to 13 V. So, quite often, after minimizing losses, such a drawdown was reduced by half, or even three.
Principle of operation
The rotor, whose main task is to create a magnetic field, is a shaft on which the excitation winding is located. Each half of it is placed in special pole parts. The slip rings supply current to the winding. The rotor rotates due to a belt drive from the drive. The stator consists of a core and a winding. Here, alternating current is generated, which is sent through the rings further along the electrical network. However, it must first be removed from the frame. In order to supply current to the rings, a brush assembly is used. Then comes the rectifier unit, which converts the alternating sinusoidal voltage generated by the generator. In different cases, different circuits for connecting the excitation windings are used. For example, another separate pair is applied. Current simply cannot flow through the battery if the engine is not running. When connecting the winding in a star configuration, you can increase the generator power by 15%. The generator relay maintains the voltage of the device within the specified limits. It changes the frequency and duration of electrical current pulses. A relay is a set of several sensors and actuators. Their task is to determine how long the field winding should be in the network. If the relay is faulty, then an unstabilized voltage will be supplied to the battery.
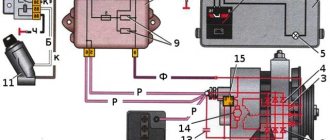
Battery charging circuit
For a general understanding of the reasons for overcharging, first consider the battery charging circuit diagram. And although it is structurally different on different cars, the general principle of construction is the same.
This circuit includes:
- Generator.
- Rectifier block (diode bridge).
- Relay regulator.
- Fuse box.
- Egnition lock.
- Charge indicator lamp.
- Battery
The charging system works using the example of the VAZ 2106 and other cars from the “VAZ classic” series as follows:
- After starting the power plant, through a belt drive, the crankshaft begins to rotate the generator rotor, as a result of which this unit generates electricity.
- Since automobile generators use alternating current, the generated energy goes to the rectifier unit, where alternating current is converted into direct current.
- After the rectifier unit, the electricity is supplied to the relay regulator, whose task is to maintain the voltage in a given range.
- After the regulator, the electrical energy passes through the circuit through the fuse box, the ignition switch and the charge indicator lamp, then returns to the output of the generator, and from there it is supplied to the battery.
The detailed diagram is shown below.
Generator
Home / Repair and operation manual VAZ 2110/2112/2111 / Generator
lite is below normal, then after selecting it from the cell, add high-density electrolyte (1.4 g/cm3).
After adjusting the electrolyte density, continue charging the battery for another 30 minutes to mix the electrolyte. Then disconnect the battery and after 30 minutes measure its level in all elements. If the electrolyte level is below normal, then add electrolyte with a density corresponding to the given climatic region (see Table 7-4). If the electrolyte level is higher than normal, remove the excess with a rubber bulb.
How to find out the charge level of a car battery by its voltage
The simplest method is visual. Today, the degree of charge of the battery can be determined by looking at the hydrometric indicator (as it is called, the “eye”). Thanks to it, the degree of charge of the product is determined without improvised means:
The green color of the indicator indicates that the battery is charged more than 60%; dark color indicates the need to charge the battery; a light color indicates the battery's need for distilled water. You can also roughly determine the performance of the battery using a multimeter by measuring the voltage with the engine off, after leaving it for about 12 hours, as mentioned above. Measurements are carried out at a temperature of +18 C.
Here is a table of car battery charge by voltage:
| Performance level (%) | Voltage (V) |
| 100 | From 12.6 |
| 90 | 12,5 |
| 80 | 12,4 |
| 70 | 12,3 |
| 60 | 12,2 |
| 50 | 12,05 |
| 40 | 11,9 |
| 30 | 11,7 |
| 20 | 11,55 |
| 10 | 11,3 |
| 10,5 |
A mid-priced battery lasts approximately 3 years. If you follow the operating instructions all this time, the battery will not cause you any trouble. One of the main points here is to avoid deep discharge. After the three-year period, control over the battery should be strengthened: at least once every couple of weeks, measure the voltage of a fully charged battery, and, if possible, the density. After 4–5 years, it is recommended to replace the battery with a new one.
Source
Maintaining a generator on a VAZ-2112 car
It is important to service this element on time - it has a large margin of reliability, but sometimes if the service is untimely, it is necessary to repair the car generator. The first step is to clean the outside surfaces of the device.
In addition, during service activities, they check whether the generator is securely fastened. The voltage regulator also needs checking. Experts recommend checking the drive belt. If it is loose, the system will not function correctly. It is recommended to check the VAZ-2112 alternator belt every 10 thousand km of the car - there should be no defects on its surface. Next, check the condition of the bearings. During this operation, it is necessary to remove the belt and rotate the rotor of the device by hand. If during rotation you feel play or jamming during movement, extraneous noise or any other sounds, the bearings are out of order and need to be replaced. For a VAZ-2112 generator, the price of which is about 4 thousand rubles, such parts can be found in any store or market.
Checking the combined relay-regulator of the car
First we will check the combined relay-regulator circuit together with the brush assembly. These are now installed on many foreign cars, and by the way, on many domestic cars (often labeled Y212A).
As you understand, it is necessary to remove the generator and disassemble it, since this combined unit is attached at the back next to the generator shaft, along which these brushes run. For this:
- We look for a special “window” on the back of the generator where the brushes are immersed.
- Unscrew the fastening bolt.
- Remove the brush assembly.
- We clean it - as a rule, it will be covered in graphite dust; the brushes are made of graphite, using special carbon.
Then we need to check it, but for this we assemble a certain circuit, it is advisable to use a power supply with an adjustable load or a charger. We also need to take a regular 12V light bulb from a car, for example from a “dimensions”, we will need wires to assemble the entire system.
We may need a battery, because many chargers do not work without it. But from the wire from the battery we connect the relay-regulator, to the brushes of which we connect a 12V light bulb, this can be done with small alligator clips, the main thing is not to break the graphite elements. A small diagram for understanding.
If you connect everything in a calm state, the light will simply light up and stay lit, this is normal, since the brush assembly is a conductor of electricity from the shaft. Let me remind you that in a calm state, the voltage on the brushes will be approximately 12.7V.
Now we need to raise the voltage on the charger to 14.5 V, the lamp will light, but when this threshold is reached it should go out! That is, 14.5 V is a kind of “cutoff” for a further increase in voltage! If you lower the value, the lamp should light up again. Then your relay-regulator is working, it passed the test.
If the voltage reaches 15 - 16V and the light is on, this means the relay has failed and needs to be replaced! It does not cause a “cut-off” and will help recharge the battery. Here's a simple check. Now a short video on the topic.
What is preferable: repair and modification of the generator or its complete replacement?
In case of minor damage to the device, from a financial point of view, it is advisable to carry out repairs, since it will cost several times less.
The only option for modifying the generator device would be to install an additional voltage relay or upgrade it. But the problem is not always the operation of the regulator.
Modification of the generator control device
Modernization of the regulatory device on the “tens” looks like this:
- To complete the modification, two regulatory elements will be required. One is standard, and the second can be used from a foreign car. The latter should have a power of 14.5 volts.
- The so-called tablet is disconnected from the standard device; as a result, the body of the brush assembly with the brushes themselves should be on hand. After this, a similar part is removed from the foreign-made relay and installed in the body of the standard device. The contact elements of the device are soldered to the relay body.
- Before any modifications can be made, the leads of the components must be bent. This will allow the contacts of the tablets to be adapted to the body of the regulatory element. The part is fixed using ordinary screws. Soldering is done using a soldering iron, and the solder must be done so that the element is completely covered with tin.
- Then the nuts on the parts must be sealed, otherwise during movement they may unscrew randomly when exposed to vibrations.
Numbering, ratings and purpose of fuses
Each of the fuses in the VAZ 2107 can serve one or more electrical circuits of the car. If a fuse fails, a specific device or vehicle system (or several) will not receive power. As a result, a particular device becomes inoperable.
Fuse failure is not always the cause of a malfunction. In many cases, a blown fuse is the result of a component or system malfunction. Such cases include:
- short circuit in the car's electrical wiring;
- burning of contacts and connectors;
- wear of the fuel pump, electric motors of vehicle system drives (windshield wiper, fan);
- malfunction of the electronic engine control unit.
In the event of a failure of any of the vehicle systems, according to the table below and the fuse location diagram, determine the fuse number and its location in the block. If this fuse is responsible for several systems, you should check the functionality of the other system. If it works correctly, the fuse is most likely good and is not the problem. After this, using a multimeter or other measuring equipment, the functionality of the fuse is checked by measuring its resistance (continuity).
Testing the fuse should only be done on a dismantled (removed) fuse. The resistance of a good fuse is close to zero. In most types of fuses, the thread of its working area is visible through the light or is located outside the body part. You can check the fuse visually, but there are often cases of erroneous inspection when the working area has a microcrack.
Fuse box VAZ 2107
Table 1. Purpose of fuses VAZ 2107 (under-hood unit):
VAZ 2107 fuses, which one is responsible for what
Possible faults
Like all other systems in a car, the alternator can also fail. Sometimes repairs can be made and the device will work again. But in case of some malfunctions, only replacing the VAZ-2112 generator will help.
Diagnostics of this unit is performed when increased noise occurs during operation. Often noise occurs due to severe wear of bearings. But often only the bearing located in the front cover fails. It is subject to increased radial loads, so it does not last long. If the drive belt is too tight, this will also affect the rate of bearing wear.
Visualization challenges
Most people have no problem understanding concepts like pressure, quantity, and flow because they encounter them all the time in their daily lives. For example, it is easy to understand that increasing the flow when watering flowers will increase the amount of water coming out of the watering hose, while increasing the water pressure will cause it to move faster and with more force.
Electrical terms such as "voltage" and "current" are usually difficult to understand because you cannot see or feel the electricity moving through cables and electrical circuits. It is extremely difficult for even a novice electrician to visualize what is happening at the molecular level or even clearly understand what, for example, an electron is. This particle is beyond human sensory capabilities and cannot be seen or touched unless a certain amount of it passes through the human body. Only then will the victim definitely feel them and experience what is commonly called an electric shock.
However, exposed cables and wires appear completely harmless to most people simply because they cannot see the electrons just waiting to take the path of least resistance, which is usually the ground.
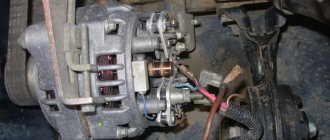
Electrical faults: diagnostic methods
Electrical problems in the operation of a generator can be identified based on several factors. So, among the popular symptoms are lack of charging, reduced charging voltage, or vice versa – increased. Without a multimeter, these breakdowns are determined by their main symptoms. So, the battery charge lamp on the instrument panel will light up or blink. Also, when the engine is running, the headlights shine very dimly, and the windshield wipers operate at a slow speed. Increased voltage will be indicated by boiling electrolyte in the battery and very bright headlights.
Superficial diagnostics can be performed without dismantling work. For testing you will need a multimeter. You need to measure the voltage at the battery terminals while the engine is running. If the device shows 12 V, the generator is not charging the battery. If the multimeter outputs below 14 V with all electrical equipment turned off, then the charge level is insufficient. Experts do not recommend testing the generator by removing the positive contact of the battery. This may damage the relay.
Fuse box VAZ-21074 injector
- 1-Rear window heating relay
- 2-Relay for headlight cleaners and washers (if equipped)
- 3-relay or signal jumper (if there is no external relay)
- 4-relay or jumper for cooling fan
- 5-high beam relay
- 6-low beam relay
- F1-F17-Fuses
- 1 (8A) Rear lights (reversing light). Heater electric motor. Warning lamp and rear window heating relay.
- 2 (8A) Electric motors for windshield wiper and washer. Electric motors for headlight cleaners and washers. Windshield wiper relay. Wiper relay and
- headlight washer (contacts).
- 3 (8A) Reserve.
- 4 (8A) Reserve.
- 5 (16A) Rear window heating element and heating relay (contacts)
- 6 (8A) Cigarette lighter. Portable lamp socket. Watch. Front door open warning lamps
- 7 (16A) Sound signals and relay for turning on sound signals. Engine cooling fan electric motor and motor activation relay.
- 8 (8A) Direction indicators in hazard warning mode. Switch and relay-interrupter for direction indicators and hazard warning lights in emergency mode.
- 9 (8A) Generator voltage regulator.
- 10 (8A) Direction indicators in turn indication mode and the corresponding warning lamp. Fan motor activation relay (winding). Control devices. Battery charge indicator lamp. Indicator lamps for fuel reserve, oil pressure, parking brake and brake fluid level. Parking brake warning light relay. Carburetor pneumatic valve control system
- 11 (8A) Rear lights (brake lamps). Body interior lighting lamp.
- 12 (8A) Right headlight. Coil of the relay for turning on the headlight cleaners (with the high beams on)
- 13 (8A) Left headlight. Indicator lamp for turning on the high beam headlights.
- 14 (8A) Left headlight (side light). Right rear light (side light). License plate lights. Engine compartment lamp. Indicator lamp for turning on the side light.
- 15 (8A) Right headlight (side light). Left rear light (side light). Cigarette lighter lamp. Instrument lighting lamps. Glove compartment lamp
- 16 (8A) Right headlight (low beam). Coil of the relay for turning on the headlight cleaners.
- 17 (8A) Left headlight (low beam).
Examination
It happens that the generator begins to act up ahead of schedule and the battery does not charge properly. Actually, it serves to ensure the operation of the source of electricity to power all cars - the battery.
We advise you to rely not only on our instructions, but also on video lessons that will allow you to carry out repairs and replacements with your own hands, even without much experience.
Troubleshooting
The first step is to determine whether your generator is actually the source of the problem. To check, you need to carry out a series of sequential activities.
- Start the engine and let it warm up to operating temperature.
- Increase the crankshaft speed to approximately 3 thousand rpm.
- Turn on all the headlights, activate the high beams, start the heater, emergency lights, heated glass, and wiper blades. That is, all electricity consumers should be turned on as much as possible.
- Measure the voltage on the battery.
- If the device shows less than 13V, then a short circuit or break has most likely occurred in the generator windings.
- Another option is a breakdown of the voltage regulator, oxidation of the contacts of the excitation winding ring.
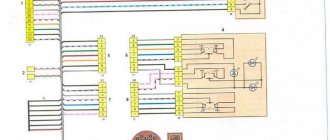
VAZ 21074 engine control system diagram
Wiring diagram of electrical connections of ECM VAZ 21074 - circuit elements. 1 – controller connector; 2 – mass air flow sensor; 3 – coolant temperature sensor; 4 – crankshaft position sensor; 5 – throttle position sensor; 6 – oxygen concentration sensor; 7 – speed sensor; 8 – ignition module; 9 – solenoid valve for purge of the adsorber; 10 – electric fan relay; 11 – electric fuel pump relay; 12 – main relay; 13 – fuse for the power circuit of the electric fuel pump relay: 14 – fuse for the power circuit of the main relay; 15 – fuse link; 16-fuse protecting the constant power supply circuit of the controller; 17 – diode; 18 – idle speed regulator; 19 – nozzles; X1 – diagnostic block; X2 – connection block to the vehicle electrical system.
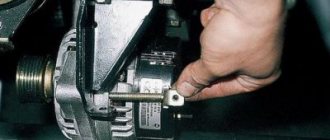
How to remove a generator on a VAZ-2112
For a more serious check, the device must be removed. The generator is held on a bracket on the engine block. To dismantle the installation, you will need keys 10 and 13, an open-end wrench 17, as well as a pry bar and socket 15.
The first step is to remove the terminals from the battery. Then loosen and remove the belt, and then dismantle the belt tensioner mechanism. Next, the wires are disconnected and the connectors are disconnected. The device is held in place by a long bolt and nut. It's not that easy to remove. Therefore, first unscrew the brackets on the motor block with a head. They are located at the back of the unit. Then the generator is deployed, which will help to easily unscrew the axle mount. It is pulled out together with the bushing, and then the axle is knocked out of the bracket.
To watch online, click on the video ⤵
How to duplicate a generator on a VAZ 2107? We crimp the wires incorrectly. We make drawdowns smaller. Read more
DUPLICATION FROM GENERATOR. WHAT DOES HE GIVE? IS IT WORTH DOING?More details
Duplicate generator for VAZ 2107 with measurementsRead more
COMPETENT DUPLICATIONS OF THE GENERATOR for the VAZ 2114! THE WAY TO THE SUB! / Vesta Gearbox and Handbrake! (Episode 28)Read more
INCREASING VOLTAGE ON VAZ / DUPLICATIONRead more
Negative wire on the car, correct connection.Read more
Duplication of wires from the VAZ generator. Will it help or not? Read more
#VAZ#CHARGING#DUPLICATIONVAZ 2107, current loss, weak charging, body weight duplicationRead more
Dubbings. A clear example of why they are neededRead more
Replacement
When dealing with any component related to electrical equipment, you need to start by de-energizing the VAZ 2110. So, we proceed according to the algorithm:
- Disconnecting the battery (remove the “-” terminal);
- Remove the pink wire that turns on the generator. To do this, you need to unscrew the nut from the positive bolt;
- Loosen the upper and lower nuts, and also unscrew the tension bolt, remove the belt;
- Turn the generator 90° and remove the lower mounting bolt;
- Clean all connections, as well as the rectifier housing itself;
- Clean the inside of the ring very thoroughly;
- Replace the generator diode bridge with a new one;
- Reassemble all parts;
- Check the functionality of the generator.
How to identify electrical problems in a car?
The first step is to understand whether your car really has power problems. There are two groups of problems in this regard; roughly, all problems can be divided into problems during startup and strange operation of the electrical network after starting the engine
It is important to distinguish this because different modules are involved in these processes. It’s worth figuring out what symptoms of the car you should look for if the electrical network is not working well after starting the engine:
- the operation of all the lamps in the cabin, as well as the headlights, side lights and brake lights is too dim; this may not be very noticeable, but in reality the difference in brightness is noticeable;
- turning off some elements of the electrical network without permission under fairly heavy loads, for example, when the fan in the cabin is turned on, the music may turn off;
- when revving up at idle, the brightness of the interior lighting noticeably increases for a second, but when other equipment is turned on, the brightness decreases;
- perhaps a barely noticeable or annoying blinking of the light, uneven illumination of the road, rapid failure of light bulbs in various modules of your car;
- a decrease in fan speed is noticeably felt when optics, music or other power consumers are turned on; there may be an incorrect connection in the network.
The problem is that a car owner can easily get used to many such manifestations. And in this case there will be no surprises. You can get used to dim light, poor airflow and other troubles. But in general, this mode of operation is very harmful to your car. Sudden failure of the fuel pump, climate system, poor operation of the automatic transmission and other components is possible.
Brush unit malfunctions
To check the brush assembly, you will need a power source, as well as any 12 V lamp. The power source is connected to the voltage regulator, the lamp is connected to the brush - it should light up. When the input voltage rises to 15 volts, the light goes out. If the lamp burns at a higher voltage, then repair of the VAZ-2112 car generator is necessary. The relay needs to be replaced. As for the brushes themselves, their malfunctions are indicated by a lack of battery charge, too low voltage in the car network, or unstable charging voltages.
The length of the brush should be more than 5 mm. If it is smaller, they need to be replaced. You can also move them slightly in the grooves to check the brushes. Working brushes move freely. If they hang, it is recommended to lubricate them. It is also worth making sure that the slip rings are in good condition - they are checked for wear. If there are marks, the rings are sanded with fine sandpaper. After replacing the brushes, the generator will immediately begin to operate normally. It is important to monitor how the device works and regularly service the VAZ-2112 generator - the price of the unit is low, but with high-quality service, only the brushes will need to be changed.
Why does the voltage drop?
What should be the normal voltage in the on-board network? The voltage in the vehicle's 12 V on-board network should be 14.2-14.4 Volts. This applies to all vehicles, from Zaporozhets to Gelendvagens. This parameter should be present when the engine is running under load.
If there is a voltage drop caused by insufficient battery charge at 12 volts, then when you turn on, for example, optics, this parameter will be below 14 volts. This is because the excitation winding of the generator device is powered by the battery through feedback. And if the battery is not fully charged, the network will not be able to ensure optimal winding current and normal operation of the generator device.
This manifests itself when outdoor lighting is activated and is accompanied by a general loss of electrical circuit power. The lighting may be dim when idling, but when the driver accelerates, the light will stabilize to normal. Therefore, battery diagnostics should be carried out not by voltage when starting the engine, but by the electrolyte density parameter. This will prevent a difference in readings between the electromotive force of the battery and its current.
Note that the voltage of the vehicle’s on-board network may vary depending on the climatic conditions of the region in which the vehicle is operated. If the car was driven from the south, and you live in the north, then a slight drop in this indicator in the car’s electrical circuit is allowed. If a vehicle is using a partially discharged battery, it must be charged, otherwise the entire charge will quickly decrease and the battery will be inoperable.
To know how to increase the voltage in the electrical circuit of a car, you need to understand the reasons:
- Battery malfunction - as practice shows, this is one of the common causes. In order for the battery to replenish its charge after parking, you need to drive the car for about 20 minutes. But if the battery is discharged for certain reasons (for example, due to sulfation of the plates or due to a lack of electrolyte), then this method of replenishing the charge will not help. It is necessary to accurately identify the reason why the battery does not hold a charge and eliminate it - replenish the electrolyte level, and sometimes simply charge it. If you realize that the battery cannot be restored, then it is better to replace it.
- Generator. Incorrect operation of the generator can lead to problems with the on-board network. Before increasing the voltage in the wiring, you need to identify the cause of the malfunction of the generator unit.
- Leakage current. Sometimes it happens that a break in the electrical circuit leads to a current leak. To eliminate the problem, it is necessary to identify the exact location of the leak and eliminate the break.
- Using equipment that is not suitable. If the rating of the electrical appliances used does not match the one set by the manufacturer, this will lead to a voltage drop. If you use powerful lighting lamps or many different gadgets for which the battery is not designed, this will cause a voltage drop. The battery will provide the charge necessary for the normal operation of light bulbs or electronic devices, but it will not have time to be replenished.
Normal voltage indicator in the VAZ-2110 generator
Content
In order for the car to work properly and not fail on the road, the car owner must constantly monitor the technical condition of his “four-wheeled friend,” while paying a lot of attention to the car generator. If the unit fails, the battery will not be able to receive electrical recharging, and as a result, the car will work only from recharging the battery, the reserve of which will be enough for a short period of time.
As soon as the battery supply is depleted, the engine will stop functioning and the car will simply stop, anywhere. In this case, the car owner will have to look for a lot of money to purchase a new generator, as well as to check and install it. But the process of monitoring technical serviceability, in which the most important thing is to monitor what voltage the VAZ-2110 generator should produce when driving, will help save money and know that the car will not let the owner down under any circumstances. If you notice that the generator is working intermittently, then you need to check the functionality of the unit, especially since it is quite simple to carry out such a process yourself, taking into account the advice and recommendations of professionals in their field. However, before work, the car owner must familiarize himself with some rules that will help check the serviceability of the unit without damage.
Source
Diode in the circuit
ATTENTION! A completely simple way to reduce fuel consumption has been found! Don't believe me? An auto mechanic with 15 years of experience also didn’t believe it until he tried it. And now he saves 35,000 rubles a year on gasoline! Read more" Installing a diode with a toggle switch is the easiest way to increase the voltage
There is no need to bother, look for a lot of information in books, etc. Everything is as accessible as possible, no special difficulties.
This option of increasing the voltage, despite its simplicity, gives the most reliable result. Ideally suited for domestic and VAZ car models.
The purpose of this method of increasing the voltage in the vehicle's on-board network is to deceive the regulator, which is located inside the generator. As you know, on old domestic car models (kopek, VAZ 2105, etc.
) the voltage drop sometimes reaches critical values - sometimes it drops to 12.5 volts. The battery, of course, will not be charged at this voltage.
A voltage regulator is the same brushes, a tablet, a chocolate bar - there are many names, but it is the same element that is responsible for regulating the voltage in the generator. On our domestic cars, mostly older ones, the tablets are of poor quality. They do not regulate voltage well, and as mentioned above, sometimes the current value drops below the baseboard.
So, what you need to do is insert an additional diode into the circuit. By this we will achieve the following: by how much the voltage on the diode is reduced, the regulator will increase the total current in the circuit.
There are several ways to integrate a diode. One of the best - remotely. Take a simple toggle switch and install it somewhere convenient.
Obviously, the toggle switch should be routed through the wire to the generator. You can insert the diode into the slot in the generator bridge, in the place where the wiring runs from the excitation winding to the regulator. T.
That is, we simply insert the diode into the wiring between the bridge and the regulator. We connect a separate toggle switch to the diode through two wires, as shown in the photo below.
When the voltage in the on-board network is sufficient, for example, in the summer, the diode is simply installed and not used. If the current is low, just turn on the toggle switch by activating the diode. In this way, we deceive the regulator. The following diodes can be used.
Their analogues, for example, imported ones, are also suitable. They are much more compact, made of plastic (body). Domestic - metal.
Using a diode, you can provide a voltage drop of 0.9 or 1.2 volts.
Thus, if the drawdown reaches 13-13. 6, then approximately 1 volt will be added by the regulator. This is normal for winter loads.
The standard drawdown of the regulator should be up to 13.8 volts, not lower. At this value, the battery can still charge, but if the voltage is lower, it won’t.
A drop in voltage below standard values for modern calcium batteries is especially critical. The fact is that low drawdown kills such batteries; they deteriorate. Naturally, an increased voltage indicator is not recommended.
It should be no more than 14.6 volts (more about this in the table at the end of the article).
Installing a diode in a circuit is a universal solution that gives good results. However, there are some important points to keep in mind:
- Observe polarity when connecting an additional diode. If you break this rule, the battery will not be charged.
- The diode must be selected so as to deliver a current of at least 5 A.
- It is advisable to install the diode outside the generator, as it will get very hot.
- Silicon diodes are considered more efficient. They are capable of taking voltage within 0.8-1.2. But germanium diodes are no more than 0.7 volts.
Other causes of low voltage
A small potential difference in the system is not always associated with a breakdown of the generator or a bad battery. If the diagnosis of these elements does not reveal any problems, then you should pay attention to the following:
- condition of the battery terminals - connection density and oxidation;
- electrical wiring problems - oxidation, violation of its integrity;
- output contacts to electrical appliances;
- correctly selected energy consumers.
Each contact must be tightly adjacent and intact, that is, there must be no formations (for example, sulfation) that will disrupt the flow of current. Incorrect connection of contacts leads to accelerated battery discharge even when the car is not running.
To improve the connection of the elements of the car's electrical system, it is necessary to clean all contacts and restore the integrity of the wires by replacing them or connecting them and wrapping them with insulating tape.
In conclusion, I would like to repeat that stable operation of the car requires constant monitoring of all elements, and the generator should attract special attention. The battery is charged from it and provides electricity to the entire car system. Pay attention to all elements: generator brushes, slip rings, voltage regulator, equipment winding.