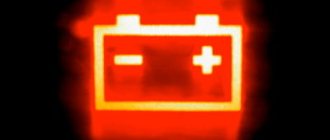
No charging of the VAZ 2109 battery, signs of a malfunction.
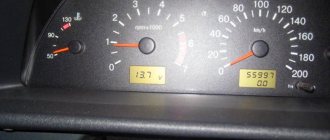
Signs of a malfunction when the VAZ 2109 battery is not charging are a warning lamp with a picture of the battery that does not go out and signs of a dead battery (weak rotation of the crankshaft by the starter when starting, dim light of the lamps). But this is not an indicator of a lack of charging, but only a signal that something is not working properly. There are times when the battery is charging, but the lamp does not go out and the lamp does not light up, but there is no charging. To determine whether or not the VAZ 2109 battery is charging, you need to measure the voltage at the battery terminals. Measurements must be made without load and with the load on. The voltage should not go beyond 13.5 -14.5V. a voltage less than 13.5V indicates that the VAZ-2109 is not charging and it is necessary to find and eliminate the cause.
Features of work
What might a faulty unit look like, how to remove and disassemble the generator, how is it rebuilt? If the device does not charge the injector or carburetor of a VAZ 21099 or 2109, first of all, let's look at the features of its functioning, namely the power circuit.
Generator power circuit
Node power circuit So, what does the circuit include:
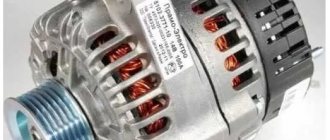
- The VAZ 2109 generator itself.
- Negative diode.
- Additional element.
- Positive diode.
- The warning light also informs the driver that the battery is low.
- Vehicle dashboard.
- Voltmeter.
- The fuse box is installed in the engine compartment under the windshield opposite the driver's seat.
- Resistor elements installed in the same block.
- Ignition relay "nine".
- The castle itself.
- Battery
- Capacitor device.
- Winding.
- Generator voltage regulator relay installed in the engine compartment.
It should be noted that the connection diagram for the VAZ 2109 generator is relevant for all cars with front-wheel drive of the eighth line - both 2108 and 21099 (the author of the video is Semyon Pedan).
Fault options.
The most common malfunction is that the charging indicator light does not go out. If the control lamp continues to burn brightly, then the voltage regulator is faulty or the wire from the control lamp to the generator is shorted to ground. If the control lamp continues to light, but not at full intensity, and lights up brighter as the speed increases, then there is a current leak through one of the additional diodes of the rectifier bridge. At the same time, the generator performs its function, charging the battery and powering consumers.
To check, you need to measure the voltage at the battery terminals with the headlights on high beam and rpm 1200 - 1500. If the voltage is more than 13.5V, then the generator is working and if the lamp burning at full intensity does not irritate, then you don’t have to do anything. Otherwise, you will have to change the diode bridge.
If the voltage is below normal, then disconnect the thin wire from the generator with the engine off and the ignition on. If the control lamp does not go out, then it is necessary to find and eliminate the wire short to ground. If the warning light goes out, then with the engine running, connect the free terminal to terminal 30 (a contact bolt with two thick wires). If charging appears, then eliminate the loss of voltage in the contacts from the control lamp to the generator.
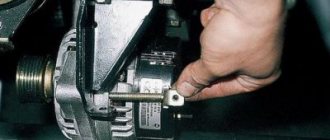
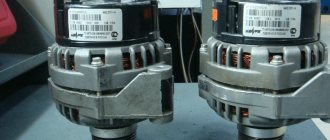
If charging still does not appear, turn off the ignition and remove the brush assembly with voltage regulator from the generator, if the design of the generator allows it, or remove the generator completely and remove the regulator. Check the removed regulator using a test lamp and battery. How to do this is described in the article “Checking the voltage regulator.” If the regulator is working, then it is necessary to remove and repair the generator. The most common malfunction in this case is wear of the armature slip rings. It is also possible that the wire from the slip rings may break.
Diagnostics
The search for a faulty element begins with checking the battery charge level. To measure the voltage at the terminals, use a multimeter or voltmeter. It is necessary to take readings in two modes:
- without load with the ignition turned off and the minus terminal removed;
- under load: by turning the key in the ignition and turning on any consumer (low beam headlights, air conditioning).
The multimeter probes in voltmeter mode are connected in series: the positive terminal is a red contact, the negative terminal is a black one. The normal value of the battery voltage at rest with a 100% charge is 12.05 - 12.6 Volts.
Important! The battery voltage directly depends on the state of charge: if the level is reduced to 10%, then the maximum voltage without load at the terminals will be about 11.3 Volts. The test under load should be carried out carefully, observing safety precautions: when turning on the ignition, do not touch the power terminal and cable with bare hands
The multimeter readings are taken twice: when the engine starts, and after 20-30 seconds. When starting the engine, the power current can reach a peak of up to 670 Amps, depending on the power of the unit. The battery supplies a significant part of the energy to the starter for the initial crankshaft rotation - at this moment the voltage at the terminals drops. A value of 8-9 V is considered normal; if the drop during startup is critical and reaches 6 V, then the battery is completely faulty
The test under load should be carried out carefully, observing safety precautions: when turning on the ignition, do not touch the power terminal and cable with your bare hands. The multimeter readings are taken twice: when the engine starts, and after 20-30 seconds. When starting the engine, the power current can reach a peak of up to 670 Amps, depending on the power of the unit. The battery supplies a significant part of the energy to the starter for the initial crankshaft rotation - at this moment the voltage at the terminals drops. A value of 8-9 V is considered normal; if the drop during startup is critical and reaches 6 V, then the battery is completely faulty.
After measuring under load, the voltage on a working battery is restored within 15-30 seconds. It is measured again, determining the charge capacity. Next, be sure to check the oxides on the terminals, the condition of the power cable for damage to the insulation, and the reliability of fastening the ground wire to ground.
A blown fuse in the mounting block is diagnosed by the condition of the fusible link. In order to determine which of them is responsible for the battery indicator light, you need to use the electrical diagram in the technical description of the car (the location differs depending on the brand of the power unit). The fuse is included in the common circuit and controls several consumers: all indications on the dashboard, cigarette lighter illumination, interior light. Typically this is socket F3, rated at 10 Amps.
The electrical circuit is first inspected, checking the contact fastenings and breaks. If no visible violations could be detected, then the multimeter is turned on in ohmmeter mode and each section is “ringed” separately: from the battery to the generator, from the rotor terminals to the fuse mounting block, the ignition coil and the instrument panel (contacts of the control light).
Why is the battery charging light on?
A faulty relay in the mounting block is tested for voltage with the on-board power supply turned on. The voltage at the relay output must be at least 9 Volts.
The diode bridge and the generator voltage regulator relay are checked with the engine running: at idle, the unit speed is increased to 4000 rpm and the voltage is measured with a multimeter at the rotor terminals. If the indicator is around 14.5 Volts, then the generator components are working properly.
Often the reason for the lack of battery indication is a minor reason: a burnt out light bulb or a poorly secured fuse in the socket. To eliminate the violation, it is enough to move the fallen fuse and put it in place in the socket until it stops.
If the failed element is not installed and the warning light does not light up, then computer diagnostics are carried out, reading error codes in the ECM. To do this, use the ODB-2 connector (under the steering column), a computer or laptop with the program installed, or a special scanner. All errors are recorded by the system in the ECU (electronic control unit) memory log; the structure of the codes is given in the technical description of the car - they are different for all models. Using a scanner or laptop, they decipher the system error and determine the cause of the failure. This diagnostic method provides a complete picture of the condition of all components over the entire period of their operation.
Low voltage on the generator.
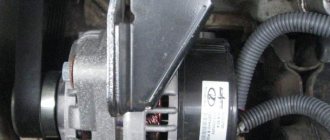
Another common malfunction is when the warning light goes out while the engine is running, but over time signs of a dead battery appear. There may be several reasons for this. The first reason is the breakdown of the main diode of the rectifier bridge. It is detected by measuring the voltage at terminal 30 of the generator with the high beam headlights on and off. If the voltage is normal or close to normal when the headlights are off, but begins to drop when the headlights are on, then the diode bridge needs to be replaced. If a KATE generator is installed, this can be done without removing the generator from the engine. But before changing the diode bridge, pay attention to the belt tension and the condition of the generator pulley. If the bottom of the pulley is shiny, this indicates that the belt is slipping due to pulley wear, which is the second reason for poor charging. In this case, the belt must be replaced, and if the new belt falls into the pulley groove, then the pulley must be replaced. In this case, it makes no sense to pull the belt through the belt. In addition, it can lead to damage to the armature bearings.
Also, weak charging may be in poor contact at terminal 30 of the generator, in the battery terminals, or in the connection of the negative terminal to engine ground. A bad contact at pin 30 can be detected by touch. Just be careful when doing this. The terminal may become very hot. If the terminal does not heat up, then use a voltmeter to check the voltage across all connections with the high beam headlights on. A voltage drop of 0.5 V indicates poor contact.
All the problems described above when the VAZ 2109 battery is not charging can be eliminated independently and in a short time. In addition to those described above, there are many more faults, but detecting and eliminating them requires more in-depth knowledge and much more time. There is no point in dwelling on them here.
admin 10/17/2014
“If you notice an error in the text, please highlight this place with the mouse and press CTRL+ENTER” “If the article was useful to you, share the link to it on social networks”
Causes
By providing voltage, the generator exhausts its resource. Its individual elements wear out over time, resulting in the following malfunctions:
- brush abrasion;
- breakdown of both stator and rotor windings;
- loose or broken drive belt;
- burnout of the diode bridge.
The reason that the generator does not charge the battery well also often lies in a simple break in the wiring or poor contact at the connection points.
If the machine has been in use for a long time, then the graphite brushes should be inspected first. They are always the first to fail. As wear occurs, contact with the rotor rings is lost and the generator ceases to perform its functions. In this case, it is necessary to replace the damaged element with a new one. The price of the brushes is low, and they are sold in virtually any specialized retail establishment.
Bridge failure quite often occurs due to incomplete loss of contact with the stator winding. As a result, the resistance increases, the conductors heat up and the diodes burn out. The entire unit is replaced.
Poor operation of the generator is also caused by a break or excessive stretching of the drive belt. Over time, it loses its elasticity and sags. A new one is installed to replace the damaged one. It is not difficult to check the degree of tension - just press on it with your hand in the central part.
The design of the generator allows, if necessary, to replace any of its main elements. Therefore, if there is a break in the rotor or stator windings, they are replaced with new ones.