Problems with voltage in the on-board network are typical for many AvtoVAZ cars. They worry owners because they damage various electrical equipment to the point of making it impossible to operate the car. Therefore, motorists are interested in the question of how much a VAZ 2114 generator should produce.
In this article we will tell you what the voltage of the generator should be and how many amperes it is designed for. We will also look at the main causes of low and high voltage, their consequences, and ways to check the generator.
How many volts and amperes should the VAZ 2114 generator produce?
The generator of the “fourteenth”, like any other car, is designed to convert the energy produced by the motor into electric current. The electricity it generates powers all the electrical equipment of the car. For normal operation, the generator must have a certain current strength and produce the required voltage.
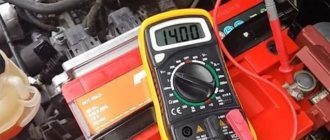
In this regard, many owners are interested in how many amperes the VAZ 2114 generator produces. If the car has a standard part, then it is designed for 90 A. question of how many volts a generator on a VAZ 2114 should produce is no less than 13-13.2 V. On average, this value is 13.6 V. But this is at full load. When consumers are turned off, it is much higher.
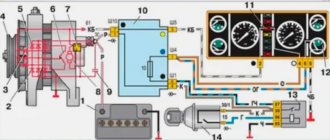
The principle of operation of a generator in a car
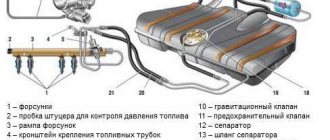
The peculiarity of the generator is that it produces alternating current. Whatever one may say, when operating this electric machine, you can only get alternating current, and only then convert it to direct current. General generator design:
- Back and front covers with pressed bearings.
- Rotor with excitation winding.
- The stator with power windings is where the voltage is removed.
- Diode bridge - three-phase rectifier.
- Electrolytic capacitor - to get rid of the alternating component of current.
- Voltage regulator - necessary for accurately setting the supply voltage of the rotor winding.
- Carbon-graphite brushes are necessary for transmitting voltage from the relay regulator to the rotor winding.
- And the remaining components - brackets, nuts, bolts, belt.
For normal operation of the generator, two components are required:
- Rotation.
- Magnetic field (constant).
It is enough to remember the school physics course - an electric current will appear in the winding only if it is affected by a moving magnetic field. Moreover, the output voltage will depend directly on the magnitude of this magnetic field. This means that the rotor winding is a source of a constant magnetic field, and it is powered through a voltage regulator, therefore, the output will always have the same voltage.
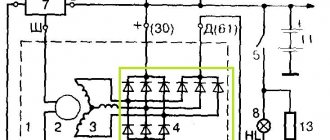
The alternating voltage is removed from the stator winding. Moreover, there are three windings, they are connected in a “star”. Consequently, we get three phases at the output. This is necessary primarily in order to reduce current ripple in the on-board network. With the help of a diode bridge, which contains six semiconductors, the current is rectified. And the capacitor cuts off the entire variable component. According to Kirchhoff's law, an electrolytic capacitor is replaced by a gap when operating in a DC circuit and by a conductor in an AC circuit.
What generator is installed on the VAZ 2114?
Having figured out what voltage the generator on the VAZ 2114 should produce, it’s worth understanding what kind of device produces it. This domestic hatchback is equipped with a three-phase generator type 94.3701 . It consists of a stationary winding or stator, a rotor, rotor bearings, an impeller, and a pulley for putting on a belt. It also has a diode bridge or rectifier, a voltage regulator and a housing.
Russian-made devices of the KZATE brand were installed on the car from the factory. Also, on some cars of recent years of production you can find standard German Bosch. Despite the fact that domestic generators, with proper care, can be used for a relatively long time, foreign-made parts are considered more reliable. Therefore, when replacing, many owners buy products from this or another foreign brand. In addition, sometimes more powerful generators are installed. They are purchased, for example, by car audio enthusiasts, since the factory ones are not designed for such a heavy load.
Useful : Where is the VAZ 2114 generator fuse located?
WHAT IS A GENERATOR?
The VAZ 2114 generator can be imagined as an electric three-phase alternating current machine. It has a built-in rectifier unit that converts alternating current to direct current. The device consists of the following parts:
- Front and back cover made of aluminum alloy. Each of them has slots for installing bearings. On the back cover body there is a battery connection terminal and a connector for supplying voltage to the excitation winding. There is also a capacitor installed on the back cover, which suppresses radio interference; there is a place for installing and fastening the brush assembly;
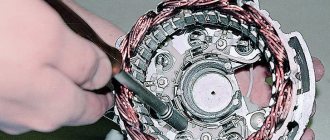
- Stator core cylinder made of transformer iron. Inside it there are grooves for laying the power windings of the generator. They have leads for connection to the rectifier block. Both covers are attached to the stator with four bolts;
- Excitation winding on the rotor shaft. It is connected with its leads to slip rings made of copper, which are installed on the same shaft. The front of the shaft has a keyway to accommodate the drive pulley;
- The brushes of the VAZ 2114 generator are a non-separable unit combined with an electronic relay controller. The relay in a metal case is riveted to the brush holder;
- A block of power and additional diodes is attached to the back cover from the inside. It contains six power and three additional diodes. To cool semiconductor devices, they are mounted on horseshoe-shaped aluminum alloy plates.
Generator set design
SOME OF ITS TECHNICAL CHARACTERISTICS
The generating set provides the following parameters:
- The excitation winding is powered by an adjustable voltage from 13.2V to 14.7V;
- The current strength of the voltage generated by the generator is 80 A;
- The belt deflection should not exceed 8 mm with a load of 10 kg.
The generator is installed on the engine on its left side in the direction of travel of the machine. The rotor rotates right, which it receives using a drive belt from the engine crankshaft.
How to measure generator voltage?
Knowing what voltage the generator should produce, you also need to be able to measure it. Otherwise, it will be impossible to understand that it is too low or prohibitively high. There are two ways to measure voltage. The first one is very simple, but imprecise. The car's on-board computer shows the voltage. Therefore, you can simply look at his testimony. Unfortunately, they are often underestimated. Therefore, you should not rely on these data to accurately diagnose the generator. In addition, sometimes the voltage on the on-board computer fluctuates under load. But this is not always a reason to troubleshoot. Perhaps one of the consumers is too powerful or connected incorrectly. Or is it just a device error.
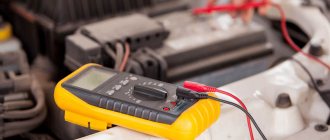
The second method gives the most accurate result. To do this you will need a multimeter and an assistant. The measurement is performed in the following sequence:
- Turn on the ignition and make sure that all warning lights on the dashboard light up as normal;
- Start the car and check that the battery indicator goes out. If the battery icon is on, it means the generator, battery or wiring problems are faulty;
- Warm up the car to operating temperature and turn on all available electrical consumers;
- Take a multimeter and set it to voltmeter mode;
- Ask an assistant to maintain engine speed within 3500;
- The multimeter is connected to the battery;
- Evaluate the measurement result. If everything is in order, the multimeter will show approximately 13-13.2 V or a little more. If the readings are lower, the generator or battery is faulty.
Next, you should carry out the same check with the consumers turned off. With a working generator, the voltmeter will show about 14.5-14.7 V.
To diagnose the generator, you need to connect a multimeter to its terminals. The device should display values in the range of 14-14.3 V. Then you should ask an assistant to increase the engine speed. The voltage of a working generator should not jump by more than 0.5 V. If it changes or was initially lower or higher than expected, the unit needs to be repaired.
HOW TO REMOVE THE GENERATOR FROM THE CAR
It is installed in a special bracket on the cylinder block; there is also a bar for tensioning the generator belt. Find the generator in the front part of the engine compartment on the right side in the direction of travel of the car. To remove it, you need to prepare the following tools:
- Wrench set to “10”;
- The same key for "13"
- Open-end wrench 17x19;
- Head at "15"
- Mount.
We remove and do not touch the engine protection.
Removal is carried out in several ways, where it is necessary to remove the engine protection. They are well described in various sources. Let's try to remove it without removing the protection. The procedure will be as follows:
- The first step is to disconnect the terminals from the battery;
- Loosen the belt tension, remove first the belt, and then the entire tension mechanism;
- Disconnect the wires from the battery, they are covered with a rubber cover, and the connector for supplying voltage to the excitation winding;
- The generator on the bracket is mounted on a long bolt and nut. It’s not very convenient to get it, so use a “15” head to unscrew the two bolts securing the bracket to the block. They are found at the back of the generator, one bolt is long and the other is shorter. Now the generator can be turned clockwise and it will be possible to remove the axis of its attachment to the bracket;
- Unscrew the nut with a wrench to “19” and remove it together with the spacer sleeve;
Use a small punch or something similar to knock the axle out of the bracket. The generator is lifted up. Now you can use it to repair the generator or perform maintenance.
Recharging the battery
Sometimes when the generator breaks down, the battery overcharges. This can be noticed not only when taking measurements with a multimeter, but also in the readings of the on-board vehicle. And if the set voltage is greatly exceeded, various electrical equipment may fail or the battery may boil out. Also, the headlights may shine brighter than usual, and the battery charge indicator on the dashboard will constantly light up. These are the main symptoms of overcharging. It occurs most often due to a faulty voltage regulator. This part on the VAZ 2114 can be easily changed with your own hands.
And the battery and generator diagnostics described above will help determine the exact presence of the problem.
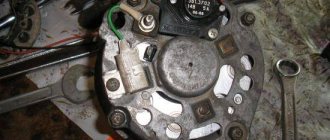
Replacing a VAZ 2114 generator with a KZATE (Katek) 115a from Priora/Kalina
Good afternoon, 2 months have passed since I collected the music. After installing the AGM battery in the trunk, the car stopped moving, the voltage dropped significantly while the cooling fan was running, after a while it became impossible to drive with the fog lights and heater at the same time (the reading on the instrument panel reached 13.1). I know that the BC and the tidy are lying about the voltage, but even taking into account the error of 0.4-0.5, I didn’t want to drive like that for a long time. Our beloved D2 and Google in general began to rustle with us in order to find the best genes and solve the problem of lack of nutrition. The choice was made in favor of KZATE 115a from Priora. The fastenings are no different from the fastenings of “Samara” generators. The only difference is in the feature, which won’t be too difficult to remake; you’ll see everything in the photo. I started calling the stores "Avtokrepezh", "Lada-detail" and other lesser-known companies, since it is very difficult to get to the car market and there are fakes out there. This generator is either not available and who knows when it will appear, or the price tag was space, from 5500 to 5800 rubles. (!) It’s very expensive, and for some reason they give a guarantee of half a year o_0. I decided to call the manufacturer directly, the answer scared me at first: “sorry, we have interruptions in production, now we don’t even have time to work for our wholesalers,” but I didn’t give up and got them one generator for myself in a week of calls for 4,200 rubles with a one-year warranty (! ) And so, we move on. for greater use we need a power wire, in my case it’s KG 25, and don’t forget about good “meaty” terminals - for dubbing + wire. Why am I rambling here, you’ll understand everything from the photos, the first photos of the voltage on the lights/fog lights and music at volume 5 on an old generator. By the way, the old generator was made in Belarus, like Bate at 90a, although I expected to see Kzate at 80a.
BC reading on the old gene
Indication on the tidy on the old gene
AGM battery voltmeter reading
Because of 16kl. the engine had to go to service for replacement. He changed my gene for about 2 hours, although for 8kl. My friend and I changed it at -20 in a parking lot in 40 minutes, it really surprised me. ok, I probably won’t tell you all the nuances, I’ll get to the essence and photos.
redesigned chip on a new gene + photos of the belt, + wires and ties, so that later there would be no terror in the comments.
PS To prevent moisture and dirt from getting into the hole from the Priora chip on the generator, after installation we fill the hole with sealant
Old and new gene
As it turned out, it was not in vain that I bought the belt; I didn’t take a photo of the old one, but it was already very tired. It’s not surprising that after installing the AGM, there was a whistle coming from under the hood, as if the Nightingale the Robber was hiding in the wing.
As a result of installing a new one, the genes received
heater/fog lights/music at 15
heater/fog lights/music at 15
heater/fog lights/music at 15
In the service they measured it from the battery under the hood, in this mode 14.3! If you turn on the stove in mode 3, add low beam + rear PTF + heated rear window + hazard lights, turn on the music louder - the voltage on the battery itself is 14.1! On the tidy 13.7! (with the old gene, I wouldn’t even risk turning on all this at the same time, since the voltage would go deep out <12.5). From observations I would like to add: 1 - when the fan is running, the speed stopped jumping, the car as a whole began to work much more pleasantly and smoothly 2 - now when I play music, I don’t have to alternate between the heater and fogs, I can turn everything on at once