Search by topic
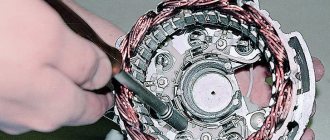
how to determine which generator is worth? The sticker on it has worn off. I didn't find any identifying marks. My generator has finally started working, almost a year has passed since the first symptoms (voltage drop). At first there was an undercharge, and irregularly: sometimes fifteen minutes, sometimes half a day. in cold weather it began to glitch more often, and on Friday I drove for half a day without charging, it rises at speed, drops at idle, sometimes until the lights on the panel come on. On Saturday I went out to start the car: the battery was discharged. I took the generator out for repairs. the top is all dirty with oil, apparently it's leaking from the turbine, everything inside is also covered in fuel oil. I think the brushes are of Khan, I took them apart and washed them: they seem to be living brushes, only one is shorter, maybe they were stuck? The seal is oak, it needs to be changed, the diodes and windings ring: intact. In general, I want to replace the oil seal and brushes. for now. assemble, install, test on the car. Or should I also change the integral? I don’t want to buy extra crap for fifteen hundred and I don’t want to remove the generator again. Again, how to buy an integral? I don't know the characteristics of my generator. I don’t know whether it’s native or from China either. how to distinguish a gene? Is it worth 50 or 80 amps?
50 And most likely you have. I haven’t met anyone else on 4JB1 (except for the collective farm). The difference is something like this: if the +B pin is closer to the block, then 50A. Otherwise 80A. One brush is shorter because... The oil seal was leaking oil and due to poor brush-ring contact, the brush closest to the seal burned. It's good if it's just her. I came across something that ate the contact rings clean (there were Chinese brushes + a Chinese leaking oil seal). How did the diode bridge ring? It needs to be unsoldered from the winding, otherwise the diode break cannot be calculated. Breakdown - yes, but breakage - no. Integrals usually do not burn. And the undercharging was most likely due to poor contact on the brushes. Post the photos here, let's find out what kind of gene you have.
no photos yet. Gena is sleeping in the car, and I’m at work. I didn’t solder the bridge until I was satisfied with this diagnosis. I'm inclined to replace the oil seal and brushes and check the gene on the car. There will be photos. thank you driver
This is what I was convinced of: it is better to unsolder/solder the bridge once again than to remove and disassemble/assemble and install the generator once again. It’s even better to assemble a test stand without installing it on a car.
For statistics, the latest generators in the bulkhead:
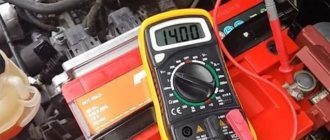
Checking the output current strength of the generator
For this test of the generator, you will need a multimeter equipped with a special probe to measure the current flowing in the wire. This probe looks like a clamp that wraps around a wire, and is most often supplied with the diagnostic device. To check the output current strength of the generator you need to:
- Place the clamp on the wire that goes to contact “B+” (“30”) of the generator;
- After this, one at a time, you need to turn on the electrical consumers on the car - radio, air conditioning, heated steering wheel and others. When turning on each consumer, the readings from the multimeter should be recorded;
- Next, you need to measure the strength of the output current when all consumers are turned on together (which were turned on in the previous test).
Next, start the engine and set high speed;
Types of generators
There are two types of car generators:
- direct current;
- alternating current.
The first type of generators is currently no longer in use. Such devices were installed on old car models (GAZ-51, Pobeda, etc.). They have many disadvantages, such as:
- low power and efficiency;
- the need for constant monitoring and maintenance;
- short service life.
Alternating current generators are now used. Their main difference is that, regardless of the engine operating mode, the vehicle network is powered by direct current. This is achieved thanks to a semiconductor rectifier.
How much does the generator produce under load?
The main source of electricity in a car is the generator. It starts simultaneously with the engine starting, after which it generates energy and charges the battery. If it fails, the battery charge will not be enough to operate the car for a long time, so the driver is obliged to monitor the condition of the generator. There are a lot of problems that can cause a generator to fail during operation. These can be either mechanical or electrical problems. Generator malfunction is also manifested by various symptoms, the most common of which are:
- The appearance of extraneous sounds emanating from the generator;
- Problems with the battery: discharging, overcharging, boiling off of the electrolyte;
- Reduced brightness of headlights with increasing speed. This situation is considered normal if it occurs briefly when switching to first gear from idle on a cold engine;
- Warning lamp warning about low battery while the vehicle is moving;
- Electronic malfunctions, including dim headlights and a weak sound signal.
Minimum battery input voltage parameter
When checking the parameters of the generator, it is worth taking into account the characteristics of the battery itself.
Many car owners are interested in what the voltage at the battery output should be for normal engine starting.
There is no exact answer here, but the average parameter should be 12.6-12.7 V. Depending on operating conditions, this indicator can be adjusted.
Some manufacturers claim that their product has a voltage of 13-13.2 Volts. This parameter is real, but you should not measure the voltage immediately after recharging with a generator or charger.
It is advisable to wait 1-2 hours before carrying out work. In this case, U should drop to a level of 12.7-13 V.
If this parameter begins to “float” or drops below 12 V, this indicates a 50% battery discharge or a generator malfunction.
It is recommended to check the charging circuit or use an external charger.
If you continue to operate the battery in this condition, sulfation of the lead plates occurs, which reduces the performance of the battery and reduces its service life.
In practice, such a decrease in voltage is not critical, because the battery can still be started, and then the generator recharges to the required level.
The main thing is to make sure that the charging circuit is working properly and that the voltage at the battery terminals is increasing.
If U at the output drops below 11.6 V, we can talk about the complete discharge of the power source.
In this case, further use of the battery is impossible - it must be removed, checked for serviceability, and charged from an external device.
Taking into account the above, we can conclude that the voltage on the battery with a working generator should be (with the engine off) 12.6-13.2 V. In practice, this parameter is slightly lower and amounts to 12.3-12.5 V.
This voltage indicates a slight undercharging of the battery. There's nothing wrong with that. The main thing is not to allow U to decrease below 12 V.
Safety precautions
It's easy to check the current strength. It is enough to connect the multimeter in accordance with the operating rules. It is necessary to follow the instructions in order not to violate safety precautions:
You may be interested in Working with a welding machine
After using the multimeter device, the cables that were cut are connected with the circuit de-energized.
Damage is corrected with electrical tape
A multimeter is a device that is simply impossible to do without in everyday life and other areas. Having even the most minimal knowledge of its operation, you can repair the devices. Knowing the indications, it is easy to determine their unsuitability.
Analysis of the received data
Don't try to draw premature conclusions. The fault can only be determined after receiving all the necessary data. As mentioned above, several options are possible.
Low charging current
You should start with the simplest thing, making sure that the generator drive belt is properly tensioned and there is no damage to the electrical wiring contacts. If this is all right, then the sources of the problem may be:
- Faulty charging current relay. The most common and easily fixed breakdown. The part costs a penny, and you can replace it yourself if you have basic equipment repair skills.
- Breakdown in the stator or rotor winding. Fixing such a breakdown requires a lot of time and money. It is possible that it is easier to replace the generator with a working one.
Failure of the windings is quite rare, so it is advisable to first replace the relay.
High charging current
In this case, tightening the belt and cleaning the contacts is not enough. Among the likely culprits of the misfortune:
The diode bridge can only be replaced by specialists in an equipped workshop.
Power surges
You probably already guessed that when detecting power surges, you will have to choose from several options, the most likely of which are:
- Drive belt slippage. It occurs when the tension is weakened or lubricants enter the working surfaces.
- Malfunction of the diode bridge, due to which it becomes impossible to stabilize the current.
- Poor contact between brushes and slip rings.
Safety rules when checking a generator
Before you start checking a car generator, you should familiarize yourself with the basic safety rules that will help maintain the health of the diagnostician and not damage the unit. The basic rules for safe inspection and repair of a generator are as follows:
It is forbidden to check generator valves with voltages higher than 12 Volts;
Please note: If you are not only checking the generator, but also welding work on the car body, you must completely disconnect the generator and battery from the vehicle’s on-board power supply before starting.
Connecting power-hungry devices
And now about connecting powerful inverters. GUYS, you should turn your head on and think, won’t such a device burn out your car’s on-board network?
Look, the power of these inverters starts from 300 and ends with 1500 watts. And in our example, the peak power generated by the car is only 1380W, and at idle it is only about 1000W. If you give it 1500W, it simply won’t withstand such a load!
After all, it needs more energy to keep the engine running, this is trivial ignition and pumping of fuel, feel free to remove another 400 - 500 W.
That is, what can the generator produce at idle so that you can take advantage of it? Guys, this is really a 300-500W inverter, you can connect a TV, a drill, and non-energy-intensive devices! But it’s unlikely to be possible to heat water or heat using heating elements.
Now this is a useful article, take a look
I think it was useful, read our AUTOBLOG and subscribe to updates on YOUTUBE.
(
37 votes, average: 4.41 out of 5)
Similar news
Engine chip tuning. Advantages and disadvantages. Is it worth doing at all? .
Voltage stabilizers for LEDs. Why do you need it for yours?
Which ELM327 is better WIFI or Bluetooth? Details + video version
Source
Which generators are better to put on a VAZ?
Below are recommendations for different models of domestically produced cars.
VAZ - 2106
G-222 is a more powerful and stable self-generator compared to the standard G-221. It has a built-in battery charging relay and increased output (50 A versus 42 A), suitable for the “six”, provided that brushes from the G-221 are used or the connection diagram is changed.
VAZ - 2107
The simplest option for modernizing the electrical network is the G-222 device. The generator is installed in the VAZ-2107 without additional problems. This car will fit a device with a current of 55A from model 2108. The only modification that will be needed during installation is the use of an additional power relay.
VAZ - 2110
The standard generator of the VAZ-2110 is KZATE with a current of 80 A. It has a factory index of 5102.3771. Estimated mileage is 140,000 km. As alternative options, it is worth considering devices 94.3701 and 120 A. It is better to install the second generator on a VAZ 2110 with an injection engine in cars with a large amount of additional equipment, in addition to a DVR and a powerful sound system.
VAZ - 2112 and 2114
It is better to install a generator from Priora or Kalina with air conditioning in VAZ-2112 and VAZ-2114 cars. This device produces a power of 115 A, which is 35 A more than the factory equipment. The only difficulty that the owner of 2114 will encounter during installation is the need to replace the pulley.
As an alternative, you can consider an Eldix brand autogenerator with a capacity of 115 A. However, it is difficult to find spare parts for it, which will cause certain difficulties even with minor breakdowns.
Cars with injection engines are equipped with generators with an output of 80A. This is the standard model 94.3701. To increase power, consider the option with KZATE 9402.3701 90A, which is suitable for the type of fastener and has a similar pulley. If necessary, ensure the operation of a large number of energy-consuming devices.
Priora
Video: GENERATOR FROM PRIORA FOR VAZ 2112.
A Russian or foreign-made generator can be installed in a Lada Priora car. One of the best options in terms of operational reliability is Bosch at 110 A. As a domestic analogue, you can consider KZATE 9402.3701-14 at 115 A.
For most cars from the Volzhsky plant, it is better to use Russian generator sets. Among the main advantages of domestic products, we note low cost, ease of maintenance and repair, and a large number of spare parts in stores. A better alternative is equipment from the German brand Bosch. It is better to avoid buying cheap Chinese electric generators.
Preparing for work
There is always a possibility of finding yourself in a situation where it is not possible to get to a service station and seek help from specialists. And if so, then every self-respecting car owner should know how to check how much the generator produces with a multimeter. This will avoid many unnecessary problems and save a lot of time and money. And, what is especially important, this does not require either complex equipment or specific skills.
A multimeter is usually called an electrical measuring device that combines several functions. This device can be purchased at an affordable price at most hardware stores. In DC and AC networks, it allows you to measure:
- Voltages.
- Power.
- Resistance.
A box with a mode switch and an analog or digital display scale will be useful not only when repairing a car, but also in the household. Therefore, it is always advisable to have it in your arsenal of tools.
Checking the generator voltage regulator
To diagnose the condition of the car generator regulator, you must use a voltmeter or multimeter in voltmeter mode. Before starting measurements, you need to start the engine, turn on the headlights and let the engine run for 15-20 minutes. The measurement itself is carried out using probes that are connected between ground and the “B+” (“30”) terminal of the car generator being diagnosed. The obtained values are recorded, after which they must be compared with normal figures for a specific car model. These numbers can be found in the technical documentation of the machine. For most machines, normal voltage ranges from 14 to 16 volts. If there are deviations from the standards specified by the car manufacturer, there is a high probability of failure of the voltage regulator, in which case it will need to be replaced.
About the structure of the generator
Any generating device approximately consists of identical parts, there is an exaggeration of this - a rotor, a stator, a pulley, a housing, and an electrical component (electric brushes, a relay-voltage regulator). The rotor is connected to the engine crankshaft by a belt drive. If the crankshaft rotates, the rotor also rotates, thereby generating electric current.
It is worth noting that even large generators at hydroelectric power plants operate on the same principle. However, there the rotor is spun by the incoming flow of water. BUT the essence is the same.
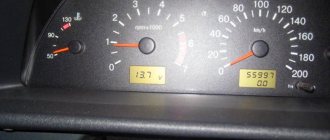
The actual voltage in the car is often 13 - 14 Volts, which is enough to recharge the car battery.
Checking the field windings
To check the serviceability of the field windings of a car generator, you must first remove the regulator and brush holder to gain access to the slip rings. For diagnostics, you will need an ohmmeter, the probes of which should be applied to the slip rings of the generator. As a result of the test, the resistance should be at a level of 5-10 ohms. You also need to make sure visually that there are no breaks in the winding.
To diagnose a short circuit of the excitation winding to ground, you will need to connect one ohmmeter probe to any slip ring, and attach the second to the generator stator. As a result of the measurement, infinite resistance should be displayed on the screen.
When diagnosing a generator, it is also necessary to inspect it for mechanical damage. Based on the results of all checks, the feasibility of repairing the device or replacing it with a new one is determined.
The generator does not charge: reasons
Let us note once again that a normally operating generator completely replenishes the battery charge level, while the charge decreases under load. At the same time, in the general circuit there are many elements that can cause a battery charge failure. Often, problems arise both in the mechanical part (generator drive, bearings, etc.) and in the electrical part (break or short circuit of windings, burnout of the diode bridge, wear of brushes, breakdowns). The generator relay regulator should also be checked separately.
One way or another, it is important to find the problematic element. Note that usually the vast majority of generator breakdowns or battery charging problems can be eliminated (by replacing the drive belt, rollers, repairing the generator, inspecting contacts, terminals and other elements). However, there are breakdowns that become the basis for replacing the entire generator assembly.
The terminals must fit tightly; oxidation is not allowed. The same goes for electrical wiring. All wires must be intact, and the contacts must be securely fastened and clean. By the way, it is important to periodically clean the contacts from oxidation, since the current will pass through the oxidized outputs worse.
Generator power selection
To correctly determine the power of the generator, it is necessary to calculate the power of the load, the operation of which will be provided by the electric generator. Load power is the total power of electrical appliances connected simultaneously to the electric generator.
The easiest and most reliable way to find out the power of each connected device is to look at the passport for this device. The power can also be indicated on the device itself.
Please note that the power of devices can be indicated in two units [kW] and [kVA]. In consumer language: [kW] is the useful (nominal) power, and [kVA] is the total power. Moreover, on some devices the power is indicated only in [kW], on some – in both [kW] and [kVA]. This means that for the first group of devices the rated and total power are the same, for the second they are not.
Car generator power. How to recognize (define) it and what it depends on
A lot of motorists are interested in the power of a car generator. After all, there are now a lot of electrical devices (for example, inverters) that can turn your car into practically a power plant for a country house. Many carry loads of 1000 – 1500 and even 2000 W! Is it a lot or a little? Can a running car do this? Some write that – NO! Others that - YES! But often they have a “mess” in their heads; I often see such statements on forums: the power is no more than 300 - 600 W. Where these numbers come from can be seen from the ceiling. Let's correctly define power, and also find out what it depends on...
THE CONTENT OF THE ARTICLE
In this article I will introduce you to the approximate power of your car alternator, this is physics grade 7. Let's take into account that we have direct, not alternating current.
How to check the generator
- 273 1 278k
Current to power conversion calculator
Convert how many amperes a kW has online. Calculator for converting current amperes to power watts
A car generator is the main source of energy in the on-board network, and if it malfunctions or fails, you won’t be able to drive for long on one battery. This is why it is so important to monitor the performance of the generator.
In most cases, checking a car's generator with your own hands is not difficult, since no matter what car you check on, the principle is the same. But still, many car owners often wonder: how to check the generator with a multimeter or with improvised means?
Next, we’ll look in more detail at how to check a generator in a garage without special stands that are used at service stations.
How many amperes does a car alternator produce per battery?
The current strength required by the electrical system of each car is individual and depends on the number of electricity consumers and their values. And also the charge current must be sufficient to charge the power source.
It is worth noting that ampere readings appear only when there is a load in the vehicle’s electrical system and, accordingly, the battery is discharged. After starting the car engine, the charging current is about 6-10 amperes and drops over time, because the battery is charging, taking on the main energy consumption. If you turn on additional equipment - headlights, radio or heated mirrors, you can see an increase in the charging current values.
When purchasing a generator, pay attention to its technical characteristics, which the manufacturer indicates on the case - that’s where you will find information about the maximum current that will flow to the battery.
In the table below you can see the approximate current values that the generator shows at different loads.
Table 1. How many amperes the generator produces under load.
How to check the generator without removing it from the car
There are two ways, using a multimeter and without it at all. The first, relatively new one, is to check the voltage at the battery terminals, and the second, old and proven one, is almost the opposite - the battery terminal must be removed with the engine running.
- Checking the battery with a multimeter first occurs at rest - the voltage should be in the range of 12.5-12.8 V. Then you need to measure the readings with the engine running, if 13.8-14.8 V is observed at 2 thousand revolutions, then everything is in order. In conclusion, it remains to check the voltage under load , that is, by connecting consumers - the stove, headlights, heating, radio. A dip in the range of 13.6–13.8 V is considered acceptable, and if the readings are lower, this indicates a malfunction.
- The second method, like many “old-fashioned” ones, is simple and trouble-free, but at the same time quite dangerous and requires care . It allegedly works both on VAZs and on relatively new cars, like the Aveo. What is the point - loosen the bolt securing the negative terminal of the battery with a 10mm wrench, start the engine and give a small load, turning on one of the consumers, for example, the headlights. Then remove the terminal while the engine is running - if it does not stall and the headlights do not dim, then everything is absolutely fine with the generator, otherwise you can be sure that it is broken. You should try this method at your own peril and risk.
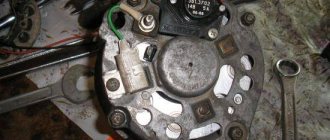
Having determined that there is a malfunction, you should dismantle and check the removed generator with a multimeter, a light bulb, and visually. Each of its elements is subject to verification separately.
| List of generator parts and applicable test methods | Visual inspection | Checking with a multimeter | Checking with a light bulb |
| Brushes | |||
| Slip rings | |||
| Diode bridge | |||
| Voltage regulator | |||
| Stator | |||
| Rotor |
On-board power supply
After launch, almost all on-board devices are powered precisely from the generating element; it bears the main load. It recharges the battery, replenishes the energy spent on starting, and also provides energy for lighting, ignition systems, fuel supply, entertainment complex (audio, video), all kinds of heating (seats, windows, mirrors).
It is worth noting that if the generating device cannot cope, then the battery can provide some of the energy; this happens at times of maximum load, for example, at night in the cold, when many electrical appliances are turned on. If some source is turned off and only one generator has enough energy, it automatically recharges the battery. So the cycle repeats.
How to check a diode bridge (rectifier)
Diodes are checked by measuring resistance and detecting conductivity. Since the diode bridge consists of two plates, we check one at once and then the other. The tester should show the conductivity of the diodes in only one direction . Now, in a little more detail: we hold one tester probe on the “+” terminal, and with the other we check the diode terminals one by one, and then swap the probes (in one case there should be a high resistance, and in the other there should not be). Then we do the same with the other part of the bridge.
Checking the diode bridge
Checking the slip rings
Even one bad diode leads to failure of the entire diode bridge and undercharges the battery.
Alternating current generator device
The operation of any generator can be compared to an electric motor that operates in reverse mode, that is, it does not consume, but produces current. Based on the type of design, modern generators are divided into two types: compact and traditional. They have a common device, but differ in the layout of the housing, fan, rectifier assembly and drive pulley. Also, modern devices have three phases.
The generator consists of the following main elements:
- drive with pulley, bearings and shaft;
- rotor with field winding and slip rings;
- stator with core and winding;
- a housing consisting of two covers;
- voltage regulator;
- rectifier block or diode bridge;
- brush assembly.
Let's analyze each element of the device separately and in detail.
Frame
The housing contains all the main elements of the generator. It consists of two covers (front and back). The covers are connected to each other with bolts. For the manufacture of covers, light aluminum alloys are used, which are not magnetized and dissipate heat well. The covers have ventilation holes and mounting flanges.
The back cover contains a diode bridge and a brush holder with brushes. Also in the back cover there is an output contact through which current flows from the generator.
Drive unit
Rotation from the crankshaft is transmitted to the generator pulley and rotates the rotor. The pulley rotation speed is 2-3 times higher than the crankshaft speed. Torque from the engine is transmitted through a belt drive. Poly V-belts and V-belts can be used depending on the design. The poly V-belt is considered more versatile and modern.
Rotor
On the rotor shaft there is an excitation winding, which creates a magnetic field and, in fact, is an ordinary electromagnet. The winding is located between two pole halves (cores) necessary to regulate and direct the magnetic field. Each half has six triangular projections called beaks. There are also two copper slip rings located on the rotor shaft. Sometimes they are made of steel or brass. The excitation winding receives power from the battery through slip rings. The winding contacts are soldered to the rings.
How to check the voltage regulator
The regulator is checked in case of undercharging or overcharging of the battery. The voltage is measured at rpm; it should be in the range of 14.4 - 15V.
In addition, you can check the resistance of the regulator capacitor (at the moment the tester probes are connected, it should decrease until it approaches infinity).
With the generator voltage regulator removed, the condition of the brushes is inspected and serviceability is checked using a 12V light bulb and constant voltage. That is, you need to connect a light bulb to the brushes, and apply 12V to the positive terminal and ground of the regulator (the light bulb should be on, and go out when the voltage increases above 15V).
How to check the generator rotor
The first step is to test the excitation winding. To do this, set the multimeter to check the resistance and measure it between the slip rings - the winding resistance should be in the range 2.3-5.1 Ohms . When it is above, there is either a break or simply poor contact between the rings and the winding terminals. Low resistance indicates an interturn short circuit .
Using the ammeter mode on the multimeter, you can also check the current consumed by the winding. You need to apply 12V to the slip rings and measure the open circuit - the excitation winding should not consume more than 3-4.5 Am.
Auto generator rotor
Car generator stator (winding)
To the full complex, you can also add a check of the rotor insulation resistance. To do this, you will need a 40-watt light bulb and wires (one wire from the socket to the ring, and the other through the light bulb to the body - if everything is normal, the light bulb will not light up, but if the filament barely glows, then there is a current leakage to ground) .
Principle of operation
Now let's take a closer look at the operation of the alternator in a car. When the ignition is turned on, current from the battery is supplied to the brush assembly. Through the brush assembly it reaches the copper slip rings and then onto the rotor field winding. Let us recall that the rotor is essentially an electromagnet that creates a magnetic field. The crankshaft, through a pulley and a belt drive, begins to rotate the rotor. Around the rotor there is a stator, which, when rotated, begins to produce alternating current. When the rotor rotation reaches a certain frequency, the field winding is powered by the generator itself.
Through the diode bridge, the alternating current is “rectified” and converted into direct current, necessary to power the on-board network. This is how a car generator provides power to consumers and recharges the battery. The voltage regulator changes the operation of the field winding as the rotor speed increases. This maintains a stable load.
Inside the car on the dashboard there is a generator indicator lamp that shows the status of the device. For example, the lamp may light up when the belt breaks. Then the network will be powered only through the battery. The duration of operation in this case will depend on the battery charge level.
How to find out which generator is on a car?
- Maintenance and filters Consumables Battery
- Timing kit
- Timing belt
- Spark plug
- Brake discs
- Brake pads
- Air filter
- Brake Elements Caliper Guide Kit
- Vacuum pump
- ABS sensor
- Engine parts Valve seals
- Engine gasket kit
- V-belt
- Exhaust muffler
- Oil pressure sensor
- Intercooler
- Air filter
- Suspension Shock absorbers
- Tie rod end
- Transmission spare parts Transmission mount (automatic transmission)
- Release bearing
- Cooling Engine cooling fan
- Evaporator
- Interior fan
- Ignition Ignition coil
- Brake light switch
- Battery
- Internal elements Trunk and hood shock absorber
- Front/rear bumper
- Windshield wiper reservoir
Call or go to Chat Help in selecting spare parts