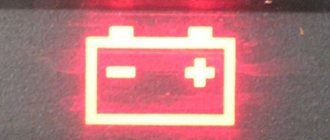
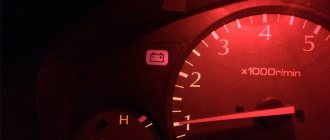
In cases where the battery stops receiving charging, the charge indicator light on the VAZ 2106 instrument panel lights up.
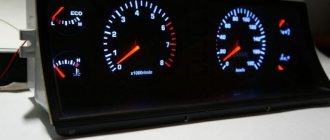
| External view of the instrument panel of a VAZ 2106 car. The numbers indicate: 19 – external lighting switch; 18 – rear window heating switch; 17 – rear fog lamp switch; 16 – indicator lamp for turning on the parking brake; 15 – battery charge indicator lamp ; 14 – control lamp for covering the carburetor air damper; 13 – tachometer; 12 – handle for setting the daily trip meter to zero; 11 – control lamp for turning on the side light; 10 – control lamp for turning on the direction indicators; 9 – control lamp for turning on the high beam; 8 – summing counter of the distance traveled; 7 – daily counter of the distance traveled; 6 – speedometer; 5 – warning lamp for insufficient oil pressure in the engine lubrication system; 4 – oil pressure indicator in the engine lubrication system; 3 – liquid temperature indicator in the engine cooling system; 2 – fuel reserve warning lamp; 1 – fuel level indicator. |
A car owner has a legitimate question: why does the battery light on a VAZ 2106 come on?.
There may be several reasons why the VAZ 2106 battery light is on. Initially, it is necessary to check the integrity of fuses No. 9 and No. 10, as well as the reliability of their installation in the sockets. If the fuse links are visually intact, then you need to simultaneously check the tops of the fuses, where they can rub against their socket. This can be easily determined by the belt that appears there, which breaks the contact in the charge circuit.
Next, you should check the integrity of the alternator belt and its tension. If the belt is intact and its tension is normal, then you should check the pulleys for wear on their internal parts. The generator belt has a wedge shape, due to which it expands between the “cheeks” of the pulley. When the pulley wears out, the generator belt falls down the pulley and begins to slip. This is easy to determine by the shiny inside of the pulley, which has been polished by the belt. If the belt slips, either the battery will be incompletely charged or there will be no charge at all. This may be one of the reasons why the battery light on the VAZ 2106 is on. In such cases, the pulley must be replaced together with the generator belt.
The burning of the light bulb may also be due to oxidized terminals of the battery wires, which prevent the passage of charging current from the vehicle's generator set.
| The first step in solving battery charging light problems on any car is to strip the battery terminals and associated wires. |
Oxidized terminals can be easily cleaned with a solution of soda and water, which removes the oxide. The terminals must be completely cleaned of oxide, wiped dry and coated with some kind of lubricant, for example Litol 24. The battery terminals themselves must also be cleaned, and also wipe the surface of the battery with a piece of rag or a brush with a soda solution.
You should not clean the terminals with sandpaper, especially coarse sandpaper, since the lead from which the terminals are made can be easily removed with sandpaper. The terminals become smaller in diameter and when installing the terminals, it is no longer possible to achieve reliable contact.
It is also necessary to check the condition of the connection of the terminals on the generator, where the terminals may also be oxidized or there may be poor contact between the generator output and the terminals. In addition, the generator needs to be checked for reliability of its contact with the vehicle ground. Usually this is a wire in the form of a “snake”.
If the generator provides charging, but the light continues to light, then it is necessary to check the reliability of the wire connection and its integrity from the generator to the battery.
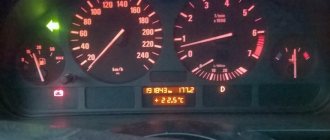
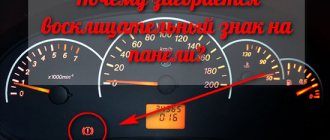
There is a light on on the instrument panel of the VAZ 2106, what should I do?
The fact is that the red lamp number 15 is on, it shows that I have problems charging the battery. I changed the relay, checked the belt tension, cleaned all the contacts, but it still lights up. Could it be the generator? Who can tell me what to do?
This lights up correctly and warns the driver that the battery is not charging. If you ignore this, the battery will discharge quite quickly and acid batteries do not like deep discharges.
Therefore, you need to check the entire battery charging network (circuit). In the description of the car, there are very detailed instructions for this case and everything is very clearly described there. Therefore, I see no point in adding anything there. It can be from a banal wire break, oxidation of battery contacts, to a malfunction of the generator itself and the relay regulator.
Everything is very simple, just like a light bulb glows constantly, as I understand it. You begin to measure the voltage with the engine running on the generator itself and subsequently further in accordance with the electrical circuit diagram. Where the voltage ceases to correspond to the norm in that area there is a malfunction.
By the way, this could also be due to the battery.
Basically there is contact, there is no contact.
I had much worse. When the engine is running in a parking lot, everything is hurt. When driving, sometimes this light was on, or even half-lit. I had no time, I had a backup battery and that was enough for me to ride all day. How things worked out. I started to figure it out, and how to figure it out, I checked all the contacts, everything was normal, I measured the voltage, everything was within normal limits. As a result, the generator began to blame, although the brushes were normal and so on. Replaced the generator and everything was back to normal. The story with the generator did not end there; after traveling for two years, the same chaos began again. Then I went to a specialist and he and I discovered soldering on the armature winding (it’s mind boggling. They sell such substandard stuff!). He and I replaced the anchor, fortunately the control unit was found and all the problems were over.
So open the description of the car, the electrical diagram of the car and especially carefully check the ways of recharging the battery. And you will be happy!
What can a constantly burning battery charging lamp indicate?
If the battery charging light is on in a VAZ 2107 or VAZ 2106, there can be only one reason - the battery is not receiving voltage from the generator, or is receiving it, but its value is insufficient. There may be several malfunctions that lead to this:
- violation of normal contact at the battery terminals;
- loose tension or damage to the alternator belt;
- lack of contact of its “negative” terminal with “ground”;
- break in the rotor excitation circuit or wear of the generator brushes;
- diode bridge malfunction.
- defective fuse;
- failure of the relay regulator.
Description of the torpedo on the VAZ 2106
The front panel is installed in the front part of the car's interior and is a non-separable structure made in the form of a metal frame treated with polymer foam and enriched with finishing material. The panel houses the instrument panel, lighting controls, heater controls, air ducts, radio and glove compartment.
What kind of torpedo can be installed instead of the standard one?
The front panel of the sixth model Zhiguli, in comparison with modern products, does not look very attractive both in appearance and in terms of instrumentation. Therefore, many owners of “classics” are puzzled by the issue of making changes to the torpedo or replacing it. The most preferred options for front panels are products from old foreign cars. On the VAZ 2106 you can install parts from the following cars:
- VAZ 2105–07;
- VAZ 2108–09;
- VAZ 2110;
- BMW 325;
- Ford Sierra;
- Opel Kadett E;
- Opel Vectra A.
Regardless of the chosen option, it is important to understand that modifications and adjustments to the selected torpedo are inevitable.
How to remove the panel
The torpedo can be dismantled for repairs, replacement or modifications. Tools you need to prepare:
- flat and Phillips screwdriver;
- knob;
- extension;
- socket head for 10.
Dismantling is carried out in the following order:
- We remove the tidy.
- Remove the stove body.
- Unscrew the screws at the bottom of the panel.
Video: dismantling a torpedo on a classic Zhiguli
Instrument panel VAZ 2106
The standard instrumentation provides control of readings and displays the status of the main parameters of the car.
The product consists of the following list of elements:
- 5 pointer instruments;
- 2 digital indicators;
- 9 indicator lights.
The following devices and indicators are installed in the panel:
- speedometer;
- tachometer;
- battery charging indicator;
- engine temperature sensor;
- odometer;
- resettable mileage counter;
- oil level sensor;
- oil pressure gauge;
- fuel presence sensor.
What kind of dashboard can be installed
If for some reason the standard dashboard does not suit you, you can update it in several ways:
- modify the dashboard by improving the backlight and gluing modern instrument scales;
- install a tidy from another car;
- make a homemade shield with installation of the necessary devices.
Depending on the chosen option, both the costs and the list of work that will need to be performed will depend. When choosing a dashboard from other cars, you need to take into account that many models on the VAZ 2106 may simply not fit not only in size, but also in connection.
From another VAZ model
Due to the unique design of the “six” instrument panel, it is quite difficult to choose a suitable replacement option. Some car enthusiasts are installing a device from a VAZ 2115, for which they change the standard front panel to a “seven” one and build a new dashboard into it. Such modifications will require the purchase of additional components (speed sensor, wires, connectors), as well as the correct connection of the standard wiring to the new dashboard.
From "Gazelle"
If you have thoughts about introducing a device from the Gazelle into the VAZ 2106, then you should take into account that the products have different connection diagrams, sizes, and in general they are very different from each other. Therefore, you first need to think about the feasibility of this kind of modification.
From a foreign car
An instrument panel from a foreign car, even from an old one, will make the front panel more beautiful and unusual. However, you need to be prepared for the fact that along with the tidy, you may need to replace the entire front panel. Most often, dashboards from BMW e30 and other foreign-made cars are installed on “classics”.
Before starting diagnostics
An important point in deciding why the VAZ 2107 or 2106 battery charging light is on is the very fact that voltage is supplied to the battery from the generator. In other words, if it does not reach the battery at all, there is nothing to be surprised about. The lamp must light in such a situation. But if the battery charging light is on, but there is charging, it will be a little more difficult to solve this problem.
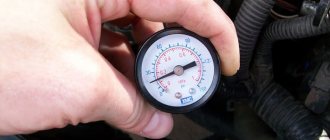
Our first priority is to determine whether voltage is supplied to the battery. This is not at all difficult to do, especially since this requires only one device - a voltmeter or multimeter turned on in its mode. We start the car engine, raise the hood and measure the voltage at the battery terminals with the generator running. If all elements of the system are working properly, the voltmeter should produce 13.6-14.2 V, and no less. This is a working indicator for normal battery charging. If the voltage is below these values, then there is some kind of malfunction.
Dashboard faults
The instrument panel of the VAZ Six consists of a small number of devices that may stop functioning over time. The causes of breakdowns may be different, but any of them will require dismantling and partial disassembly of the shield. If one of the devices malfunctions or fails altogether, driving the vehicle becomes uncomfortable because it is impossible to control one or another vehicle system. Therefore, it is necessary to monitor the serviceability of the indicators and promptly correct any problems that arise.
Removing the dashboard
To dismantle the dashboard you will need a pair of flathead screwdrivers and pliers. The procedure is performed in the following sequence:
- Unscrew the fastener and remove the steering shaft housing.
- We pry up the shield first on one side and then on the other.
When reassembling, first install the top part of the panel, and then press on the bottom to snap the brackets into place.
Replacing backlight bulbs
If it was noticed that one of the indicators on the tidy stopped lighting up when the lights were turned on, then the most likely reason is the failure of the light bulb. To replace it, you will need a pair of slotted screwdrivers, and the procedure itself consists of the following steps:
- Repeat steps 1–2 to remove the dashboard.
- We find the device on which the light bulb has burned out and, with a simple movement of the hand, remove the socket from the pointer.
Checking and replacing the instrument panel light switch
Sometimes a situation arises when the instrument panel lighting switch stops functioning. In this case, the panel is simply not illuminated and driving a car in the dark becomes problematic. Breakdowns of the switch in most cases are caused by damage to the internal mechanism. To remove and check the part you will need a flathead screwdriver and a multimeter. The process works as follows:
- By pulling the button, we remove the switch from the instrument panel.
Checking and replacing individual devices
The breakdown of any of the VAZ 2106 indicators causes inconvenience. Problems are caused both by the age of the car and the attitude of the owner towards it. Therefore, it is worth considering possible device malfunctions and ways to eliminate them.
Fuel level indicator
Two elements are responsible for the fuel level readings on the sixth Zhiguli model: an indicator installed in the dashboard and the sensor itself, located in the gas tank. Through the latter, the light in the indicator is also activated, which indicates a low fuel level. The main problems with the device in question boil down to sensor problems, in which the arrow constantly shows a full or empty tank. We check the mechanism as follows:
- With the tank constantly full, disconnect the pink wire from the sensor by turning on the ignition. If the arrow moves to the beginning of the scale, the sensor is considered to be working. If this is not the case, then the problem lies either in the pointer indicator or in the wiring shorted to ground.
- To check the indicator, dismantle the tidy and disconnect the gray wire with a red stripe, then turn on the ignition. When the arrow returns to the extreme left position, the pointer is considered working and the wire is damaged.
If the fuel sensor fails, to replace it you will need a 7-mm open-end wrench and a Phillips screwdriver. The essence of the procedure is to remove a pair of terminals and unscrew the fasteners. A new one is installed in place of the faulty part.
Table: checking the fuel sensor
Video: installing a digital fuel gauge
Tachometer
The instrument panel tachometer displays engine speed readings. The TX-193 device is installed on the VAZ 2106. The following problems are possible with the mechanism:
- lack of evidence;
- twitching of the arrow in any mode of operation of the power unit;
- overestimated or underestimated readings.
The first malfunction is caused by wiring problems and poor contact. Therefore, you should check the condition of all connecting elements and connectors, starting with the brown wire with the terminal on the ignition coil: there should be no oxides or other damage on it. Otherwise, clean the contact with fine sandpaper and tighten the nut. You should also check the reliability of the connection between the tachometer and ground and, if necessary, restore it. In addition, with the ignition on, use a multimeter to check whether power is supplied to the device. If there is no voltage, inspect the integrity of fuse F9. Also, a digital device is used to check the reliability of the contacts in the tachometer wiring harness.
If the arrow twitches, then the problem lies in poor wiring contact or in the distributor (wear of the shaft bearing, slider or contacts on the cover). Such a malfunction can be eliminated by restoring contact or replacing failed parts. If the tachometer readings are incorrect, you will need to disassemble the distributor, clean the contacts and set the correct gap between them. If this does not help, one of the elements of the tachometer board may have failed. In this case, the device is dismantled, the board is disassembled and repaired. However, disassembly is only appropriate if you understand electrical engineering.
To replace the device you will need pliers and a screwdriver. The sequence of actions is as follows:
- We pry up the tidy and move it to the side.
- We disconnect the corresponding pads from the tachometer.
temperature sensor
The engine coolant temperature is measured using a sensor located in the cylinder head and an indicator on the dashboard.
Despite the high reliability of the sensor, malfunctions can sometimes occur with it, which are indicated by non-standard readings, for example, the absence of needle deviations. To check the sensor, you will need to remove it from the engine, lower it into water and gradually heat it up, and measure the resistance using a multimeter.
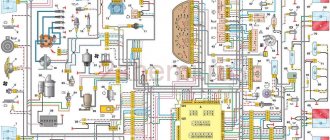
Charging system design and generator
Before you begin any car repairs, you need to learn and understand on what principle this or that unit works. As is known, generators installed on VAZ cars have mixed excitation. Its rotor is magnetized, but current is required on its stator to excite the generator. When the generator speed reaches the operating norm, an induced current appears on the rotor winding in an excited state. The voltage is transferred from the slip rings to the commutator using carbon brushes (very similar to the commutator of an electric motor).
In the path of the current collected by the carbon brushes there is a diode bridge. Since the battery requires direct current for charging, and alternating current comes out of the generator winding, a diode bridge is installed to rectify it.
After receiving
DC electricity is supplied to the positive terminal of the battery and to the charging relay. This relay in VAZ cars is marked RS-702.
Quite often, car owners call it the battery warning lamp relay.
Let's look at the principle of operation of the relay itself: current is supplied to the coil in which the steel core is located. A magnetic field arises between the core and the coil, which attracts the plate to itself, and the plate, in turn, opens the contacts of the other circuit. The control lamp is connected to this circuit. That is, in the closed position, current flows to the control lamp, but when the contacts are broken, it does not flow.
1.8. Instruments and warning lamps
Shows driving speed in kilometers per hour (km/h) or miles/hour.
Trip meter
Records the total number of kilometers traveled.
The figure on the far right shows a run of 100 meters.
Daily trip counter with reset button
The reset button for the trip meter is located at the bottom right of the speedometer panel.
Coolant temperature indicator
If the needle is in the middle of the large field while driving, this indicates normal operating temperature.
If the gauge indicates overheating, stop the vehicle and let the engine idle until the coolant temperature drops to normal levels.
Fuel indicator
When the ignition is on, the indicator shows the amount of fuel in the tank.
If the needle does not deflect or deflects unevenly, stop the engine immediately and check the oil level.
If the level is normal, have the engine lubrication system checked by your nearest technician.
The tachometer shows the engine speed in revolutions per minute.
The red zone indicates a dangerously high speed.
When the turn signal is on, the lamps flicker to indicate the turn direction is in effect.
When the hazard warning lights are on, the lamp flickers to indicate that the alarm is active.
The warning light comes on when the remaining fuel reserve is about 7 liters. Warning
The fuel warning light comes on when the ignition is turned on.
When this light comes on, it indicates that the high beams are on.
This warning light indicates that the transfer case lever is in the 4H or 4L position.
The warning light lights up when the ignition is on and goes out after the engine starts.
If it lights up while driving, contact a specialist.
The warning light lights up when the ignition is on and goes out when the engine starts.
If it flashes while driving, the oil pressure is very low.
Stop the engine immediately and check the oil level.
If it is normal, have the lubrication system checked by your nearest service center.
Under no circumstances should the engine be operated with the warning light on.
When the ignition is on, this indicator light illuminates if the handbrake is applied.
It does not show braking effect.
If this warning light comes on with the ignition on and the handbrake applied, the brake fluid level is below the specified level.
If it comes on while driving, stop immediately and check the brake fluid level.
If it is very low, contact the workshop immediately.
If this warning light comes on, the fluid reserve has dropped to a critical point or the brake booster line is faulty.
To achieve sufficient braking in this situation, greater pedal pressure is required.
Repeated activation of the service brake system may cause a short-term drop in pressure, which cannot be regarded as a malfunction.
When the water accumulated in the water separator reaches too high a level, this warning light comes on.
If it lights up while the engine is running and does not go out, the water separator must be drained.
This indicator light may remain on for a short time or go out immediately.
The effect depends on the temperature of the engine and coolant.
If the glow plugs are warm enough to start a cold engine, the warning light goes out and the engine can be started.
The warning light comes on when the ignition is turned on and goes out when the engine is started.
If the warning light comes on during operation, the timing belt must be replaced.
The timing belt needs to be changed every 75,000 km.
If you continue to drive while the warning light is flashing, you may damage the engine.
Replace the belt as soon as possible.
The indicator light comes on when the ignition key is turned to the “ON” position.
If the light comes on while driving, it indicates a malfunction in the electronic injection system.
You need to contact a specialist and fix the problem.
This signal indicates that the oil temperature in both gearboxes is too high.
If the light comes on while driving, you need to slow down and stop the car in a suitable place.
Switch the lever to "P" and let the engine idle until the signal goes out.
When the signal goes out, you can continue driving.
If the signal does not go out, you need to have the automatic transmission lubrication system checked by a specialist.
If at high speed with all-wheel drive (4H) this signal comes on, you need to switch to 2H and move the freewheel hubs to the “FREE” position.
Loose or damaged alternator belt
During diagnostics, it is imperative to check the condition of the alternator belt. Sometimes it happens that due to its long-term operation or under the influence of other factors, it becomes deformed, as a result of which the generator drive misfires. Pay attention to the belt tension. Its weakening leads to the same effect.
If the belt is not deformed and has no visible damage, it can simply be tightened. Otherwise, it must be replaced. The normal belt tension is such that it can be rotated around the horizontal axis by 85-90 degrees.
Instrument panel VAZ-2103
- Glove box cover,
- storage shelf,
- Gear shift lever.
12 Parking brake lever,
- Alarm,
- Instrument lighting switch,
- Indicator lamp for insufficient fluid level in the hydraulic brakes, 16. Accelerator pedal,
- Brake pedal,
- Clutch pedal,
- Ignition switch
- Instrument cluster.
Instrument cluster VAZ-2103
- Fuel level indicator,
- Coolant temperature gauge,
- Oil pressure gauge,
- Tachometer,
- Daily mileage counter,
- Speedometer,
- Odometer,
- Indicator lamp for turning on the high beam headlights,
- Turn signal indicator lamp,
- Indicator lamp for turning on side lights,
- Trip counter reset button,
- Battery charge indicator lamp,
- Indicator lamp for the carburetor choke control handle,
- Parking brake indicator lamp,
- Heated rear window switch,
- Insufficient oil pressure warning lamp,
- Rear fog lamp switch,
- External lighting switch,
- Fuel reserve warning lamp.
Why are the icons different colors?
The icons on the instrument panel have different colors so that the driver can determine the severity of the alert. Therefore, the priority is the color classification of significant “hieroglyphs”:
- The red color of the indicators, as in the proverb about a traffic light, warns: “If you see a red light, stop! Not moving, no moving!” It notifies of serious violations in the control system or non-compliance with safety standards (for example, a picture where the car door is open or the handbrake is not released).
- Yellow (orange), “color” may indicate an emerging need for maintenance or repair of any component or mechanism.
Important! Exceptions include Renault models. In them, orange icons indicate the normal functioning of the fog lights or rear window heating system.
- If the light turns green or blue, you can rest assured. The running system is working properly and in normal mode. You can start moving.