Many motorists have encountered the problem that the gearshift lever begins to dangle. What is the reason for this phenomenon? You can immediately determine that the problem lies in the mechanics of the link between the lever and the gearbox. The article will tell you how to fix the problem and tell you about some of the nuances of the process.
Video about how the gearshift lever on a VAZ-2114 can dangle:
The video will tell you how to eliminate a loose gear lever.
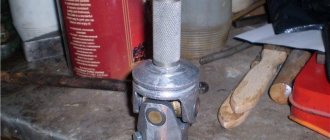
Tool for repairing gear knob fastening
In this article we talk about this lever.
Before starting any repair and restoration operations, the motorist needs to collect tools. So, to eliminate the looseness of the gearbox lever you will need: a 13-size wrench and sandpaper.
The gearshift lever is loose: replacing the bushing on a VAZ-2114
Fearing that repairs will take a lot of time and effort, many car enthusiasts postpone it indefinitely or pay huge sums to a car service center. But, in fact, as practice shows, the procedure itself takes little time and almost every car enthusiast can handle it on his own.
So, let's consider the sequence of the process step by step:
- We lift the gearshift knob casing or dismantle it altogether.
We remove the gearshift knob cover.
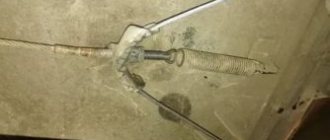
Unscrew the nut securing the gearbox linkage
Disconnect the rod from the gearshift knob
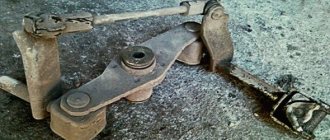
Worn parts of the gear lever bushing
Video about getting rid of vibration on the gear knob
Let's get started
The most common factor influencing the “inadequate” behavior of the gearshift lever in the VAZ 2114 is the first reason described above. Therefore, this is where we should start solving the problem. To do this, you will need the following tools: electrical tape, sandpaper (grinder), ruler, 13mm wrench and lubricant.
Actions are performed in the following order:
- Remove the handle cover.
- Unscrew the nut and remove the handle and rod.
- We take out the bushing.
- We remove the plastic bushings and clean the metal bushings from dirt.
- We measure 2-3mm from the edges with a ruler, draw a line, glue electrical tape under the line for convenience, cut off the excess with a grinder (you can use sandpaper, but this will be a serious test).
- We put everything in place, lubricate it if necessary, don’t forget to tighten the nut, and put on the casing.
- Enjoying the silence.
There is a second way. It's a little more complicated. Washers are cut out of the plastic cover, or special rubber (plastic) nuts are purchased. You need to screw them on both sides of the drawstring, then you may not have to grind it down (although usually you still have to). The method is designed to reduce rattling by dampening vibration with rubber or plastic.
[custom_ads_shortcode2]
Causes of gearshift lever failure
The VAZ 2110 high-speed gearbox is equipped with mechanisms that are designed to withstand heavy loads. The VAZ gear knob copes with its functions perfectly. On the VAZ 2110 – 2112 variants there is a gear shift cushion. This element also has another name: “butterfly”.
It is advisable to understand the reasons why the VAZ 2110 gear shift lever needs to be repaired. As a rule, checking this element is necessary if extraneous noise from the gearbox is noticed.
There are several reasons why a rattling sound began to be noted from the gearbox. In particular, these are:
- defective spare parts;
- spring breakage;
- wear of spare parts related to the engine.
Manufacturers and prices of analogues
Gear shift levers are also produced by other manufacturers:
- Sphere AutoBra 2138-K (together with a leatherette cover, with red inserts) – 390 rubles;
- Sphere AutoBra 2138-SR (together with a leatherette cover, completely black) – 390 rubles;
- Sphere AutoBra 2140-CH (together with a leatherette cover, black, perforated surface) – 450 rubles;
- Sphere AutoBra 2141-Sr (together with a leatherette cover, the lever itself is gray) – 400 rubles;
- Azard KPP-00132 (black set with genuine leather frame) – 480 rubles.
When is it necessary to adjust the gearshift lever?
The need to carry out this procedure arises if the first gear does not engage. Such a manifestation as ringing of the scenes may be the result of a defect in the factory production of this spare part. Also, on a VAZ 2110, adjusting the rocker can help if the speed at the gearbox is difficult to engage.
Thus, each of these reasons leads to the appearance of play in the gearshift knob on the VAZ 2110. Taking this into account, this mechanism is subject to mandatory diagnostics. Timely detection of faults will allow the motorist to avoid problems with the gearbox.
Handle from Vesta to Priora
A detail from Vesta on Priora attracts the attention of many VAZ-2170 owners. Even analogs cannot compete with it. The insert on the gearshift lever itself is made of high-quality black mirror plastic with a silver edging. The catalog number of the standard part for the VAZ 2170 assembly is 8200-379945. Cost with dust cover – 2,000 rubles.
It is important to note that there will be no problems with installing the gear shift part - the mounting is similar. Completion of minor tuning should be indicated by a thorough check of the lever's functionality. It is better to detect the lack of “response” of the box while the car is standing still. Carry out a little diagnostics, then hit the road.
Sources
- https://avtonomnaya-gazifikaciya.ru/priora/zamena-ruchki-pereklyucheniya-peredach.html
- https://fastmb.ru/autoremont/190-kak-snyat-rychag-pereklyucheniya-peredach.html
- https://CarsUp.ru/transmissiya/sborka-rychaga-kpp-vaz-2107.html
- https://e-motors96.ru/prochee/zamena-rychaga-kpp-na-vaz-2101-vaz-2107.html
- https://moto-sol.ru/diagnostika-i-remont/kak-snjat-ruchku-kpp.html
- https://3xru.ru/kak-snyat-rukoyatku-pereklyucheniya-korobki-peredach/
Restoring the functionality of the VAZ 2110 gear shift lever
How to remove rattling gear lever on a VAZ 2110? It seems possible to eliminate this manifestation yourself. If the problem lies in the spring, there is no need to disassemble the box or take other complex actions. In some cases, the problem can be eliminated by purchasing a repair kit for the rocker, including bushings, washers, etc.
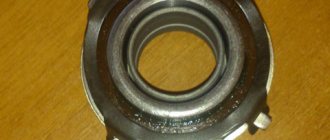
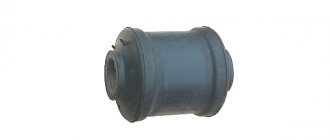
The main purpose of the bushing is to hold the lever in a certain position. This element experiences heavy loads. Given this, it may burst over time. The result of this is excessively free movement of the lever. The bushing must be replaced.
When installing the spring, it is recommended to wrap the handle with a tourniquet to ensure a tight fit.
To install new plastic or rubber washers from tools, you need a set of keys, files, and a screwdriver. You also need a plastic cover, from which a washer is cut out using scissors.
- Removing the casing from the gearshift lever.
- The nuts and screw are unscrewed.
- The bushing, washer and bolt are removed.
- The washer is cut to fit the sleeve.
- All dismantled elements are installed back.
DIY reupholstery process
Reupholstering the interior yourself is a painstaking task that can take you more than one day. All work can be divided into several stages:
- car seat reupholstery;
- ceiling reupholstery;
- door reupholstery;
- front panel reupholstery;
- armrest reupholstery;
- re-upholstering the steering wheel and gear knob.
In order for the work to go faster and better, you should follow several general rules that apply to both large parts with complex shapes and smaller elements of the car.
- All parts must be dismantled, even the smallest and most inconspicuous ones. It may seem to you that pasting, for example, a gearshift knob can be done inside the cabin, but this is not so. The seams will turn out crooked, and the space around will be covered with glue.
- Don't forget to wash the parts and remove any old coating.
- If there is serious damage to the surface to be pasted, for example, dents or deep cracks, they must be restored. To do this, you will additionally need a special putty composition and primer for plastic.
- Leather, both natural and artificial, is an elastic material, so it must be stretched well. If you don't do this, the coating will end up sagging unsightly. To make the leather stretch better, soak it for 20–30 minutes in hot water, but not boiling water. You can determine the required temperature without a thermometer. Use water that you would bathe in yourself.
- During the process of covering the material, warm it up with a warm stream of air from a hair dryer. If you don’t have it in your arsenal, you can replace it with a powerful household one. However, this will affect the elasticity of the skin, so it is better to use a special tool.
- It will be quite difficult to perform some operations alone. So call a reliable friend for help.
When cutting material, be economical. Remember school labor lessons and crafts made from colored paper. You need to arrange the parts patterns so that there is as little empty space between them as possible. This will reduce the amount of trimming.
Upholstering the seats
To ensure that the seats are in harmony with the rest of the interior, you can simply sew covers for them. This work is perhaps one of the most difficult, since you need to be able to make patterns according to the parameters of the chairs, and also use a sewing machine. It is best to contact a car workshop for this. But if you are determined to do everything yourself, then read the instructions carefully.
- Measure the height and width of the seat cushion and backrest, as well as the headrest.
- On paper or transparent polyethylene, make patterns of the parts, taking into account all measurements. For greater accuracy, apply the polyethylene directly to the seat and trace the contours.
- Cut out the resulting parts.
- Attach the patterns to the wrong side of the material and outline them with chalk. Leave about 2-3 cm as a margin for later sewing together.
- Using sharp scissors, carefully cut out the leather pieces.
- Before sewing the elements together with a machine, process them with a hand basting stitch. This will ensure that you receive the correct form. Do not pull the parts tightly together. All you need at this stage is to combine the material to get an idea of what the finished product will look like. In case of alteration, such a seam is easy to rip out. To prevent the elements of the product from falling apart, secure them together with pins.
- Carefully try on the resulting covers. If the shape matches and no changes need to be made, start working with the machine.
- If you chose thin leather, but want your covers to be thicker and more durable, use this trick: make similar patterns from thick mattress fabric, and then sew them with leather back to back. If desired, the internal space can be filled with foam rubber. This will make the covers even softer.
- Don't forget to add hooks and garters to secure the cover to the chair.
- If the seats have airbags installed, do not sew these areas on the cover with a sewing machine. It will be much easier to rip a hand stitch.
During the fitting phase, make sure that the covers do not interfere with the operation of the seat belts.
Carefully measure the length and width of all seat components Make a pattern for the front seat, based on the diagram Make a pattern for the rear seat cushion, based on the diagram Make a pattern for the rear seat back, based on the diagram Connect all the parts as shown in the figure
Let's move to the ceiling
Despite the fact that the ceiling has a fairly large surface area, it is quite easy to cover it with material. This is due to the lack of a pronounced relief, such as on the front panel.
- First of all, remove all hanging elements from the ceiling, and then dismantle it. The dismantling principle will vary depending on the car model. This usually requires removing the front seat. The correct procedure is described in detail in the vehicle's operating manual.
- Take a stiff sponge and remove the old coating.
- The old glue will remain on the ceiling. It should also be removed. The easiest way to do this is with a degreaser.
- In order to prepare the surface for applying glue and improve adhesion, the ceiling must be sanded. Use fine grit sandpaper.
- Pasting begins from the center of the ceiling. You need to apply a 10 cm long strip of composition to the central part of the surface.
- Take a piece of material of the required length and attach it to the ceiling. Press the central part and then smooth it with a rubber spatula.
- In order to glue the rest of the skin, you need to apply glue in a similar way at intervals of 15 cm. After each strip, the material must be pressed and smoothed. Don't forget about tension. This way you will avoid sagging.
- Make sure that no folds form. When the material is completely glued, iron it further and then dry it with a hairdryer. When the glue hardens and the leather dries, the product will take its final shape.
- To complete the work, the edges need to be wrapped on the back side of the ceiling and glued, and the excess should be cut off.
Before you start gluing the ceiling, remove the old coating with a hard sponge. Apply thin strips of glue at regular intervals and stretch the material. Press the material and dry it with a hair dryer.
Due to the impressive volume of the ceiling, you may need an assistant during the process of reupholstering it. Have one person stretch the leather while the other applies glue and presses the material to the surface. This way the work will go much faster, and the result will be of better quality.
Armrest reupholstery
In the cabin, only the upper part of the armrest is visible, so it is enough to cover only it. It's very easy to do.
- Remove the armrest cover.
- The new sheathing can be glued directly on top of the old covering.
- Cut a piece of material long and wide enough to completely cover the part.
- Apply a thin bead of glue to one of the edges of the armrest and adhere the material to it.
- Heating the skin with hot air from a hairdryer, stretch it and glue the opposite edge.
- Stretch the leather over the sides of the lid and glue them.
- Cut off the excess.
Glue the skin first to the top and then to the sides
If you want to cover the side parts of the armrest with material, then you will have to make a pattern. There are two ways to do this. The first is to measure the length and width of each of the edges of the armrest, and then draw up a pattern using these measurements. The second method is simpler and more accurate; we will describe it below.
Gearbox knob trim technology
The easiest way to tighten the gear knob is. However, this process uses a certain method, which will also be useful to you when pasting the steering wheel, doors and front panel. In addition, you can use it by covering the entire armrest.
- Wrap the dismantled gear knob with cling film.
- Cover it tightly with masking tape on top in several layers.
- Use a marker to mark the locations of future seams. To do this, you need to trace the curves of the handle.
- Use a utility knife to cut the tape along the lines. If the handle has a standard shape, then you will most likely end up with two parts.
- Attach the resulting patterns to the wrong side of the material, and then trace them.
- Cut out the leather pieces and then sew them together.
- Turn the resulting product out and then pull it onto the gearshift knob. To make the leather stretch better, do not forget to soak it in hot water.
There is another method of covering this part with leather. For it you do not need to sew the material after cutting. Using a sewing machine, make stitches along the edge, retreating 3 mm into the part. The stitches can be made with threads to match the skin tone, or they can be contrasting to create a certain image. Next, you will need to place the parts on the glue, and then use a needle and strong thread to lace the resulting cover, passing the needle under the stitches.
Cut the masking tape along the lines Cut out the leather pieces Sew each piece at a distance of 3-5mm from the edge Pass the needle and thread under the stitches and pull the pieces together
There are various lacing methods: macrame, sports, herringbone and others. Choose the one that seems most aesthetically pleasing and easy to implement.
Choose the type of lacing that is most convenient for you
Improving the steering wheel
Making a pattern for re-upholstering the steering wheel is done in the same way as described in the previous section: the surface is wrapped with film, and on top with tape. Lines are drawn with a marker at the seams. They need to be done on the inside of the steering wheel, as well as on the edges of the spokes.
- The resulting parts need to be transferred to the material, retreating about 2 mm inward so that the skin does not sag. Cut out the resulting elements and then sew them together.
- Sew the edges of the parts on a sewing machine, just as described in the alternative option for covering the gearshift knob.
- Attach the cut out parts to the steering wheel. To prevent the material from creeping, place it on a thin strip of glue. There is no need to achieve strength at this stage. In any case, you have lacing in front.
- Take the needle with the thread threaded, and then, passing it under the stitches, lace the braid. You can use different types of lacing for this.
- It is best to start lacing from the bottom of the handlebar and then move counterclockwise.
- Don't forget that you are working with leather. It needs to be constantly straightened and tightened.
- Dry the completely laced braid with a hairdryer. After this, it will take its final form.
We recommend: Functions and purpose of engine oil in an engine
Cover the steering wheel with masking tape in several layers. Remove the masking tape from the steering wheel. Transfer the contours of the parts onto the material. Sew the parts together. Attach the resulting cover to the steering wheel. Pass the needle under the stitches on one side and the other of the cover and pull the sides together.
To make the interior look more stylish, use threads of the same color and the same seam for lacing the covers on the steering wheel and gear knob.
Door reupholstery
The pattern for covering the doors is also made using masking tape. Be sure to mark the locations of the door handle, as well as the window handle. You will need to cut out these areas. The patterns are traced on the material, and then the resulting parts are cut out.
- Before applying glue, all plastic elements must be thoroughly sanded and then degreased.
- Along the line bordering the glass, apply a thin strip of glue and press the material to it.
- Directing a stream of hot air onto the skin, stretch it across the entire door. Watch the holes for the handles.
- Glue the middle and edges of the product in this way.
- To make the coating adhere better, smooth it with a rubber spatula.
- Cut off the excess edges.
- When the door covering is finished, wait for the material to dry completely.
Cover the surface of the door that you will cover with tape with tape. Draw lines on the places of future seams, and then cut the tape along them. Cut the fabric in accordance with the shape of the surface to be covered. Before applying glue, the plastic surface must be sanded and degreased. Press and smooth the leather.
Front panel reupholstery (torpedo)
Reupholstering the front panel is one of the most difficult processes when upholstering the interior, so it is best to do it last. If the part has many curves, then first you need to make a pattern. This is done using masking tape, according to the same principle as when making a cover for the steering wheel and gear knob.
- Trace patterns from masking tape onto the sheathing material and add about 10 mm for the seams.
- Connect the parts with a basting stitch in the same way as you did when making chair covers.
- Try on the resulting product. If its shape matches the shape of the panel, process the seams using a sewing machine.
- Since plastic is used to make the panel, it must be sanded with a fine-grain abrasive, and then the surface must be degreased.
- Apply several strips of glue to the prepared surface and attach the resulting cover.
- Smooth out the material using rubber spatulas or rollers. Make sure all seams are in place.
- Dry the product with a hairdryer.
Cover the front panel with a thick layer of masking tape Cut out the parts from masking tape Transfer the contours of the parts onto the material and cut them out Sew the parts together and glue the material to the panel
If the torpedo has a simple rectangular shape, then the re-upholstering process can be significantly simplified and the step of making a pattern can be skipped. Simply cut a piece of material that is long and wide enough, then glue the leather to the top and stretch it over the entire panel. At the same time, help yourself with a stream of air from a hairdryer and smooth the material with a spatula.
Gear shift knob, or what is the design of the system?
A feature of all manual gearboxes is the need to manually operate the lever. We can assume that it is precisely this that performs the most important function in determining the speed limit of your movement. This means that without it, driving a vehicle becomes simply impossible. The principle of operation of the lever is quite simple: by tilting it in the longitudinal and transverse directions, you set it to a position that corresponds to a certain speed.
The gear shift lever handle is connected to the synchronizer via a fork, the position of which transmits information about the number of the selected speed. The synchronizer sets the gears of the gearbox so that the generated engine power allows the car to move at a given speed. When the position of the lever corresponds to neutral gear, it is held in place by springs. The gear shift pattern is often depicted on the head of the lever.
Gearbox cover: price and manufacturers
Even a malfunction of such an insignificant part as the gearshift lever cover can cause quite a lot of trouble. There are several options for a box cover that can be installed instead of a torn standard one:
Autobra 2183-CH. Black, made of genuine leather – 400 rubles.
Universal options. Manufacturers often present a cover (boot) for Lada Priora along with a lever. It can be completely different: black, two-color, with or without edging. You don't always want to change everything at once, so searching for a new boot may take some time.
How can the gear shift lever be positioned?
The location of the gearbox levers can be either floor-mounted or steering column mounted. And despite the fact that the latter is considered more convenient to use, nevertheless, in most cases, car manufacturers prefer the first option. This is due to some disadvantages of the steering column arrangement, including: low speed and clarity, the likelihood of incomplete gear engagement, the rods wear out much faster, sometimes they can jam, as well as “knocking out” the gear.
But in both cases, the design of the gear shift lever remains the same. The only differences can be in length, and if previously it could reach even 30 cm, today manufacturers strive to make it as small as possible, eliminating too much travel of the gear lever. Therefore, with a floor arrangement, nothing will change significantly in the design, but there will be noticeably fewer breakdowns.
Make or buy
Let's start with the main thing. Namely, from the idea of modernization. The gearshift lever is usually located inside the case, and the top handle itself, which the driver grabs when changing gears, can be plastic, silicone, leather, etc.
The leather option is usually found on more expensive models. And in Soviet or old domestic cars, glass knobs with flowers, roses and other once-fashionable handle decor options are not so rare. Now some people appreciate rare solutions, trying to decorate the interior of their own car with something similar. Making a complete lever attachment from glass, plastic or silicone is quite problematic. It's much easier to buy it. But you can sew the cover yourself if you have certain skills and desire.
Shift lever squeak and other problems
From all of the above, it is clear that this part is one of the most important in the entire gearbox, and if it fails, then driving such a vehicle becomes life-threatening. The most common reasons why such an emergency can occur are either mechanical damage or the consequences of incorrect operation. Here are a few breakdowns that you can easily detect on your own.
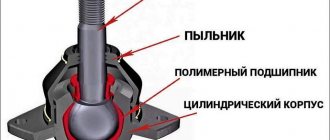
You should know that the gear shift knob should move freely, without jamming . If difficulties arise in performing this action, most likely the spherical washer or ball joint has failed. They need to be replaced urgently. The creaking of the gear shift lever also indicates a malfunction. If spontaneous shutdown occurs, then you should definitely check the spring; it is quite possible that it simply jumped off.
Do you know about the main malfunctions of the manual transmission knob?
The device, together with the gear shift mount, is quite simple. There are several basic faults that can be corrected or simply repaired part of the box drive. Malfunctions of the gear shift knob include the following:
- External signs of wear. The part itself can wear out quite well, lose its color and become “greasy”. This is unpleasant, because this appearance ages the interior, and the lever itself becomes unpleasant to hold in your hand.
- Torn cover. The cover will collect all the dust along with small grains of sand so that they do not get inside. If the cover breaks in at least one place, all the dust will fall down. It will interfere with the standard operation of the Priora gearbox mechanism, so that over time, signs of a malfunction of the large mechanism will appear.
- The gearshift knob dangles like a play. First of all, such play interferes with correct and quiet gear shifting.
How to repair a gear shift lever?
In any case, no matter what happens, repairing the gear shift lever involves replacing failed parts, and without completely removing it it will be impossible to do this. For this purpose, the plastic protective plate is dismantled and the hinge cage is released. After which it is necessary to move the jet rod to the side and remove the entire lever. But in order to free up access to all the plastic bushings and axles, it is necessary to remove the cover for the gear shift lever.
Check how the axle moves. If it is loose, then you need to change all the bushings, and do not forget to lubricate the new spare parts with special lubricant before installing them.
To replace the spring, it must be pulled out, and for this you need to dismantle the retaining ring and the hinge with the lever. If you cannot do without replacing the ball joint, you should carefully push the spherical washer apart with your fingers and remove the worn part. At the same time, when installing a new one, lubricate it.
The thrusts change as follows. There is a clamp at the bottom of the car; you should loosen it. Next you need to disconnect it from the hinges and, by unscrewing the fastening nut, you can freely pull out the rod. Installation of the new one is carried out in the reverse order. Thus, having replaced all damaged elements with new ones, you can drive safely. At the same time, do not forget that periodically it is necessary to adjust the gear shift lever.
Material selection
All work begins with the selection of material. Nobody forbids you to take some kind of rubber, fabric or any other option. But here the issue of practicality and operational stability should be taken into account.
It is optimal to choose one of the following materials.
- Leather. If we take practicality, quality, aesthetics and price-quality ratio, then leather cases are objectively the best. Only leather should be purchased specifically for cars, and not for haberdashery or furniture. These are materials that are completely different in quality and characteristics. Automotive leather has a polymer coating that additionally protects against mechanical damage, ultraviolet radiation, chemicals, oil, gasoline, etc. When selecting parameters, it is also worth choosing perforated leather without large pores;
- Eco leather. Fashionable and popular material based on polyurethane. Do not confuse with leatherette, which uses PVC. The latter does not breathe and has worse performance characteristics than eco-leather. Practical, inexpensive and easy to use. Although the skin is still a little inferior;
- Alcantara. A relatively new material that is very pleasant to the touch, does not fade, does not freeze, unlike leather, and does not crack. Don't be put off by the fact that Alcantara is thin. In fact, it is durable and wear-resistant. May cost slightly more than genuine leather. Plus, Alcantara is easier to work with and can be processed better.
Regardless of what you choose, each material is perfectly suited to the task at hand.
It doesn’t matter what kind of car you are going to sew a leather, eco-leather or Alcantara cover on.
Varieties of backstage
Despite the different design models, only two types can be distinguished:
- Long-stroke (standard, previously installed on cars of model 2109 and similar).
- Short-wheel drive (installed on Kalina cars).
Structurally they are very similar, only different in size. The advantage of short-throw ones is that with their help, gears are engaged easier and faster.
True, many myths have formed around the gear shift: some claim that the dynamic characteristics of the car are significantly improved. This is all wrong; there is no connection between the dynamics of the car and the view of the backstage. But still, the short-stroke one has advantages over the standard one.
Why change the backstage
There are situations when it is necessary to intervene in the gear shift mechanism due to the failure of a component. But there are cases when an extreme measure is required - replacing the VAZ-2109, 2114 rocker.
In these cases, replacement is required:
- An oil leak appeared due to damage to the oil seal. Only the oil seal can be replaced.
- Complete failure of the scenes.
- You have realized the advantages of a short-stroke design and you have the funds for this kind of tuning.
Symptoms of gear shift mechanism failure:
- Increased gearshift lever play. Please note that this behavior may also be caused by a loose cardan. Sometimes the bolt securing it gets screwed out, so to reduce the backlash it is enough to tighten it, and first apply a drop of thread locker.
- Difficult to shift into gear. Sometimes extraneous sounds are heard.
- Gear shifting is not possible.
- Inconsistency between the position of the lever and the selected speed. For example, the back one disappears, and the first one is in its place.
If a slight play appears, it is advisable to carry out diagnostics and identify the breakdown of the unit. Make repairs immediately, otherwise one or more speeds will disappear at the most inopportune moment.
If you detect an oil leak from the gearbox, carefully inspect the crankcase. The leak will reveal itself. Lubricant usually leaks out through the CV joint seals and rocker panels.
In the latter case, to replace you will need to perform a number of actions:
- Purchase a new gearbox seal for VAZ-2109, 2114. Its price is about 100 -200 rubles.
- Drain the oil completely from the gearbox by unscrewing the plug from the bottom using the key “17”. If necessary, you can replace the lubricant later. It is recommended to pull out the upper dipstick to facilitate oil drainage.
- Disconnect the cardan from the rocker arm.
- Remove the boot, use a 10mm wrench to unscrew the bolt securing it to the gearbox rod.
- Using an awl or a thin screwdriver, remove the old oil seal. Inspect it for damage.
- Install the new oil seal using a pipe or large washer to press in.
After replacement, install the boot. Assess the condition of the cardan: if it has too much play, it will need replacement. After carrying out all the work, be sure to check that the speeds are turned on correctly.
In most cases, it is not the rocker itself that fails, but the cardan. Due to its displacement, even a small one, a failure occurs in the gear shift mechanism.
Standard VAZ-2109,2114 scenes are rarely installed during repairs; similar parts from Lada Kalina are used. The replacement looks like this:
- Using two keys set to “13”, unscrew the clamp securing the cardan to the rod.
- Using a screwdriver, pull the boot towards the box housing. If desired, you can remove it completely, and if it has cuts or other damage, replace it with a new one.
- Unscrew the fixing bolt with a “10” key.
- Knock down the cardan with a hammer, strike carefully so as not to damage anything.
- The Kalinovsky universal joint is much more durable and reliable, so install it instead of the standard one.
- Reassemble the entire structure in reverse order. But do not rush to tighten the bolt on the clamp - adjustment is necessary.
Replacing the universal joint
- Working with the clamp (on the drive rod it must be released and then pulled off the rod);
- Knocking down the cardan (before this, you need to remove the boot; you can knock down the part with gentle blows of a hammer);
- step 3 - installation of a new part (the procedure is performed in the reverse order: putting on the boot, fixing the cardan, putting the drive on the rod; the clamp is not tightened).
Next you need to adjust the system. As a result of self-replacement of parts or simply over time, the rocker may become loose. Fixing this problem is quite simple. Watch the video on how to tighten the slide on a VAZ 2114:
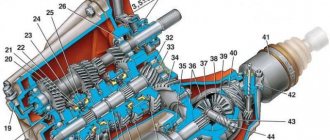
The gearbox is an important link between the car's power unit and its wheels; with its help, the nature of the torque changes. This happens due to a change in the gear ratio between the gears in the unit housing. In most cases, the driver himself decides when which gear should be engaged, that is, he mechanically changes the position of the lever and thereby changes the position of the driven gear relative to the drive gear. Let's figure out why the gearshift knob rattles on front-wheel drive cars such as the VAZ 2114 and similar 13 and 15 models of this family.
Manual transmission lever
First, we need to understand why this happens, where the vibration comes from, and why it’s actually not that bad on this particular car. To do this, we need to remember which drive is here and how the engine and gearbox are located. The car is front-wheel drive, so the gearbox is located perpendicular to the direction of travel, that is, the lever in the cabin does not fit directly into the box; a rocker is used. In the classic series with rear-wheel drive, the lever is directly inserted into the box, and if it starts to rattle there, then this is a sure sign of problems with it.
The VAZ 2114 gear knob works differently and has a special rod system so that the driver can change gears comfortably. The reasons for the rattling of the gearshift knob lie in the banal little shortcomings of the engineers who developed this mechanism:
- Incorrect connection sleeve size;
- Lack of gasket;
- The parts simply didn't fit together.
All these problems are revealed by the very small metal bushing that connects the rods to each other directly under the lever. In one case, vibration of the gearshift lever begins due to the fact that it was inserted incorrectly, leaving a gap. Or maybe the bushing was initially chosen a little smaller than what was needed, and it was not inserted tightly. In addition, then it was decided to simply wrap the bushing with a rubber gasket to avoid the appearance of a gap.
It is precisely because of the constant impacts of metal on metal that that same unpleasant iron grinding and rattling of the lever appears.
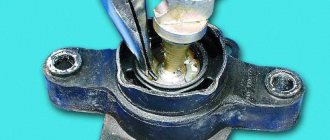
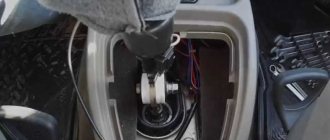
Self-repair begins with the fact that you need to figure out how to remove the gearshift knob on a VAZ 2114 . This is usually done simply and the owners of similar 15 and 13 models should do the same, if, of course, they have similar problems. So, the algorithm of actions looks like this:
- First you need to remove all the armrests and bathtubs that drivers like to furnish the space between the seats with. This must be done so as not to spoil them in the process of self-repair.
- Next, you need to carefully remove the casing from the lever, since it can simply be torn, but it still costs money, and it adds significant aesthetics.
- Now you need to find a bolt and nut under the lever, the latter is usually unscrewed with a regular open-end wrench 13, so there should be no problems with this, you just need to have the appropriate wrench. After unscrewing, take the bolt out, it is also advisable not to drop the nut.
- That's it, the lever, together with the very bushing that causes the VAZ 2114 gearbox lever to rattle, remains in our hands.
Now you need to carefully inspect the bushing externally, after all, it is precisely because of it that the gearbox lever 2115 rattles. If there is any external damage that is too obvious and signs of wear, then you may have to look for a new part so that you do not have to repeat these manipulations in the future . Now let’s figure out what operations need to be carried out in order to understand how to adjust the rocker on a VAZ 2114:
- We remove the outer plastic braid of the bushing to free its iron body.
- Now we need to see if there are any signs of friction on it. Their presence will indicate that the size is incorrect. They will be especially pronounced if the sleeve is slightly longer than necessary. If this is confirmed, then these extra millimeters are the reasons why the VAZ 2115 gearbox lever rattles. In this case, you need to try on how much excess is in the hole and simply grind it off with a file, usually there are only 1-2 millimeters there.
- Now you need to select some kind of gasket according to the shape of the part, or simply wrap it with electrical tape so that it fits into place more tightly and then does not move.
So it became clear how to eliminate the rattling of the VAZ 2114 gearbox lever and why this generally happens. After our simple manipulations, the vibration should completely disappear, now the lever will always be in a calm state.
The described methods do not require any special knowledge and can be performed by an ordinary person in his garage with a minimum set of suitable tools.
Content
Backstage adjustment
There is nothing complicated in the procedure; you can do it yourself, but you will have to run from the pit to the salon.
Yes, it is advisable to do this work in a pit or overpass. You need to act approximately according to this principle:
- Loosen the nut on the clamp.
- Set the gearshift lever to the reverse gear position.
- Set the box rod to the reverse speed position. This is difficult to achieve, so adjustments will have to be made.
- Check how the gears shift. If the rear one is too far to the left, loosen the clamp and turn the cardan counterclockwise. If the fifth speed (including reverse) has gone too far to the right, then the cardan rotates clockwise.
By adjusting the position of the gearshift rocker, you will notice that when the lever is installed in the middle, neutral speed will be engaged. When turning on the fifth gear, the lever should not catch the passenger seat, and when moving in reverse, the driver's seat should not interfere with the movement of the lever.