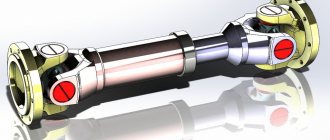
Cross design
The mechanism of the steering shaft crosspiece performs a transport-guiding function and is designed to transmit the torque of the wheel to the gear of the rack and pinion assembly. The transmission of torque is carried out by the steering shaft cardan, to which the crosspiece is attached. In many models of modern cars, the crosspiece performs the same function and has a similar shape. The cross itself consists of four identical protrusions, each of which is equipped with needle-type bearings. All elements of the cross are made of high-strength steel and must withstand high loads.
Lada Granta suspension device
Front suspension device (diagram)
| 1 — cover; 2 — ball joint; 3 - retaining ring; 4 — hub bearing nut; 5 — protective cap; 6 — hub; 7 — hub bearing; 8 — steering knuckle; 9 — front wheel brake disc; 10 — brake mechanism shield; 11 - nut; 12 — eccentric (adjusting) bolt; 13 — rotary lever; 14 — front suspension spring; 15 — shock absorber rod; 16 — upper spring cup; 17 — upper support of the shock absorber strut; 18 — shock absorber rod nut; 19 — bearing of the upper support of the shock absorber strut; 20 — spring gasket; 21 — front suspension compression buffer; 22 — protective casing; 23 — telescopic stand; 24 — front wheel drive shaft; 25 — bracket for mounting the anti-roll bar cushion; 26 — front suspension stretch; 27 — anti-roll bar; 28 — stabilizer bar; 29 — front suspension arm |
Signs of wear on the crosspiece
Often, motorists do not pay attention to insignificant signs that it is time to make repairs, and wait until the problem makes itself known publicly and this is fraught with consequences, especially when it comes to loss of vehicle controllability.
The first signs of wear on the crosspiece appear as:
- the presence of noticeable resistance to the steering wheel when rotating at speeds above 80 km/h;
- delayed wheel turning and loss of sensitivity (delayed response of wheels and steering shaft);
- increased free play angle of the wheels (popularly this symptom is also called “Steering play”);
- uneven rotation of the steering wheel, the steering wheel moves with sharp jerks;
- obvious grinding or knocking noise that occurs when the steering wheel is rotated; the grinding becomes especially noticeable and obvious on an uneven road.
Most often, motorists turn to a car service center to replace the steering shaft crosspiece mechanism only when the last sign of a malfunction appears, but in vain, because in the event of an emergency, the steering control will not be able to adequately respond to the driver’s efforts, and sometimes, the steering control may even fail, this is already fraught with very big troubles.
Repair of the shaft cross is carried out every 50 - 100 thousand, it is better more often, otherwise it will have to be completely replaced with a new one.
To replace, you will need to purchase a crosspiece - on average 150-300 rubles, some car services claim that for the steering to work correctly, you need the entire steering shaft (4 - 7 thousand rubles), but on most cars it is enough to change only the crosspiece.
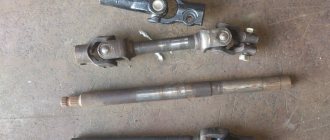
Self-replacement procedure for the steering shaft crosspiece
The replacement takes place in several stages:
- We lift the car off the ground using a lift or by rolling it into a hole, but you can also get by by lifting the front of the car.
- We set the steering wheel at a right angle and fix it, and also fix the steering wheel; during replacement, movement of the wheels and steering wheel is not desirable.
- To access the steering shaft, remove the left (right) wheel. We go into the salon and unscrew the fastening bolt; after a slight effort, the steering shaft should come off the steering wheel.
- Under the car, carefully remove the upper and lower casings, check the amount of dirt on the crosspiece and steering shaft driveshaft; not all cars have them protected by a boot (purchase and installation of such rubber will cost 100-200 rubles).
- We find and unscrew the bolt on the crosspiece; you may have to use a WD tool. Once the bolt is removed, the steering shaft should easily come off the steering rack.
- Pull the shaft down and pull it out. Often the crosspiece mechanism is rusty and dirty; first of all, you will need to wash it.
- For flaring you will need a sprocket of the appropriate diameter; fix the shaft in a vice.
- Using a head (presumably a 8-pointer), we knock out the cross first in one direction (remove the bearing cup), and in the other direction (also remove the cup).
- Then we take a new crosspiece and insert it in the same order - we start one side first, and then the other, press it in using a vice (but not too tightly, the metal may wrinkle).
- We align both cups and roll them with a chisel and hammer.
The final assembly procedure is no different from disassembly - the main thing is to maintain order. So, we have replaced the steering shaft crosspiece; if everything is done correctly, the handling will respond better to your efforts.
The steering crosspiece is the key to the control of the car; it is responsible for transmitting the rotation of the wheel to the rack and pinion assembly through the steering shaft cardan (the crosspiece itself is attached to it). Not just the ease of driving, but the safety and health of all passengers depends on its correct functioning. If the car has been in use for more than 100 thousand kilometers, it most likely needs repairs; it is worth studying in advance the question of when and how to change the crosspiece on the steering cardan.
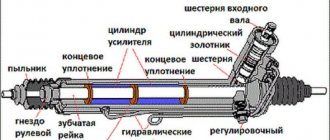
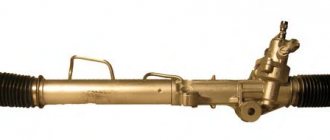
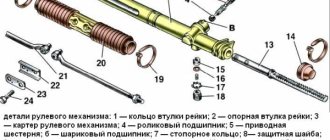
Rack and pinion mechanism
If you touch on the steering mechanism on the Lada Granta, you need to notice its design aspects and characteristics.
- The steering column can be adjusted to tilt. The steering wheel itself is endowed with the ability to lock due to the presence of a special anti-rotation device, which is structurally connected to the ignition switch.
- The rack and pinion mechanism of the steering unit allows you to change the ratio of gear ratios in different operating modes.
- A mechanism based on the electrical principle of operation is integrated into the system as an amplifier.
- The electric amplifier is equipped with a unit through which self-diagnosis of the entire unit is carried out and, if a deviation from the norm is detected, it directly excludes the amplifier from the overall functionality of the system.
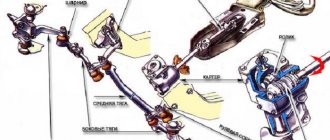
The principle of implementing the steering unit circuit is quite simple. The mechanism, which has a pair of gears and a steering rack, is fixed in the engine compartment using rubber supports on a specially designed shield. The reliability of such fasteners is ensured by bolts attached to the body. The ability to transmit rotational force to the wheels is carried out through a pair of steering rods, which are connected to rotary levers fixed on the bodies of the Lada Granta shock absorber struts.
The interaction of the gear pair is regulated using a gap, the value of which is set at the manufacturer’s factory. The meshing accuracy is controlled and adjusted by means of a spring stop that presses the rack to the gear.
The indicated gap value under standard conditions reaches 0.1 mm. During operation, the gap changes due to the gradual wear of individual elements of the steering unit. This may be one of the main reasons causing the previously mentioned knocking noise. We will also not ignore other factors that can cause this annoying knock for the Lada Grant owner, namely:
- the fastening of the rack itself to the body elements is weakened;
- the appearance of play in the ball joints of the rods or the tips of the steering unit;
- wear or damage to the steering shaft gear teeth.
In the first case, you need to know how to tighten the steering rack, as well as how to replace it.
How do you know when it's time to change the driveshaft?
Signs of its malfunction are noticeable, but have little effect on the quality of movement, which is why many car owners ignore the problem until the last moment, almost to the point of losing control of the car. You should not ignore signs of a malfunction; if at least two appear at once, you need to immediately carry out diagnostics. What are the signs of wear or breakage?
- When driving at a speed of more than 80 km/h, the steering wheel resists when turning, making it more difficult to turn.
- The steering wheel turns unevenly and jerks when turning, which puts additional stress on the hands.
- The steering wheel has become less sensitive, and the turning of the wheels responds to control late.
- The appearance of noticeable play (free movement of wheels with stable fixation of the steering wheel).
- Vibration of the driveshaft. Check with a tachometer to see if this vibration appears at one speed or at different speeds. Only vibration at different speeds indicates problems with the cardan; if it occurs at different speeds, but at the same frequency, then you need to think about how to change the steering cardan on a grant, because the speed of the cardan was different at that time.
- Knocking and grinding noises in the steering wheel, especially when driving on rough roads.
Power steering and power steering: do-it-yourself installation
The electric booster first appeared on Kalina, then on Grant and on the new Priora. You can drive a car without an ESD. But if a car owner previously owned a car equipped with a hydraulic or electric booster, then, at a minimum, he will experience great inconvenience. On the Lada Granta in the minimum configuration, the manufacturer does not install electric power steering, so many owners of such cars decide to install the power steering themselves. This procedure is not the easiest, and the unit is not cheap. But its presence means a comfortable ride, maneuverability and safety.
Installation does not require any special knowledge or skills; minimal experience and a set of tools are sufficient. If, nevertheless, the question arose about installing electric power steering on the Lada Granta, then when purchasing an electric power steering unit, you should pay attention to its number.
The set of numbers contains a definition of the place of production, these are the last two digits:
- 00 – made in Makhachkala (not the highest quality, has many negative reviews);
- 04 – Korean amplifier, you can buy it in a store, a rare copy at auto wrecking yards;
- 02 – made in Kaluga, a good medium option.
To install the amplifier you will need a set of wrenches, screwdrivers and an angle grinder (grinder). Before proceeding with installation, the steering wheel, all steering column switches, the ignition switch, and the steering column with cardan must be removed. The further algorithm of actions is as follows.
- Knock out the bolts from the removed bracket in the form of a plate and cut off about 3 cm from the top with a grinder.
- Drill holes in the plate to mount the electric amplifier.
- Fix the cardan to the EUR.
- Place washers under the bracket (where the electric booster is mounted), and you can use them to adjust the steering wheel.
- Attach the electric booster, and then install the cardan into the rack.
How to change the steering cardan
- It is better to roll the car into a pit (at least raise it in front of the car).
- Fix the steering wheel and steering wheel at a right angle. You should also not move or touch the wheels during repairs.
- Remove the front wheel, then unscrew the mounting bolt through the interior. If all operations are carried out correctly, the shaft should come off the steering wheel on its own.
- Remove both casings (top and bottom), make sure there is a boot on the steering shaft. If it is not there, it is better to install it after repair; the part costs no more than 200 rubles.
- Unscrew the bolt on the crosspiece, then the shaft will come off the steering rack on its own.
- Pull down and pull out the shaft. Before repairing, it is better to wash it from dirt and rust; it also affects the quality of movement.
- Secure the shaft in a vice. When it is secured, take the head and knock out the cross on one side to remove the bearing cup. Repeat the same action from the other end.
- Insert a new cross in the same order (one at a time on each side).
- Press in a new crosspiece with a vice (do not overpress).
- Align the cups and roll them with a hammer and chisel.
- Install the new part on the car in reverse order.
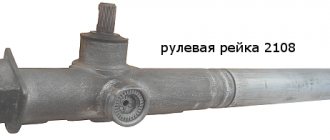
Many car owners note when they are looking for where and how to change the steering joint on a Toyota that steering crosspieces from the VAZ-2015 are very suitable for this brand. This greatly simplifies the process of finding parts and reduces the overall cost of repairs.
Preparatory actions, dismantling unnecessary parts
To remove the crankcase protection, you need to unscrew 4 screws located in one row near the bumper. Also, unscrew two screws having a standard size of M6 × 16. In some configurations, the protection consists of two parts, but in this case they are attached only with self-tapping screws. These words are illustrated by the following photo:
First, unscrew the “10” screws, and then the two “18” screws. In the second case, there will be more screws (eight).
Now let's look at how to remove the battery. First of all, disconnect its terminals. Then, you need to move the additional fuse box to the side. In general, actions are performed according to the photo:
You also need to remove the mounting platform itself, for which you unscrew 4 screws. You will need a 13mm wrench, as well as a 10mm spanner. We will repeat the entire sequence again:
- Unscrew the nuts holding the battery terminals using a wrench 10;
- Remove both terminals;
- Move the fuse box to the side by unscrewing 2 fastening screws;
- Unscrew the nuts with a 10mm wrench and remove the battery;
- Unscrew the screws with a 13mm and remove the metal plate.
Why might the driveshaft break?
The most common reason is constant use of the car on uneven roads, driving over potholes and ruts. During such shaking, a large load falls on this moving part.
The second reason may be oil leakage due to a leaking oil seal. Because of the oil, the sealing ring https://podshipnik-mo.ru/koltsa-uplotnitelnyye hardens, and a gap appears between the oil seal and the rod. Or the mirror on the driveshaft connection is broken, and various roughness and burrs appear on the rod. In this case, the splines will have to be changed or sanded (but this is a temporary remedy).
We noticed that when driving on uneven roads (for example, gravel), vibration is strongly transmitted to the steering wheel. It is also possible that a knock may occur, but it is not the steering rack that is rattling. The cause of the rattling may be play in the steering shaft. It is proposed to solve the problem with the help of a simple modification, which was used on VAZ 2108-15 cars.
Knocking and rattling noises appear due to gaps in the mating parts. To eliminate them, insert a rubber cube (dimensions 22x22x22 mm) into the universal joint of the intermediate steering shaft. It is cut out from the rubber bumper of the rear suspension of the “classic”.
To install the rubber part into the steering shaft, you don’t need to remove anything, just crawl under the panel and look for the connection above the brake pedal. To fit the cube into a narrow space, you will need to lubricate it (for example, WD-40) and use a clamp or jack.
For owners of Lada Granta and Kalina models with ESD, there is an alternative to this modification - install a steering driveshaft without knocking (catalog numbers: 11186-3422092-00, 21230-3401085-00). Let us remind you that in some cases the causes of knocking can be eliminated by tightening the steering rack or steering shaft bolt. Have you encountered such a modification? What effect did you feel after installing the rubber cube?
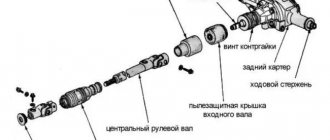
Diagnostics, repair and reassembly
Before determining why there is a knock in the steering, you should completely disassemble the rack and carry out diagnostics for wear, destruction of components and connections. Disassembly is carried out in this order. Secure the steering rack in a vice, having previously installed spacers made of soft metal or other material. Unscrew the nut securing the mechanism crankcase pipe. The crankcase tube is removed. Remove the clamps securing the pipe bushings and remove them.
Unscrew the adjusting nut. Here you need to use a special 24mm wrench, which has external edges for unscrewing. Sequentially remove the rack stop spring, the sealing ring and the rack stop. Remove the crankcase cover. After removing the bearing cage and sealing ring, remove the rack. The second element of the steering mechanism pair - the gear shaft - is dismantled.
Now you can diagnose the condition of the bearings and sealing rings. After thorough cleaning, the wear of the gear sectors and the condition of the surface of the rack and shaft are assessed. After all, this is where the reason lies that causes the knocking that appears. If necessary, select the necessary parts and replace them.