Checking the correct fuel level
We place the carburetor cover vertically, as we have discussed more than once on the website mashinaa.ru. In this case, the tongue on the float levers should recess the damping ball on the needle valve and be approximately parallel to the plane of the needle valve, and the stamping line on the floats should be parallel to the surface of the carburetor cover. If this does not happen, we adjust the fuel level again, more carefully.
checking the correct position of the floats on the Solex carburetor
Notes and additions
— When adjusting the fuel level in the float chamber of carburetors 2108, 21081, 21083 Solex, you should check the correct position of the floats in the float chamber. To do this, on the carburetor cover removed, inverted and installed horizontally, we ensure that the floats are parallel with respect to the imprint on the cardboard gasket of the cover. This way we will prevent the floats from touching the walls of the float chamber.
setting the parallelism of floats on a Solex carburetor
— In addition, it is worth setting the amount of free play of the floats. On the inverted lid, use a ruler or caliper to measure the distance from the cardboard spacer to the lower corner of each of the floats.
measuring the distance to the bottom corner of the floats
Raise the floats as high as possible and again measure the distance from the lower corner of the floats to the cardboard spacer. There should be an increase of 15 mm. This is the free movement of the floats. If it does not correspond to the required value, we achieve the required value by bending the rear tongue on the float levers.
setting the full stroke of the float on a Solex carburetor
Summing up the settings of the carb, before selling the car, I established that with 1.3 the consumption on the highway was 5.5 liters, with 1.5 about 6 speed 90 km/h gearbox 4.
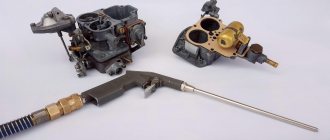
Adjusting the VAZ 2108 carburetor: troubleshooting it yourself
Russian passenger cars VAZ 2108, 2109 and even the first “tens” were equipped with carburetors produced by the Dimitrovgrad Plant (DAAZ) under license from the famous European brand Solex. The units are quite unpretentious and reliable in operation, but still require periodic maintenance and adjustment. Most G8 owners can perform this procedure on their own if they carefully read all its intricacies. It is unacceptable to mindlessly interfere with the operation of the carburetor.
What models are installed on VAZ 2106/2107 cars
All types of carburetor mechanisms equipped with the VAZ 2106/2107 are aimed at reducing fuel consumption and giving the car maximum dynamism. In addition, an important role is played by such an indicator as environmental friendliness. For a decade, AvtoVAZ engineers gave preference to the most environmentally friendly types of carburetors.
Carburetors of three different models were installed on modern VAZ 2106/2107, as well as on cars produced in previous years:
- Manufacturer: Dimitrovgrad Automobile Assembly Plant (or DAAZ). It should be noted that the company produced carburetors under license from Weber. Structurally, these devices were as simple as possible both in operation and in further maintenance. In addition, their main advantage was to provide excellent speed performance for cars of the sixth and seventh VAZ models. At the same time, DAAZ carburetors consume a very large amount of gasoline - from 10 to 14 liters per 100 kilometers.
- Manufacturer: DAAZ, modification “Ozone”. This is a more advanced version of the first type of DAAZ, which has high environmental performance. The device provides good acceleration characteristics and consumes less than 10 liters of fuel per 100 kilometers. However, the disadvantage of this model is that it comes with a second camera. In its operation, a pneumatic valve plays an important role, which, in case of contamination or poor-quality adjustment, can stop the carburetor from working.
- Manufacturer: DAAZ, modification 21053, which is produced under license from Solex. One of the most modern types of carburetors for equipping the VAZ 2106/2107. Maximum environmentally friendly and productive. It has a more complex design; the first in the DAAZ line is equipped with a reverse fuel supply system, which makes it as economical as possible. However, Solexes are demanding on the quality of gasoline - otherwise the fuel nozzles become clogged very quickly.
Modern VAZ 2107 models are equipped with this unit.
Common features in the design of carburetors for the VAZ Six and VAZ Seven
The carburetor mechanisms that are equipped with all VAZ 2106/2107 models throughout the entire production period of the car are two-chamber, that is, they have two internal combustion chambers. Structurally, all carburetors have three indivisible parts:
- at the top there is a cover of the device, which protects the mechanism from dirt, and fuel fittings;
- the middle part is a housing, inside which the chambers and diffusers themselves are located, transfers the air-fuel mixture to the engine;
- The float compartment and throttle valves are located in the lower part.
In the operation of DAAZ carburetors, small parts are of great importance - gaskets, jets, float, economizer or dampers. All elements of the system are interconnected and failures in one part will inevitably lead to failure of the entire device.
The DAAZ carburetor on the VAZ 2106/2107 works according to the following principle:
- Gasoline enters the float chamber through the inlet valve.
- The required fuel level is regulated by the needle of the forced idle economizer or power stroke economizer - in any case, fuel enters the chamber in a strictly defined proportion.
- Next, the fuel is sent to emulsion chamber No. 1 through nozzles.
- In the chamber (or VBC), gasoline is crushed into small parts and mixed with air.
- When the torque increases during acceleration, internal combustion chamber No. 2 may also be activated.
- After the formation of the air-fuel mixture, the pump directs it to the diffusers, and through them to the engine.
That is, the main task of the carburetor is to form the air-fuel mixture in a strictly adjusted proportion to ensure smooth operation of the engine.
The presence of many small elements ensures reliable operation
When adjustment is needed
Before you take a screwdriver and start turning the screws of the fuel unit, you need to understand one important point. It is as follows: adjusting the Solex carburetor is not a separate operation, but the final stage of the troubleshooting procedure or its scheduled cleaning. The only exception is if the settings were accidentally or unknowingly changed by you or someone else.
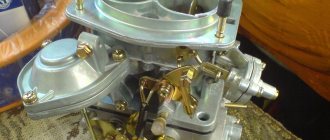
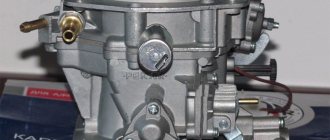
Solex carburetor - general view
The following signs indicate interruptions in the supply of the air-fuel mixture to the engine associated with Solex problems:
- the car began to stall at idle;
- fuel consumption has risen above normal and is accompanied by unstable operation of the power unit;
- a cold engine starts and immediately stalls, you have to make several attempts by manipulating the choke lever and the accelerator pedal;
- when you press the gas, a “failure” occurs, accelerating dynamics are completely absent;
- The car stalls while driving when you release the accelerator pedal while coasting.
Note. Unfortunately, the cause of the listed malfunctions is not always the carburetor. Problems with cold starts also arise when there is no compression in the cylinders, and the “culprits” for failures are often faulty spark plugs.
Wear of spark plugs also leads to increased gasoline consumption and the appearance of failures.
Point two: fixing not every problem ends with adjusting the fuel supply. The issue will be covered in more detail below, along with methods for repairing common breakdowns of the G8 carburetor. But in some cases you can’t do without adjustment:
- after removing or disassembling the Solex for the purpose of repair;
- upon successful cleaning or purging of the unit’s channels;
- after replacing rings or the entire piston group in a car engine;
- as a result of reconfiguring the timing in the ignition system, replacing high-voltage wires or installing new spark plugs.
Advice. Considering the low quality of fuel sold at many gas stations in Russia, it is recommended to remove the entire carburetor once every 20-25 thousand kilometers, disassemble it and thoroughly clean it with a compressor. After which you need to make adjustments.
Important points
- Before adjusting the carburetor, it is recommended to self-clean it. To do this, a special liquid for cleaning carburetors is poured into the gas tank, the engine starts and runs (the volume of liquid poured and the engine operating time are always indicated on the container with the cleaning liquid and depend on the specific brand). Sometimes this measure is enough to get rid of the above signs of carburetor malfunction and do without fine adjustments.
- If self-cleaning does not help, there is only one way out: you need to remove and wash the carburetor. For washing, both special liquids and ordinary kerosene are used. It is strictly not recommended to use brushes or fluffy rags to remove dirt. Hairs and lint remaining in the small holes of the carburetor can negate all efforts to clean it. The best option: thorough rinsing in a special liquid, and then blowing out all small holes with compressed air.
- Before removing the carburetor and cleaning the inside, it is recommended that the outside be thoroughly cleaned. Moreover, it is necessary to clean not only the carburetor itself, but also all the parts located next to it. Please be aware that any dirt left on adjacent parts may find its way into the clean carburetor when it is installed back into the engine. And if this happens, the entire cleaning procedure will have to start again.
In order for the carburetor to work correctly, attention should be paid not only to its adjustment, but also to cleaning. If any of these procedures are neglected, the carburetor will soon fail again. In addition, attention should be paid not only to the quality of gasoline, but also to the condition of the car’s air filter, since in some cases it is a worn filter that causes rapid contamination of the carburetor.
Copywriter with five years of experience. (1 vote, average: 5 out of 5)
Preparing tools and devices
If you intend to thoroughly clean the carburetor of your V8, then you will not be able to do it without a compressor. To blow out accumulated dirt from the channels, it is necessary to supply air at a pressure of at least 6 bar. The remaining tools are common ones found in every garage:
- 2 screwdrivers - Phillips and thin with a narrow flat slot;
- a set of small open-end wrenches - 8, 10, 13 mm;
- round nose pliers;
- rubber bulb (syringe);
- 2-3 wooden toothpicks;
- rags.
Compressor for carburetor purging
Note. It would be nice to have a tester or multimeter on hand to check the voltage. But if necessary, you can do without it.
Liquids for cleaning carburetor channels
A special product sold in aerosol cans (for example, from the ABRO brand) is excellent for cleaning channels. Do not use acetone or inorganic solvents, which corrode plastic parts, for cleaning. Buy new paper gaskets for DAAZ 2108 carburetors in advance (they will also fit the “nine”). You cannot buy or change jets, since the standard ones are designed for the entire service life of the machine, and fakes with large holes for fuel are often sold in repair kits.
What to do with increased consumption
Before you tightly grasp the carburetor, be sure to make sure that the other systems are in good working order - the spark plugs are in working order, the high-voltage wires do not break through to ground, and there is compression in the engine cylinders (the minimum value for the VAZ 2108 is 11 Bar). Unscrew the spark plugs and check the condition of the electrodes.
Important. The color of the electrodes reflects the picture of the operation of the power unit. A black coating indicates that the mixture is over-rich, the proportion of gasoline in it is too high. White color indicates a lean mixture, the norm is a light brown tint.
Light brown is the correct color for the electrodes on the spark plugs
The most unpleasant problem is an increase in fuel consumption, which occurs for the following reasons:
- the economizer diaphragm is worn out;
- the main air jet or channels inside the unit are clogged;
- the needle valve, which limits the flow of fuel into the float chamber, does not hold;
- jets of unknown origin from a repair kit were installed.
Location of the economizer cover
Note. Listed here are problems that you can solve on your own. If the recommended measures do not have an effect, then the malfunction is more complex and you will have to contact a carburetor repair specialist to fix it.
To check the diaphragm, remove the air filter housing (the cover is secured with 3 10 mm nuts, the housing with 4 8 mm nuts). On the left wall of the carburetor in the direction of travel of the car, find a triangular economizer cap screwed with 3 screws, unscrew them with a Phillips screwdriver. Underneath there is a spring-loaded membrane that needs to be checked and replaced if necessary.
Removing the filter on the figure eight
To eliminate other causes, you will have to remove the top cover of the Solex by disconnecting the starter cable and unscrewing the 5 fastening screws with a Phillips screwdriver. Then follow the instructions:
- Unscrew the air jets, remembering where each one should be. Fuel jets are hidden under them in the wells; unscrew them with a thin screwdriver and pull them out with a toothpick. Blow through the calibrated holes thoroughly.
- Using a blower, suck the gasoline out of the float chamber along with the dirt. Fill all channels and diffusers with the product from an aerosol can, wait for the time indicated on it and carefully blow out the carburetor without removing it from the car.
- Take the removed cover of the unit, turn it with the floats up and try to blow into the fuel supply pipe, plugging the pressure release fitting with your finger. If air passes through, replace the needle valve as it will also allow gasoline to pass through unhindered.
- If you replaced all the jets before increasing the flow rate, feel free to unscrew them and throw them away, and return the standard ones to their place.
- Before assembly, make sure that the floats do not touch the walls of the chamber; if necessary, carefully bend them.
- Reassemble the Solex in reverse order and begin adjusting.
To remove the top cover of the Solex you need to unscrew 5 screws
Reference. Oddly enough, with a lean mixture, gasoline consumption also increases. Since the car “does not pull” due to lack of fuel, you solve the problem by pressing the gas too hard, or even pulling the “choke”, half closing the air with the damper. Naturally, fuel is consumed beyond the norm.
Write a review
Your feedback:
Attention: HTML is not supported! Use plain text. Grade:
Grade:
Bad Good
Enter the code shown in the picture:
Question: Is this an original DAAZ carburetor, not a fake?
Answer: The carburetors are original.
Carburetors from other manufacturers are often mistaken for fakes: AT, LSA, Road Map, PEKAR
These manufacturers have their own markings and appearance.
We have no information about cases of counterfeit carburetors of the main models produced by OJSC DAAZ. There is no protection on the carburetors either. It is better to make the purchase in the presence of an experienced motorist, who will be able to determine by appearance that the product is counterfeit. Start your purchase by inspecting the carburetor packaging.
Boxes for packaging carburetors are universal, with designations of carburetors that can be packed in them. A mark is made against the designation of the carburetor actually packed in the box, usually in the form of a tick.
All distinctive features, markings, appearance, etc. You can watch the video review on the product page
Question: What color is the box?
Answer: Carburetors come in boxes from LADA Image JSC and OAT Group
Packaging design of JSC "LADA Image":
Packaging design "Group OAT":
Question: There is a version that the original DAAZ products are packaged only in a red and white box, and everything else is fake.
Answer: The official website already has answers to similar questions. You can also find tips and tricks on setting up carburetors there.
Answer:
Answer:
Answer:
1) Why increase the speed much higher than recommended by the car manual?
2) When changing the idle mode only due to one adjusting element, inevitably, the mixture composition will go beyond the optimal range and unstable speed will appear.
Answer:
Question: I have a SOLEKS 21053 carburetor, should the float chamber needle keep the fuel flow if the return line is plugged? Answer: The float and needle valve are capable of maintaining a constant fuel level up to a pressure of 0.45 kg/cm2.
Question: I bought a carburetor 21053-1107010-20 for a VAZ-21053, and there are three vacuum distributor fittings. Which of these fittings (upper, lower or middle) should it be connected to, and what are the two additional fittings for? Answer: The lower fitting is intended for connecting the vacuum ignition timing corrector on the distributor-distributor. The two upper fittings should be plugged, because they are designed to control the exhaust gas recirculation valve, which your vehicle does not have.
Question: I read most of the “questions and answers”, but did not find an answer to my question. Which jets need to be changed on Solex 21053-1107010-20 for a 1.2l engine?
Answer: For a 1.2 liter engine. You need a carburetor 21051-107010 (currently not produced due to lack of demand) with 23x23 diffusers. On the carburetor 21051-1107010-20, you should install the fuel jet GDS 1 chamber 102.5 or 105, if there are comments on your fuel consumption.
Question: I have several questions about carburetors. 1. When installing a 21053 carburetor on a classic, what kind of textolite gasket should be used, thin or thick, between the carb and the intake manifold, and what will result from an incorrect installation (now the thick one seems to be from 8, but in your FAK I saw a message that you need to install 4mm) . 2. I have an engine displacement of 1650, compression 13-14, is carburetor 21053 suitable? Or is it better to put Ozone? 3. I was interested in why the second chamber in carburetor 21053 is very lean? (110/165) no other has such depletion, what is this connected with and wouldn’t it be better to put at least 115/165? 4.How does the level in the float chamber affect the flow rate? If it is less, then the consumption is also less and vice versa? How to correctly set the floats, in the literature there is a template according to which the level is set and at the same time it is said that from the gasket to the floats when the ball is pressed there should be 2mm and this somewhat contradicts the template. Why am I asking all this, I just found out experimentally that the jets in the first chamber exactly correspond to the factory ones (107.5/145 (slightly leaner)), but I haven’t really picked up the 2nd chamber yet... the dynamics are generally satisfactory, but the fuel consumption is slightly increased, sometimes 15l/ 100 km in the city, maybe it’s worth putting Ozone on my volume?
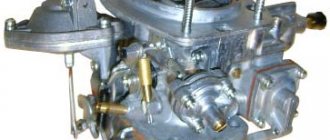
Photo of the location of carburetor parts
General diagram of the DAAZ 2108 unit
This is what the floats installed on the Solex lid look like
Jet placement diagram
Troubleshooting other problems
Among minor problems, the most common problems are idle speed. They are decided depending on the reason:
- The electric valve that opens the idle jet does not work. Check the voltage supply to it with the ignition on, and then unscrew the valve and watch how it retracts the needle. If this does not happen, replace the part.
- The idle jet is clogged. Again, unscrew the valve and blow through the calibrated hole.
- The rubber o-ring on the valve has become loose. As a result, air leaks occur, causing the engine to operate unstably. Replace the seal.
- The rubber ring sealing the idle channel is torn or weakened. It is put on a thin brass tube pressed into the carburetor body. To get to it, you need to remove the unit cover.
- The channels supplying the fuel mixture for idling are clogged. The issue is resolved by washing and purging, as described in the previous section.
Idle valve with jet
Advice. If the idle speed disappears due to the fault of the electric valve during a trip, you can organize the fuel supply directly. Unscrew the element, remove the jet and remove the valve needle. Put it in place and calmly continue your journey, and upon arrival, replace it.
Replacing the trigger diaphragm
When the car stalls during a cold start, you need to change the trigger diaphragm. Due to the breakthrough, it does not retract the air damper, causing the engine to “suffocate.” The unit is located on the right side (in the direction of travel), its square cover is held on by 4 screws. Unscrew them and change the diaphragm.
Replacing the accelerator pump diaphragm
When you feel a “failure” when you press the accelerator and accelerate the car, your actions should be as follows:
- Check the accelerator pump diaphragm, located under the cover on the left wall of the carburetor (in the direction of travel of the car). If it is torn, replace it.
- Remove the air filter housing and the top cover of the Solex. Underneath it, look for nozzles built into the fuel supply diffusers. Pry them off with a screwdriver, pull them out and blow them out. Replace the rubber ring if it is torn.
- Test how well the accelerator pump lever presses the diaphragm. If play is detected, change this lever.
The nozzles are removed using a screwdriver
The last malfunction lies in the electronic unit EPHH, which controls the operation of the electric valve. If the “eight” stalls when coasting in gear, then the reason is precisely this block. Changing it is not a problem; the price of this part is low.
As a rule, after eliminating the listed problems, carburetor adjustment is not required. But if you notice a change in speed in one direction or another, then the settings can be slightly adjusted.
Solex carburetor repair
Before starting work, you must remove the unit from the vehicle. This is not difficult to do and can be done by any car enthusiast, even with minimal knowledge and experience in car repair. First of all, you need to remove the air filter housing and disconnect all the pipes. Next, you need to disconnect the throttle and choke cables. After this, you can unscrew the carburetor and intake manifold nuts.
The next step is to completely disassemble the assembly into its component parts. The process looks like this:
- Remove the solenoid valve together with the fuel nozzle.
- Unscrew the five screws with a screwdriver and remove the top carburetor cover. It is important to do everything carefully so as not to damage the float.
- Remove the float (to make the task easier, you need to squeeze out the axle rod with a suitable object of smaller diameter).
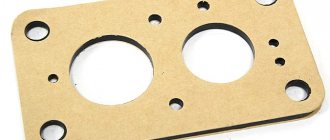
- Remove the gasket (all removed gaskets must be replaced with new ones, this is a consumable item, and you should not skimp on this).
- Remove the fuel valve.
- Remove the fuel filter from the side of the unit.
- Remove the accelerator pump nozzles (replace them if necessary).
Next, you need to dismantle the pump diaphragm (it is also better to replace it, since it comes to repairing the carburetor) and two emulsion tubes. The nozzle located below is also removed, and at the final stage the screws for adjusting the quality and quantity of fuel are unscrewed.
Carburetor cleaning
Before you start repairing and disassembling, you need to buy a repair kit in advance. To wash the parts, you can use a special liquid, which is sold at any auto parts store. Or a folk remedy: kerosene or acetone.
After disassembly, rinse and clean:
- jets;
- sprayers;
- emulsion tubes;
- fuel valve;
- pump cover.
After washing, you need to dry all the parts and blow them with compressed air. If a compressor is used for these purposes, it is important not to lose small elements. All parts are assembled in reverse order.
Reinstalling the carburetor is not difficult, but there are a few things to consider. When the assembly is mounted on the intake manifold, you should make sure that the housing has a flat surface. Often it ends up with some deformities. If there are such irregularities, the surface should be smoothed with sandpaper. Next, the carburetor is secured with nuts, the choke cable and accelerator rod, fuel hoses, etc. are installed. Lastly, the air filter.
DIY adjustment instructions
The first adjustment of the Solex is performed during the assembly process. This is the installation of the trigger drive cable. Press the “choke” handle all the way, insert the cable into the hole in the lever, and clamp its casing on the bracket. Then secure the cable with a bolt when the damper is in the “fully open” position and check the operation of the mechanism.
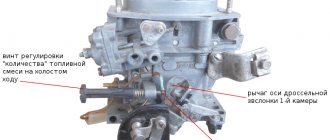
1 — screw-regulator of the amount of mixture; 2 — quality screw; 3 - rubber ring; 4 - plug
2 screws are responsible for the fuel supply settings:
- a plastic handle installed on the right wall of the unit and regulating the amount of mixture;
- on the same side, at the end of the carburetor sole, there is a well where a screw is hidden - a mixture quality regulator, which is responsible for the ratio of air and fuel for idling.
The end of the starter cable must be secured with a bolt.
Important point. Please note that both propellers have virtually no effect on the operation of the engine while driving, since 90% of the fuel mixture goes into the cylinders directly through the diffusers, bypassing the idle system.
The operation of the VAZ 2108 carburetor is adjusted on a warm engine, so after assembly, start it and bring it to operating temperature. If the engine stalls during warm-up, add speed manually by slightly tightening the fuel quantity screw. Perform the settings in the following sequence:
- Using a thin flat screwdriver, unscrew the quality screw until the engine speed stops increasing. Then tighten it half a turn.
- Reduce engine speed to 100 rpm by turning the plastic quantity screw knob counterclockwise.
- Achieve a crankshaft speed of 850 rpm by tightening the mixture quality screw.
Adjusting the mixture quality
If you have previously corrected minor problems, as a result of which the engine idle speed has become higher, then you do not need to touch the quality screw. Reduce them by turning the plastic handle, bringing them to the norm - 850 rpm.
Reference. Masters adjust VAZ 2108 carburetors using a special device - a gas analyzer that shows the level of carbon monoxide (CO) in the car's exhaust. At idle it should not exceed 1.5%, and at 2000 rpm - 2%. This is the best setup method, use it whenever possible.
Adjusting the throttle drive
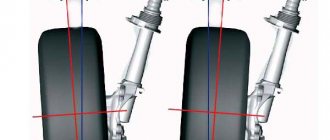
The figures below show the positions of the air damper with the choke recessed and extended.
Adjusting the air damper of the carburetor VAZ 2104, 2105, 2106 and 2107 is as follows:
- We recess the suction.
- Using a slotted screwdriver, unscrew the screw securing the rod (the spring sets it vertically).
- Tighten the screw.
- We check the movement of the air damper.
If you feel that the engine response is extremely low, and the acceleration dynamics leave much to be desired, then we recommend that you pay attention to adjusting the throttle valve drive, in other words, the “gas” drive. It is better to use a partner in this adjustment.
The tools we need are a screwdriver, a flashlight, a caliper and a 8mm wrench.
- Turn down the choke completely or close the air damper.
- Next, the partner must fully depress the gas pedal all the way to the floor. In this case, the air damper should open completely, as shown in the figure below. After releasing the gas pedal, the damper should close completely without any residual gaps.
- Using a caliper, we measure the length of the rod - it should be eight centimeters. For traction, it is adjusted by rotating the tips, having previously unscrewed the lock nuts.
- We put the rod in place and re-check the degree of opening of the air damper using the gas pedal.
In this article, we described to you how to independently adjust the carburetor of a VAZ 2104, 2105, 2106, 2107. We hope that our article was useful to you.
If you don't take care of the drive, the car may stall. To do this, you will need a simple Phillips screwdriver and a 7 mm open-end wrench.
The positions of the damper are shown above with the “suction” extended and recessed.
To adjust the drive, do the following:
- drown the “suction”;
- Unscrew the rod fixing screw with a screwdriver (the spring will push it out vertically)
- Tighten the screw;
- Check the valve stroke.
If this drive is incorrectly configured, the car's engine response drops and acceleration dynamics deteriorate. The setup is done with an assistant.
You will need the following tools: a screwdriver, an 8-mm open-end wrench, a flashlight, a ruler or a caliper.
- Turn down the “choke” (air damper drive) completely.
- Have your assistant press the gas pedal all the way to the floor. The throttle valve will open completely, as shown in the picture below, you can shine a flashlight into the first chamber. When you release the pedal, the damper should completely close the first chamber without any gaps. If there are gaps, then proceed to the next step.
- Next, we measure the length of the rod with a caliper; it should be exactly 8 cm. To adjust the length of the rod to the required size, rotate the tips by unscrewing the lock nuts.
After all these operations have been completed, put the rod in place and repeat the check. Nowadays, rods are made of low-quality plastic, which shrinks over time. Therefore, you need to check the operation of the traction after a week or two.
We looked at all the ways to adjust the carburetor yourself. We hope this article helped you, if you have any questions, ask them in the comments and we will definitely answer.
Functionality check
How successfully you have repaired and adjusted the carburetor, you need to check in the following ways:
- According to the stability of the engine at idle speed.
- By changing the color of the spark plug electrodes.
- Based on the vehicle's driving dynamics in different modes and efficiency.
When all manipulations on setting up the Solex are completed, the engine should idle stably and without shaking. If this is not the case, you need to look for the causes of problems in other systems or go to a specialist. If the outcome is successful, take a two-liter plastic container, pour 1 liter of gasoline into it and secure it under the hood. Run 2 hoses from the bottle to the fuel pump and the carburetor return fitting, then start the engine and check the car while driving until the fuel in the container runs out. In urban conditions you must drive at least 12 km, on the highway - 14 km.
After the trip, unscrew the spark plugs and inspect the electrodes. If they are covered with a black coating, and there is enough gasoline for tens of kilometers, tighten the quality screw 1-2 turns, accordingly increasing the rotation speed with the plastic handle. Then check the car while driving again.
Advice. Do not rush to reconfigure the unit if the electrodes are white. If the mixture is not too lean, and you are satisfied with a quiet driving style, then with these settings you can significantly save gasoline (up to 1 liter per 100 km). Otherwise, unscrew the quality screw 1 turn and adjust the crankshaft speed.
VAZ 2108 Solex carburetors are quite complex units. Therefore, do not try to disassemble them down to the screw yourself if you do not have the appropriate skills and experience. Also, do not listen to the advice of ignorant motorists, otherwise, instead of tuning, you will only worsen the situation and inevitably end up with a specialist, where you will have to pay money. And lastly: do not turn the mixture quality screw for no particular reason, this will affect fuel consumption and the life of the spark plugs.
When to adjust: main signs of malfunction
The main problem for any carburetor is low-quality gasoline. It is because of this that contamination occurs in this unit, disrupting the operation of the entire engine. It’s easy to verify the low quality of gasoline: just unscrew the spark plugs. If they are covered with a white coating, it means it’s time to change the gas pump and clean and adjust the carburetor. There are several more characteristic signs of a faulty carburetor.
- The engine begins to triple (that is, only three of the four cylinders work).
- The car starts moving with jerks, which can also occur during movement.
- Even at idle, the engine is unstable.
- Fuel consumption has increased significantly.
- The engine responds to pressing the gas pedal with a noticeable delay.
How does a VAZ 2108 carburetor work?
The carburetor of the VAZ 2108 car consists of two main parts - upper and lower. In each of them, there are some parts and mechanisms that are directly connected to each other. Let's look at the design of the standard Solex carburetor in more detail:
- Float chamber. It houses the jets, float and throttle valve;
- The first and second chambers, with a dosing device;
- Vehicle idle system;
- Transition system located in the second chamber;
- Econostat;
- Pneumatic economizer;
- Accelerator pump;
- Gasoline starting mechanism;
- EPHH;
- System providing crankcase ventilation;
- The mechanism that controls the dampers.
The purpose of the Solex carburetor is to accurately dose gasoline, mixing it with oxygen. Distribute the resulting mixture evenly among the cylinders. The flaps move alternately.
How to work a carburetor on a VAZ 2108
On the Lada 2108, different engines were installed, from 1100 cubic meters to 1500. At the same time, the carburetor design did not change at all. Enlarged jet holes helped adjust the fuel supply for a more powerful engine.
The operating principle is quite complex. Gasoline passes through a filter at the carburetor inlet. There is also a valve that prevents the amount of gasoline in the chamber from decreasing.
From the chambers, gasoline flows through jets into wells, where it mixes with oxygen and forms a flammable mixture. Some of the gasoline is taken by the idle jet, also mixing it with air. The rest of the mixture is injected under the valve. At the place where this injection occurs, two screws are installed - the quality of the fuel and its quantity. Thanks to them, you can adjust the number of engine revolutions and the supply of gasoline. The VAZ 2108 carburetor is adjusted using a flat-head screwdriver.
The economizer serves to add fuel to the combustion chamber when the throttle valves are fully opened.
The econostat is also responsible for the additional supply of gasoline, but, unlike the economizer, it passes it through the nozzle. The econostat starts working when the engine reaches maximum power.
The accelerator pump in Solex carburetors serves for atomized injection of fuel into the float chamber. It is activated when you sharply press the gas pedal, that is, during acceleration. Its device also provides for stopping the fuel when the gas pedal is released. This will protect the mixture in the float chamber from excessive air leaks.
Acceleration pump nozzle
A starting device is installed in order to increase the amount of gasoline supplied to the float chamber. Mainly used to start the engine “cold”. Increasing or decreasing the fuel supply is carried out manually, using a choke.
After the mixture is ready, it is fed into the combustion chamber through the intake manifold opening. Since the Solex carburetor was installed on all modifications of the VAZ 2108 engine, the difference between them can only be in the size of the manifold hole. Therefore, be sure to pay attention to the diameter of the hole and the size of the gasket. This will be useful to you if you carry out repairs.
What to do if there is no spark
The peculiarities of our climate are such that a car engine may not start due to the fact that it has lost a spark. There are several reasons for this:
- the operation of the switch is disrupted;
- The Hall sensor is not functioning correctly;
- the ignition coil does not work;
- contacts are dirty or oxidized;
- a breakdown occurred in the high-voltage wire;
- The ignition switch does not work.
But there is another reason why there may not be a spark. It is associated with a lack of contact on the spark plug, as a result of which it turned black from soot. The spark disappears if the ignition timing in the carburetor is incorrectly set.
It should also be said that there are many more reasons why the wire may not start, but first of all it is worth checking the performance of the carburetor.