Photo instructions for repairing a carburetor on a VAZ 2107
Checking the needle valve for functionality
This photo instruction shows the process of removing and checking the needle valve; I recommend following it in order to easily check the valve for functionality.
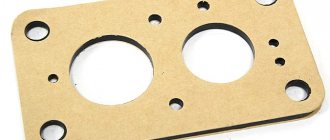
How to disassemble and check carburetor cover parts for malfunctions
If you need to check the carburetor cover parts, this photo instruction is for you!
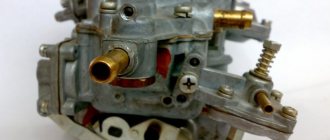
How to repair the pneumatic throttle actuator on a VAZ 2107 carburetor
Has your pneumatic throttle valve on your carburetor broken? Then this instruction is for you!
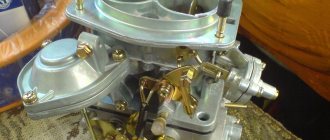
Repair of the body and the process of disassembling the carburetor for a VAZ
Is it time for a hull repair? Then I recommend following the instructions below and you will not have any problems with disassembling and repairing the carburetor body.
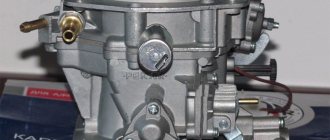
Throttle body repair and disassembly process
Has the throttle valve exhausted its service life or has its operation simply been disrupted? Look at the photo instructions that I prepared for you!
Back to the past! We remember about carburetors: how to drive, configure and repair
A carburetor is a specific part of a car. At one time he frightened many handy car owners and even professional mechanics (it was not for nothing that the carburetor mechanic was always a separate, narrow specialist and was respectfully called a “shaman”!), and even more so now, when sacred knowledge has been practically lost. Many remember their carburetor cars with a shudder - the constant floating of idle speed, special starting techniques, failures and jerks in movement, caused either by heat, or humidity, or the Moon in Capricorn... Although some were lucky, the injection era of the second half of the 90s years, let's be honest, everyone was greeted with relief. However, even today, in the third decade of the 21st century, you can cross paths with a carburetor car. Not everyone and not always have sufficient free funds when the need arises for some kind of budget auxiliary machine - for country construction, hunting/fishing, or as a “jump car” to get to the garage where a decent car is parked... Yes You never know the tasks for which an old and inconspicuous car (usually domestic) would be useful, which you don’t mind throwing anywhere and scratching without grabbing your heart and wallet. But if, among the dead injection rot, a well-groomed “carb” car comes across, many, crossing themselves, quickly walk past...
Take the same “jump car” - look how the prices for Matiz are inflated - 200-300 thousand are now being asked for a copy with rusty sills! For four times less money you can buy an Oka in excellent condition. But 99% OK - with carburetor engines, and many are scared off by unstable starting, jumping idle, jerking during acceleration and other hemorrhoids, for which there is no one to really turn to in terms of repairs... Or here’s a classic of the genre for a lover of active car sex: Niva and UAZ vehicles, which may well turn up in the form of “time capsules” from grandfather’s dusty garages, are very likely to have “carb” engines.
The same applies, for example, to the VAZ 2109/08 – one of the most balanced and successful cars in the domestic automobile industry of all time. If such a car turns up inexpensively and with a intact body, you should take it, regardless of the carburetor. “Devyatos” with its rear beam that practically does not protrude from the bottom after lifting the suspension and installing tougher tires is a very crawlable and passable vehicle, capable of performing ¾ of the Niva’s tasks, except for completely off-road cases! And in general, in the end, in 2022, a carburetor car may turn out to be the first and main car for some time - anything can happen...
In principle, almost any engine for an old carburetor car can be bought in its injection form and simply change the engines. Or not even the whole thing, but just the intake. But this procedure does not take five minutes and is often not very cheap... Such movements made sense at the beginning of the injection era, when owners of cars from early years of production sought to join the latest engine developments. Or if you are a mechanic working in a car repair shop, and you have a lot of different hardware at prices “for your own” or even free. But when we are talking about an old and inexpensive car, an auxiliary or even the main one, then changing the engine to an injection one is just throwing away money, time and effort.
This is a completely useless idea, because:
- A well-functioning carburetor paired with contactless ignition starts in any frost no worse than an injector!
- A well-tuned carburetor on domestic cars gives exactly the same dynamics as on the same engines, which were later “injected” without changing the design of the engine as a whole!
- A tuned carburetor has similar (or even lower) fuel consumption than an injector on the same engine!
But the key word in all this is “MOUNTED”... However, in reality, a carburetor is a fairly simple thing to resuscitate and adjust. But not everyone knows about it! Yes, Kolesa.ru is still not a step-by-step repair manual, and we will not go into the design features and life hacks of all existing varieties of carburetors, which will require a very thick book. Considering that the basic systems on almost all carburetors are identical with minor differences, we will simply give an easy-to-understand general course of action that will clearly demonstrate that there is no need to be afraid of the carburetor.
And anyone who does not shy away from repairing a car with their own hands, without being a professional in this field, can bring this unit into ideal condition.
Is it worth starting all this?
If fate has connected you with a carburetor car in 2022, two logical and reasonable questions arise that lie on the surface. Maybe just buy a new carburetor and screw it on in a quarter of an hour instead of the old, buggy one?
Not forbidden. And carburetors for almost the entire Russian automobile industry are available today and are not in short supply. But the cost of a new carburetor is 5000-6000 rubles (for some it’s just a trip to a cafe, and for others it’s even a third of their salary!), and the culture of their production is extremely low... The era has passed, and they are manufactured on long-worn equipment with defects casting and drilling, with channels clogged with chips and dust. Unfortunately, there is no guarantee that the new carburetor will not, due to fatal design defects, over-enrich the mixture or not keep idle... So it seems more rational to overhaul the old carburetor, which was already guaranteed to work in the past.
Second question: maybe use the services of a professional carburetor specialist and not get into such a complex unit yourself, without having any (or only a basic) understanding of its structure? Alas, you still have to roll up your sleeves. The fact is that not a single carburetor specialist will do what you need - a complete overhaul, cleaning and adjustment of the carburetor for its long and trouble-free operation. No one! And before, “shamans” (who are now, by the way, not so easy to find) never did this, and they won’t even today! Because otherwise they simply won’t earn money - nothing personal... Their field of activity is eliminating MINOR malfunctions of at least a living carburetor, when it is necessary to quickly deal with a local problem, cutting off 500-1000 rubles and sending the client home. Total disassembly of the carburetor in the format of a roadside express repair with soaking it for a day in a bucket of acetone - how do you imagine that?! Such a service was once offered only by carburetor factories that engaged in complete restoration repairs, and by carburetor shop foremen at large motor transport enterprises. In the Soviet and early Russian years, private car owners could come to the plant, hand over their carb and receive a rebuilt carb with a guarantee - washed, after replacing all wear parts and with a guarantee. But today such services are very rare, and this can only be done efficiently with your own hands.
So let's start by searching and reading a book on repairing and tuning your carburetor. Finding one, and for free, will not be any problem - torrents, knowledge bases of online clubs of old Soviet cars, etc. are at your service. Well, mastering it should not cause any problems. Carburetor books are not Kant’s ideas about the relativity of perception; they are small brochures in volume, but are written in a language that is understandable enough for any person who loves automotive technology, but is not a repair pro.
Complete disassembly and cleaning
Stage one and most important. It is completely useless to try to revive an old carburetor that has seen life without removing it from the car. Or rather, you can revive it, but you can never make it work stably for a long time! Trying to spray an aerosol cleaner, “carb cleaner,” into different holes is a waste of time and money. Problems with unstable operation in different modes will regularly arise over and over again, driving you crazy. The fact is that inside any carburetor there is a complex labyrinth of channels and passages, where various rubbish accumulates over the years of operation (or inactivity): fuel deposits, grains of sand, water and water-induced flakes and dust of corrosion of the zinc alloy body. And we need to wash and blow all these passages and tunnels.
First, you need to remove the carburetor from the engine and clean the outside of dirt and oil using a toothbrush and a syringe from a half-liter PET bottle of gasoline - with a stopper in which a hole is pierced with a needle...
...and then on a clean and empty table, COMPLETELY disassemble it down to the last screw! It’s difficult to decide on something like this because you’re not used to it, but in fact, we’re not looking at a 19th-century Breguet with a battle from Faberge. Carb is very good at sketching the appearance of the carburetor on a sheet of paper and laying out the extracted parts (jet jets, emulsion tubes, screws) on the sheet in accordance with the conventional diagram. Additionally, you can take pictures of the process on your phone.
Of the tools for disassembling any carburetor, as a rule, a flathead and Phillips screwdriver are sufficient for 95%. Some items may require a wrench, but this is likely an exception.
In principle, to completely revive a carburetor, it is not even necessary to understand the name of this or that unscrewed part (that this, for example, is the main fuel jet of the primary chamber, but this is the emulsion tube of the secondary chamber...). The main thing is to strictly record what was screwed in where, and when assembling, screw it in as it was!
Once we have disassembled it, we put all the large parts in a bucket and fill it with acetone. You will need three liters for about 300 rubles. Can be partially mixed with gasoline or white spirit. Stir and swirl the parts in the liquid to fill the channels and holes, and leave to soak for a day. After a day, we remove it, shake off the remaining flushing fluid and thoroughly blow with compressed air ALL the holes that we see. Ideally, a compressor for pneumatic tools; if you don’t have one, use a tire compressor with a thin spout, or even a foot pump. You can stop by a tire shop and ask for an air gun to blow it out - most likely they won’t refuse you and won’t ask for money.
Replacement of all elastic and rubber
Before this epic, it is necessary to purchase a repair kit for our carburetor, which includes most of the parts that can fail over time. Oddly enough, there is still no shortage of repair kits for the most popular and widespread carburetors on sale... The cost of a set is 300-350 rubles.
However, we don’t need everything from the repair kit... It’s better not to change parts with calibrated holes and sizes responsible for dispensing fuel and air (nozzles, tubes, needles, accelerator pump nozzle, etc. - in general, all yellow brass parts), leaving the old ones . New ones are often drilled and turned with unsatisfactory accuracy or no accuracy at all. But we definitely replace all the cardboard spacers, rubber-fabric membranes and rubber rings with fresh ones!
If gasoline gurgles in the float, buy a new float. They are sold separately and are not included in repair kits. Another important organ of any carburetor is the shut-off needle valve, which together with the float regulates the fuel level in the float chamber. It may be included in the repair kit or again sold separately. Like jets, the original valve is sometimes of better quality than a new one; whether to change it or not, you need to find out by blowing through the supply fitting with your mouth and making sure that the needle is tightly locked.
We assemble the carburetor in the reverse order according to the diagrams you drew during disassembly with the parts laid out on them and auxiliary photographs taken previously on a smartphone.
Setup and adjustment
Contrary to popular belief, car carburetors are devices with a minimum of adjustments. As a rule, all parameters for preparing a gasoline-air mixture are set CONSTRUCTIONALLY, by the geometry of the structure and the throughput of the nozzles.
In fact, the only adjustments that need to be made are setting the fuel level in the float chamber by bending the stop tab, adjusting the starting device and idle speed. The latter is usually done simply with a screwdriver on the tachometer or even by ear, and the former is often done directly on the carburetor installed on the car, although it is much more convenient to do this on the table during assembly. In this case, gasoline is supplied to the carburetor instead of a pump by injection from a plastic bottle squeezed in the hand through a piece of hose. If the assembly is carried out on a home kitchen table, it is permissible to replace the fuel with alcohol - so as not to stink in the apartment. You cannot replace it with water, because then it will be difficult to expel it from the fuel channels, but we also achieved this by thorough washing and subsequent purging...
Setting up the starting device for different models is carried out differently, but this process always involves setting certain gaps in millimeters according to the book. There is nothing complicated in the procedure, but its importance cannot be overestimated! Surely many remember how their carburetor car many years ago required a certain cunning algorithm of actions to start. Pull the choke out two-thirds, press the gas pedal twice, and after the engine catches, press the gas pedal again... Or any other combination of options - each “swallow” had its own quirks for starting. All this is the result of a monstrous underestimation of the importance of adjusting the starting device by both car owners and auto mechanics! A correctly configured carburetor start made the start of a cold engine extremely stable and monotonous like an injection engine. There have never been any intermediate positions at the choke handle - they appear only on a misadjusted carburetor. There absolutely could not be any pressing of the gas pedal during a cold start - again, they were only required by misregulated carburetors! The tuned carb starts the engine like an injector - the choke handle is pulled strictly all the way, we don’t touch the pedals, we turn the key and the engine starts reliably.
Checking the functionality of the jet
Now you need to return to the removed cover and check the functionality of the idle jet.
It is imperative to clean the cover, check the diaphragm and the cold start gap.
Check also the float geometry, which directly affects the technical properties. How is this geometry checked? Using your own float.
Features of the functioning of other Solex units
To shut off the supply of gasoline to the first chamber (more precisely, to its transition device) and to the XX device, a valve called an electromagnetic valve is used. Its standard state (when no voltage is applied) is closed. Opening of this element is possible in two cases: when the crankshaft speed is less than 1900 per minute; when you press the gas. When the ignition is turned off, and also when the car picks up speed above 2100, the solenoid valve returns to its normal (closed) state.
Of great importance for the adequate operation of the G8 carburetor is an accelerator pump of a diaphragm design, equipped with a mechanical drive. It has two valves in its design. One of them is in the sprayer. Under the load of injected fuel, it opens, and when gasoline is no longer supplied, the valve closes under the pressure of its own mass. Thanks to this valve, there is no air leakage, and gasoline does not escape from the channels.
Another valve (check valve) is placed directly in the channel that connects the pump cavity and the float device. If the driver releases the gas, the chamber is filled with fuel and the check valve opens. Its closure occurs at the moment when fuel begins to be pumped.
The cam, which is part of the pump we are considering, presses on the lever when the throttle valve opens. This lever is connected by a diaphragm. Due to this, a portion of fuel is supplied to the carburetor chambers, which allows the fuel mixture to be qualitatively enriched when accelerating the vehicle.
When the throttle valves are opened significantly, another important mechanism begins to operate - the economizer. The essence of its work is this: through a valve (it has a ball design) gasoline is taken from the float device. The valve is held closed while vacuum holds the diaphragm in the manifold. When the dampers are opened, a decrease in vacuum is observed. It is important that the fuel for enrichment flows into the emulsion compartment through the economizer, bypassing the main jet.
Let us briefly describe several more systems of the carburetor we are interested in:
- Intake manifold (IMC). This mechanism is attached to the motor using heat-resistant gaskets and pins. The manifold is made from an aluminum-based alloy by casting. The task of the VK is to transfer the combustible mixture formed in the carburetor to the cylinders of the car engine.
- Econostat. The mechanism is necessary for additional supply of gasoline to the second chamber from the float device (fuel is supplied through an intricate system of tubes and econostat jets). The econostat turns on when it is necessary to further enrich the fuel mixture (for example, when driving at maximum power).
- Idle speed economizer (forced). This device includes in its design a shut-off solenoid valve, a screw sensor, and a control unit.
Adjusting the carburetor with your own hands.
There is nothing scary, much less complicated, about adjusting the carburetor with your own hands. Since all procedures are performed with conventional tools. Unlike the injector, where computer diagnostics are required. So, let's start by adjusting the fuel level.
Adjusting the float mechanism.
The float mechanism is adjusted after washing, before assembly. For this procedure we will need to visually inspect the entire mechanism. Because if the bracket is bent, the system will not work correctly. This will cause the floats to skew and touch the walls of the chamber. But this problem can be corrected manually. We just bend the bracket. And finally, we lower the float to the lower position, thereby opening the fuel valve. Then we measure the distance. There should be 15mm between the float and the valve.
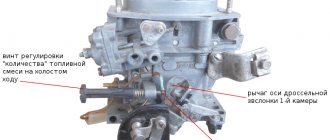
Idle speed adjustment.
Idle speed adjustment is performed with two screws. The screw is “quality”, and the second is “quantity”. First, let's figure out “who is who.” Tighten both screws until they stop. Then back three turns and start the engine. If everything works out, the revs will start to jump. The engine will not run smoothly. If the car does not start, then unscrew both screws one more turn. Then we begin to tighten one of the screws smoothly and slowly. If the engine speed begins to increase, then this is a “quality” propeller. If you tighten the “quantity” screw, the engine will start to stall.
So let's start adjusting. This work is carried out only on a warm engine. We unscrew both screws, find the “quality” from them and begin to tighten them slowly. The engine speed will begin to rise and become more even. At the same time, we also begin to slowly tighten the “quantity” screw, thereby lowering the engine speed. As a result, we need to achieve 800 - 900 rpm and stable operation. And at the end we tighten the “quality” screw a little until the operation becomes unstable. And back one turn. Carburetor adjusted!
Preparing tools and devices
If you intend to thoroughly clean the carburetor of your V8, then you will not be able to do it without a compressor. To blow out accumulated dirt from the channels, it is necessary to supply air at a pressure of at least 6 bar. The remaining tools are common ones found in every garage:
- 2 screwdrivers - Phillips and thin with a narrow flat slot;
- a set of small open-end wrenches - 8, 10, 13 mm;
- round nose pliers;
- rubber bulb (syringe);
- 2-3 wooden toothpicks;
- rags.
A special product sold in aerosol cans (for example, from the ABRO brand) is excellent for cleaning channels. Do not use acetone or inorganic solvents, which corrode plastic parts, for cleaning. Buy new paper gaskets for DAAZ 2108 carburetors in advance (they will also fit the “nine”).