It will not be news to anyone that an incorrectly adjusted wheel alignment can lead not only to a deterioration in the quality of the tire, but also to high fuel consumption. That is why it is worth approaching the camber alignment responsibly.
Setting up the wheel alignment on your own is not at all difficult, as it might seem at first. We will try to consider this issue in detail and give the best advice to new mechanics. Stabilization of a pair of steering wheels is the most important aspect that affects the stability of the car on the road. What does it mean? The wheels should move in a straight line and, bypassing the turn, return to their original position.
Following from this, the urgent need for the wheel stabilization procedure is explained very simply. When the car is moving, the wheels, which are not stabilized, move to the side as a result of shocks from the road. Then the driver must return the wheels to the desired (straight) position. Considering that this happens constantly, the person driving gets more tired. In addition, the steering contacts wear out faster. And with increasing speed, the growing instability becomes unsafe.
What determines the stabilization of steered wheels? The answer is simple: from their alignment or collapse. alignment can be adjusted in auto repair shops, but it is quite possible to solve this problem yourself .
Signs that your wheel alignment needs to be adjusted
The first thing to do is determine the need to adjust the camber.
Let's look at this point by point:
- Continuous movement of a car from a given course of straight-line movement in one direction or another.
- Uneven tire wear.
- When inspecting the front wheel tread groove along the axis of rotation, it is necessary to inspect the edges of this groove. The edges are the same - this means there is no cause for concern, but if one of them has some sharpness and the other does not, then you have a problem. But you should pay attention to this only when driving calmly. If you are a fan of fast speed, then this condition can be deceptive.
- Difficulty in maneuvering.
The presence of at least one of these symptoms indicates that a wheel alignment needs to be installed. Drivers who have some experience in repairing cars with their own hands, if they really want to, can perform wheel alignment themselves.
When and why do you need it
Manufacturers recommend that owners of foreign cars carry out the procedure every 30,000 km, and owners of domestic cars - every 15,000 km. The period may be reduced if the car is operated in difficult conditions and often drives on bad roads. In some cases, an unscheduled procedure may be required:
- if the disc is crushed when entering a hole at high speed;
- if the chassis was repaired;
- if shortened springs were installed on the car or the ground clearance was changed for other reasons, auto buffers were installed;
- if when driving you clearly feel the car “pulling” to the side;
- if the tires begin to wear out much faster;
- if the steering wheel does not return well after negotiating a turn.
What will you get from the wheel alignment results?
- The directional stability of the car will improve. When driving in a straight line, the vehicle will move only forward, without moving to the side.
- The car will become more maneuverable, strong drifts will disappear, and control will be simplified.
- Fuel consumption will be reduced and tire service life will increase.
Depending on the purpose, one or another type of wheel camber can be selected
How is wheel alignment adjusted?
For repairs you will need:
- ruler;
- chalk;
- standard set of tools;
- cord with a plumb line;
- flat area with a pit or lift.
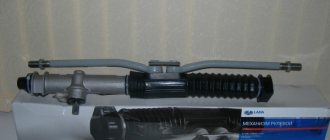
First you need to find out how accurately the convergence was performed earlier. Those. Is the steering rack in a “zero” position during straight-line motion? How to do it? We follow the following instructions:
- Place the car on a level surface.
- Then turn the steering wheel as far as possible in one direction, making a mark on the top of the steering wheel (in the middle of the circle) and turn the steering wheel all the way in the other direction. In this case, it is necessary to count the number of whole revolutions and parts of a whole circle (shares).
- When you have calculated, divide the resulting amount by 2 and turn the steering wheel to this position.
If this result coincides with the usual position of the steering wheel, then the “zero” position of the rack is set. If not, you will have to do it yourself.
Where to perform the procedure
You can go one of two ways:
- Do the balancing yourself, but for this you will need to buy, place and deal with equipment, as well as purchase a garage with a pit, and know what to do. In addition, some vehicles, including trucks, are very difficult to maintain on your own. The main plus: it's free. Accuracy can be good if you know the matter, but not perfect, like a professional.
- Contact the service center. Our specialists know the features of different car models, have a selection of parts and high-quality equipment for their installation. This option is faster, better quality and more reliable also because many services provide a guarantee on their work.
How to set the “zero” position?
It is necessary to remove the steering wheel; to do this, unscrew the nut. Afterwards, fix it in the “zero” position we calculated (the steering wheel spokes should be positioned symmetrically). Now we will be guided by this position. To test yourself, you need to alternately rotate the steering wheel left/right - it should turn the same number of revolutions in both directions, so turn the wheel to the sides as far as possible and count them.
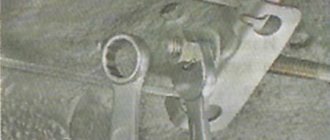
Next, you need to loosen the tie rod end lock nuts. One rod should be unscrewed a little, and the second should be tightened by the same number of revolutions (this is very important!). This procedure can be done once and no longer change the position of the steering wheel. And in the future - just adjust the convergence.
Anti-roll bar
Modern sports cars have a fairly low suspension height and a low center of gravity. Accordingly, their body roll is usually barely noticeable. However, even in low-slung cars, body roll remains a problem because drivers like to corner without body roll, at high speeds, and with full vehicle control. As a first approximation, stiffer suspension springs are installed to reduce body roll. There is really no reason to use additional stabilizers, since the car is usually quite light and roll can only be dealt with by the correct choice of springs. The main argument against installing stabilizers is the partial loss of independent wheel suspension properties, and the stiffer the stabilizer, the greater the loss.
If the car is structurally equipped with a stabilizer bar (often due to the fact that the donor car has such a suspension design), there is no need to add stiffness to the stabilizer; select the stiffness of the suspension springs. On eco-vehicles with a high center of gravity, there is often no alternative to a stabilizer or other devices that reduce body roll.
When installing the stabilizer, you can use relatively soft suspension springs. However, you need to stay within the limits of good roll control when driving at high speed on winding roads. The stabilizer is made of spring steel and works like a torsion spring: the greater the car roll, the stronger the resistance of the stabilizer (naturally, within the strength of the material). Typically, the stabilizer is activated when the body rolls more than 3-4 degrees and prevents further growth of the roll, while the stabilizer only works when driving in corners and on uneven roads. In other words, in the absence of a stabilizer, due to the installation of medium or low stiffness springs, body roll can reach 7 degrees or more.
On cars with a low center of gravity, you can install relatively soft suspension springs and a lightweight stabilizer, but when braking, the front of the car will “dive” unless a special anti-dive suspension design is used. Remember, the front suspension springs should always be stiff enough to prevent excessive body dive when braking.
When installing a stabilizer, you need to ensure its rigidity so that it is minimally necessary to prevent body roll, or at least the roll is within acceptable limits (the stiffer the stabilizer, the more independence of the wheel suspension is lost).
Loose or worn stabilizer mounts will reduce the effectiveness of the stabilizer.
- Introduction
- Chapter 1. Chassis
- Chapter 2. Suspension height
- Chapter 3. Suspension geometry
- Chapter 4. Suspension springs and shock absorbers
- Chapter 5. Camber, longitudinal and transverse angle of inclination of the steering axis
- Chapter 6. Ackermann angles, wheel toe, “shock control” and anti-roll bars
- Chapter 7. Rear suspension
- Chapter 8. Brakes
- Chapter 9. Vehicle Settings
- Chapter 10. Testing and adjusting the vehicle
How to adjust wheel alignment?
After checking straightness, you need to check the degree of vehicle load, tire pressure, whether the suspension and steering mechanism are securely fastened to check for knocking noise when turning the steering wheel. After this, you can proceed directly to checking and adjusting the toe.
To determine the wheel toe level, you should calculate the difference between points on the rim in front and behind its geometry axis. To do this, you need to use a special chain with a ruler or a tension device.
To measure toe-in, a ruler is placed between the wheels so that the tips of the pipes rest against the side of the tires and the chains touch the ground. When you set the arrow to the zero position, the car should be rolled forward a little so that the ruler is behind the wheel axle. In this case, the arrow should show the level of convergence. If there is a discrepancy with the norm, it must be adjusted.
In order to adjust the wheel alignment, you need to rotate the connecting couplings of the side steering rods. When this operation is carried out, the control nuts must be tightened securely.
Must-know information
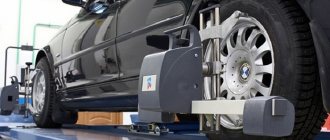
Optical stand for wheel alignment adjustment
If you suddenly find yourself in a distant locality where there is no car service, and a breakdown occurs, do not despair. Even if you need to replace the shock absorber yourself or repair the suspension, after which you must carry out wheel alignment, using these instructions, you can do everything yourself.
First of all, you will need to find some kind of garage. For example, the premises of a former state farm would be suitable, where, however, you cannot find a stand, but you can find a ruler, albeit an ancient one, for adjusting the toe angle.
What is it for
Before performing an operation, you should know why it is necessary. Is it not possible, without adjusting the angle, to get to the nearest city, where experienced craftsmen will get down to business at a car service center? It turns out that everything is not so simple. You can get there, but how? Improper camber will lead to the fact that even a few kilometers of driving can lead to baldness of the tread on one wheel. In addition, driving such a car is very difficult and dangerous.
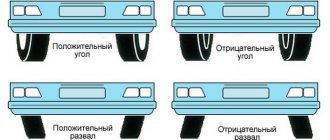
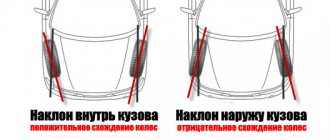
What is positive and negative wheel alignment?
Parameters that every driver must know
What is collapse? Not every motorist, even those who have traveled many kilometers, knows this. By the way, wheel camber is the angle located across the plane of rotation and the vertical of the wheel. If this angle is less than the normal value, the wheel will be directed inward to the vertical of the upper part. If the angle is greater, the wheel will look outward, relative to the vertical.
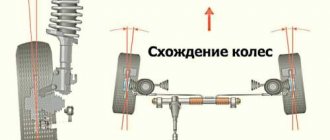
As for wheel toe, it is called the angle between the plane of rotation of the wheel and the direction of movement. This angle is measured in degrees or millimeters.
Transverse and longitudinal angle
In addition to the parameters described above, the driver should also be aware of the different axle angles.
Thus, the transverse angle of inclination is the value that is measured between the projection of the steering axis relative to the vertical of the transverse plane of the wheel.
On the contrary, the longitudinal angle of the axle is the value that is between the vertical and the projection of the wheel's turning axis on the longitudinal plane. This angle is also called caster, and it should be equal to 6 degrees. And after proper adjustment, the caster will ensure self-alignment of the wheels due to speed.
Sign 5: the car pulls to the side when braking - it deviates from the course to the right or left
Pulling to the side when braking is a sign of a large difference in wheel alignment angles. At different values of the camber and caster angles, when braking, the car turns towards a smaller caster angle of the king pin. When driving in a straight line, the car may not pull away, because one parameter is compensated by another: due to incorrect camber, it pulls in one direction, due to the PNS, in the other, and the car eventually balances out.
Other possible causes of the problem:
air in the brake system;
faulty brake cylinder on one side.
What to do: Bleed the brake system to remove air. If this does not help, check the brake cylinders. If there are signs of brake fluid leaking or the cylinder pistons do not come out when you press the brake pedal, replace the part. If everything is in order, adjust the wheel alignment angle and perform a wheel alignment.
Sign 10: Loss of directional stability on rough roads
If the car pulls strongly to the side when it hits bumps, holes and other irregularities, this may be a sign of an incorrect wheel alignment angle. When a wheel hits an uneven surface, it “moves” towards the installation angle, so the car loses directional stability.
Other possible causes of the problem:
failed steering parts;
What to do: go to a service station and check the shock absorbers, chassis and steering system. Or immediately diagnose the wheel alignment: if the shock absorbers and steering are in order, the reason lies there.
