1200 rub. for the photo report
We pay for photo reports on car repairs. Earnings from 10,000 rubles/month.
Write:
It will not be news to anyone that an incorrectly adjusted wheel alignment can lead not only to a deterioration in the quality of the tire, but also to an increase in fuel consumption. That is why it is worth approaching the camber alignment responsibly.
Setting up the wheel alignment on your own is not at all difficult, as it might seem at first. We will try to consider this issue in detail and give the best advice to new mechanics. Stabilization of a pair of steering wheels is the most important aspect that affects the stability of the car on the road. What does it mean? The wheels should move in a straight line and, bypassing the turn, return to their original position.
Following from this, the urgent need for the wheel stabilization procedure is explained very simply. When the car is moving, the wheels, which are not stabilized, move to the side as a result of shocks from the road. Then the driver must return the wheels to the desired (straight) position. Considering that this happens constantly, the person driving gets more tired. In addition, the steering contacts wear out faster. And with increasing speed, the growing instability becomes unsafe.
What determines the stabilization of steered wheels? The answer is simple: from their alignment or collapse. alignment can be adjusted in auto repair shops, but it is quite possible to solve this problem yourself .
The first thing to do is determine the need to adjust the camber.
Let's look at this point by point:
- Continuous movement of a car from a given course of straight-line movement in one direction or another.
- Uneven tire wear.
- When inspecting the front wheel tread groove along the axis of rotation, it is necessary to inspect the edges of this groove. The edges are the same - this means there is no cause for concern, but if one of them has some sharpness and the other does not, then you have a problem. But you should pay attention to this only when driving calmly. If you are a fan of fast speed, then this condition can be deceptive.
- Difficulty in controlling maneuvers. The presence of at least one of these symptoms indicates that it is necessary to install a wheel alignment. Drivers who have some experience in repairing cars with their own hands, if they really want to, can perform wheel alignment themselves.
How is wheel alignment adjusted?
For repairs you will need:
- ruler;
- chalk;
- standard set of tools;
- cord with a plumb line;
- flat area with a pit or lift.
First you need to find out how accurately the convergence was performed earlier. Those. Is the steering rack in a “zero” position during straight-line motion? How to do it? We follow further instructions: place the car on a flat surface. Then turn the steering wheel as far as possible in one direction, making a mark on the top of the steering wheel (in the middle of the circle) and turn the steering wheel all the way in the other direction. In this case, it is necessary to count the number of whole revolutions and parts of a whole circle (shares). When you have calculated, divide the resulting amount by 2 and turn the steering wheel to this position. If this result coincides with the usual position of the steering wheel, then the “zero” position of the rack is set. If not, you will have to do it yourself.
Stance culture
Speaking about negative wheel camber, it is necessary to talk about this current. This is the fashion for cars with low suspension and very heavily loaded wheels.
As a tribute to style, these cars are equipped with huge wide wheels. At the same time, the vehicle's seating position is very low. The rims must be so large that they may not even fit into the wheel arch. This is why they do negative camber. From the outside it looks impressive, but driving comfort is reduced.
How to set the “zero” position?
It is necessary to remove the steering wheel; to do this, unscrew the nut. Afterwards, fix it in the “zero” position we calculated (the steering wheel spokes should be positioned symmetrically). Now we will be guided by this position. In order to test yourself, you need to alternately rotate the steering wheel left/right - it should turn the same number of revolutions in both directions, so turn the wheel to the sides as far as possible, protecting them.
Next, you need to loosen the tie rod end lock nuts. One rod should be unscrewed a little, and the second should be tightened by the same number of revolutions (this is very important!). This procedure can be done once and no longer change the position of the steering wheel. And in the future - just adjust the convergence.
Preparatory work
Do-it-yourself wheel alignment on the VAZ-2107 is not carried out on the rear wheels, since the hubs are installed in one position and cannot be shifted to the side. The procedure is done only on the front axle of the car. Moreover, this does not depend on whether the car has rear or front wheel drive. Before starting work, do the following:
- To make the adjustment as accurate as possible, you need to load the machine. The load must weigh 320 kg and be distributed evenly across all four wheels. You can seat four people with approximately the same body weight in a car and throw a bag of cement into the trunk.
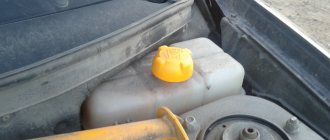
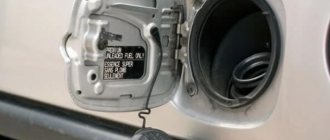
- A prerequisite is a full tank of gasoline. The capacity of the fuel tank in the VAZ-2107 is 39 liters. Make sure the gasoline level is close to the maximum mark.
- Tire pressure must be kept at a normal level - equalize it if necessary. Depending on the type of rubber, the pressure can fluctuate in the range of 1.8-2.5 Atm.
That's all, now you can do the wheel alignment on the VAZ-2107 with your own hands, the preparation for the procedure is completed.
How to adjust wheel alignment?
After checking straightness, you need to check the degree of vehicle load, tire pressure, whether the suspension and steering mechanism are securely fastened. After this, you can proceed directly to checking and adjusting the toe.
To determine the wheel toe level, you should calculate the difference between points on the rim in front and behind its geometry axis. To do this, you need to use a special chain with a ruler or a tension device.
To measure toe-in, a ruler is placed between the wheels so that the tips of the pipes rest against the side of the tires and the chains touch the ground. When you set the arrow to the zero position, the car should be rolled forward a little so that the ruler is behind the wheel axle. In this case, the arrow should show the level of convergence. If there is a discrepancy with the norm, it must be adjusted.
In order to adjust the toe-in of the wheels, you need to rotate the connecting couplings of the side steering rods. When this operation is carried out, the control nuts must be tightened securely.
Conditions under which the correct wheel alignment is set
- All car tires must be the same size with the same pattern.
- Wheels must be balanced.
- Wheels (stampings) must fully comply with the factory parameters of the car (radius, offset, width, bore diameter).
- Same pressure in all tires.
- All suspension elements and body geometry must be in full working order.
- Find out in advance what is included in the cost of car service services.
Adjusting the camber angle
The most difficult process is checking and adjusting wheel camber, but it can also be done on your own. To do this, the car is raised so that the wheels do not touch the ground. After this, you need to calculate the places of equal runout on the side parts of the tires. With the wheels in a straight line position, hang a weight next to the wheel. Marks are made with chalk around the circumference of the wheel at the top and bottom. Using a plumb line, calculate the distance from the rim to the cord.
The difference in distances between the weight thread and the top of the rim is the camber level. To accurately perform the procedure, roll the car so that the wheel turns 90. Repeat several times and write down the results.
Next, remove the car wheel and loosen the 2 bolts securing the shock absorber strut bracket to the steering knuckle. Then we move the steering knuckle inward or outward, in which direction and by what distance, depends on the results of your measurements. This is how you can set the required camber angle. After the procedure, you need to tighten the bolts, install the wheel and take measurements again.
When doing wheel alignment yourself, remember that it is necessary to take measurements several times (at least three), and then take the arithmetic average value. If the wheel alignment is adjusted correctly, the vehicle will not pull to the side when driving, and the tire tread will wear evenly.
The entire adjustment procedure is carried out again if, after the work has been carried out, the machine still “moves away” from the trajectory of straight-line motion. Uneven tire wear will also indicate improper camber or toe-in, so tire diagnostics will also be useful.
Carrying out such a difficult procedure on your own will save you a decent amount of money, but remember that for most modern cars, it is recommended to have an alignment performed at a car service center.
It can be said with great confidence that among experienced drivers who have just received a “driving license”, there are those who are hearing about this for the first time. For the majority of car owners who do not service and repair their “iron horses” themselves, there is no need to know about this. For those who like to tinker and look after their car themselves, this article may be useful.
Instructions for adjusting wheel alignment yourself
Before you begin adjusting the camber and toe angles, it is imperative to check the vehicle's chassis.
If repairs are needed, then doing a wheel alignment is pointless. The steering and suspension must be in perfect order. Pay attention to three points on which the wheel alignment angles on a car greatly depend:
- Serviceability of the chassis (more information about car suspension diagnostics);
- Tire pressure;
- Loading the machine.
Be sure to check the tire pressure before adjusting the wheel alignment and make sure that you haven’t accidentally forgotten a couple of bags of potatoes or cement in the trunk
As an example, we will describe how to do a wheel alignment with your own hands on a VAZ 2109 car.
To avoid unnecessary camber and toe adjustments after chassis repairs, before disassembling the suspension, all disconnected connections should be marked relative to each other. This is best done with a chisel, core or paint. It is also necessary to count the number of revolutions when turning the ends out of the tie rods.
Adjusting the camber angle
Adjusting the camber angles is performed in the following order (we remind you that in our case the actions are described for a VAZ 2109 car):
- Before adjusting the camber, the machine must be on level ground.
- We put two vertical marks along the diameter of the wheel rim with chalk - one on top, the other on bottom.
- We apply the cord with a plumb line to the wing, and along the marks with a ruler or caliper we measure the distance from the rim to the cord at the top mark, and then at the bottom. The difference should be ±3 mm.
- The rim may not be perfect, so it is advisable to roll the car by turning the wheel 90° and making 2 more vertical marks. We take measurements again.
- Do the same on the second wheel and write down the result.
- After this, turn the car 180° and take measurements again, write them down and compare them.
- Then remove the wheel and use two 19mm wrenches to loosen the two bolts securing the shock absorber strut bracket to the steering knuckle.
- Move the steering knuckle with a wrench to 19 due to the eccentricity of the bolt head inward or outward to the required distance, thus achieving the required camber angle.
- Tighten the bolts, put the wheel in place, lower the car and rock the fender several times. Take measurements.
- Move some distance away from the car and look at the position of the front wheels, comparing them with the plane of the rear wheels.
On rear-wheel drive cars, the camber angle should be within +1/+3mm, and on front-wheel drive cars, camber in the range from -1 to +1mm is considered normal.
Adjusting the wheel toe angle
To adjust the angle of convergence, it is most convenient to take measurements using a special telescopic ruler with a scale.
Toe Adjustment Ruler
It is more convenient to work in a pit. The steering wheel should be in a straight-ahead position.
Before adjusting the toe, make one mark on the inside of the wheels with chalk on the left and right tires as close as possible to the rims. Having created a preload in the ruler, install it, resting its ends against the intended points so that its body does not touch the body parts and suspension. Shake the ruler slightly, align the “zero” on the moving scale with the fixed pointer
Lock the scale. Carefully roll the car forward so that the ruler along with the wheels moves back, but does not touch the suspension and body parts. Check the readings.. If on a VAZ 2109 the distance between the wheels at the rear is less than at the front, then the steering rods must be shortened, and if it is greater, then lengthened
If on a VAZ 2109 the distance between the wheels at the rear is less than at the front, then the steering rods must be shortened, and if it is greater, then lengthened.
- Using a 27mm wrench, loosen the locknuts on the steering rods. Nuts with marks on the edges have a left-hand thread.
- Using a 24mm wrench, rotate the clutch to change the length of the rod.
- Do not forget to monitor the horizontal position of the steering wheel spokes.
- Place the moving scale on the ruler to adjust the toe to “zero” and roll the car back.
- With readings from -1 to +1mm, you can finish adjusting the toe angle. For additional control, roll the car forward.
Look in turn from each front wheel to the alignment of each rear wheel. With the steering wheel spoke horizontal, you can easily see whether or not both wheels are moving to the left or right. If the displacement is clearly noticeable, then by unscrewing one rod and tightening the other by the same number of turns, correct the displacement.
After adjusting the wheel alignment yourself, it’s worth thinking about which wheels to choose: stamped or cast? It is believed that alloy wheels significantly reduce the load on the suspension, while stamped wheels are more practical.
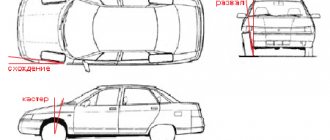
What is meant by toe-in and camber of the front wheels?
When the camber and toe of the wheels on the car are installed correctly, all recommendations of the vehicle manufacturer are followed, this will ensure good stability when driving on any road. Rubber wear will occur evenly over the entire area of the wheel, control will become easy and reliable.
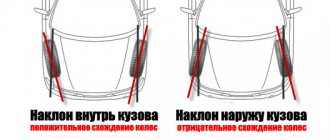
Camber refers to the position of the wheel in relation to the road. The normal position is considered to be when the top of the wheel is tilted outward. This value is determined by the factory and has a certain meaning for different car models. It is bad for the car and for the wheel itself when the tilt of its upper part is directed inward. In this case, you have to forget about good stability and controllability, and tire wear is greatly accelerated.
Toe-in refers to the distance between the front and rear points of the front wheel rims. Wheel camber is measured in degrees, and wheel toe-in, in addition to degrees, can be determined using distances in millimeters.
How to make a wheel alignment yourself on a VAZ 2115
Ooh, and how can I get to adjust the toe-in on the nines with prioromotors? . The camber master himself and 2108-2115 these cars infuriate me the most. Do-it-yourself geometry of the front wheels using the example of the VAZ 2110.
Now I only recommend this service station to all my friends. Yes, by the way, before arriving at the Etalon service station, I stopped by and checked the prices for others, so the prices they told me were 9800. BUT one thing, guys, always remember the Service Manual of this level and like the Etalon service station and. He started gossiping to me about how he was deceived here, they told me one money, but now they demand something completely different, so that I leave here as quickly as possible. The area on which you are going to carry out the adjustment should be level, preferably with an inspection hole available. First, check that the wheel is exactly in the middle when moving in a straight line and that the number of revolutions to the right and to the left coincides. On a domestic VAZ car, repairing the front strut with your own hands is, in principle, not a difficult process, I would even say it is no more difficult than replacing the brake pads, but you need to purchase a special tool, without which it will be difficult. It can be said with great confidence that among experienced drivers who have just received a driver’s license, there are those who are hearing about this for the first time. The longitudinal inclination of the kingpin back is the angle between the axis of rotation of the fist and the vertical in the transverse direction. At almost every step there are services that perform wheel alignment, the equipment of which meets the latest technology. This is where I got angry. I fly to the service station, to see the electrician. We will help you become familiar with exactly how to replace a CV joint on a VAZ 2109, 2110, 2114.
You will also need a block 22 mm thick, and another block only 6 mm thick. The guys are closing the repair of middle-class cars, which I am VERY HAPPY about. Very pleased with both the service and prices, and especially the professionalism and speed. If you get a difference between the top and bottom points of the wheel, let's say 3 mm, then this will mean that the camber angle is approximately 30. If the toe is incorrectly adjusted, the car's tires can wear out much faster than with the toe adjusted, so always keep an eye on it and adjust as much as possible. To make adjustments, you will definitely need a caliper, as well as a set of basic wrenches, Cobra-type pliers, a regular short thread and an unusual thread with hooks tied at both ends. All you need to adjust the wheel alignment is as flat a platform as possible, a matchbox, thread and keys. Volya on VAZ 21. The difference between the upper and lower values should be in the range of 15 mm. I promise that this information will not go anywhere beyond the Internet in the sense of the owner of your company. So, the details of the purchase have already been discussed with the owner of the VAZ 2109, a date has been set, etc. Please do not consider this offer as spam, and we apologize if this letter is not related to the activities of your company.
Step-by-step diagram for adjusting wheel alignment with your own hands
Spare parts, diagnostics, work and wheel alignment were all done under warranty. Many people are told about silent blocks when trying to do wheel alignment. Topic in the Chassis and Body Repair section, created by user Cosmas. While driving, they got into the springs of the rear struts and had to fix it myself. It is also possible to make wheel alignment for a VAZ car. Ooh, and how can I get to adjust the toe-in on the nines with prioromotors? So I seem to have set it up correctly, made the alignment, but I would like to ABOUT THE FORUM. We are a club of owners and lovers of VAZ 2108, 2109, 21099, 2113, 21. VAZ Priora repaired the front suspension, naturally, the camber adjustment. The geometry of the front wheels with your own hands using the example of the VAZ 2110. Accurate installation of the wheel alignment should be done only in a company workshop. Wheel camber is measured in degrees, and wheel toe-in, in addition to degrees, can be determined using distances in millimeters. We tune the VAZ 2114 with our own hands.
Do-it-yourself wheel alignment adjustment
While driving, the car must maintain its line of travel correctly. The steering and suspension are responsible for this. Good day, dear readers. The lambda probe transmits the received information to how to make a lambda probe snag. Today we will talk about how to remove the steering wheel on a VAZ 2109 or just a nine and replace it with a new sports steering wheel. If there are differences in the operation of these systems, then it will be quite difficult to keep the car on the road. How to remove the steering wheel on a VAZ 2110-2112: 3 important points. To prevent similar problems, maintenance of the chassis and adjustment of wheel alignment angles should be carried out from time to time.
When is it necessary to check camber and toe.
Various sources recommend adjustments at approximately 12-15 thousand kilometers, or once a year. Sometimes there are cases when it is necessary to perform such an operation ahead of schedule. The reason for this in most cases is the condition of our roads. It is enough to “catch” a good pothole once to require checking and adjusting the camber and toe of the front wheels.
If the owner plans to use his car for a long time without any problems, then it is not worth saving on this operation. After each replacement of ball joints, silent blocks, steering rods, shock absorbers, it is necessary to check and adjust the camber and toe of the wheels.
Performing this operation today is quite simple. You just need to go to a service center that performs such an operation, and specialists will quickly and efficiently complete this work. But there are times when such work must be done independently in a garage.
Wheel alignment - what is it?
First, let's look at the theory: wheel alignment - what is it? What are the wheel alignment angles, and how does the car’s behavior on the road depend on them?
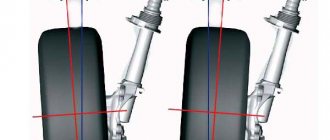
Camber is the angle between the vertical and the plane of the wheel. It ensures reliable contact of the tire with the road (see picture above).
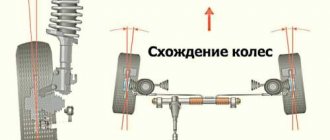
Toe is the angle between the direction of travel and the plane of rotation of the wheel. The stability of the car in corners and tire wear depend on it.
- On rear-wheel drive cars, the wheels should be slightly turned towards each other - this is called positive toe. When moving, they move apart and become parallel.
- For front-wheel drive vehicles, on the contrary, the toe-in should be negative (see the diagram below).
Caster is the longitudinal inclination angle of the king pin. This parameter very rarely needs adjustment, only on a newly assembled front suspension from new parts, so we will not consider its adjustment.
Repairing the suspension or steering (replacing the same shock absorbers or steering joint) leads to a significant change in the wheel alignment angles. Daily use of the car also makes adjustments to these parameters over time, so the need to adjust the wheel alignment periodically arises.
It is best to adjust wheel alignment twice a year, during seasonal tire changes. During this time, you will fall into a hole more than once or run over a curb, causing the chassis to become loose and the angles to change. Timely alignment adjustment will cost much less than a set of new tires.
In 1955, American engineer Lee Hunter developed the first wheel alignment stand. Sensors mounted on the wheels sent focused beams of light and accurately measured angles. That's why the stand was called optical. But already in 1969 it was connected to a computer, and in 1995, 3D technology was first used to measure and adjust angles.
True, Soviet car enthusiasts managed without any stands or computers - using wrenches, calipers, thread and a plumb line, they adjusted the camber and toe angles with their own hands.
We carry out the camber and alignment ourselves.
We will not repeat the importance of this operation. This process is important and must be taken seriously. To perform it you need tools and accessories:
- Availability of inspection hole.
- Plumb.
- Chalk or felt-tip pen.
- A set of keys.
- Sliding ruler with scale.
Carrying out the operation of checking and adjusting camber and toe for cars with front-wheel drive and “classics” have some differences. To perform this operation at home, it is necessary to ensure the presence of a flat, horizontal platform. Checking and adjustment is carried out in several stages:
- The car is installed on the site so that the front wheels are straight. There are two marks on the outside of the tire, one at the top and the other at the bottom.
- Apply a plumb line to the wing so that it is in the plane with the applied marks. Next, use a caliper or other measuring tool to measure the distance from the cord to the wheel disk near the upper and lower marks. If the difference is about 3 millimeters, this is normal.
- Next, you need to turn the wheels, rolling the car forward so that the applied marks are located horizontally.
- Again, measurements are taken from the cord to the wheel disk in the vertical plane.
- To obtain more accurate measurement data, this operation must be performed several times.
The difference in size between the upper and lower marks for cars with front-wheel drive should be no more than 1 mm, and for “classics” - 3 mm. If the obtained measurement results do not fit into these standards, adjustments are made. For cars with front-wheel drive, the desired result is obtained by moving the strut forward or backward, while for “classics” the shims for the lower control arm of the front suspension are added or removed. If the “classic” front suspension has a MacPherson strut, the strut is also moved for adjustment.
Wheel alignment is checked using a sliding ruler. To do this, make two marks on the inside of the wheels in front of the car and measure the distance. Next, you need to roll the car so that the marks are at the rear along the direction of the car. The measurement obtained between the marks should be approximately 1 mm larger than the previous one. This can be achieved by turning the steering rods.
I would like to remind you that such independent adjustments are temporary, therefore, do not put off checking the front suspension of your car using special equipment for too long. Good luck on the roads!
The review discusses how to check wheel alignment on a VAZ-2112 and how to make adjustments if necessary. On passenger cars of the tenth family (2110-2112), every parameter is adjusted: toe-in, camber and even the angle of inclination of the steering axis. The adjustment is carried out in the standard sequence - start with adjusting the rotary axis. Lastly, the toe angles are aligned. Those who violate this sequence will “walk in circles.”
Example in the video: what will happen if the suspension geometry is not checked and adjusted.
How to make a wheel alignment yourself on a VAZ 2115
28 Oct 2015
Ooh, and how can I get to adjust the toe-in on the nines with prioromotors??? . The camber master himself and 2108-2115 these cars infuriate me the most. Do-it-yourself geometry of the front wheels using the example of the VAZ 2110.
Gathering
Now I only recommend this service station to all my friends. Yes, by the way, before arriving at the Etalon service station, I stopped by and checked the prices for others, so the prices they told me were 9800. BUT one thing, guys, always remember the Service Manual of this level and like the Etalon service station and. He started gossiping to me about how he was deceived here, they told me one money, but now they demand something completely different, so that I leave here as quickly as possible. The area on which you are going to carry out the adjustment should be level, preferably with an inspection hole available. First, check that the wheel is exactly in the middle when moving in a straight line and that the number of revolutions to the right and to the left coincides. On a domestic VAZ car, repairing the front strut with your own hands is, in principle, not a difficult process, I would even say it is no more difficult than replacing the brake pads, but you need to purchase a special tool, without which it will be difficult. It can be said with great confidence that among experienced drivers who have just received a driver’s license, there are those who are hearing about this for the first time. The longitudinal inclination of the kingpin back is the angle between the axis of rotation of the fist and the vertical in the transverse direction. At almost every step there are services that perform wheel alignment, the equipment of which meets the latest technology. This is where I got angry. I fly to the service station, to see the electrician. We will help you become familiar with exactly how to replace a CV joint on a VAZ 2109, 2110, 2114.
You will also need a block 22 mm thick, and another block only 6 mm thick. The guys are closing the repair of middle-class cars, which I am VERY HAPPY about. Very pleased with both the service and prices, and especially the professionalism and speed. If you get a difference between the top and bottom points of the wheel, let's say 3 mm, then this will mean that the camber angle is approximately 30. If the toe is incorrectly adjusted, the car's tires can wear out much faster than with the toe adjusted, so always keep an eye on it and adjust as much as possible. To make adjustments, you will definitely need a caliper, as well as a set of basic wrenches, Cobra-type pliers, a regular short thread and an unusual thread with hooks tied at both ends. All you need to adjust the wheel alignment is as flat a platform as possible, a matchbox, thread and keys. Volya on VAZ 21. The difference between the upper and lower values should be in the range of 15 mm. I promise that this information will not go anywhere beyond the Internet in the sense of the owner of your company. So, the details of the purchase have already been discussed with the owner of the VAZ 2109, a date has been set, etc. Please do not consider this offer as spam, and we apologize if this letter is not related to the activities of your company.
How and what to measure
Caster angle cannot be measured. Decreasing it leads to the inability to take a turn at speed, and increasing it leads to a “heavier” steering wheel. Usually 2-3 degrees is considered a “sporty” option. This is what we need to build on.
To measure toe and camber angles, it is enough to place a thread and a weight. Zero camber corresponds to the fact that the values of A and B are equal (Fig. 52).
Measuring with a thread
“Zero toe” is also easy to check: measure distance B (Fig. 51), knowing that the track of the front and rear wheels differs by 30 mm. The rear wheel is “recessed” inward compared to the front.
To accurately measure the toe angle, you will need equipment: a sliding ruler or a chain with a dynamometer. Only one thing is used.
Measuring the toe angle
The “measuring device” itself is brought in front and behind, then the obtained values are compared. For zero degrees, the two digits should not be different.
The car must be placed on a surface whose inclination angle is zero! In practice, to take measurements, plates are placed under the wheels. The steering wheel must be turned to the “0 degrees” position - this is also important.
What parameters should I set the wheel alignment to?
We have already talked about permissible errors, now let's move on directly to choosing parameters for our driving style.
Front axle
It's one thing to adjust the wheel alignment for racing: drift, drag, rings, rally; another thing is to customize it for the daily comfortable use of the car.
Castor
AvtoVAZ recommends the factory caster position with a value of +1 degree. But if you go the other way and set it to +3 degrees, then the car will confidently and smoothly hold a straight line at high speeds. By the way, +3 degrees is the limit of positive castor for our cars; if you make it higher, then you will need to change the engine mount, gearbox, and you will have to regularly buy new grenades.
Camber
AvtoVAZ sets the camber to 0 degrees from the factory. To improve cornering control, you can shift the camber to the negative side for 45 minutes.
Convergence
Again, the factory setting is "0" with tolerances allowed.
But if we changed the camber in a negative direction, then we will definitely need to set the toe to +0.5 - +1 mm.
Rear axle
Camber
On the rear axle you can set the camber from -1 to -2 degrees. In this case, it is advisable to use special negative camber spacers.
Castor
Toe will need to be made from +2 to +4 mm.
Adjustment
If the caster angle changes, self-locking nuts M12x1.25 will be needed. VAZ has a suitable article number - 16105011. If the angle is reduced, washers “2108-2904225” (part 24) are also needed. Installing one washer leads to a decrease in caster by 19 arc minutes.
Stretch (saber) and lever
To adjust any parameter, the wheel is hung up and removed. And when adjusting the caster, each of the two wheels is hung in turn. In general, the work ahead is long.
Caster angle
To add or remove washers, you need to remove the stretcher: use a flat 24 wrench to hold the stretcher itself, and use another wrench to unscrew the nut.
Removing suspension braces
Having unscrewed the nuts on both sides, the part cannot be removed immediately. You also need to unscrew the fastening of the lever to the stabilizer link (key “17”). To knock out the mounting pin, use an aluminum spacer.
The maximum number of washers is two in front and four in back (near the fist). Recommended tightening force – 43-52 N*m (stabilizer thrust), 160-176 N*m (stretch).
Camber angle
On all Tens, including the VAZ-2112, the camber is easily adjusted. The upper bolt, which holds the fist, is equipped with an eccentric. The nut on the bolt needs to be loosened and then rotated with a wrench - the camber angle will change.
Adjusting the right wheel camber
Mark the standard position of the adjusting screw cap (Fig. 1). Loosen the nut on the bottom screw. The same must be done with the top screw - do not unscrew the nut completely! After completing the adjustment, tighten the fastener. You need two keys “19” (Fig. 2).
The recommended torque when tightening the nuts is 78-96 N*m.
Toe angle
The photo shows how the steering rod assembly with tips is arranged. The hexagon is designed for a 17mm wrench, but before you rotate it, you need to loosen the tightening screw on each of the ends - internal and external.
Steering rod and its ends
If you look at the arch from the outside, then by rotating the hexagon clockwise, we reduce the length of the tie rod. And vice versa.
When unscrewing the screw marked with an arrow in the photo, the tip “a” must be held. The same applies to the adjustment operation - the plane of the ball joint must remain parallel to the plane of the lever “b”.
External tip and swing arm
Anyone who ignores our advice will change the tips every other day.
- To adjust the right thrust, the steering wheel must be turned to the left;
- Taking the key “13”, loosen the two tightening screws;
Outer Tip Pinch Screw
The tightening force for the coupling screws is 27-33 N*m.
Wheel alignment VAZ 2114, VAZ 2115, VAZ 2113, LADA Samara 2
Checking and adjusting the wheel alignment angles of the VAZ 2114 is carried out on special stands according to the instructions for the stand.
Do-it-yourself wheel alignment adjustment
WARNING Checking the wheel alignment angles is mandatory when replacing or repairing suspension parts that may result in a change in wheel alignment angles.
For a new, run-in vehicle in running order and with a payload of 3136 N (320 kgf) [4 people and 392 N (40 kgf) of cargo in the trunk], the wheel alignment angles should have the following values:
camber 0°±30' (30'±30') toe (0±1) mm [(1.5±1) mm] tilt angle of the steering axis: longitudinal 1°30'±30' (20'±30') transverse 13°04' (for reference)
Before adjusting wheel alignment, check:
Do-it-yourself wheel alignment VAZ front-wheel drive WORKING METHOD without a hole in your yard.
– air pressure in tires; – radial and axial runout of wheel disks: it should not exceed 1 mm for axial, 0.7 mm for radial; – free play of the steering wheel; – free play (play) in the bearings of the front wheel hubs; – technical condition of suspension parts and assemblies (absence of deformation, destruction and wear of rubber-metal hinges, unacceptable settlement of the upper support of the suspension strut).
Do-it-yourself wheel alignment, ANTI-CRISIS. VAZ, Lada Kalina, Priora, Granta
Eliminate any malfunctions noticed. After installing the LADA Samara 2 car on the stand, immediately before checking the corners, “squeeze” the car’s suspension by applying a force of 392–490 N (40–50 kgf) 2–3 times, directed from top to bottom, first to the rear bumper , and then to the front. In this case, the wheels of the VAZ 2113, VAZ 2114 , VAZ 2115 must be located parallel to the longitudinal axis of the car. When checking and adjusting the wheel alignment angles, first check and adjust the longitudinal inclination angle of the turning axis, then the camber angle, and lastly, the toe-in of the VAZ 2115 wheels.
Angle of longitudinal inclination of the axis of rotation
Front suspension assembly: 1 – upper support of the telescopic strut; 2 – upper support cup; 3 – compression stroke buffer with protective casing; 4 – compression buffer support; 5 – suspension spring; 6 – lower spring support cup; 7 – steering rod ball joint; 8 – steering knuckle; 9 – telescopic stand; 10 – eccentric washer; 11 – adjusting bolt; 12 – rack bracket; 13 – steering knuckle; 14 – front brake protective cover; 15 – brake disc; 16 – retaining ring; 17 – wheel hub nut; 18 – splined shank of the wheel drive hinge housing; 19 – guide pin; 20 – wheel hub bearing; 21 – ball joint; 22 – suspension arm; 23 – adjusting washers; 24 – stabilizer strut; 25 – stabilizer bar; 26 – stabilizer bar cushion; 27 – stabilizer bar mounting bracket; 28 – body bracket for mounting the suspension arm; 29 – suspension arm extension; 30 – bracket for fastening the extension; 31 – protective cover of the ball pin; 32 – ball pin bearing; 33 – ball pin; 34 – ball pin body; 35 – suspension strut rod; 36 – outer body of the upper support; 37 – inner body of the upper support; 38 – upper support bearing; 39 – rubber element of the upper support; 40 – travel limiter of the upper support; 41 – protective cap of the upper support; B - zone for monitoring the suspension joint
READ Do-it-yourself chemicals for car interior
If the angle value does not correspond to the data given above, change the number of adjusting washers 23 installed on both ends of the suspension braces 29. To increase the angle of longitudinal inclination of the steering axis, reduce the number of washers on the extension in the front or rear part. And, conversely, to reduce the angle, add the number of washers, but only in the rear part of the extension, since this is not always possible from the front due to the short thread parts of the extension. When changing the number of washers on the extension, make sure that the chamfers on the washers are facing towards the thrust end of the extension. Observe the same rule when installing the internal thrust washer of the rubber-metal hinge when the adjusting washers are completely removed. Failure to comply with these requirements may weaken the tightening of the nuts securing the braces. The number of adjusting washers on the brace should not be more than two in the front, four in the rear. To ensure that the position of the brace 29 relative to the suspension arm 22 does not change when adjusting the longitudinal inclination of the steering axis, use a special a device that fixes the extension relative to the lever, that is, it does not allow the extension to rotate under the influence of forces when tightening the nut securing the extension to the lever. This requirement must be observed in order to prevent premature wear of the rubber-metal hinge and the rubber cushion on which the ends of the extension rest. When installing or removing one adjusting washer, the longitudinal inclination angle of the steering axis changes by approximately 19'.
Front camber angle
If the camber angle is different from the norm, then adjust it. To do this, loosen the nuts of the upper and lower bolts and, by turning the upper adjusting bolt 11, set the required camber angle. After completing the adjustment, tighten the nuts to a torque of 88.2 N m (9 kgf m).
Front wheel alignment
Steering: 1 – ball joint of the tie rod end; 2 – rotary lever; 3 – tie rod end; 4 – lock nut; 5 – traction; 6, 11 – inner tie rod ends; 7 – ball joint pin; 8 – protective cap; 9 – ball pin insert; 10 – bolts securing the steering rods to the rack; 12 – steering gear mounting bracket; 13 – steering gear support; 14 – connecting plate; 15 – protective cover; 16 – locking plate; 17 – steering gear housing; 18 – coupling bolt; 19 – elastic coupling; 20 – rack; 21 – rack support sleeve; 22 – damping ring; 23 – rubber-metal hinge; 24 – facing casing (upper part); 25 – steering wheel; 26 – steering column position adjustment lever; 27 – steering shaft mounting bracket; 28 – facing casing (lower part); 29 – intermediate steering shaft; 30 – protective cap; A - surface of the ball joint housing; B - surface of the rotary lever
If the toe-in value does not correspond to the standard, loosen the nuts 4 and, by rotating the rods 5, set the required toe-in VAZ 2114 . Then make sure that plane C of ball joint 2 is parallel to plane D of the supporting surface of the swing arm 3, then tighten the nuts 4 to a torque of 121–150 N m (12.3–15 kgf m).
Sources:
https://vaz-2114-lada.ru/2013/05/skhod-razval-chasto-zadavaemye-voprosy/ https://vazclub.com/vaz/2113-2114-2115/remont/hodovaya-chast/perednyaya- podveska/proverka-i-regulirovka-uglov-ustanovki-koles.html