Replacing the camshaft oil seal step by step with photos
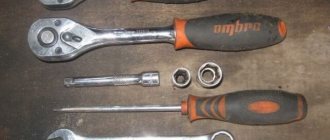
Having prepared the necessary tools, you can get to work.
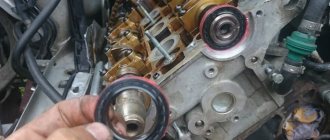
First of all, disconnect the negative terminal from the battery on your VAZ 2114. Move the piston of the first cylinder to top dead center. Remove the pulley from the camshaft. The key is then removed from the camshaft. The seal is easy enough
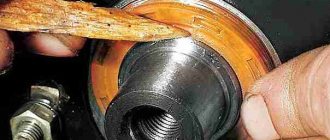
You just need to pry it off with a flat screwdriver. Before installing the new device, pay attention to the inner edges on both sides. They should be free of all kinds of damage, dents, rubber sagging, etc. The working edge must be lubricated with plain motor oil
This will allow the element to easily settle into a new place and also protect it from premature wear. If problems arise with the reverse pressing of the oil seal, its seating edge can be processed with a file or fine sandpaper. Inside the block head, the element is installed with its working edge. A regular wooden stick will help you carefully place the element in its place on the camshaft. Just do not use metal elements for pressing. It should be pressed in until it stops. Perform the assembly reassembly procedure. The camshaft pulley is installed as a protruding element of the hub in relation to the power unit. Be sure to adjust the camshaft belt tension level.
At this point, the installation procedure for the camshaft oil seal can be considered complete. The most difficult stage is rightly considered to be the disassembly stage. Replacement is quite simple. Every VAZ 2114 owner is able to cope with such a task with his own hands.
Reasons for failure of camshaft seals
There are many reasons why the camshaft oil seal fails:
- Wear . Since the camshafts are constantly in motion, they get very hot, and the oil seal is installed on the outside, there is no proper cooling. Thus, the inner part of the product, although made from resistant material, still wears out, and over time, oil smudges appear in the places where the material is rubbed.
- Damage to the structure from weather conditions . Strong temperature changes can affect the structure of the oil seal itself. So, cracks may appear on it or it will become deformed, which will make it unsuitable for use.
This is interesting: How to change a valve seat - replacing valve seats on a VAZ-2108 with your own hands
Perhaps these are all the reasons why a part may fail and will require replacement.
Replacement procedure
Replacing the camshaft oil seal on a VAZ-2114 8-valve car and other vehicles equipped with a similar engine is practically no different from that on the 16-valve power units of the 2112 model. However, there are still some differences.
Performing manipulations on 8-valve engines
The replacement procedure begins with fixing the car in a stationary state using the parking brake and “heels” under the wheels. The gear lever must be in neutral. After this, using a 10mm wrench, the timing cover is removed.
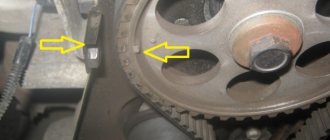
The camshaft and crankshaft pulleys should be installed in the TDC position. To do this, the mark on the camshaft sprocket is aligned with the installation lug located on the rear cover of the timing drive. After the gas distribution mechanism has been brought to the required position, it is fixed using a screwdriver inserted into the teeth of the flywheel.
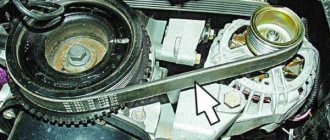
Using a 17 key, loosen the tension roller bolt and remove the belt from the upper sprocket. After this, the camshaft pulley is secured from turning and the bolt securing it to the end of the shaft is removed. The star itself is removed
When dismantling the sprocket, care should be taken, since under it there is a small semicircular key, which is very often lost during the disassembly of the timing drive.
After the above-described manipulations, the camshaft oil seal is removed using a screwdriver. The new part is lubricated with engine oil and pressed into place using a special mandrel. If you don't have one, you can use a socket head of a suitable size. Assembly of the mechanism is carried out in reverse order.
Performing manipulations on 16-valve engines
Replacement of VAZ-2112 camshaft oil seals is carried out in a manner similar to that described above. In this case, the exhaust camshaft sprocket is first dismantled, then the intake camshaft. The amount of work increases slightly due to the greater number of mounting points for the timing cover.
In addition, special care should be taken when reassembling the mechanism and setting marks. On 1.5 liter 2112 engines, incorrect installation of timing marks often leads to damage to the valve mechanism and CPG
Replacement process
Replacing camshaft seals can be a real challenge for some car owners, but if you follow the instructions, everything will work out . So, consider the sequence of actions for replacement:
- We remove the “minus terminal” from the battery.
- Open the hood and unscrew the mounting bolts of the timing belt protective cover. Let's take it out.
- Using a 17 wrench, we loosen the mounting bolt of the camshaft exhaust pulley. To prevent the part from turning, it must be secured with a screwdriver.
- We carry out the same operation with the inlet pulley.
- We dismantle the timing belt and remove the gears from their seats.
- Very carefully, so as not to damage the surface of the camshaft, we pry up the oil seal and dismantle it.
- We lubricate the new oil seals with engine oil.
- Using a 24mm socket we press new oil seals.
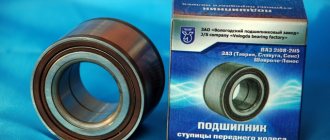
Seal selection
The choice of camshaft oil seal should be taken seriously, since it is this detail that determines how efficiently the camshafts are used. Usually these parts can be adjusted to size.
Thus, the size of the camshaft oil seal for the VAZ-2110 is: 42×28 mm. But, it is recommended to buy parts specifically for cars.
Original
2108-1005034 — original catalog number of the camshaft oil seal. The inlet and outlet versions of the product are interchangeable, unlike the shafts themselves.
The average cost is up to 100 rubles per 1 piece, if we are talking about the manufacture of AvtoVAZ.
Substitutes
Of course, it is not always possible to find the original, so there is a list of analogues that can be used. They are certified and the size is correct.
Table of replacements for the standard camshaft oil seal for the VAZ-2110:
As practice shows, camshaft oil seals manufactured by Elring are recommended for use. The company produces a fairly large range of rubber sealing products, the quality of which is noted by car enthusiasts at a high level.
Reasons for failure of camshaft seals
There are many reasons why the camshaft oil seal fails:
- Wear . Since the camshafts are constantly in motion, they get very hot, and the oil seal is installed on the outside, there is no proper cooling. Thus, the inner part of the product, although made from resistant material, still wears out, and over time, oil smudges appear in the places where the material is rubbed.
- Damage to the structure from weather conditions . Strong temperature changes can affect the structure of the oil seal itself. So, cracks may appear on it or it will become deformed, which will make it unsuitable for use.
Perhaps these are all the reasons why a part may fail and will require replacement.
Replacing the cuff
Replacing camshaft seals on a VAZ 2112 begins with standard procedures:
- It is necessary to stop the car with the handbrake, engage first gear and put “shoes” under the wheels
- Then we de-energize the electrical circuits of the car by removing the terminals from the battery
We still have to get to the cuffs themselves, so we remove all the interfering components and parts in order:
- The drive belt of the electric generator is in the way, so we loosen the tightening of the lower and upper nuts securing it
- Then, to loosen the drive belt, we bring the generator closer to the cylinder block, to do this we turn its adjusting bolt counterclockwise, as in the photo below
The adjusting bolt for tensioning the drive belt allows you to move the electric generator closer or further from the motor, while releasing or tightening the drive belt.
Adjusting bolt for tensioning the drive belt
So:
We use the “10” socket with a ratchet to unscrew the six bolts that secure the front cover of the timing case and remove it
Unscrew the mounting bolts of the timing casing and remove the casing
- Then you need to remove the right wheel, as well as the plastic shield from the engine compartment
- Take Head “17” with a knob and turn the crankshaft in the direction of the clock hand
- In this case, we place the head on the bolt that secures the electric generator drive pulley.
- Rotate until the marks on the camshaft toothed pulleys coincide with the marks on the rear timing belt cover.
- In this case, the engine flywheel mark should be opposite the slot in the clutch housing cover
- We insert a screwdriver between the flywheel teeth, through the hole in the clutch housing, to secure it from turning.
- Then you can safely unscrew the bolt that secures the generator drive pulley, and remove the pulley
- Now, using the “17” key, you need to loosen the nut of the timing belt tensioner roller
- We turn the roller and loosen the belt tension, then remove its rear branch from the exhaust camshaft pulley, then from the belt tension roller and the coolant pump pulley
Remove the timing belt after loosening the tension roller
- Then carefully remove the belt from the crankshaft and exhaust camshaft pulleys, as well as the support roller.
- We take a spanner “17” and unscrew the bolt that secures the camshaft pulley so that the camshaft does not rotate and the marks do not go astray, insert a screwdriver into the pulley hole and thus hold it
We unscrew the “17” key, the bolt that secures the pulley, and use a screwdriver to hold the camshaft from turning
- You can remove the toothed pulley from the camshaft and at the same time pull out the key, if it sticks out, if the key is recessed, it will not interfere with removing the oil seal, then you can leave it in place
- We pull the oil seal out of the seat using curved pliers or a screwdriver
Pull out the oil seal using a screwdriver
Installing the oil seal
All that remains is to insert the new oil seal into place; for this you also need instructions:
- Before installation, it is necessary to lubricate the working surface of the cuff; use engine oil for lubrication.
- Then we press the cuff into the seat
- Pressing should be done carefully so as not to “lift up” and damage the rubber of the oil seal rim
- To perform pressing, it is better to use a hammer with a plastic or rubber head.
- He will also use a mandrel or a piece of pipe of the required diameter.
Press the cuff into place with a hammer and mandrel
- In this case, the edges of the oil seal must be flush with the edges of its seat
- We do the same with the second camshaft oil seal, if necessary.
- Replacement of camshaft seals on a VAZ 2112 was completed successfully
- Then we install the pulleys, timing belt, generator drive pulley, timing case and generator drive belt
- The tension of all drive belts should be adjusted.
As you can see, the procedure can be done with your own hands, requiring a minimum of tools and no specific knowledge. Remember - replacing the cuffs in a timely manner will save you from more serious problems. Additionally, there is always the opportunity to study video materials.
VAZ 2109: replacing the camshaft oil seal without problems VAZ 2110 camshaft play - solving the problem Replacing the VAZ 2110 camshaft oil seal using an independent method Replacing the VAZ 2110 camshaft and all about it
This is interesting: Replacing the coolant temperature sensor VAZ-2112 16 valves: we explain all the nuances
Removing the cuff
Note. In order for the replacement of camshaft seals on a VAZ 2110 to be successful, it is not necessary to dismantle the engine or the VAZ camshaft.
Camshaft oil seal VAZ 2110 16 valves
The cuff itself is located behind the toothed pulley. To dismantle it, you should arm yourself with a special tool - 2085. If this is not available, a regular hook can help remove the oil seal. So, let's start removing:
- first of all, loosen the clamps of the poly V-belt tensioner;
- remove the belt;
- now you need to dismantle the damper;
- we reach the safety shields - upper and lower;
- disconnect them from the end of the engine;
- Now you need to turn the crankshaft until the cylinder piston reaches top dead center.
Note. When performing the above operation, it is recommended to use the ignition timing mark.
Note. This belt can of course be secured accordingly rather than removed. But, as you know, the belt cannot be tightened, otherwise it will become deformed. Therefore, it is still better to remove it.
Camshaft oil seal VAZ 2110 8 valves
From this point on, the crankshaft cannot be turned either, since one of the pistons is already at top dead center. Let's continue:
- block the camshaft pulley accordingly;
- First, use a wrench to unscrew the bolt, and use a pry bar to keep the shaft from turning.
You can also ask an assistant, if you have one, to hold the shaft from turning. In addition, to prevent the shaft from turning, you can pass a 10-mm head with an extension through the hole in the pulley, and then put it on the nut that secures the rear timing belt cover.
- The camshaft pulley is removed.
Note. In order not to lose the key, you should remove it from the camshaft groove.
- Now we should start removing the oil seal that will appear before us;
- take a screwdriver and remove the cuff.
The puller is screwed into the oil seal as far as possible. At the same time, press the slip ratchet.
- you need to loosen the knurled screw and rotate the inner part in the direction of the camshaft until the oil seal comes out.
Installing a new cuff on the camshaft
VAZ 2110 camshaft oil seal
Note. It is recommended to lubricate the new cuff with machine oil. In addition, the threaded head of the tool, which we use along the shaft, is lubricated. Only after this is the cuff pressed inside using a rubber hammer.
To easily install a new cuff, it is recommended to use a bushing of a suitable size instead of a handy tool. You also need to take a long bolt and a large washer.
Note. The bolt that is selected must be the same diameter as the camshaft pulley.
- install the bushing on the outer diameter of the oil seal;
- install them together using a bolt and washer;
- tighten the bolt until the cuff is in place (that is, flush with the cover).
Note. If you don’t have a bushing at hand, the cuff can be pressed in with hammer blows through the bit. We remember that you cannot press the cuff in completely, because this can block the hole from which the oil drains.
What does the cuff affect?
To assess the full significance of the role of the camshaft oil seal, let's try to work backwards. Let's take a closer look at what can happen if the oil seal fails and stops reliably performing its tasks.
- The minimum harm that a faulty cuff can cause is oiliness of the entire engine compartment.
- Oil consumption will increase significantly; you will have to add lubricant regularly. The corresponding warning light will constantly remind you of this and will soon become annoying.
- If the oil level drops, valve knocking will begin, which will soon fail. It's only a matter of time.
- Non-metallic elements of the engine compartment that are filled with oil will soon collapse, become deformed, and cease to perform their tasks efficiently.
- If oil gets on the contacts, it will cause problems with starting the engine.
- The camshaft position sensor will begin to generate errors. This will entail an increase in fuel consumption, since the ECU will not be able to regulate the supply of fuel to each cylinder; the load will be the same everywhere.
Functionality check
Before you start replacing the cuff, if you find traces of oil on the engine, you need to carry out several checks:
- It is likely that the system responsible for ventilating the oil sump is clogged;
- The hoses in the system may become pinched, causing a malfunction.
If checking these elements shows that everything is in order, you will have to replace the oil seal.
We advise you to pay attention to several important points
- Start the engine and listen for rattling valves or a loose camshaft making noise. A regular stethoscope will help you here, which will provide more accurate listening. It is likely that you will need to replace the cuffs and camshaft, or its components that are responsible for the knocking.
- In some situations, knocking can be eliminated by simply replacing the timing belt.
- Check the engine at idle speed. If the engine operation is unstable, or it is difficult to start the engine, check the condition of the camshaft position sensor. Sometimes replacing this element returns the motor to its previous operating efficiency.
To replace the problematic oil seal, you will have to perform several disassembly steps. As a result, you will need to do the following:
- Remove the front protective cover, and then remove the timing belt;
- Remove the camshaft pulley mounting bolts. To do this, hold the element with a screwdriver to prevent it from turning, and perform the removal procedure itself using a 17 mm wrench;
- Remove the toothed pulley;
- Remove the oil seal. For this operation, you will need a flat-head screwdriver or needle-nose pliers.
This set of measures will allow you to remove and replace the oil seal. But we advise you to check the condition of the camshaft and, if necessary, replace it.
To get to the camshaft you need:
- Remove the oil pressure sensor completely. If you don’t want to dismantle it, then at least disconnect the wires from the device;
- Unscrew the camshaft bearing housing mounting bolts. There are as many as 20 of them there. After this you can easily remove the case;
- Do not forget about the plugs that are located in each technological hole. Take them out;
- Disassemble the potentially problematic camshaft and determine the need for repair or replacement.
Reassembly
When reassembling the assembly, be sure to take into account the position of each dismantled element. Be careful with the plugs. Make sure that each of them is strictly in its place.
Before installing the oil seal and additional elements, do not forget to lubricate them thoroughly. The seal can be pressed into place using a hammer. Just not metal, but rubber or plastic. Make sure the edges are flush with where the component will be installed.
Benefit of the cuff
If the oil seal (cuff) fails or, simply, leaks oil, this significantly affects the operation of the car:
- the most minimal harm is that on the VAZ 2110 the engine and the entire engine compartment will be oily;
- importantly, oil consumption will increase, it will have to be constantly topped up, which the oil level sensor will constantly remind you of;
- when the oil level drops, valve knocking will be heard, and they are more likely to fail;
- oily non-metallic parts in a car are quickly destroyed;
- Oily contacts lead to many problems, starting with poor engine starting;
- Since problems may arise with the quality of camshaft lubrication, its position (phase) sensor may also malfunction. At the same time, fuel consumption increases, since there will be no adjustment of the fuel supply to each individual cylinder, and the load will be the same for all valves.
Sports camshafts for VAZ-2110
Daily trips in our universal “basin” did not cause any particular discomfort. The high-speed injection VAZ engine struggled, but accelerated the car quite tolerably. But as if mocking the limited capabilities of the engine and the driver’s constant attempts to get to the next traffic light first, even Russian-assembled pseudo-Korean sedans overtook it.
In the end, we got tired of it, and we decided to do some light tuning of the engine, namely, change the factory camshaft to a sharper one, thereby changing the valve timing and ensuring more efficient filling of the cylinders with the working mixture in the higher speed range. Before this operation, measurements on a power stand showed that the experimental “2111” in its standard version has 80 hp.
At the AT Racing company, in addition to replacing the camshaft with a Master Motor, the VAZ vehicle was given chip tuning by its mechanics - they installed an injection controller reconfigured for the new shaft. I also had to change the throttle pipe (the standard one, with a 46 mm hole, was replaced with a wider one - 52 mm). To top it off, in place of a rather large box, “pregnant” with a standard air filter, there was a direct-flow filter cylinder from “K
About the oil seal
The oil seal is one of the most common and long-invented sealing devices for moving mechanisms. This part is widely used due to its simple design. It should be noted that the oil seals used in VAZ cars have a direction and need to be installed only in the designated direction of shaft rotation.
Purpose of oil seals
Valve seals are designed to remove excess oil that gets onto the valve stems. It is the excess, a certain amount of it that should wash the sleeve with the valve. If the valve seals (for some reason) stopped working (became unusable) and oil began to get into the combustion chambers, you need to replace the valve seals on the VAZ 2106.
Device
The oil seal is made of special rubber, which does not lose its properties when in contact with oil. This kind of rubber is called oil-resistant.
Structurally, the oil seal is similar to a ring; inside the oil seal there is a so-called “box”. Which, under the influence of oil pressure, is pressed against the working part of the shaft and creates a tight seal.
The oil seal also has a spring that presses its working part against the shaft ensuring tightness.
Dimensions of the oil seal distributed by VAZ
The dimensions of the oil seal installed on the camshaft of VAZ cars are the same only for front-wheel drive Lada cars. It should also be noted that the dimensions of the oil seal do not differ depending on the type of engine, that is, if the engine has 16 valves, then the oil seals for each camshaft will be the same.
Oil seal size: 28*42*7
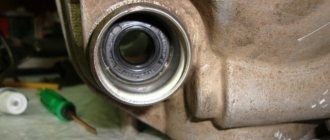
Where is
The oil seal is located under the timing belt boot, behind the camshaft gear.
The oil seal must be replaced if engine oil leaks through it. This leak can lead to oil getting onto the timing belt, which is strictly prohibited. Oil can damage the belt and lead to its breakage, which on 16-valve engines can lead to valve bending.
Seal selection
The choice of camshaft oil seal should be taken seriously, since it is this detail that determines how efficiently the camshafts are used. Usually these parts can be adjusted to size.
Thus, the size of the camshaft oil seal for the VAZ-2110 is: 42x28 mm. But, it is recommended to buy parts specifically for cars.
Original
2108-1005034 – original catalog number of the camshaft oil seal. The inlet and outlet versions of the product are interchangeable, unlike the shafts themselves.
2108-1005034 is a fake! The inscriptions are not clear. Be careful when choosing
The average cost is up to 100 rubles per 1 piece, if we are talking about the manufacture of AvtoVAZ.
Substitutes
Of course, it is not always possible to find the original, so there is a list of analogues that can be used. They are certified and the size is correct.
Table of substitutes for the standard camshaft oil seal for the VAZ-2110:
Manufacturer's name Catalog number Cost, in rubles
| Master-sport | 2108-1005034ACM-PCS-MS | 45 |
| Reinz | 80-33653-10 | 55 |
| Elring | 546.968 | 60 |
| Herzog | HL8 5034 | 125 |
| Trialli | PM 155 | 180 |
| Corteco | 16012080B | 210 |
| Trialli | PM 785 | 400 |
Camshaft oil seal manufactured by Erling
As practice shows, camshaft oil seals manufactured by Elring are recommended for use. The company produces a fairly large range of rubber sealing products, the quality of which is noted by car enthusiasts at a high level.
Installation and replacement of VAZ-2112 camshafts 16 valves: photo, video
Replacement of camshafts on the 16-valve VAZ-2112 engine occurs when they wear out and the support journals wear out. Most often this happens when the time for a major overhaul of the power unit or cylinder head passes. This is a rather complicated procedure, but you can really do it yourself.
The video below shows the installation of camshafts and split gears on a 16-valve engine of the VAZ family
The video material will tell you how to replace camshafts on a VAZ-2112 16 valves, and give some recommendations and advice.
Camshaft replacement process
Camshafts with gears and fasteners
In order to install camshafts on the VAZ-2112 16 valves, they must first be dismantled. Like any spare part, they are installed in the reverse order from disassembly.
So, let's look at the step-by-step process of removing and installing the intake and exhaust camshaft.
Removing camshafts
- To begin with, as with any repair operations, it is necessary to remove the “minus terminal” from the battery.
- Remove the timing belt cover.
After unscrewing the mounting bolts indicated in the diagram, remove the timing cover
Now you need to remove the valve cover
Please note that the bolt tightening order must be followed during assembly.
Unscrew the fastening nuts and remove the valve cover.
Disconnect the wires of the emergency oil pressure sensor, and then unscrew it.
Disconnect the emergency oil pressure sensor
Using a socket wrench or 8mm socket, unscrew the 20 bolts securing the camshaft cover.
Scheme for dismantling and tightening the camshaft bearing housing bolts
We dismantle the camshaft bearing housing. Now, there is free access to two plugs that are located on the rear side of the cylinder head. We take them out.
You need to be careful with the camshaft plugs; if you install them incorrectly, oil will leak out. If you don’t notice it in time, you’ll shorten the engine’s lifespan or end up in need of a major overhaul.
Remove the two rear cylinder head plugs
We take out the intake camshaft. We take out the exhaust camshaft.
We remove the camshafts from their seats
We press the seals out of the camshafts.
Remove the seals from the camshaft. If it does not come off, carefully cut it or pry it off with a screwdriver.
Installation of camshafts
Now that everything is removed, you can proceed to installing new camshafts on the car:
- Lubricate the cams and shaft support journals with engine oil.
Lubricate the camshaft journals and cams with engine oil.
We place each camshaft in its seat. It is worth considering that camshafts are not interchangeable, so they should not be confused.
The intake camshaft is shown on the left and the exhaust camshaft on the right.
Apply sealant to the surface of the cylinder head and camshaft bearing housing.
How to apply sealant to the camshaft bearing housing cover
We put the camshaft cover and cylinder head in place. Tighten the bolts evenly to a certain torque. We press new oil seals and install the rear plugs.
We press new oil seals onto the camshafts
We collect the remaining parts that were removed from the car.
Choice
Cylinder head camshafts for the VAZ-2112 are produced only by the manufacturer, so there is no need to look for analogues.
Original catalog numbers: inlet - 2112-1006015, outlet - 2112-1006014. Each camshaft costs an average of about 3,000 rubles.
Intake camshaft marking Exhaust camshaft marking
Nuances
When installing the bearing housing and cylinder head, do not apply sealant that contains silicone. This is due to the fact that the motor heats up, and accordingly the sealant heats up, which releases vapors that can get into the cylinders and further through the system. You should use a sealant whose instructions or packaging indicate that it is safe for the oxygen sensor.
When applying sealant to cavities, you should not apply a lot of it, because when tightening the bolts, it can get inside and this will lead to clogging of the oil channels, and therefore there will be no lubrication. The lack of lubricant will lead to increased wear of parts that will quickly fail.
Replacing and installing camshafts on a 16-valve VAZ-2112 is not entirely easy, but it is quite possible
The main thing to ensure results is caution and following instructions. It is worth noting separately that the intake and exhaust camshafts are different and not interchangeable. On the intake there is an additional border for the phase sensor
On the intake there is an additional border for the phase sensor.
Disassembly procedure
- The front protective cover, and then the timing belt of the VAZ 2110;
- Unscrew the camshaft pulley mounting bolt (key 17), holding it from turning with a screwdriver;
- Remove the toothed pulley;
- Use a screwdriver or thin pliers to remove the oil seal.
If you only need to replace the cuff, then the analysis can be considered complete. If we continue further, then we need:
- It is better to remove the oil pressure sensor completely, or at least disconnect the wires from it;
- Unscrew the bolts securing the camshaft bearing housing (there are 20 of them) and remove the housing;
- Please note that there is a plug in each technological hole. They need to be removed;
- Next, disassemble the camshaft and decide whether it can be repaired or whether a complete replacement is needed.
How is the crankshaft oil seal replaced?
To successfully complete the task, you first need to arm yourself with all the necessary tools and prepare an inspection hole in the garage to perform a whole range of work.
Developments from the following manufacturers are recommended for purchase:
| Name | Manufacturer | Price |
| Victor Reinz | Germany | 350 rubles |
| Elring | Germany | 300 rubles |
| Ajusa | Spain | 650 rubles |
| Espra | Spain | 250 rubles |
| Goetze | Germany | 600 rubles |
Screwdrivers, wrenches, sockets, and new seals should be on hand. All work comes down to separate replacement of the front and rear crankshaft oil seals.
Changing the front oil seal
Access to the front crankshaft oil seal largely depends on the specific make of the car, so before carrying out all the work, it is advisable to read the operating instructions with all the necessary information. For owners of domestic cars, in particular the VAZ brand, all work comes down to the following steps:
- At the first stage, the tension of the generator belt is weakened
- The belt is completely removed from the pulley
- The nut that serves to clamp the pulley is unscrewed
- Remove the pulley from the shaft
- In car modifications with a transverse engine, the oil pump housing is removed
- Pry a screwdriver under the oil seal and remove it from its seat
- Installing a new seal
- We assemble the parts in reverse order
It is advisable to treat the junction of the oil seal with the crankshaft with machine oil and apply the substance to the outer surface of the seal and the output end of the shaft.
Changing the rear oil seal
This type of work requires a lot of time and effort from the car owner. To get to the rear oil seal, you need to disassemble the cardan and disconnect the box and clutch housing. The next steps are as follows:
- We dismantle the gearbox along with the clutch basket, do not touch the flywheel
- Loosen the bolts securing the flywheel to the engine
- To set the flywheel to a static position, fasten one gearbox mounting bolt and insert a screwdriver, resting the teeth against the mechanism
- We remove the retaining plastic, and only after that the flywheel itself
- Unscrew the rear clutch shield and release the fasteners connecting the rear engine cover
- Find the rear oil seal and remove it with a screwdriver
- Lubricate the seat
- Press in a new copy with a screwdriver
It would not be superfluous to replace the rear cover gasket; it is also advisable to lubricate all contacting parts with machine oil during work. Then we assemble the entire assembly in reverse order.
Very useful recommendations
We recommend not pouring diesel oil (as amateurs advise) into a gasoline engine; a thick sediment will appear in it, which will lead to blockage of all oil channels of the engine.
This work requires some skills from you, if you are already familiar with the structure of the motor and the tools, and are not afraid to disassemble the engine yourself, then strictly following our useful tips, you will be able to replace the valve seals with your own hands.
To replace, you will need a new set of valve stem seals (see VAZ 2106: replacing valve stem seals on your own), which we recommend ordering from a store specializing in spare parts or purchasing immediately; the caps are in stock.
Ask: Why in a specialty store? Because, having experience, we have made the following conclusion - a specialized store is interested in a good reputation and, in principle, will not sell “inappropriate” or obviously low-quality goods.
In any auto market, the choice of caps is much wider, sometimes sellers have no idea who the manufacturer of the product is, so don’t expect any guarantee of quality in this case. It is reliably known that the bulk of cheap spare parts on the auto market today are imported from China.
In a specialized spare parts store, the seller can determine by computer, by entering the code in your data sheet, the engine model, based on this data, and select the necessary (suitable) valve seals.
Selection of parts for tuning an 8 valve engine
Before tampering with the engine, it is necessary to accurately determine:
There are about a dozen different types of camshafts, with significant differences in characteristics. Eg:
In other words, we can say that there are three main types of camshaft designs:
- “low-level” (increased power at the “lower” levels from 1200 rpm)
- “civilian” (average version)
- “main” (sport mode, increase at the “top”)
According to the laws of physics, it is impossible to achieve the same increase in all modes, so you should immediately decide on the type of camshaft.
Practice shows that for quiet driving around the city, with the possibility of saving fuel, a “low-level” camshaft is most suitable. For city-highway traffic, it is better to choose the middle option; for highway drivers, the “highway” option is more suitable.
To achieve maximum effect, you should immediately install a split timing camshaft drive gear.
Causes of malfunctions
The main cause of the malfunction is simple mechanical wear. Any oil seal is, by its nature, a consumable - after a certain period of time it begins to deteriorate, since it is made of an elastic material.
The malfunction may manifest itself in the form of changes in shape, swelling, scarring, rupture or chipping of the material from which the consumable is made. Another manifestation of a malfunction may be the cuff being completely squeezed out of the seat.
Other causes of problems with the camshaft oil seal are incorrect selection of consumables, manufacturing defects, or incorrect installation. In these cases, the oil seal also does not perform its functions and needs to be replaced.
This is interesting: Malfunctions of the exhaust system of VAZ 2110/2112. Muffler replacement
Causes of oil leaks
As you know, a damaged oil seal leads to oil leakage, which is unacceptable. But before blaming this element for everything, you need to know about other reasons that lead to similar symptoms.
| Cause | Your actions |
| Dirty crankcase ventilation system | When the system is contaminated, the fluid flow is disrupted, pressure increases, and traces of oil leakage from the crankcase appear. You need to clean the crankcase ventilation system |
| Pinched crankcase ventilation system hoses | If the hoses are pinched, this will also soon lead to a leak. The problem can be solved in two ways - restore the structure of the hoses or replace them with new ones in case of wear |
| Deformation, wear of the oil seal | This is a case that we will talk about in more detail in our article. Replacing the oil seal is not difficult, so it is not necessary to contact a service station. |
Article on the topic: How to change and what is the best oil to fill in the box of a VAZ 2110
Damage to the oil seal leads to leaks. As a result, oil gets onto the timing belt, which negatively affects its condition, performance and efficiency of the entire engine. Therefore, replacement is a necessary measure.
Tuning and sports camshafts
Replacing the camshaft in a VAZ 2110 with a sports one
If there is a need to do engine tuning, but there is no clear definition of which camshaft to install, you should consult with the experts. In addition, you need to familiarize yourself with the basic information.
Sports camshaft
As a rule, the camshaft can be low or high:
- The advantage of the first option is an increase in torque at the “lower” levels, due to this it becomes possible to sharply accelerate without engaging a lower gear. At medium speeds, such camshafts are no better than serial products, while at high speeds they are even worse.
- in the second option, the opposite picture is observed; here we mean high rises, which increase engine power, while high torque goes towards high speeds. A significant drawback lies in the failures at the “lower” levels. The better the performance of the overhead camshaft, the stronger this effect.
https://youtube.com/watch?v=mVhKFl9yj5U
Camshaft tuning scheme
As a rule, tuning camshafts have a lift of up to 11 millimeters. If this figure is higher, then the camshaft will be called sports. Despite this statement, there are exceptions.
Camshaft tuning
Often, car enthusiasts prefer tuning shafts, since sports cars are almost never used in city conditions. They are characterized by a small dip at the “bottoms”, as well as unstable high idle speeds. Greater efficiency can be observed only at maximum speed, and this is unacceptable in normal urban conditions.
Any repair of the car will be undertaken by the service station technicians, but there is no need to spend money on such services, since today, with the help of videos and photos, it is possible to do everything yourself. If the process of replacing the camshaft is being performed for the first time, step-by-step instructions will definitely help. Since the price of repairs at a car service center is now high, most car owners try to repair the car themselves, using advice and recommendations. It may take longer to replace a part this way, but you can save a lot of money.
Torque and sequence of tightening the camshaft bed
Camshaft cover tightening sequence
Correct tightening of the camshaft bed, as well as other parts of the cylinder head, determines the normal functioning of all components and assemblies. So, in order to tighten threaded connections, a standard tightening pattern and a torque wrench are used.
Before installing the bolts in place, they must be washed thoroughly and lubricated with silicone grease.
In order to properly tighten the bolts, you need to know the sequence. It starts from the middle part and gradually moves directly to the edges. The detailed sequence can be seen in the photo below.
Tightening diagram for each camshaft bed bolt with numbering
As for the tightening force itself, it is 8.0-10.0 Nm . After the bed is installed on the block head, the connection bolts are tightened by hand or without much force using a ratchet with a head.
We tighten all the bolts by hand, but do not tighten them
When all the bolts are in place, you need to take a torque wrench and tighten them according to the standards in the order indicated above.
Torque wrench for tightening threaded connections
In what cases is it necessary to tighten the camshaft bed?
The bolts are tightened. Marked with arrows
Tightening the camshaft bed will be necessary if it was previously dismantled for restoration and repair work. So, in what cases will you need to remove the bed, let’s look at it in more detail:
- Replacing camshafts, lifters or valve seals.
- Overhaul of the block head.
- Engine repair operations.
- Replacement of individual elements of the cylinder head.
Consequences of improper bed tightening
The consequences of improperly tightening the camshaft bed include the following:
- Oil leakage due to a gap or loose connection.
- Passing air inside the cylinder head.
- Malfunction of the engine or cylinder head.
- Ingress of foreign objects (water, dirt, dust).
All these factors can negatively affect the performance of the cylinder head and main power unit.
How to tighten the cylinder head bolts
Be sure to tighten according to the diagram given in the article. To tighten the bolts, you need to follow a few simple steps:
- Install a new head gasket and place it on the centering bushings.
- Install the head and tighten its mounting bolts.
- Start tightening with a torque of 20 N*m. If the scale is in “kgf/m”, then divide by 10.
- In the second run, you need to tighten all the bolts according to the diagram by 90 degrees.
- During the third pass they turn another 90 degrees.
Bolts with a length of 95 mm or more cannot be used. In general, the procedure is quite simple, but a torque wrench is required - without it, it will not be possible to maintain the correct tightening torque of the VAZ-2112 cylinder head (16 valves).
Read US on VKontakte
Do-it-yourself oil seal replacement
The process of replacing the camshaft oil seal is almost the same on all cars. After a certain mileage, depending on the car, spots of engine oil appear in the area of the camshaft pulley and oil seal, and with each increase in kilometers they increase. This means the camshaft seal needs to be replaced. You will learn how to do this yourself below.
The point is not even that you are losing oil, but that it ends up on the camshaft drive pulley and timing belt, and such a turn of events is already dangerous. Hot engine oil begins to deteriorate the rubber of the belt, which immediately reduces its service life; in addition, the belt also becomes slippery, and this can lead to slippage of its teeth on the teeth of the pulleys.
This may result in bent valves or cracks in the pistons. In any case, it is necessary to get rid of oil drips, that is, you need to replace the seals.
The best option would be not to make marks with your own marker, but by turning the bolt on the crankshaft pulley in a clockwise direction, align all the pulleys according to the factory marks that are on the pulley and on the engine block (they need to be clarified in the manual of your motor, since on different engines there may be different marks).
It also happens that there are no marks on the engine, but only on the camshaft pulley, therefore, install the mark on the pulley opposite the plane of the connector of the head and the engine block, but it is best to check in the manual.
1.First you need to unscrew the bolts and remove the timing belt protective cover.
2. Then you need to remove the valve cover by unscrewing the bolts securing it.
3.Then we begin to place marks on the belt and camshaft pulleys. This is done so that later the disassembled parts can be reassembled with precision.
4.After this, it is necessary to loosen the fixation of the belt tension roller and loosen the belt tension.
5.Next, carefully remove the belt from the camshaft pulleys.
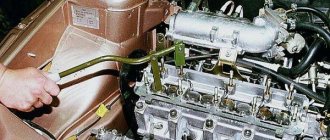
6. Using a wrench, unscrew the bolt that secures the camshaft pulley; it is best to lock the pulleys to avoid turning, using a pry bar.
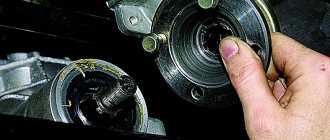
7. Next, you need to remove the pulley or pulleys, if there are two of them, using a puller from the end of the camshaft, and mark where, which pulley was which.
8. Remove the key from the camshaft. And using a screwdriver or tweezers, remove our oil seal, carefully so as not to damage the surface of the camshaft on which the oil seal rubs.
9. Then we lubricate the outer surface of the oil seal with sealant, and the inner surface with engine oil and put it on the camshaft, then press it in. If you have an engine with two camshafts, then you need to replace two oil seals.
10.After replacing the oil seal, we begin to assemble all the parts, first we put the key in place.
Conclusion
Replacing camshaft seals on an 8-valve VAZ-2110 is quite simple and easy. This operation does not require any special skills or abilities. Separately, it is worth noting that the choice of oil seals should be taken seriously, since a low-quality product can affect not only oil loss, but also the wear of the camshafts themselves. If the described operations are too complicated for a car enthusiast, then it is recommended to contact a car service center, where they will do everything quickly and efficiently.
Replacing the camshaft oil seal - the main nuances of the work
- Replacing the camshaft oil seal - the main nuances of the work
- When does a camshaft oil seal need to be replaced?
- Replacing the camshaft oil seal
- Do-it-yourself oil seal replacement
- And now more about replacing the oil seal with your own hands:
Good afternoon, our dear readers. Do you know why the sealing element is called an oil seal? Let us go back a little to the recent past. And only after this, when we learn this fact, will we consider all the issues on our topic today.
- When does a camshaft oil seal need to be replaced?
- Replacing the camshaft oil seal
- Do-it-yourself oil seal replacement
- And now more about replacing the oil seal with your own hands:
Step-by-step work order
Before you begin, make sure that the car is on a level surface, the handbrake is on, and the negative cable on the battery is removed.
Removing the seals
- First of all, open the hood and remove all the plastic elements. This applies to protecting the timing belt and engine lining.
If the bolts are not corroded, they will unscrew easily
Next, a dilemma may arise about whether to carry out the replacement without removing the cylinder head and dismantling the cylinder head. If you chose the second option, then the procedure for removing the cylinder head is written in great detail in this article.
If the first option is still closer to you, then we perform the following procedure:
- Since the oil seals on the engine are located directly behind the camshaft pulleys, there is no escape from dismantling them.
- Next, you need to arm yourself with a special puller, but if you don’t have one, then a regular flat-blade screwdriver will do.
- Using a screwdriver, slowly remove the special key from the groove on the shaft.
The location of the key is indicated by the arrow
Please note that the key must be put in a safe place so as not to lose it.
- Then, we carefully remove the oil seal, first from one side and then from the other.
Be careful not to damage the shaft itself
Installing camshaft seals
Before you begin installing new cuffs, check its condition by inspecting its working edge, which should not have any defects; it should be smooth without visible damage to the rubber. This also applies to the oil seal spring; it must be intact and there must be no signs of stretching or other visible damage.
The edge under the number is 1. and the spring under the number is 2.
Installation procedure
- Before installing the oil seal on the camshaft, lubricate its lip with engine oil.
The edge is oiled
When the oil seal is on, it will easily pass through the body
Tapping should not be strong, but frequent
When installing the belt, follow all rules and requirements for aligning all marks.