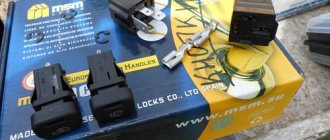
The main malfunction in which the VAZ 2109-2108 starter refuses to turn the engine is the failure of the solenoid relay. That is, when you turn the ignition key, either nothing happens at all, or clicks are heard, but the shaft does not rotate. In this case, the relay must be replaced with a new one. To carry out this repair, you will need the following tool:
- socket head 13
- ratchet or wrench
- flat blade screwdriver
The first step is to remove the starter from the VAZ 2109-2108. Then unscrew the nut securing the starter winding wire to the relay:
And we take this wire to the side so that it does not interfere with us in the future:
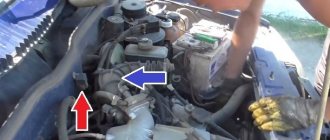
Then use a screwdriver to unscrew the two bolts securing the retractor to the body, as shown in the photo below:
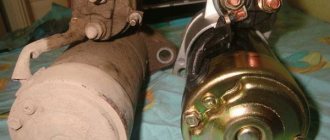
And now you can disconnect the retractor from the starter without any problems. To do this, you need to lift it up a little to disconnect the relay armature from the starter lever, since they are engaged with each other:
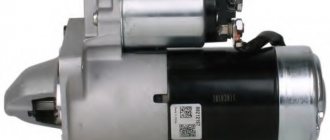
The final result of the work is shown in the image below:
We buy a new relay for about 500 rubles and replace it. When installing, it is worth keeping in mind that, again, the anchor catches on the inner lever. That is, you can insert all this one by one, first hook the armature separately, and then insert the relay:
And finally we tighten all the bolts and install the starter back on the car. As you can see, there should be no difficulties when performing this type of repair of the VAZ 2109-2108. If you have any questions, ask below in the comments, we’ll figure it out together.
Probably all car owners have found themselves in a situation in which the engine does not want to start. Basically, this problem can be solved by charging the battery or cleaning the contact elements. At the same time, sometimes it happens that the problem cannot be solved without repairing the starter solenoid relay. We’ll talk now about how to carry out such a procedure. For those who do not want to figure it out on their own, you can immediately contact a service center where the starter will be repaired efficiently.
Features of the retractor relay device
In order to independently repair any part in a car, you need to understand how it works. This will give you an idea of what elements are inside, how they work, and, accordingly, how to get to them for repair.
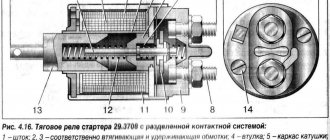
The solenoid relay is a capsule containing an electric magnet, a return spring and a rod. A magnet consists of two windings: a retracting core, and a winding that holds it in a certain position. It is their work that moves and fixes the core inside the mechanism.
As soon as the key is turned when starting the engine, the battery supplies electricity to the windings, which perform the retraction function. As a result, an electromagnetic field appears around the core, which sets it in motion. At the same time, the return spring is compressed, which will then return it to its original position. Together with these movements, the opposite end of the part is attached to the flywheel. Due to this, the gear connected to the bendix is connected to the flywheel and transmits movement to it.
As a result of all these manipulations, the engine starts. After which the mechanism turns off the electric current inside itself and returns all its parts to their original position. Only the core remains in its original position thanks to one of the windings.
Reference. There are relays with only one winding that has a pull-in function. But such parts are not common due to the fact that they consume a lot of electricity, and as a result, drain the battery faster.
Selecting a part for a VAZ-2110
Often the entire starter assembly is replaced, but we recommend not doing this. The pull-out relay is much cheaper than the entire kit.
The choice of a new relay should be approached with the utmost seriousness, since the quality of the part will determine how long it will serve the owner.
Analogs
In addition to the proposed version of the original part, there are quite a lot of analogues that can be installed on a car. So, many car enthusiasts do just that. Let's look at what the automotive spare parts market offers the owner of a 2110:
- Cargo 131143 – the cost is 1200 rubles. High quality for little money.
Signs and causes of relay failure
If the relay is broken, the following signs will tell you about it:
- when you try to start the engine with the key, it does not start, or starts only after two or three attempts;
- There is a buzzing sound after the engine starts. This means that the starter rotates at higher speeds, although it should no longer be.
If at least one of these signs is observed, then this is a reason to be wary. The relay may soon break. There are several reasons why this happens:
- one of the windings, or both, were burned or broken at once;
- deformation of the return spring inside the mechanism;
- a short circuit has occurred inside the part on one of the windings;
- The surface area of the contact plates has decreased, or they have completely burned out.
Understanding the reasons why the relay fails, repairs will take less time, because It’s immediately clear where to look for the problem.
Main causes and symptoms of dysfunction
It is quite simple to detect VR malfunctions based on characteristic signs:
- The starter continues to operate after starting the power unit, making buzzing sounds and picking up speed.
- There may be a loud click when the ignition system is activated, but the starter does not engage. This click may not occur if the coil is broken or the power supply is insufficient.
- The starter's work is wasted; it turns, but does not have any effect on the motor flywheel.
The most common causes of retractor malfunction are:
- Damage to the electromagnet and its windings;
- Hull deformation;
- Damage to contacts;
- Weakening or breakage of the return spring;
- Anchor malfunction.
The points listed above occur during natural wear of the part, destruction of components, deformation of contact plates, and burnout of the winding.
What type of relay can be repaired?
One of two types of relays can be installed in a car: collapsible and non-dismountable. If the car has the second type of relay, then you won’t always be able to fix it yourself.
A non-separable relay can only be repaired if the contact plates are burnt. If one of the windings has deteriorated or a short circuit has occurred in them, then it will no longer be possible to repair it - only replacing the part.
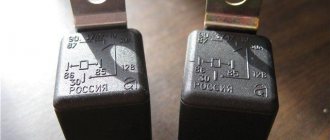
Important! In case of self-repair, when removing the relay, it is recommended to mark the terminals so as not to confuse them when installing the mechanism in place. It is also a good idea to clean and degrease the contacts on the relay and starter.
Repair
There is no need to talk about repairing the device, as such, since this unit cannot be repaired if it is not dismountable. In case of breakdown, the part is replaced. Of the entire part diagram, only the anchor can be repaired. If we look at the same “ten” as an example, it will be more difficult to dismantle the starter than to change the element itself.
To carry out the replacement, the car must be driven into a pit, since in this model the starter can only be reached from below. If there is protection, you will need to remove it first. Then all lead wiring is removed. After which it is possible to dismantle the latter by unscrewing the fixing nuts.
When the assembly has been removed and cleaned of dirt, traces of corrosion and oxidation, you need to unscrew the bolts securing the solenoid relay. Removing the fastening does not affect the anchor, which is securely attached to the spring fork by the eye. Subsequent dismantling of the part and installation of a new one is as simple as possible. The purchased element must be securely secured with bolts.
Repair of a collapsible unit will consist of several stages:
- Unscrewing the fastening nuts of the housing cover;
- Desoldering the ends of the winding if necessary;
- Removing the cover and checking the key points - burnt power contacts require sanding; their wear is accompanied by replacement;
- Assembling the unit in a logical sequence and checking for functionality;
- Installation.
During disassembly, the failed elements are replaced, which returns the unit to its previous performance. However, if this part of the ignition system fails and subsequent measures will no longer provide reliable operation. It is optimal to replace it with a new one.
How to check the starter solenoid relay?
When checking the relay, first of all you need to look to see if the wiring connecting it to the starter is broken. This is done simply: we look visually and look for places of ruptures. Then, we try to start the engine, if there is a sound of operation - everything is in order with the wires.
There are times when when you turn the key, a click is heard, but the starter does not rotate, which means the contact plates are burnt. You can check this by applying voltage to the car engine, bypassing the relay. In this case, the relay terminals are disconnected from the lock. Then use a screwdriver to close the terminals located on the battery and on the starter. If rotation begins, then there is a problem with the retractor.
There is another way to check the starter. This is done as follows:
- The relay contacts are connected by short wires to the plus and minus of the battery.
- The negative end of the wire is not connected to the battery. It is placed on contact. If at this moment there is a click, then the part is working properly, if not, then the part is faulty.
Diagnostics
In order to diagnose the breakdown of this unit, you do not even need to dismantle it. The most obvious example will be a specific example: for example, diagnostics on a VAZ-2110.
First you need to do a few things to make an optimal assessment:
- check the fixation of the terminals and the condition of the battery, remove any traces of oxidation on the contacts and terminals;
- make sure that the wiring is securely fastened; if there is corrosion, clean it with sandpaper;
- Check the operation of the unit by turning on the starter.
If the device is not working, you should first pay attention to the wiring to prevent a break. If the latter is functioning properly, you need to check the operation of the traction relay. this is quite easy to do: it is best if someone tries to start the engine, and the other participant in the process listens to the sounds of the engine compartment. The absence of a clicking sound will indicate relay dysfunction and the need for repair work or replacement with a new one.
If there is a characteristic clicking sound, but the functioning of the starter is not observed, there is a possibility of burning of the contact plates. Checking is carried out using a screwdriver. You need to disconnect the terminal coming from the ignition switch. Then you need to connect the terminals connected to the battery and going to the starter. This forms a direct voltage supply without participation in the relay circuit. When this circuit operates, there is a breakdown.
The same check can be carried out on a dismantled part:
- the part is installed in close proximity to the battery, as close to the wires as possible;
- the contacts are connected to the corresponding positive and negative terminals;
- when you touch the body of the unit, the free end of the negative wire should hear a click, indicating that the device is working, otherwise replacement or repair work is required.
For diagnostics, you can also use a multimeter, which will indicate the root cause of the malfunction: a problem with the starter or a battery with wiring. The device is connected to the positive terminal, which receives the voltage of the car battery. The second wire of the measuring device must be connected to ground. Having resorted to outside help, so that the assistant turns the key in the ignition, you need to check the voltage data - the norm is 12 V. At lower values, there is a high probability of a low battery charge, which does not allow the rotor to start, but gives an impulse to activate the unit. Diagnostics with a tester is also possible.
Alternatively, you can use a test lamp and battery to determine the breakdown. To do this, you just need to connect the lamp to the winding: if it lights up, then everything is in order, but if no effect follows, then the reason lies in the break. It is difficult to check a short circuit using this method, due to the insignificant influence of possible deviations on the brightness of the light.
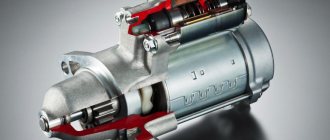
Starter design
The unit used to start a car engine is essentially a compact and powerful electric motor, the design of which is supplemented with several specific details:
- A bendix (overrunning clutch) located on the armature shaft, necessary to transmit torque from the electric motor to the crankshaft of the internal combustion engine.
- A fork that longitudinally moves the coupling along the armature shaft. It is installed in the front cover (mask) of the starter.
- A retractor relay that drives the plug and closes the electrical circuit through which current is supplied to the windings of the electric motor. It, like the fork, is installed on the front cover.
The transmission of torque to the bendix can be done directly or through a torque-increasing planetary gearbox, which is mounted in the main body of the unit, its front or rear cover.
Starter solenoid relay diagram
Starter retractor relay device
The design of the unit is quite simple. Inside the metal case are:
- The core, also called the armature or rotor. The core is made of a magnetic or magnetizable alloy, or is made in the form of a steel rod with a winding.
- Drive rod fixed to the core.
- Armature return spring.
- Closing rod with a contact plate located on it.
- Contact plate compression and return springs.
- Pull-in winding.
- Holding winding.
- The back cover of the relay is made of dielectric material, most often plastic.
- Bolts passing through the cover with contact plates located at their inner ends. From one of these bolts, current is supplied to the pull-in and holding windings.
- In some cases, there are one or two additional terminals to supply voltage to the windings.
The assembly is secured with screws or bolts to the front cover (mask) of the starter.
Causes of malfunctions when the element does not work
Malfunctions of the starter retractor relay cause immobilization of the vehicle. They may be due to:
- reducing the contact area of platinum contacts;
- winding breakage or burnout;
- deformation of the return type spring;
- short circuit in one of the windings.
Examination
VAZ 2110 retractor starter
To check the functionality of the starter, you will need a battery and two wires:
- First the starter is removed;
- Using the first wire, the output of the solenoid relay is connected to the positive terminal of the battery;
- The second cable is connected to the negative terminal with the starter ground;
Note: if there is a click, this indicates that the Bendix mechanism is working. It is important that the click is sharp and fast. If the sound seems sluggish and drawn out, then something is wrong inside the mechanism, for example, the pin contacts have burned out.
Why does the retractor click but the starter does not turn?
Greetings to all lovers of car repairs with their own hands. The topic of this article is very relevant and it will be about why the car starter does not turn, the retractor clicks. Well, to be even more precise, we will try to repair the non-separable starter solenoid relay.
When the starter solenoid relay clicks, the starter does not turn, the reason could also be that the large copper plate inside the solenoid relay has stopped closing the internal contacts.
As a rule, modern solenoid relays are not made disassembled, but if it is really necessary, then it can be disassembled and made.
True, this requires quite a lot of experience. The repair process can also be viewed at the end of the article in video format.
The test subject will be a starter from a Mitsubishi Space Wagon.
Note the retractor cylinder - this is its correct position in the retractor assembly.
If you put it the other way around, the bendix will not reach the flywheel.
Since I am almost sure that the starter does not turn the retractor clicks due to the lack of contact in the retractor relay itself, I will try to disassemble it, especially since I was not able to purchase a new one.
How to remove and install
For convenience, it is better to remove the starter, although many people do without it. On the other hand, you can replace the relay and diagnose the starter at once, you just need to remove it more carefully.
To remove the traction device itself, first of all we disconnect from the battery power, this moment is very important, otherwise you may get a good shock and you will definitely burn all the wiring. It would be good to clean the starter itself from accumulated dust and dirt, it will be easier to work. The process will be described for the type of relay that is assembled and whose parts can be replaced; it is more complicated than a non-assembled one for objective reasons.
- It’s easier to remove the battery terminal with the tenth key (remove the minus!).
- You need to remove the red wire from the relay itself, or rather its terminal.
- Using the eighth key, unscrew the nut of the brush assembly, it is located on the back of the relay, on the bolt, remove the contact that it held.
- Now we unscrew the fastenings of the relay to the ground (these are the same coupling screws).
- You need to remove the power wire and then pull out the pull-out relay.
- Now unscrew the end mounting nuts and remove the upper part of the relay.
- The old relay core must be replaced with a new one.
- And now we remember how we took everything apart and put it back together in reverse order.