Every motorist knows the important role the starter plays. If this part malfunctions, it becomes impossible to make the engine work. One of the possible causes of failure is the failure of the starter solenoid relay. It is almost impossible to start the car in such a situation. Therefore, many car owners, before visiting an auto parts store, try to repair a faulty starter solenoid relay in the garage with their own hands .
Purpose and principle of operation of the solenoid relay
On most vehicles, the retractor is mounted in the same unit with the starter, and is designed to control the freewheel. At the end of the clutch there is a gear that rotates the engine flywheel at the time of starting, but during its operation such rotation is not allowed, as it leads to breakdown of the starter or on-board electrical network if the starter starts working in generator mode.
To do this, the retractor extends the clutch only when it is necessary to start the engine, after which it returns to its original position, removing the gear from engagement with the flywheel. The peculiarity of the solenoid relay is that the starter can only operate when it is activated. This is done to prevent tooth fractures when the rotating gears of the clutch and flywheel meet.
Inside the relay there is a coil with an armature, which is acted upon by current after the circuit is closed. The magnetic field that arises around the coil moves the armature towards it, compressing the return spring and pushing the lever, which moves the freewheel. When the engine starts, the electrical circuit of the coil opens, the magnetic field force disappears, and the return spring pushes the armature with the clutch to its original position.
The starter device on the VAZ 2109, how it works
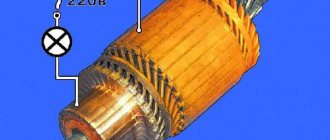
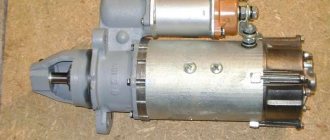
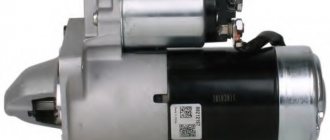
Starters on the VAZ 2109 are DC motors, with a maximum consumption of 500 A to 700 A. During normal operation, 260 A is consumed, with a power of about 1.3 W. They differ from other starting devices in that there is no support at the end of the anchor shaft, instead there is a bushing pressed into the clutch housing.
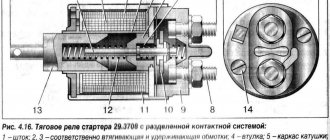
Starter device: 1. Armature shaft; 2. Drive gear; 3. Gear bushing; 4. Freewheel roller; 5. Clutch housing; 6. Gear drive lever axis; 7. Starter cover on the drive side; 8. Gear drive lever; 9. Traction relay anchor; 10. Traction relay housing; 11. Solenoid coil of traction relay; 12. Holding winding of the traction relay; 13. Traction relay rod; 14. Traction relay core; 15. Contact plate; 16. Traction relay cover; 17. Contact bolts; 18. End manifold;19. Brush; 20. Brush spring; 21. Starter cover bushing; 22. Casing; 23. Pinch bolt; 24. Starter cover from the collector side; 25. Armature winding; 26. Armature core; 27. Stator winding; 28. Stator pole; 29. Starter housing; 30. Limit disc; 31. Lead ring; 32. Centering disk; 33. Buffer spring; 34. Freewheel outer ring; 35. Freewheel hub; 36. Gear travel limiting ring; 37. Guide rod; 38. Plunger; 39. Starter; 40. Auxiliary starter relay; 41. Mounting block; 42. Ignition switch; 43. Generator; 44. Battery; 45. I. Scheme of operation of the overrunning clutch.
The main elements that make up the design of the VAZ 2109 starter are:
- Front cover with plain bearing;
- Engagement drive or bendix mechanism (roller overrunning clutch so that the mechanism rotates in only one direction). The cylinders block rotation in the opposite direction, the fork connects the element to the retractor relay, and the gear to the flywheel. Through the ring gear, torque is transmitted to the engine crankshaft. The coupling on the armature shaft moves along a screw thread made in its front part;
- Model No. 5712 has a planetary gearbox located further on the axis. With such a starter, the bendix shaft and armatures are located in parallel. The rotation speed of the clutch is lower, but the torque on the flywheel is much higher. As a result, trouble-free starting is guaranteed even at low air temperatures, and the voltage does not drop when spinning up the flywheel, and the starting current on the armature windings is much less;
- The moving part of the device, the rotor with the collector, is located behind the bendix or behind the gearbox;
- Stator, in a metal case. It has four poles, which are secured by a screw connection along with the winding coils inside the housing. Of these, 3 coils are connected in series to the armature winding (serial coils). One of the coils is connected in parallel (shunt coil), so the starter is a mixed-excitation electric motor. This gives a large torque when braked and not too high an armature speed at idle.
- Brush holder, four copper-graphite brushes, a positive pair and a negative pair, are attached to it. Together the entire structure makes up the brush assembly. With the help of brushes, current is transmitted to the armature;
- From the rear, the starter is closed by another, rear cover on a plain bearing;
- A retractor electromagnetic relay is located on top. It engages the roller overrunning clutch, and the voltage from it is transmitted to the relay armature. Inside the relay is a coil with an insulated copper wire and a metal rod (core). It moves the contact rod, which is located at the rear, as well as the overrunning clutch lever;
- An anchor composed of a shaft on which electrical steel plates are strung and pressed, with slots. They contain a copper tape winding with cardboard insulation. The ends of the armature winding are connected by caulked soldering to the collector plates. The shaft rotates in metal-ceramic bushings. Of these, the front one is in the clutch housing, where the front part of the shaft is placed when the starter is installed. The rear one is pressed into the starter cover;
- Drive lever.
The entire structure is connected to the flywheel ring gear through the drive gear. When voltage is applied, an electromagnetic field appears on the relay coil. The electrical circuits of the stator and armature windings close, and an EMF occurs. It sets the armature into rotation. The latter, using a lever, moves the clutch forward. The transmission gear meshes with the ring teeth and transmits torque to the motor flywheel.
The armature moves to its extreme point of movement, closing the relay contacts on the opposite side. In this case, the current no longer flows through the 1st winding, because its ends are closed to the “plus” of the battery. The retracted armature is held by a relatively weak magnetic flux created by the magnetic field on the holding winding. Additionally, current is supplied to the corresponding elements of the starter motor. In starter No. 5712, torque is transmitted through a converter (gearbox) to the 2nd shaft. In other models, force is transmitted through the splines to the hub, directly, in both cases, triggering the rotational movement of the overrunning clutch. The roller overrunning clutch has 2 rings in its design, internal and external. At the same time, the inner ring is put on and secured to the shaft, with which it turns. The outer one is connected to a transmission gear connected through a ring gear to the engine flywheel.
The rings are flat, and the steel cylinders located between them block rotation in the opposite direction. These cylinders are located on the inside of the outer ring of the clutch. Since the niches for them are cut out in the form of half-drops, when turning in one direction the cylinders move freely. When changing the direction of movement of one of the rings, their rotation is impossible. In this case, the coupling turns into a single, motionless whole.
After the engine has reached operating speed, the rotation speed of the flywheel significantly exceeds the speed of the starter. Then, due to the design feature of the bendix, its rings are disconnected. The gear is thrown back, and the starter motor loses contact with the running engine of the car. Turning the ignition key back stops the supply of voltage to the solenoid relay. The current flows from the “plus” contacts of the battery to the relay contacts (which are closed), passes through the pull-in winding, then the holding winding and the last stage – the “case”.
The fact is that in a car, all its metal (conductive) parts of the body in the wiring play the role of a wire, a negative pole. So, the machines have a single-wire electrical network, which is de-energized when connected in this way. In this case, the movement of current through the windings is multidirectional. The magnetic fluxes are mutually compensated, and the core is demagnetized.
The armature returns, braking due to the friction of the brushes and commutator. In this case, the contacts of the starter motor are open. The lever moves the clutch back and the starter is turned off.
Device Features
Before you think about how to disassemble the starter solenoid relay, you need to become familiar with the operating principle of this system. To begin with, it is worth understanding that the device runs on battery power. On the other hand, the device is capable of creating a parallel magnetic field, which affects the armature. The return spring is then compressed, which drives the bendix. At the end it connects to the splines that are on the flywheel.
The principle of operation of the element is based on the subsequent closure of the corresponding contacts. At the same time, due to the action of the magnetic field, the armature of the coil is constantly located inside.
When the engine is started, access to power is limited. At the same time, the spring begins to return to its original position, and the bendix disengages. If you are interested in more detail about the operation of the starter solenoid relay, the video on our page will help you figure it all out.
Types of solenoid relays and their manufacturers
Let's briefly touch on the solenoid relays used on VAZ cars. They are divided into four types:
- for non-geared starters of VAZ 2101-2107 (“Classic” models);
- for non-geared starters of VAZ 2108-21099 models;
- for VAZ gear starters of all models;
- for AZD starter gearboxes (used in VAZ 2108-21099, 2113-2115 models).
In addition, as mentioned above, they are divided into collapsible and non-collapsible. Older models are collapsible. New and old are interchangeable .
For VAZ cars, solenoid relays are produced by the following companies:
- Plant named after A.O. Tarasov (ZiT), Samara, Russian Federation. Relays and starters are produced under the KATEK and KZATE trademarks.
- BATE. Borisov Automotive and Tractor Electrical Equipment Plant (Borisov, Belarus).
- Kedr Company (Chelyabinsk, Russian Federation);
- Dynamo AD, Bulgaria;
- “Iskra” A Belarusian-Slovenian enterprise whose production facilities are located in the city of Grodno (Belarus).
When choosing a particular manufacturer, it is necessary to take into account that the highest quality and most common brands are “KATEK” and “KZATE”. Also remember that if an AZD starter is installed on your car, then “native” relays manufactured at the same enterprise are suitable for them. That is, they are not compatible .
Catalog number and cost of analogues
Finding a branded VAZ 2114 starter is not always easy. At the same time, the quality of the original components is very poor, which is further complemented by a high level of defects among the products sold. Therefore, experienced car owners recommend purchasing analogues from third-party manufacturers. The best alternative options for the original VAZ 2114 starter are presented in the table below.
Table - Good analogues of the original VAZ 2114 starter
| Manufacturer | vendor code | Approximate cost, ruble |
| As-pl | S9008 | 1750-2300 |
| HC Parts | CS332 | 2650-3500 |
| Startvolt | LST0115 | 3400-3800 |
| Bosch | 986014950 | 7300-8900 |
| WPS | 30714N | 2880-3500 |
Signs of a malfunctioning retractor
The following signs may indicate a retractor failure:
- After starting the engine, the starter does not turn off; it rotates at high speed and has a characteristic buzzing sound.
- After turning the key in the ignition switch, a click occurs, indicating that the device is activated, but no rotation of the starter is observed. Sometimes, if there is a break in the coil, the armature is stuck in a certain position, or there is no power, there may be no click.
- After turning the key in the lock, the starter begins to idle without affecting the engine flywheel.
The starter does not turn over, what should I do?
In the life of owners of the VAZ-2114, and other cars close to this line (see above), sometimes such an unpleasant moment arises when you need to go somewhere, but it is not possible to start the power plant due to the fact that the starter does not turn the flywheel engine.
That is, when you turn the ignition key to the “start” position, nothing happens.
And if in the summer you can calmly look for the cause of the malfunction, then in the winter, in severe frost, you won’t spend much time searching for the malfunction. And in order to quickly fix a breakdown, you need to know where to look for it.
How to quickly start your car in cold weather, see below.
Checking the solenoid relay with a multimeter
Before checking the solenoid relay, it must be removed from the car along with the starter. Unfortunately, it is difficult to answer the question - how to check the starter solenoid relay without removing it. Naturally, some of its malfunctions can be detected by ear. But, if any are found, you will still have to remove everything from the car and check it on the table.
The only exception is the freezing of the retractor into which moisture has entered. In such cases, it is enough to simply warm up this unit using a hairdryer or a household heater. It is quite simple to understand that the retractor is frozen. If before this everything worked fine, and with the onset of severe frost the starter suddenly stopped showing signs of life, it would be most logical to assume that the retractor froze, and did not fail with other described malfunctions. Although anything can happen.
Also, before you start tormenting the solenoid relay, make sure that:
- The battery is charged and is not the cause of unsatisfactory starter operation.
- There is normal electrical contact between the battery and the starter - the power wires are securely fastened and have not oxidized.
Dismantling. So, we removed the starter from the car. Next, the power wire coming from the power terminal of the retractor into the starter is disconnected. The solenoid relay itself must be removed from the starter housing. To do this, depending on the model, you need to unscrew two or three screws.
If the retractor on your car is secured with two screws, be sure to mark with a marker the orientation of its body, as well as its rod. In some starters, it is impossible to put the retractor back together incorrectly, but still, it’s better to play it safe and put a couple of marks with a marker for orientation.
Now, in order to check the starter solenoid relay for broken windings or problems with the power contact, you only need a multimeter with a continuity mode.
Checking the pull-in winding
It is carried out in the following sequence:
- The multimeter switches to direct dialing mode.
- One of the probes of the device is securely connected to the control contact of the solenoid relay. It is flat, and when removing the starter you disconnected the thin wire coming from the ignition switch.
- The second probe of the multimeter is connected to the power contact with a jumper.
In this position, the current generated by the multimeter should go through the pull-in winding. Accordingly, if the device beeps, there is no break. If it is silent, the retractor winding is broken.
Checking the holding winding
It is carried out in the following sequence:
- The multimeter switches to direct dialing mode.
- One of the probes of the device is securely connected to the control contact of the solenoid relay. It is flat, and when removing the starter you disconnected the thin wire coming from the ignition switch.
- The second probe of the multimeter is connected to the body of the retractor. In this case, you need to make sure that the probe has reliable contact with the metal of the case (clean off any dirt and sand a small area with sandpaper).
In this position, the current generated by the multimeter should go through the holding winding of the starter solenoid relay. Accordingly, if the device produces sound, the winding is intact. If the multimeter is silent, the holding winding of the starter solenoid relay is broken.
Checking the relay power contact
The purpose of this stage of checking the starter solenoid relay is to make sure that when the solenoid and holding windings are activated, a starting current flows through the power contact to the starter windings.
The check is performed in the following sequence:
- The multimeter switches to direct dialing mode.
- The first probe of the device is connected to any of the power contacts of the retractor relay (there are two of them, and they are both threaded).
- The second probe is connected to the remaining power contact.
- The rod (armature) of the retractor relay must be acted upon in such a way that it goes inside all the way. To make this more convenient, the multimeter probes should be secured to the power contacts using alligator clips.
In this position, when we have already connected the device to the power terminals, but have not acted on the rod of the retractor, the relay plate should not be pressed against the power contacts, and current should not flow through them. If, even before pressing the retractor armature, the multimeter worked and showed a closed circuit, this indicates that the power contact of the relay is in a stuck state. Even before disassembling the starter, this should have been evidenced by the continuous operation of the starter even after the ignition key was released.
If everything is in order with the power contact of the relay, then when you press the retractor rod as described above, the multimeter should show a closed circuit. If there is no continuity sound in this position, the contact plate for some reason does not close the power contacts. Before disassembly and inspection, this breakdown should have manifested itself like this: when we turn the ignition key, we hear a click, but the starter does not turn the engine.
If during the test described the multimeter did not beep, but showed some resistance on its display, then this means that the relay does not conduct current well. Such a defect occurs, most often, due to melting of the contact pads, as a result of which the cross-section of this section of the circuit is significantly reduced and the resistance increases. The starter, at the same time, could turn the engine, but barely, sluggishly and uncertainly.
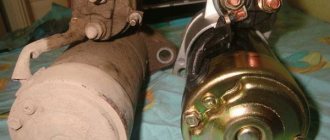
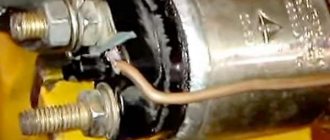
Unfortunately, most retractors cannot be disassembled for repair without barbaric methods. But, if you succeed, then you will see something like the following picture.
This is what melted and heavily oxidized power relay contacts look like. It is clear that the starting current, which, by the way, is more than a hundred amperes, will not be able to flow normally through such a connection. If he can at all. In general, if the retractor shows a defect in the relay contact during inspection, and it was possible to carefully unscrew it, the sites can be cleaned of melted slag and oxides, and perhaps after successful assembly it will all work better than new.
Unfortunately, the manufacturers of the vast majority of car starters believe that there is nothing inside the retractor for the average user to look at. Accordingly, these devices are made absolutely non-separable. On the other hand, the retractor is not that expensive. At least much cheaper than a complete starter. In addition, for many foreign-made starters, craftsmen have long found an alternative replacement among cheap domestically produced retractors.
Therefore, if checking the starter solenoid relay shows that it is screwed, it is easier to buy a new one than to somehow try to repair it. Although car repair gurus, as they say, are knee-deep in the sea - they don’t even throw away a bolt torn in half with a licked thread, but repair it.
Starter windings
A starter is an ordinary power electric motor with all its characteristic diseases, and winding wear is one of them. If the starter windings just begin to smell when starting the engine, this is a sure sign that they will soon fail.
If we disassemble a starter with burnt windings, we will see that the protective varnish on them has faded and they have darkened. As a rule, this happens when the driver overdoes it with starting the starter. If there is a smell at the starter windings, they will soon fail. The starter cannot spin for a long time, the maximum duration of its operation is a few seconds, and inexperienced motorists can turn the starter on an engine that does not want to start for various reasons, for several minutes until the battery is completely discharged or the starter windings overheat.
In this case, most often you have to say goodbye to the starter, since rewinding the windings is quite a troublesome and expensive task. It's often easier to replace the starter than to rewind the windings, so don't try to get the most out of the starter. Take care of him.
Strength testing of the solenoid relay
Well, the last thing regarding how to check the starter retractor relay is the so-called power tests. The purpose of the event is to determine whether the holding winding works reliably. That is, does the bendix and gear disengage with the flywheel before the starter turns the engine crankshaft? This, unfortunately, also happens. And this happens due to the fact that an interturn short circuit occurs in the holding winding. Accordingly, the electromagnetic field that it generates is weak, and it is not able to hold the retractor rod, so to speak.
The second purpose is to determine whether the retractor winding has enough force to tighten the retractor armature. That is, can the solenoid relay engage the gear in mesh with the flywheel?
To carry out these same power tests on the starter solenoid relay, you will need three thick wires and a battery. The essence of the test is to simulate the operation of the retractor relay, and make sure, with the help of even and strong hands, whether the retracted rod of the retractor is firmly held by the corresponding winding.
Important!!! The steps described below require a clear understanding of what is being done. More importantly, do not brake by forcing the solenoid relay to remain in the operating position for too long. Slow actions will inevitably lead to overheating of the retaining winding of the retractor, after which checking for the presence of a break in it, described above, will give a “positive” result.
Checking the strength of the retracting winding is carried out in the following sequence:
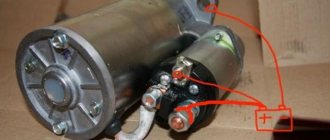
- The retractor relay armature must be secured to the table using a securely screwed screw and a piece of wire (shown in the photo below).
- The power contact without a jumper is connected to the “plus” of the battery.
- Using the second “plus” wire, the battery is supplied to the control (flat) contact.
- The armature is pushed until the power relay contacts. To do this, it rests against a self-tapping screw, to which it is secured with wire.
- Now comes the most important part! The negative voltage from the battery is supplied to the power contact with a jumper.
- Immediately after the relay is activated, we try to pull the retractor by hand, trying to remove the rod from it (to do this, it is attached to the screw with wire).
- After applying the “minus”, we do not hesitate - within 3-4 seconds we make sure that the retractor armature is securely held inside, and open the circuit (remove the “minus”).
If in step 6 you were able to pull the rod out by hand, then the holding winding is working weakly or not working at all.
If the holding winding were in contact with the housing, then during the test we would see strong sparking at the contacts (it will happen, but insignificant). In addition, the retractor rod, under the influence of the spring, would be pushed out of the retractor on its own.
Important!!! If you hesitate on the first try and don’t have time to understand what’s what, check again only after 5-10 minutes. This is necessary in order to allow the holding winding to cool (its heating may not be felt on the body).
Diagnostics without removing the starter using a multimeter
To do this, use a multimeter (tester) to first sequentially measure the voltage at the terminals of the battery, disconnected from the vehicle’s on-board network. It is approximately 12.7 V. If the device readings are less than 12 V, the battery is considered to be severely discharged and is not suitable for further testing.
Next, restore the normal connection of the wires and measure the voltage at the battery terminals and relay contacts. Compared to the previous case, it changes by no more than 0.1 V and will be equal at both control points. Turn the key to the start position. The voltage at the relay contacts should not fall below 12 V. Otherwise, the connecting wires are most likely faulty; it is possible that one or more contacts in the current flow circuit have burnt out.
Cleaning contacts and replacing individual parts
After removing the cover, you can assess the condition of the contact plates. Carbon deposits or oxidation should be removed using sandpaper. You can try to replace damaged springs, if any, by selecting ones that are suitable in size and characteristics. Selecting springs is a very complicated matter. It is necessary to measure not only the dimensions, but also the force developed. It will not be possible to do this without having special equipment at your disposal.
Having completed the repair, we place the cover in place, lubricate the joint with sealant, secure it and recheck it. After making sure that all parameters are normal, we install the relay on the starter and perform final assembly.
To be honest, such repairs will not last long. Over time, the plates fade, become thinner and are no longer able to provide reliable contact. We note once again that it is advisable to carry out such work only in situations where there is no access to spare parts. In other cases, the correct solution is to replace the starter solenoid relay with a new and known good part.
Why did it happen so?
Perhaps the automatic requests do not belong to you, but to another user accessing the network from the same IP address as you. You need to enter the characters into the form once, after which we will remember you and be able to distinguish you from other users exiting from this IP. In this case, the page with the captcha will not bother you for quite a long time.
You may have add-ons installed in your browser that can make automatic search requests. In this case, we recommend that you disable them.
It is also possible that your computer is infected with a virus program that is using it to collect information. Maybe you should check your system for viruses.
If you have any problems or would like our support team, please use the feedback form.
Repair kit for retractor relay 2110 KZATE is a set of new elements and parts that are included in a specific unit or mechanism and are used instead of old, worn parts. After installing a new set of parts, the performance characteristics of the mechanism are completely restored and, perhaps, its replacement is not required.
Repair and maintenance of modern equipment is difficult to carry out without the use of spare parts. Often, expensive components in cars fail and require replacement. It’s just not always wise to purchase new parts. You can use a repair kit that is made of high-quality materials.
Delivery to regions
- Delivery of an order worth over 5,000 rubles is free if the delivery cost does not exceed 500 rubles; in other cases, delivery of goods is paid upon receipt of the goods.
- Delivery to the transport company is FREE.
- The timing, cost and method of delivery depend on the weight, dimensions and cost of the ordered product.
- Delivery options can be selected by the online store manager.
Orders are processed daily from 07:00 to 19:00 (Moscow time).
Order of shipment to regions of the Russian Federation:
- Place an order in the online store (on the website or by calling 8-800-234-96-34).
- Pay for the cost of the goods in any convenient way (card, Yandex.Money, QIWI, Webmoney, by bank receipt).
- After receiving the money (usually money arrives instantly), we will almost immediately deliver the order to the transport station.
Online store managers will help you choose the cheapest and fastest method of order delivery; you can trust our specialists who have studied all the nuances of pricing of transport companies.
Checking the starter using the battery
Before contacting a car service center, buying a new unit or spare parts for it, you should try to check its performance yourself. With the right approach, it is possible to independently identify problems.
First of all, if you suspect a malfunction of the starting device, you need to check the contacts on the battery and starter terminals, their tightness and the presence of oxidation, the battery charge, since in many cases the problem in starting the internal combustion engine is the above factors.
A simple way to check that the electrical network is working is to close the terminal bolts of the electric motor with a screwdriver; before this procedure, you need to put the car in neutral speed (or move the selector lever to park or neutral mode).
If the starter starts the engine, you should look for a fault in the electrical circuit. Otherwise, remove the unit by disconnecting all fasteners from the engine and removing terminals and other wires.
How to check Bendix
After removing the electric motor, it is necessary to inspect the bendix (the gear at the very end); if there is increased wear of the teeth or cracks in it, it should be replaced.
The Bendix should only turn in one direction, otherwise it will have to be replaced. By connecting the unit to the battery, it is unlikely to be able to diagnose the serviceability of the Bendix, since it can spin, but with insufficient force to start the internal combustion engine.
How to check Solenoid relay
When you turn the ignition key, you should hear a click, indicating that the armature is retracted and the bendix is engaged.
Before checking the serviceability of the starter, it is necessary to firmly secure it (either in a vice, having previously wrapped it with a thick layer of fabric, or with the help of a strong assistant who will hold the unit), since a very strong jerk may occur when starting it.
It is necessary to connect the positive from the battery to the positive on the starter, and the negative from the battery to the body of the unit. If the unit is working properly, then there should be a quick and sharp click and the bendix will extend and begin to spin.
If there is no click or movement of the overrunning clutch, it is necessary to replace the solenoid relay. When the power from the battery is disconnected, the bendix should retract.
How to check the Anchor and Brushes
To check the brushes and armature, you will need a multimeter or a 12-volt light bulb. Checking with a light bulb involves connecting its contacts to ground and the brush holder with the starter connected to the battery. When the light comes on, it indicates high brush wear.
When checking with a multimeter, the contacts are connected identically, only the results of measuring the resistance should tend to infinity, otherwise there is a short to ground.
The armature can only be checked by disassembling the electric motor. In addition to carrying out a visual inspection for the presence of oxidation, traces of short circuits, and increased wear, to check the armature you will need a special device PPYA (armature testing device) to check the interturn closure.
The difficulty of diagnosing armature malfunctions, as well as its repair, will require contacting specialized specialists, but in order to avoid unnecessary costs, it is necessary to check all other parts of the unit.
How to check the starter winding
To check the motor winding you will need a multimeter or a light bulb. The wires of the control lamp are connected to the winding terminal and the starter housing. If the light comes on, then there is a breakdown in the winding.
Using the same connection, the winding resistance is checked, for which the multimeter must be switched to the appropriate mode. The average reading of a serviceable winding will be 10 kOhm.
The starter is the most important element of the car, and its malfunction will immediately make itself felt either by the inability to start the car or by difficulties with it.
This unit is very reliable, but problems do occur with it. Some of them are easy to determine on your own, but to identify others you will need special equipment, which is available only to highly specialized specialists.
Checking with the starter removed using a multimeter
This test of the solenoid relay allows you to very accurately perform internal diagnostics and determine the condition of the windings and contacts. Dismantling the starter, depending on the make of the car, is carried out in various ways. For VAZ 2110, this procedure is carried out from below from the pit. Before unscrewing the fasteners, remove the wires (it is better to mark the terminals so as not to confuse them during assembly); you may need to remove the crankcase protection.
To begin with, voltage is applied from the battery to the body and terminals of the relay; operation is accompanied by a characteristic click and visible movement of the rod. Further checks are carried out using a multimeter, which is switched to resistance measurement mode and the range of 200 Ohms is selected.
Video: Checking the starter removed from the car
First, check the serviceability of the retractor and retention coils. To do this, one of the probes is connected to ground, the second touches the contacts in succession. The device readings are 2 ohms. Deviation of the device readings from the specified value is a sign of a break or short circuit. To check the power contacts, remove the core from the relay body and remove the return spring, after which the core is inserted back. The core rod is pressed against the table with a certain force and the resistance between the contacts is replaced. The resistance is approximately 1.5 ohms.
Clicking sounds on the solenoid relay and starter relay
Many electrical appliances make a characteristic clicking sound when operating; it is these sounds that confirm their functionality. In any relay used, the contact groups are connected electromagnetically. When voltage is applied to the contact terminals, which are flexible movable brackets, due to oppositely polar charges, their mutual attraction occurs.
The movement and connection of contacts is accompanied by a characteristic sound, which we hear. An experienced driver, after listening to the clicks, will be able to determine the source of the sound: the starter or the retractor is clicking, as well as whether this device is working properly.
A guaranteed and reliable engine start can be achieved only by ensuring the operability of all elements and components that make up the necessary chain: battery, ignition switch, starter relay, starter solenoid relay.
Relay clicks and starter inactivity
When the engine does not start, but there is still some life left in the system that starts it, the situation is not hopeless. In this case, there may be several reasons for the problem:
- discharged battery;
- lack of good contact or faulty wiring;
- damaged ignition switch;
- a failed starter (voltage does not reach the brushes or the starter bendix slips);
- not working solenoid relay.
Each of them provides for a certain behavior of the car owner. If the problem is caused by the battery, you just need to charge it or replace it. It is sometimes very difficult to detect damage to car wiring yourself, but this can be easily done at the nearest service station. The worst thing is with the starter itself - it needs to be removed and diagnosed.
The ground is connected to the device body, and the positive terminal is connected to the stud behind the relay. During normal rotation of the device, the cause must be sought in the solenoid relay; in case of complete inactivity, the cause must be found in the relay itself.
When repairing a starter with your own hands, you must remember that there is constant increased wear on the brushes, bendix and retractor relay. Therefore, for its trouble-free operation, these components are subject to periodic monitoring and timely replacement.
Starter bushings
At the front and rear of the starter are bushings or bearings on which the shaft rotates. If they wear out, the symptoms may be different - the relay may click, but not turn the starter, because the shaft has lost alignment and the primary winding closes with the secondary.
In this case, there is a danger of burning the windings, and this can lead to melting of the wires, a short circuit in the electrical system and, in the worst case, a fire. The bushings and bearings of the starter wear out over time, which can lead to a fire. If the relay clicks and the starter does not spin , under no circumstances should the starter be kept on for a long time. After several attempts, the shaft may fall into place and start the engine, but at the first appearance of symptoms, it is imperative to disassemble the starter and replace the bushings. In this case, there is no point in delaying for obvious reasons.
Solenoid relay replacement process
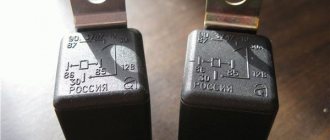
Solenoid relay RDS 2110.
If the starter does not operate when the ignition is turned on or only works every once in a while, then most likely the reason lies in the solenoid relay.
replace it without removing it from the vehicle , but as practice shows, it is best to remove it.
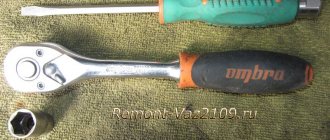
Required Tools
This is what a retractor looks like. You will need a tool.
To make a full replacement you will need some tools.
Namely: a flat screwdriver, a ratchet and a socket 8. Attention: if the car enthusiast is not sure that he will be able to carry out repair and restoration work on his own, then it is recommended to contact a car service center.
Algorithm
Let's consider the sequence of actions aimed at changing the solenoid relay on a VAZ-2110:
- First of all, you will need to turn off the power to the vehicle so as not to short-circuit the network and not burn anything.
- We remove the starter from the car.
- Remove the terminal from the starter and move it to the side.
We unscrew the housing where the solenoid relay is located.
We take out the solenoid relay.
The relay is pulled from the starter.
Immobilizer and alarm
Car alarms can also negatively affect the operation of the starter. Sometimes security systems can also present some surprises. Finding out the cause is quite simple, but fixing it is difficult.
The fact is that in the alarm systems with auto start and in the standard immobilizers of some cars, inconsistencies may arise that appear over time. This problem was relevant for the 2007-2008 Ford Focus 2.
Without any reason, one fine morning the starter completely refused to work. Although everything indicated that the electrical equipment was normal, all contacts were reliable, the starter did not want to turn the engine at all.
On Ford and some other cars, this was solved by replacing the standard immobilizer, and the officials did this under warranty. It was easy to find out the reason - bypassing all systems, the power from the battery to the starter was simply turned on through a button, and then it worked as if nothing had happened. The cases are not widespread, but they were, so this option also cannot be discounted.
REPLACEMENT
We figured out where the starter relay is located on the VAZ 2114, now all that remains is to find out how it can be changed. There are two options for replacing this part:
- With the removal and installation of the starting unit itself;
- Without removing the starter.
In any case, you should have the necessary tools:
- Combination key 13;
- A screwdriver (it would be better to have several of them - Phillips and slotted ones);
- Key for 10.
A set of keys is always necessary to have in stock. Let's look at how to replace the solenoid relay on a VAZ 2114 with removing and installing the starter (by the way, this is much easier to replace):
- Remove the battery terminals;
- Unscrew the two bolts securing the air filter housing (10mm wrench);
- Disconnect the connector of the air flow sensor (MAF);
- Unscrew the air pipe clamp and dismantle the housing;
- We pull off the wire chip of the solenoid relay (held on a plastic clip);
- Using a 13mm wrench, unscrew the nut securing the positive terminal;
- We unscrew the fastenings of the starter itself (it is secured with three 13 nuts);
- We take out the mechanism;
- With the starting device removed, use a 13mm wrench to unscrew the wire on the VR cover going to the stator winding;
- Using a screwdriver, remove the three screws securing the VR and dismantle this device.
Now you need to install the new part and put everything back together in reverse order. That's it, the replacement of the retractor on the VAZ 2114 is completed. Of course, you can try to get to the relay mounting screws right in place without removing the starter, but it’s up to you to decide how easier it is to remove this device.
Required Tools
In order to carry out repairs yourself and replace a faulty starter, you need the tools that are listed in the table below. Table - Tools required to replace the front strut
| Name | Note |
| open-end wrench | "at 8", "at 13" |
| Spanner | "at 13", "at 14", "at 15" |
| Ratchet | With extension |
| Head | "at 13", "at 14", "at 15" |
| Pliers | Can be replaced with pliers |
| Penetrating lubricant | For example, WD-40 |
| Screwdriver | With flat cross blade |
| Wire brush and rags | For cleaning contaminated surfaces |
DIY starter repair
It is known that a car cannot drive without a starter. It seems like a simple electric motor, but you can’t do without it. You can start a piston unit with a failed “starting” unit only from a pusher, but only for a trip to a car service specialist.
The reasons for the breakdown of such a critical mechanism are quite obvious. Most diseases can be cured if you repair the starter yourself. We list below the main sources of malfunctions:
- natural wear and tear of electric motor elements;
- water ingress while washing the car engine;
- improper operation of the unit, for example, long periods of operation of the electric motor after starting the engine;
- short circuits.
Do-it-yourself partial repair of the starter usually saves you from all this. That is, it is not at all necessary to buy a new unit entirely. Next, we will look at which specific elements fail, and how to repair the starter with your own hands.
Let us first note that according to the symptoms when turning the ignition key, it is necessary to distinguish between the types of malfunctions of the starting electric motor. If, for example, after turning the key you hear a clicking or crackling noise, then the problem is in the retractor cylinder. The latter can be completely replaced.
How to deal with the VAZ unit
First, let's look at how to repair the starter with your own hands on VAZ cars. First, let's take the very first of the cars in this line.
To repair a VAZ 2101 with your own hands, we will use the tools listed below:
- set of wrenches;
- flathead and Phillips screwdrivers;
- sandpaper;
- heads.
So, let's start work by opening the hood.
- Disconnect the terminals from the battery.
- We dismantle the air filter housing with the filter element.
- Unscrew the three nuts securing the electric motor to the motor.
- We disconnect the wires after taking photographs of the connections.
- We remove the defective device.
- Perhaps the so-called “pants” - the exhaust pipe - will interfere with this, then you will have to unscrew the four bolts and “lower the pants”.
- We separate the retractor cylinder from the dismantled element by disconnecting the wire and unscrewing three screws. We inspect it and, if necessary, replace it completely.
- After unscrewing the bolts, remove the motor casing.
- After unscrewing the two bolts, remove the cover.
- Separate the windings from the brush holder plates and remove the insulating tube.
- Separate the cover from the collector side.
- Use a screwdriver to remove the motor brushes. We measure them and replace them if necessary.
- We disassemble the drive of the defective assembly unit. To do this, undo the cotter pin, then remove the drive lever, disengage the drive from the clutch, and then remove it.
- We inspect the windings of the electric motor.
- If necessary, we press it out, and then replace the bushings of the assembly.
- We clean elements with soot or plaque. We replace failed parts with new spare parts.
- We carry out assembly and installation in the opposite direction.
Note that do-it-yourself starter repair for a VAZ 2106 is carried out according to similar instructions.
If we discuss the problem that interests us regarding front-wheel drive VAZs, then it is enough to simply consider what differences there are from the given instructions. The tools used here are the same.
However, for example, when repairing a VAZ 2109 starter yourself, you do not need to disconnect the exhaust pipe during removal from the car. Further manipulations are carried out exactly as described above.
Naturally, repairing a similar VAZ 2108 starter with your own hands is done according to a similar scenario. When repairing a VAZ 2110 starter with your own hands, it is easier to immediately remove the solenoid relay while dismantling the unit from the car by unscrewing the corresponding nuts.
However, in case of repairing the starter of a VAZ 2115 with your own hands, the electric motor can be dismantled immediately along with the retractor cylinder.
By the way, it is not necessary to replace this completely assembled cylinder if it breaks. You can also repair the starter retractor relay yourself. To do this, you need to disassemble it, inspect the retractor winding, return spring, and replace failed parts. As for domestic cars, UAZ repairs can be performed according to the given instructions from VAZ.
How are things going with other popular cars?
Now let’s touch on two more truly popular cars. Let's talk about sorting through the starting element on Oka, as well as Nexia.
To repair the starter at Oka with our own hands, we will need:
- set of wrenches;
- screwdrivers.
We start by dismantling the unit; it is located under the thermostat of the cooling system.
- In this car, the starting device is attached to only two points; to remove it, you need to unscrew the bolt on one side and the nut on the other. But first we disconnect the wires, both from the battery, from the retractor cylinder and from the connecting block.
- We unscrew the two nuts, and then remove the traction relay.
- Unscrew and remove the cover casing from the collector side.
- We dismantle the brush springs, locking, and adjusting washers.
- Separate the cover from the body where the collector is.
- We remove the brushes, then measure them; when they are worn out, they need to be replaced.
- Having unfastened the cotter pin, we dismantle the lever axis.
- Remove the cover from the drive side.
- We remove the drive lever, then take out the anchor.
- We inspect the windings of the electric motor.
- We dismantle the drive coupling and inspect its condition. This clutch is also called bendix. In case of any defects in the clutch, it is easy to repair the Bendix of any starter with your own hands. You just need to replace the broken elements.
- We take out the bendix spring and replace it if necessary.
These are some simple manipulations.
It must be said that in such a small car, such as the Tavria, the mounting of our treasured electric motor is also made at two points, and its design is similar. Therefore, Tavria does its own repairs in the same way.
Well, with Oka and Tavria it’s somehow easier, but if the starting unit of another people’s car breaks down, will it be more difficult? Let's see. To repair the starter of a Daewoo Nexia with your own hands, you need to prepare:
- set of wrenches;
- screwdrivers.
- To dismantle the unit from the car - here, like all rather large cars, there are three fastenings - unscrew the nuts and disconnect the wires. You need to know that a “ground” wire is attached to the upper bolt that secures the electric motor to the piston unit.
- We immediately check the drive gear; it should only rotate unidirectionally.
- We disassemble and sort out the assembly in the same way as in previous cases.
- We also disconnect the solenoid relay.
- We remove the cover from the collector side, as well as from the drive side.
- We dismantle and then, if necessary, replace the brushes.
- We take out the anchor and study the windings.
- If necessary, we press it out, and then replace the bushings of the assembly.
- We do the assembly in reverse order.
Apparently, there are few difficulties here.
The same can be said about repairing a starter, for example, an Audi 80 with your own hands. There you need to act, practically repeating the above points.