Starter solenoid relay is an electromagnet that performs two functions in the ignition system. The first is to bring the Bendix starter gear to the flywheel ring gear. The second is its return to its original position after starting the engine. A breakdown of the solenoid relay may result in the engine simply won't start. There are not many reasons for relay failure. In this material we will try to describe the signs and causes of failure, as well as diagnostic and repair methods.
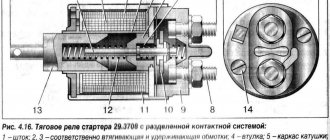
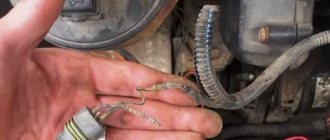
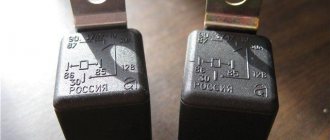
Solenoid relay with core
Operating principle of the solenoid relay
Before moving directly to the malfunctions and methods for eliminating them, it will be useful for car owners to know the device of the starter retractor relay and how it works. It is immediately worth noting that the mechanism is a classic electromagnet , consisting of two windings (holding and retracting), a circuit for connecting it to the starter, as well as a core with a return spring.
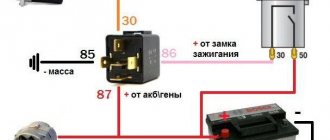
Scheme of operation of the solenoid relay
When the ignition key is turned, voltage from the battery is supplied to the coils of the solenoid relay. This creates an electromagnetic field that moves the core located in its body. That, in turn, compresses the return spring. As a result of this, the opposite end of the “fork” moves towards the flywheel.
In this case, the gear connected to the bendix is squeezed out until it engages with the flywheel ring. As a result of engagement, the contacts of the built-in starter circuit are closed. Next, the retracting winding is turned off, and the core remains in a fixed position with the help of a working holding winding.
After the ignition key turns off the engine, voltage to the solenoid relay stops supplying. The anchor returns to its original position. The fork and bendix, which are mechanically connected to it, disengage with the flywheel. Thus, a malfunction of the starter solenoid relay is a critical failure due to which it is impossible to start the engine.
Checking the starter using the battery
Before contacting a car service center, buying a new unit or spare parts for it, you should try to check its performance yourself. With the right approach, it is possible to independently identify problems.
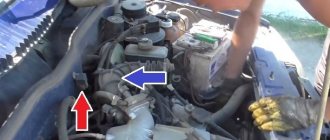
First of all, if you suspect a malfunction of the starting device, you need to check the contacts on the battery and starter terminals, their tightness and the presence of oxidation, the battery charge, since in many cases the problem in starting the internal combustion engine is the above factors.
A simple way to check that the electrical network is working is to close the terminal bolts of the electric motor with a screwdriver; before this procedure, you need to put the car in neutral speed (or move the selector lever to park or neutral mode).
If the starter starts the engine, you should look for a fault in the electrical circuit. Otherwise, remove the unit by disconnecting all fasteners from the engine and removing terminals and other wires.
How to check Bendix
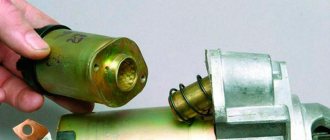
After removing the electric motor, it is necessary to inspect the bendix (the gear at the very end); if there is increased wear of the teeth or cracks in it, it should be replaced.
The Bendix should only turn in one direction, otherwise it will have to be replaced. By connecting the unit to the battery, it is unlikely to be able to diagnose the serviceability of the Bendix, since it can spin, but with insufficient force to start the internal combustion engine.
How to check Solenoid relay
When you turn the ignition key, you should hear a click, indicating that the armature is retracted and the bendix is engaged.
Before checking the serviceability of the starter, it is necessary to firmly secure it (either in a vice, having previously wrapped it with a thick layer of fabric, or with the help of a strong assistant who will hold the unit), since a very strong jerk may occur when starting it.
It is necessary to connect the positive from the battery to the positive on the starter, and the negative from the battery to the body of the unit. If the unit is working properly, then there should be a quick and sharp click and the bendix will extend and begin to spin.
If there is no click or movement of the overrunning clutch, it is necessary to replace the solenoid relay. When the power from the battery is disconnected, the bendix should retract.
How to check the Anchor and Brushes
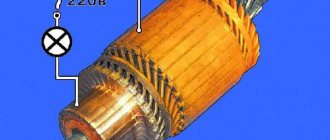
To check the brushes and armature, you will need a multimeter or a 12-volt light bulb. Checking with a light bulb involves connecting its contacts to ground and the brush holder with the starter connected to the battery. When the light comes on, it indicates high brush wear.
When checking with a multimeter, the contacts are connected identically, only the results of measuring the resistance should tend to infinity, otherwise there is a short to ground.
The armature can only be checked by disassembling the electric motor. In addition to carrying out a visual inspection for the presence of oxidation, traces of short circuits, and increased wear, to check the armature you will need a special device PPYA (armature testing device) to check the interturn closure.
The difficulty of diagnosing armature malfunctions, as well as its repair, will require contacting specialized specialists, but in order to avoid unnecessary costs, it is necessary to check all other parts of the unit.
How to check the starter winding
To check the motor winding you will need a multimeter or a light bulb. The wires of the control lamp are connected to the winding terminal and the starter housing. If the light comes on, then there is a breakdown in the winding.
Using the same connection, the winding resistance is checked, for which the multimeter must be switched to the appropriate mode. The average reading of a serviceable winding will be 10 kOhm.
The starter is the most important element of the car, and its malfunction will immediately make itself felt either by the inability to start the car or by difficulties with it.
This unit is very reliable, but problems do occur with it. Some of them are easy to determine on your own, but to identify others you will need special equipment, which is available only to highly specialized specialists.
Starter solenoid relay diagram
Solenoid relay circuit
In addition to the previous point, we present to your attention a diagram of the starter retractor relay . With its help, it will be easier for you to understand the principle of operation of the device.
The solenoid coil of the relay is always connected to the negative side through the starter. And the holding winding goes directly to the battery. When the relay core presses the working plate against the bolts, and “plus” is supplied to the starter from the battery, then a similar “plus” is supplied to the “minus” output of the retractor winding. Because of this, it turns off, and the current continues to flow only through the holding winding . It is weaker than the retractor, but has sufficient strength to constantly hold the core inside the housing, which ensures continuous operation of the motor. The use of two windings allows you to significantly save battery energy when starting the engine.
There are relay models with one winding - pull-in. However, this option is unpopular due to significant battery consumption.
Checking status
Before changing the relay, make sure that the problem with starting the engine is related to this component.
To do this, consider two situations that indicate its malfunction.
Your actions
The relay makes clicks, but the armature does not spin
If there are clicks from the relay, check the condition of the armature. To do this, the terminals of the retractor relay are bridged with a large screwdriver or a piece of welding cable to the terminals at the ends. Taking a thin wire or a screwdriver can easily burn the terminals. When the armature is working, after closing the terminals, the armature will spin, which can be determined by the sound. Consequently, the solenoid relay itself has failed and requires repair.
Even if there is silence after closing the terminals, the problem should be looked for in the starter. The relay no longer plays any role here.
Having discovered that the relay has served its purpose, it must be replaced or repaired, if possible.
Signs and causes of relay failure
External signs of a broken starter relay include the following:
- When you turn the key in the ignition switch, no action is taken to start the engine, or starting is possible only after making several attempts.
- After the engine starts, the starter continues to rotate at high speed. This can be heard by ear by the strong buzzing of the mechanism.
A malfunction in the relay is one of the reasons that the car does not start, and there may be several reasons for its breakdown:
- failure (burnout) of the contact plates inside the relay (popularly called “nickels”), reduction in their contact area, “sticking”;
- breakage (burning) of the retracting and/or holding winding;
- deformation or weakening of the return spring;
- short circuit in the pull-in or holding winding.
How to check the starter solenoid relay with a multimeter
If you find at least one of the listed signs, then the next step to fix the problem is to conduct a detailed diagnosis.
Check with a test lamp
For these checks we need a battery. We connect the test lamp to the “plus” of the battery. We put a wire on the negative terminal, pre-twisted in the form of a ring, so that it “sits” securely on the terminal. It is advisable to use “crocodiles” for this check.
We perform all testing steps the same as when diagnosing a solenoid relay with a multimeter. Only instead of the probes of the device we use a test lamp and a negative battery cable.
In all cases, if the light comes on, it means there is a circuit:
- The retracting and holding winding is intact. There is no break in them; there is contact with the “ground” and power terminals.
- The movable armature platform closes the power bolts, and current flows through them.
If the light bulb burns at half-glow, it means that somewhere in the circuit there is a high resistance or poor contact. In an amicable way, the relay needs to be disassembled and all elements of the retractor must be visually checked for broken soldering or broken wires.
But modern relays are not collapsible; removing the top cover yourself is problematic . There are enthusiasts who flare it and take out the insides, but it may not be possible to flare it reliably. If you do this well, then share your experience in the comments . I couldn't do it, I broke several covers.
How to check the solenoid relay
There are several methods for checking the solenoid relay. Let's look at them in order:
- The operation of the relay can be determined quite simply - at the moment of startup, a click is heard produced by the moving core. This fact indicates the serviceability of the device. If there is no click, it means that the starter retractor relay does not operate. If the retractor clicks but does not turn the starter, then the likely reason for this is that the relay contacts are burnt.
- If the solenoid relay is activated, but a peculiar rattling noise is heard, then this indicates a malfunction in one or both relay windings . In this case, the starter solenoid relay can be checked using an ohmmeter by measuring the resistance of its windings. It is necessary to remove the core and return spring from the housing, and then check the resistance between the windings and ground in pairs. This value should be within 1...3 Ohm. After this, insert the core without a spring, close the power contacts and measure the resistance between them. This value should be 3...5 Ohm (the value depends on the specific relay). If the measured value is lower than the indicated numbers, then we can talk about a short circuit in the circuit and failure of the windings.
Troubleshooting relays
The faulty part is identified quite simply. It is not at all necessary to remove the spare part from the car. If the car does not start, then you need to perform the following steps.
First, check the wires going to the starter for breaks. If the cable is in order and current is supplied, then we proceed to checking the solenoid relay. Turn the ignition key and listen for a characteristic clicking sound. Its absence indicates one of the following relay malfunctions :
- anchor jamming;
- winding break;
- lack of food.
If there is still a click, but the starter does not turn or turns very slowly, most likely the contact plates are burnt .
Keep in mind that slow rotation may occur if the starter bushing is worn out.
If there is a click, you should try to start the starter . This is done using a screwdriver or a metal wrench. First, remove the wire from the relay connecting it to the ignition switch. Then we close the terminals: battery and starter.
In such a situation, current flows directly from the power source. If the electric motor starts working, then you should repair the starter solenoid relay with your own hands.
It happens that the starter brushes through which the relay is connected fail. Then we dismantle them and install new ones. In the worst case, it happens that the commutator wears out the brushes. Such a malfunction will cause the car owner much more problems.
Repair of starter retractor relay
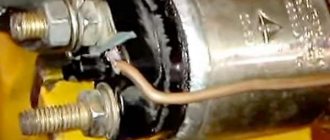
Worn relay contact plates
On many modern cars, the solenoid relay is made in a non-separable form. This is done for two reasons. First, this increases the reliability of the mechanism and its durability due to mechanical protection from external factors. The second is that automakers want to make more profit from the sale of their components. If your car has just such a relay, then the best solution in this case is to replace it. Write down the brand of the relay, its technical parameters, or better yet, take it with you and go to the nearest store or car market for a similar new one.
However, some car owners repair it themselves. But at the same time you need to know how to disassemble the starter solenoid relay . If the relay is collapsible, then it can be repaired. In the case of non-dismountable parts, repairs are also possible, but to a small extent. In particular, when burning “nickels”, improving and cleaning the contact. If one of the windings burns out or short-circuits, then such relays, as a rule, cannot be repaired.
During dismantling, mark the terminals so that you do not confuse them during installation. It is also recommended to clean and degrease the relay and starter contacts.
For further work you will need a flat blade screwdriver, as well as a soldering iron, tin and rosin. Disassembling the relay begins with the fact that it is necessary to remove the core from it. After this, two are unscrewed that hold the top cover where the coil contacts are located. However, before removing it, it is necessary to unsolder the mentioned contacts. In this case, it is not necessary to solder both contacts . Usually, to get to the “nickels”, it is enough to unsolder only one contact and lift the cover on one side.
Disassembly and repair of the solenoid relay
Repair of the retractor relay VAZ 2104
Next, you need to unscrew the bolts holding the “nickels” from the top side and remove them. If necessary, they need to be reviewed. That is, clean them with sandpaper in order to get rid of carbon deposits. A similar procedure must be performed with their seats. Using a plumbing tool (it is best to use a flat blade screwdriver), clean the seat, removing dirt and carbon deposits. Reassembling the relay housing occurs in the reverse order.
Disassembly and assembly of a collapsible relay occurs in the same way. To do this, you need to unscrew the stud bolts and disassemble its body. This will give you access to the internal elements of the device. The audit work is carried out similarly to the above algorithm.
REPLACEMENT
We figured out where the starter relay is located on the VAZ 2114, now all that remains is to find out how it can be changed. There are two options for replacing this part:
- With the removal and installation of the starting unit itself;
- Without removing the starter.
In any case, you should have the necessary tools:
- Combination key 13;
- A screwdriver (it would be better to have several of them - Phillips and slotted ones);
- Key for 10.
A set of keys is always necessary to have in stock. Let's look at how to replace the solenoid relay on a VAZ 2114 with removing and installing the starter (by the way, this is much easier to replace):
- Remove the battery terminals;
- Unscrew the two bolts securing the air filter housing (10mm wrench);
- Disconnect the connector of the air flow sensor (MAF);
- Unscrew the air pipe clamp and dismantle the housing;
- We pull off the wire chip of the solenoid relay (held on a plastic clip);
- Using a 13mm wrench, unscrew the nut securing the positive terminal;
- We unscrew the fastenings of the starter itself (it is secured with three 13 nuts);
- We take out the mechanism;
- With the starting device removed, use a 13mm wrench to unscrew the wire on the VR cover going to the stator winding;
- Using a screwdriver, remove the three screws securing the VR and dismantle this device.
Now you need to install the new part and put everything back together in reverse order. That's it, the replacement of the retractor on the VAZ 2114 is completed. Of course, you can try to get to the relay mounting screws right in place without removing the starter, but it’s up to you to decide how easier it is to remove this device.
Types of solenoid relays and their manufacturers
Let's briefly touch on the solenoid relays used on VAZ cars. They are divided into four types:
- for non-geared starters of VAZ 2101-2107 (“Classic” models);
- for non-geared starters of VAZ 2108-21099 models;
- for VAZ gear starters of all models;
- for AZD starter gearboxes (used in VAZ 2108-21099, 2113-2115 models).
In addition, as mentioned above, they are divided into collapsible and non-collapsible. Older models are collapsible. New and old are interchangeable .
For VAZ cars, solenoid relays are produced by the following companies:
- Plant named after A.O. Tarasov (ZiT), Samara, Russian Federation. Relays and starters are produced under the KATEK and KZATE trademarks.
- BATE. Borisov Automotive and Tractor Electrical Equipment Plant (Borisov, Belarus).
- Kedr Company (Chelyabinsk, Russian Federation);
- Dynamo AD, Bulgaria;
- “Iskra” A Belarusian-Slovenian enterprise whose production facilities are located in the city of Grodno (Belarus).
When choosing a particular manufacturer, it is necessary to take into account that the highest quality and most common brands are “KATEK” and “KZATE”. Also remember that if an AZD starter is installed on your car, then “native” relays manufactured at the same enterprise are suitable for them. That is, they are not compatible .
Results
The starter retractor relay is a simple device. However, its failure is critical , as it will not allow the engine to start. Even an inexperienced car owner with basic plumbing skills can check and repair the relay. The main thing is to have the appropriate tools at hand. If the relay is not removable, we still advise you to replace it, since, according to statistics, after repairs are completed, its service life will be short. Therefore, if the solenoid relay does not work in your car, buy a similar device and replace it.
Dismantling
There should be no problems with the dismantling process. The main thing here is to remove the starter, since the required relay is held on it. Therefore, dismantling is carried out as an assembly.
- Turn on the handbrake, disconnect the battery by removing the negative terminal from it.
- A wire with a large cross-section goes from the battery to the contact of the relay. It can be turned off by unscrewing it using a 13 key.
- Remove the thin winding power wire from the solenoid relay.
- Using the same 13mm wrench, unscrew the three mounting nuts holding the starter to the clutch block.
- You can remove the device through the bottom or top. If you chose the top, then you need to slightly rotate the starter around its axis and remove it.
- The lower output is more difficult, since here you need to remove the crankcase protection. But if parallel work is carried out that requires similar manipulations, problems will not arise.
Repair
Next, you have a choice to make: replace the entire relay or try to repair it.
Only a relay that has a collapsible design can be fully repaired. It is not uncommon for cars to have a relay with a non-separable body. Repairs there are also possible, but only partial.
- Unscrew the pair of bolts that hold the relay on the starter, disconnect the core shackle from the upper end of the drive lever;
- Install a new solenoid relay in its place, thereby completing the replacement.
But if you want to save money or just like to tinker with your car, you can try to bring a damaged relay back to life. To do this, we offer you detailed instructions.
If this measure does not help, we will disassemble the case and repair it.
- The relay consists of a housing with a winding inside, a core with a return spring and contacts.
- The spring disconnects the starter rotor gears from the Bendix ring when the power to the relay winding is turned off.
- The back cover of the relay is fixed with screws to the body. Therefore, the first thing we do is remove this cover by unscrewing the corresponding fasteners.
- Both contact bolts have a nut, which you also unscrew.
- You will see washers under the nuts. Do not lose them so that you can return them to their place during reassembly.
- Unsolder both terminals of the winding using a soldering iron. Then remove the cover.
- If you find traces of carbon on the contacts, they can be removed with a small file.
- There is a rubber O-ring under the cover. Check it for elasticity and integrity. If the ring is damaged or worn, replace it with a new one.
- Remove the contact plate along with the rod.
- Use a flathead screwdriver to remove the return spring.
- If the spring is deformed or stretched too much, it will need to be replaced. Otherwise, a worn spring will not be able to guarantee the desired contact. As a result, the relay does not work properly.
- Disassemble the contact plate. To do this, you need to remove the retaining ring that insulates the washer. After this, the plate will fall out on its own due to the pressure created by the spring.
- Remove the contact bolts from the cover. Clean the surfaces of their contacts. Often, due to burning of the contact surfaces, the solenoid relay stops working normally.
- If the carbon deposits are too strong and cannot be removed with simple sandpaper, do not rush to buy new bolts. Just rotate them 180 degrees. So they will touch on the other side, where there is no carbon deposits.
- The relay windings are located in a non-separable housing. If they are damaged, you will have no choice but to completely change the relay.
- Replace all damaged and worn elements of the switching relay, and then put everything back into the housing. Reinstall the solenoid relay and check if the ignition returns to normal.
Collapsible and non-dismountable VRS
The VRS adjustment is carried out if there is no doubt about its malfunction. However, in most cases it is easier to replace the VRS with a new relay than to repair it. You should also know that most modern HRS cannot be repaired due to their non-demountable design.
Non-separable VRS are created for the purpose of unit reliability. As you know, a housing closed on all sides is less susceptible to various influences. However, if it fails, you have to replace the relay with a new one.
Another thing is collapsible VRS. Despite the fact that they fail much more often, they look much better compared to non-removable structures, at least for our motorists. After all, such VRS make it possible to repair, and there is no need to buy new parts every time.
So, frequent causes of failure of a collapsible type VRS are the mechanical drive, which wears out over time, short circuiting and combustion of the contact group that occurs due to getting inside the windings.
The exact fault can only be determined after disassembly. However, this does not apply to a fault associated with a shorted winding. This problem can be diagnosed using an ohmmeter. When measuring resistance, you need to build on standard values - the indicator should be at least 10 kOhm. If not, then this indicates a short circuit in the windings, which will force you to buy a new VRS.
Where to look for the reason?
Knowing the operating principle of the entire circuit, you can easily identify those elements of the circuit with which problems may arise. These include:
- battery;
- wires and their connections;
- egnition lock;
- solenoid relay;
- power electric motor;
It is in this order that the circuit should be checked when looking for the cause.
Battery
Let's start with the battery. One of the reasons for the starter not turning on is a low battery. As a result, its energy is simply not enough to make the electric motor work, although there is enough of it to operate the relay (hence the clicks). An indirect sign of a discharged battery is a strong dimming of the control lamps on the dashboard when trying to turn on the starter.
The second problem with the battery is unreliable fixation of the terminals or their severe oxidation. Because of this, the contact is insufficient and strong resistance occurs, so the required amount of energy does not flow to the starter.
If everything is in order with the battery, we move on to the wires. First of all, you should check the reliability of fastening and the integrity of the “positive” wire to the battery and the relay terminal, as well as the engine ground. It is noteworthy that for some reason many car enthusiasts ignore checking the ground connection, so they cannot find the reason for a long time.
Video: Maxus LDV Maxus starter clicks, does not turn
Wiring, ignition switch
Let's move on to the power wires of the solenoid relay going to the lock. Here, by the way, you can do it easier by checking the entire circuit at once in one simple operation:
- We put the car in “neutral” gear and tighten the handbrake.
- Open the hood and provide access to the solenoid relay terminals.
- We take a screwdriver or a small key and use them to connect the power supply terminals of the electric motor.
If, as a result of shorting the terminals, the starter starts to turn, most likely there is a voltage loss in the power circuit or in the relay itself. In this case, first check the ignition switch. By the way, there is little point in checking the wiring of this circuit, since if the relay is triggered, then voltage is still supplied.
The main reason for the lock is burnt contacts. Because of this, the voltage sufficient to hold the anchor is not enough, although it is enough to retract. Typically, burning manifests itself in the form of repeated clicks without turning on the electric motor.
How does it all work?
To figure out where to look for the cause, let's look at the circuit diagram for connecting the starter, which is quite simple.
Since the starter is a power electric motor, when turned on, it consumes a lot of energy, the source of which is the battery.
Starter connection diagram
To minimize resistance losses, the “positive” power wire has a sufficiently large cross-section and is pulled directly from the battery to the solenoid relay. The “minus” is the engine itself.
Theoretically, it turns out that electricity is supplied to the starter constantly. But there is a gap in this circuit that allows the electric motor to be turned on only at the right moment. And this gap was made in the solenoid relay. The wire from the battery goes to one of the terminals of this relay (there are three in total). The second terminal is connected via a bus to the brush assembly of the electric motor and in the normal state these two terminals are open. A wire going to the ignition switch is connected to the third terminal, and another wire is laid from this lock - to the battery.
The task of the retractor relay is to close the first two terminals, as well as move the bendix with the gear to engage the flywheel.
The circuit works like this: in the normal state, the armature of the retractor relay, due to the action of the spring, is in a position where the power supply terminals of the electric motor are open and the bendix is disengaged.
When turning the key, the driver closes the power circuit of the retractor relay. Voltage is applied to its winding, resulting in a magnetic field acting on the armature, which leads to its retraction. At the same time, he pulls the bendix, inserting it into its gears, and when he reaches the stop, he closes the power supply terminals. engine (nickels). As a result, the circuit break is eliminated and energy is supplied to the engine - it starts working.
The described malfunction - audible clicks without the engine firing - indicates that for some reason voltage is not supplied to the second node.