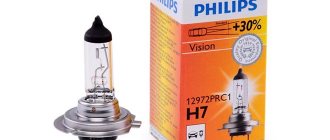
In head optics, low beam lamps most often have to be replaced. For a Lada Kalina car, the low beam lamp is a halogen lamp with an “H7” socket, the power of which is 55 watts (no more). Osram bulbs may come from the factory, but others will do. After replacement, the filament will occupy a new position, and the headlight adjustment may be lost. So, checking the settings, and, if necessary, adjusting the headlights is carried out immediately after replacing the lamps, which on the Lada Kalina is done without dismantling the headlight unit.
How to choose good lamps
It is not enough to replace a faulty element in a car; you also need to select the right spare part. Light bulbs are no exception. The auto parts market offers a large selection of lighting devices from a variety of manufacturers with appropriate quality.
Conventionally, lamps can be divided into three categories:
- Good lamps should last a long time, but don't have to be expensive. Quite good manufacturers, such as Philips, Osram, etc., sell affordable lighting devices with standard characteristics. The price of one lamp, for example, with an H1 base is, on average, 102 rubles. In this case, the characteristics will be averaged, as on standard lamps with, “Dialuch” and other lamps, on the packaging of which you can find Chinese characters, are cheap low-quality light sources. The illumination is worse, and the service life can sometimes exceed the operating time of even the most expensive lamps.
- A separate category of light sources are expensive light bulbs or, as they are commonly called, high-brightness lamps. Trivial examples are: Osram Nigth Breaker +110 or Philips Racing Vision +150. In fact, the brightness of such lamps is actually higher, since they operate in overheating mode. But durability is less. You can also include LED lamps and xenon, as this is a kind of optics tuning.
When it comes to choosing a lamp, we always think of light sources for low beam headlights or PTF. For other luminaires, lamps are selected with much lesser requirements.
Selecting an original light bulb based on the article number is expensive. It’s much easier to go into a store and tell the salesperson about the type of base so that he can give you the right light source.
Step-by-step replacement instructions
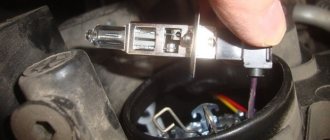
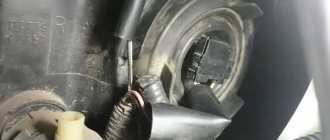
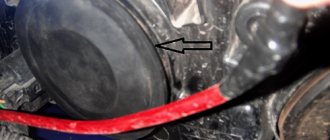
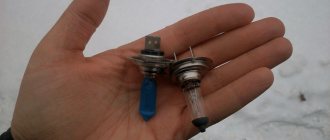
Each H7 standard bulb has an iron base, which is pressed to the headlamp with a wire clamp. To bend this bracket, just get close to the plane of the headlight from behind. Let's open the hood and see what exactly will bother us.
Engine compartment of Kalina-2 (VAZ-2192, 2194)
Behind the headlight on the right is a washer reservoir. It is dismantled like this: disconnect the electric motor terminals, tighten the plug harder, find one nut and one fastening bolt. The fastening elements are unscrewed with a 10mm wrench, then the tank is placed on the engine. Next we could look at how to remove the headlight on Kalina-2, but in this case this is not required.
Before performing any manipulations with electrical equipment, always disconnect the negative terminal of the battery. It is better to connect this terminal last (before closing the hood). Be careful.
Replacement sequence:
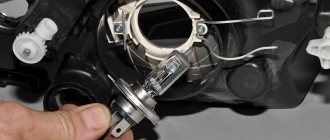
- Remove the rubber cover covering the low beam lamp compartment;
- Disconnect both terminals from the lamp contacts;
- The fastening bracket is removed from the grooves by first pressing on it, then the bracket is moved to the side;
- They take out the lamp, install a new one in its place, and return the bracket to its place.
Next, perform steps “2” and “1” in reverse order. The connection diagram is not important - there are only two contacts, and both go to the filament. Now, if we connected LEDs, then everything would look more complicated.
The bracket presses the cartridge to the plane of the headlight
When installing a halogen light source, you must remember: the surface of the lamp glass must be perfectly clean. Do not allow grease marks to remain on the flask. Installation is carried out using only cotton gloves. The glass of the flask is cleaned with industrial alcohol or Secunda.
Types of lamps used in the Lada Kalina 1 car
Lada Kalina cars use a huge number of light sources. To make it easier to navigate, they are divided into categories: external and internal.
External lighting devices:
| Low beam | H7 |
| High beam | H1 |
| Front turn signal | PY21W |
| Rear turn signal | PY21W |
| Side turn signal | W5W |
| Side light | W5W |
| Rear marker lamp and PTF | P21/4W |
| Stop signal | P21W |
| Reverse | P21W |
| License plate light | W5W |
| Fog lights | H11 |
Internal lighting devices:
| Trunk lighting | C5W |
| Interior lamp | C10W |
| Instrument lighting | W1/2W |
| LCD indicator | W1/2W |
| Cigarette lighter | W1/2W |
| Glove compartment lighting | C5W |
| Individual lighting | T4W |
2302-18-10-02 (Copy)
By pressing the spring clamp of the lamp, we disengage it from the hooks of the reflector and move it to the side.
By pressing the spring clamp of the lamp, we disengage it from the hooks of the reflector and move it to the side.
By pressing the spring clamp of the lamp, we disengage it from the hooks of the reflector and move it to the side.
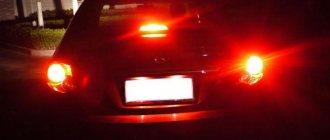
What causes lamps to burn out in Lada Kalina
There are three reasons why lamps in a car can burn out. And here is each of them:
- Life time. It is worth noting that any lamp is designed for certain operating hours. Once the operating time exceeds its limits, the light source begins to dim, and then the filament melts and the light source stops working. The operating time of the lamp may be affected by the voltage of the on-board network.
- All automotive light sources are designed for a voltage of 12 Volts, but not more than 14.7V. If this parameter is exceeded, the incandescent device begins to operate in overheating mode, which leads to its failure ahead of schedule. Overvoltage can occur due to a breakdown of the voltage regulator relay.
- Quality. A lot depends on the quality of the light source - from illumination to service life. To prevent the lamp from burning out prematurely, try to choose light sources recommended by the manufacturer.
Adjusting the headlight beam
Correctly adjusting headlights can only be done in a service station. However, let's look at how this operation is performed by experienced craftsmen.
Kalina-2 block headlight, correct adjustment of the beam direction
There are two adjustment screws on the back wall of the unit called the headlight unit. The first of them, located closer to the radiator, allows you to deflect the light beam “up and down”, and the “horizontal” direction is adjusted with the second screw. Ideally, this should happen: when the car is 5 meters from the screen, the border of the light spot touches line “2” (see figure). Line “1” is spaced from the ground at a distance equal to the height of the centers of the headlights. The second line is drawn 65 mm lower.
When making adjustments, the corrector switch is moved to position “0”. Of course, you only need to turn on the low beam. We also note that the headlights are adjusted one by one (the “excess” light source is covered with a cloth).
Here are a couple more tips that will be useful:
- The centers of the beams should be on lines AE, BE;
- Line “0” has the following meaning: it intersects with line “1” at one point, so the border of the spot should pass exactly through this point;
- The caps of the plastic adjustment screws are compatible with a hex screwdriver. However, a Phillips screwdriver will also work.
So, we have fully examined how to adjust the headlights on Kalina-2. Of course, replacing lamps with subsequent adjustment is a less labor-intensive operation than connecting a radio. However, accuracy is important here. And the special equipment used to perform the settings is only available at service stations.
Lighting tuning options
The most common options for tuning Lada lighting products are:
- tinting;
- installation of an additional brake light.
Tinting of car lights occurs by painting or wrapping with film. The second method is more popular among drivers, because the film does not reduce the lighting intensity so much. In addition, covering the lantern with film can be done faster and better than conventional painting.
Tinted tail light
For the coloring process you will need:
- hair dryer (household or industrial);
- plastic scraper;
- clean scraps of fabric;
- vinyl film (1 square meter is enough);
- stationery knife;
- water sprayer.
It is possible to carry out the tinting process without removing the lighting, but performing such work at the highest level is only available to trained specialists. It would be better to first dismantle the products according to the standard scheme.
After this, you need to clean the components from dirt, spray water (if indicated in the instructions for the film) and apply the vinyl. To give it the desired shape, heat it with a hairdryer, and then smooth it with a scraper, removing excess water. Cut the film with a knife and wait for it to dry. The whole process will not take more than an hour. Remember that applying paint or film will affect the brightness of your lighting, so you may need to install brighter bulbs.
An example of painting the lights on a VAZ 2109
Often, to improve safety on the road, Lada drivers decide to install an additional brake light at the rear. For this you will need:
- knife or file;
- key to 8;
- LED strip;
- glue;
- soldering iron;
- wiring;
- sealed substance.
If you install additional components, it is not necessary to dismantle the Lada bumper - just stick your hand under it at the location of the light sources and unscrew the corresponding nut with a size 8 wrench.
Additional brake lights on Lada Kalina
After this, disassemble the reflector: cut off the layer of sealant with a sharp knife and clean the edges with a file. Next, take the LED strip, cut it into pieces and place it on the glue inside the reflector. Connect the wires coming from the tape to the lighting system using a soldering iron. After installation, check that the connection is correct by turning on the brake lights. If you did everything correctly, assemble the reflector using a sealing substance. Pull the wiring coming from the tapes through the rubber in the reflector body. Wait for the sealant to dry. Route the wiring to the left (right) side of the car, depending on the installation location of the first reflector. Route the wires into the luggage compartment after removing the plug. After this, connect the brake light to the lamp wires, isolate the wiring and check the operation.
2302-18-10-08 (Copy)
In this case, two protrusions, located asymmetrically relative to the axis of the lamp, must fit into the corresponding grooves of the socket.
In this case, two protrusions, located asymmetrically relative to the axis of the lamp, must fit into the corresponding grooves of the socket.
In this case, two protrusions, located asymmetrically relative to the axis of the lamp, must fit into the corresponding grooves of the socket.
To replace the daytime running light lamp and side light, turn the lamp socket counterclockwise...
2302-18-10-05 (Copy)
By pressing the ends of the spring clamp of the lamp, we disengage them from the hooks of the reflector and move them to the side.
By pressing the ends of the spring clamp of the lamp, we disengage them from the hooks of the reflector and move them to the side.
By pressing the ends of the spring clamp of the lamp, we disengage them from the hooks of the reflector and move them to the side.
2302-18-10-10 (Copy)
Pulling the lamp, remove it from the socket.
Pulling the lamp, remove it from the socket.
Pulling the lamp, remove it from the socket.
We install the new W21/5W lamp in the reverse order.
Replacing headlight bulbs on a car manufactured before 2013
The only difference in the procedure for replacing lamps in the headlight of a car manufactured before 2013 is that the side light lamp is located under the high beam lamp cover, and the daytime running light lamp is simply absent.
We will show you the replacement of the side light lamp on the right headlight unit.