string(10) “error stat”
A car consists of many components and parts, some of which require constant attention, while others require periodic inspection. Even small, at first glance, not very important details can cause a lot of trouble for the car enthusiast. These inconspicuous devices include the radiator cap, a malfunction of which can cause a number of problems. Therefore, we will try to figure out how to check the radiator cap and why it is needed in a car.
Design and principle of operation
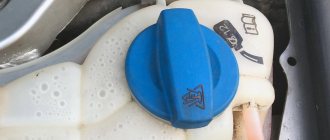
As a rule, the radiator cap is located either on the radiator itself or on the coolant expansion tank.
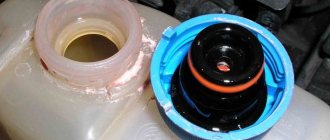
Hence, it should be called correctly - like a cooling system cover, and if the name also includes a functional meaning - then, according to technical terminology, it will sound correctly - like a bypass valve for the cooling system of an internal combustion engine of a car. Depending on the manufacturer and brand of car, the design of the radiator cap may differ both in appearance and in the complexity of the technical mechanism, but in any case it will consist of the following main parts:
- a tin cover with rotary clamp elements on the neck of the radiator or expansion tank;
- sealing rubber under the lid;
- intake valve mechanism;
- exhaust valve mechanism;
- two valve membranes in the form of rubberized plates;
- cover housings where the valve mechanisms are located.
The functional purpose of the radiator cap is to regulate the coolant pressure in the internal combustion engine cooling system. Therefore, the bypass valve system is designed for operation in a temperature range from a low point of -40⁰ C to a high point of +125⁰ C. The lower point is determined by the minimum winter ambient temperature, and the upper point is determined by the boiling limit of the coolant at an excess pressure of 100 kPa. That is: -40⁰ C is the freezing point of antifreeze and antifreeze, and +125⁰ C is their boiling point at slight excess pressure. For water, these temperature ranges will respectively range from 0⁰ C to +105⁰ C.
The bypass valves of the cooling system cover operate approximately according to the following three-position scheme:
- At +20⁰ C (conventionally), the pressure of the ambient air and liquid in the cooling system are equal, while both valves are closed.
- The car engine is running and heating up, causing the coolant to expand. When a certain limit is reached, the release valve opens and releases excess pressure without allowing the liquid to boil.
- After the engine is turned off, it begins to cool along with the cooling system fluid, which, in turn, decreases in volume and creates a vacuum. This is where the inlet valve opens to maintain normal pressure.
How to properly check the cover and fix the problem
First, inspect the part for damage. Carelessness is the main factor that can harm the entire cooling system and the engine as a whole. When purchasing a new cover, you should check it for damage, as it may be defective from the store.
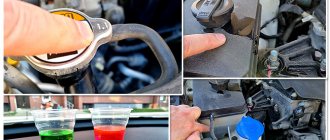
If the cover has no external defects, it should be tightened and the engine started. The internal combustion engine must run to reach operating temperature. After this action, you need to carefully turn the plug counterclockwise. A hissing sound should appear. From this you can understand that the plug really works as it should.
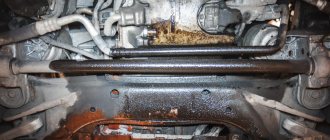
While the engine is running, you should check the thick pipes of the cooling circuit. If there is inappropriate pressure in the system (low), then the pipes on a running engine will be depressed.
Unscrew the cap of the expansion tank and squeeze the pipe. Then close the plug and release the pipe. It should return to its original form at the everyday pressure in the cooling circuit for the power unit.
The best option for testing the system reservoir plug is a pump with a measuring indicator of the pressure level in the circuit.
Diagnostics of the element on cars of the Kalina, Priora, Gazelle models
To understand the serviceability of the cover, you need not only to check its condition, but also to carry out diagnostics using atmospheric air. Special service centers use pressure pump equipment that pumps the required number of atmospheres. It can be used to calculate the performance of the valves in the expansion tank cap.
For example, drivers of a Priora do not have a special pump, how can they check the functionality of the expansion tank cap?
Diagnostics of the quality of the plug will be less accurate, but it is still possible to identify malfunctions of the valves:
- You should first turn off the engine.
- Once the car's power unit has been standing for a while, unscrew the cap from the neck of the expansion tank.
- Inspect the part for obvious defects. Inspect the rubber seal inside the lid.
- If the plug is in good condition, return the cap and start the engine again.
- Wait until the engine reaches normal temperature.
- Take the plug in your hand and gently unscrew it until air hisses. If it appears, then the valves in the plug are ready for further operation.
- Turn off the engine and let it stand.
- Inspect the hoses adjacent to the circuit. If they are retracted, then the pressure in the system is below normal. Accordingly, the vacuum valve cannot cope with pressure regulation.
This is the basic instruction manual for AvtoVAZ models. This instruction is suitable for Kalina, Priora and Gazelle brand models.
The design of a modern radiator
How does a radiator sealant work: is it useful, which one is better to choose?
An internal combustion engine cooling radiator, as a rule, has two tanks (lower and upper), a core in which the liquid (antifreeze or antifreeze) is cooled, and several additional parts for fastening. The liquid from the engine cooling jacket enters the radiator, where its temperature drops to the required value, then the antifreeze is again transferred to the engine. Light metals are used to make the core and tanks: either aluminum or brass. Thanks to their high thermal conductivity, they provide efficient and fast cooling of antifreeze.
The core of the radiator consists of horizontally arranged metal plates connected to hollow tubes running vertically down from the upper reservoir to the lower reservoir. Thus, when moving through the core, the liquid is divided into several streams, and the area of its contact with atmospheric air increases, leading to an increase in the cooling intensity.
Radiator pipes allow the tanks to be connected to the engine cooling jacket. The bottom tank usually has a drain tap through which liquid can be drained. The engine jacket is also equipped with a similar tap. Antifreeze is poured into the cooling system through the neck of the upper reservoir.
https://youtube.com/watch?v=fJ9OtFZQCxE
https://youtube.com/watch?v=fJ9OtFZQCxE
The functioning of cooling systems of modern cars takes into account the temperature value:
- engine;
- coolant;
- environment;
- oils, etc.
The operation of the cooling system can be explained as follows. The liquid heated by the engine is directed by a pump through pipes to the radiator, where its temperature is reduced. After which the cooled liquid (antifreeze) is again supplied to the engine jacket, and then the cycle is repeated.
Car radiator cores can be:
- tubular-lamellar;
- tubular-ribbon.
In the first case, the cooling tubes may have the following arrangement:
- chess;
- at an angle;
- in a row.
The fins of tubular-plate radiators are either flat or wavy, and can have different sizes. In addition, to enhance heat transfer, special turbulators are sometimes made on them (perforations that are bent and form narrow passages for air).
For radiators, called tubular-band radiators, the cooling tubes are always arranged in a row, and a copper sheet with a thickness of 0.05 millimeters to 0.1 millimeters is used to make the strip of their grilles. To enhance heat transfer with the help of swirls, shaped holes are made on the tape using the stamping method or bent cuts are created.
Today, the most widespread are car cooling radiators made on the basis of aluminum alloys. Such devices are cheaper and lighter than brass analogs, but are inferior to the latter in reliability and service life. Another advantage of brass radiators is that they are easier to repair: they can be soldered. While the radiator of the cooling system, known as aluminum, is more difficult to repair, since its parts and structural elements are connected to each other using rolling and sealing materials.
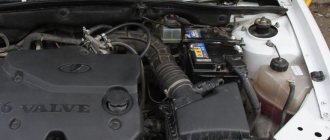
Functions and principle of operation of the VAZ-2107 cooling system
The engine cooling system of the VAZ-2107 belongs to the category of liquid, sealed, using forced circulation of coolant. To compensate for temperature fluctuations in the volume of antifreeze, an expansion tank is used in the system. The liquid heated in the engine is used in the interior heater, which is connected to the system by inlet and outlet hoses.
The cooling system includes the following elements.
- The tube through which coolant is discharged from the heater radiator.
- Hose supplying fluid to the interior heater.
- Thermostat bypass hose.
- Cooling jacket pipe.
- The hose through which fluid is supplied to the radiator.
- Expansion tank.
- Cooling jacket for the cylinder block and cylinder head.
- Radiator cap (plug).
- Radiator.
- Fan shroud.
- Radiator fan.
- Rubber lining for the radiator.
- Pump drive pulley.
- The hose through which fluid is removed from the radiator.
- Generator and pump drive belt.
- Pump (water pump).
- The hose through which coolant is supplied to the pump.
- Thermostat.
The main function of the cooling system is to maintain the engine temperature within normal limits, i.e. in the range of 80–90 °C. The operating principle is based on the removal of excess heat into the atmosphere through an intermediate technological link - coolant. In other words, antifreeze or other liquid, heated to a high temperature in the cooling jacket, is sent to the radiator, where it is cooled under the influence of air flows and again supplied to the engine. Circulation is carried out using a pump driven by a belt from the crankshaft - the faster the crankshaft rotates, the faster the coolant circulates in the system.
Cooling system radiator
The cooling radiator of the VAZ-2107, which is a key element of the car’s cooling system, is usually made of copper or aluminum. The radiator design includes:
- upper and lower tanks;
- cover (or stopper);
- inlet and outlet pipes;
- safety pipe;
- tube-plate core;
- rubber cushions;
- fastening elements.
In addition, the radiator housing has a hole for the fan sensor, which is usually located on the lower tank, next to the drain hole.
The radiator dimensions are:
- length - 0.55 m;
- width - 0.445 m;
- height - 0.115 m.
Product weight - 6.85 kg. To ensure higher thermal conductivity, radiator tanks can be made of brass. The core is assembled from thin transverse plates, through which vertical tubes soldered to them pass: this design allows the liquid to be cooled more intensively. To connect to the cooling jacket, there are nozzles on the upper and lower tanks on which hoses are attached with clamps.
Checking the lid using improvised means
How to check the expansion tank cap. device and principle of operation of the expansion tank
Checking the operation of the bypass valve is quite simple. To do this, you need to disconnect any small pipe of the cooling system on the engine, for example, a heated damper or manifold. Next, you need to use a compressor with a pressure gauge (to know the exact pressure supplied) to supply air to the system.
The pressure value at which the valve operates will be easy to determine by hissing and gurgling coming from the elements of the cooling system
Please note that the pressure should not be released suddenly at the end of the procedure. This threatens that when opening the lid, antifreeze may splash out under pressure.
From the expansion tank, liquid enters the radiator through a check valve. It holds pressure from the radiator side, but opens quietly if there is a complete vacuum there. Its verification is carried out in two stages:
- You should try to lift the valve patch with your finger. Ideally, it should move with minimal effort (without mechanical resistance).
- On a cold engine, when there is no excess pressure in the radiator, it is necessary to install the plug in its seat. Next, disconnect the tube going to the expansion tank of the cooling system and try to “inflate” the radiator through it. The valve is rated for low pressure, so you will probably be able to blow a small amount of excess air into the radiator. This can be checked by unscrewing the radiator cap again. In this case, a characteristic hissing sound of air emanating from it should be heard. Instead of a mouth, you can also use a compressor with a pressure gauge. However, you need to make sure that the pressure does not increase sharply.
We check the radiator cap in a garage. How??
We check the radiator cap in a garage. How??
Tell me, who has experience, how to check the radiator cap without special tools for its opening pressure. How can I find out whether it holds more than the stated 0.9 or everything is smooth?
With the car warm, feel the radiator pipe. If there is pressure, then everything is fine. If the pipe is soft, then the valve on the cover is faulty. Well, take a visual look at the lid.
If the plug does not hold pressure, the coolant is forced into the conservator earlier than necessary; therefore, the conservator is full, and the boiling point of the coolant decreases. Here it’s not far from overheating, but if it’s the other way around, even at 0.9 the cap does not bleed coolant into the expansion tank. How to check that the valve will work at 0.9?
Alternatively, take it from a working car? Or put yours on a working car!
If it is more than 0.9, then sooner or later it will squeeze out somewhere; most often the upper radiator cap suffers; in a garage, you can’t check it, only by comparing it with another car IMHO.
Tell me, who has experience, how to check the radiator cap without special tools for its opening pressure. How can I find out whether it holds more than the stated 0.9 or everything is smooth?
The pressure is controlled by a spring. There are no shock loads on it, so we can say that over time it does not lose its properties.
The lid itself has 2 types of faults - it does not release at all or does not hold at all. There is no point in checking the throughput pressure (if the cap is original).
Doesn't hold pressure - the problem is in the elastic band. The hose on a warm car will be sluggish and non-elastic.
It doesn’t let through - on a warm car the hose will be like “*** in the night”)))))) Stone. And the level in the expansion tank will not change between hot and cold.
In both cases, the cover must be replaced.
TLC Prado 150 TX-L
It’s stupid to look for a black cat in a dark room, especially if it’s not there. But it’s even stupider to look for a black snake in a dark room. Especially if she is there.
Basic malfunctions of the engine cooling system
How to replace the Lada Kalina cooling radiator
The cooling system of a car engine consists of a large number of individual parts - radiator, fan, pipe system, sensors. If at least one element does not work correctly, the entire system begins to work worse. Therefore, the cause of the breakdown may be:
- Radiator clogged. It is this element that is intended for the forced removal of thermal energy from the engine. If it becomes clogged externally (a large amount of dust and dirt gets into its slots) or internally (the core becomes clogged with a significant amount of rust and liquid sediment), then the efficiency of the unit is sharply reduced. Accordingly, the radiator, like the entire cooling system, must be periodically cleaned both outside and inside using special cleaners or improvised means.
- Faulty pump. For this reason, the cooling system either leaks from under the cooling pump bearing, or the circulation of liquid through the cooling jacket is disrupted. There are several reasons for pump failure. Among them are banal wear of its blades or internal parts, weakening of the drive, and violation of tightness. Often, corrosion can be observed on metal impellers, but the plastic impeller simply breaks off and turns.
- The thermostat is not working correctly. The main task of this unit is to block the flow of antifreeze or antifreeze into the radiator until the engine has warmed up sufficiently. On most cars, it opens only when the coolant temperature reaches +87... +95°C. Accordingly, if it fails, the engine will heat up for a very long time, especially in cold weather. If the thermostat is stuck and does not open at all, then the temperature in the system will be higher than normal until it boils. When it is open constantly, the temperature is below normal.
- Cooling fan malfunction. Depending on the type of its drive, there may be many reasons. For example, a mechanically driven fan may have loose drive tension. If the drive is electric, then the cause of its failure may be a faulty thermal relay or drive motor. If the drive is hydraulic, then the reason most likely lies in insufficient pressure (low level) of oil in the system.
- Depressurization of the system. Coolant leaks can occur in a variety of places. For example, on the pipes, their connections (on clamps), in the radiator housing, on the pump, on the cooling jacket of the cylinder head. If the cylinder head gasket burns out, the coolant mixes with the engine oil. This not only leads to a decrease in antifreeze levels, but also to a deterioration in oil performance, which puts additional stress on the engine.
- Temperature sensor malfunction. Information from it is sent to the electronic control unit, and based on it, the ECU issues commands to form an optimal air-fuel mixture, turn on/off the cooling system fan and other commands. You can check the temperature sensor using a multimeter.
- Low coolant level. Even if the cooling system is completely sealed and there are no leaks, the level of antifreeze in it still drops over time. This happens due to its evaporation. This process is quite long, but the car owner needs to periodically monitor the appropriate level and, if necessary, add or completely change the coolant if the end of its service life has come.
- Radiator cap valve leaking. In this case, the pressure in the cooling system will be below normal. Because of this, the liquid will boil even when the engine is idling. Coolant is also discharged into the expansion tank, but only after the engine is stopped. There will also be a large consumption of antifreeze.
Another malfunction can be considered the use of antifreeze with inappropriate parameters, for example, ordinary water. As you know, in cold weather it crystallizes, which usually leads to mechanical failure of the elements of the cooling system. Therefore, you need to choose antifreeze in accordance with the requirements of the car manufacturer.
Checking the level and replacing coolant Kalina 1117
Tools:
Open-end wrench 13 mm
Parts and consumables:
- Coolant 6 liters
- Rags
- Wide capacity, at least 6 liters
Note:
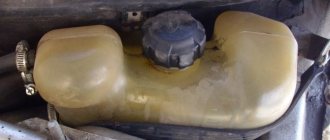
The expansion tank is installed in the engine compartment on the left mudguard.
1. To check the fluid level, place the car on a horizontal platform. The fluid level in the expansion tank should be checked on a cold engine.
2. On the side of the tank there are marks “MAX” and “MIN”, between which the fluid level should be on a cold engine.
3. When the engine is warmed up to operating temperature, the coolant level in the tank may be slightly above the “MAX” mark. If the level is at the “MIN” mark or below, add fluid recommended by the manufacturer to the tank.
Note:
When the engine is hot, the liquid in the cooling system is under excess pressure. To avoid burns, do not remove the expansion tank cap until the engine has cooled to a safe temperature.
4. If it is necessary to add fluid to the system when the engine is warm, stop it. After 10 minutes, covering the expansion tank cap with a rag, unscrew it a quarter turn, releasing excess pressure in the system.
5. Unscrew the cap of the expansion tank.
6. Add coolant to the tank, slightly short of the “MAX” mark. Remove coolant leaks with a rag. We wrap the cap of the expansion tank.
Note:
If the fluid level in the expansion tank is constantly decreasing, then there is most likely a leak in the cooling system. In this case, it is necessary to check the tightness of the cooling system and eliminate the malfunction.
7. Coolant should be replaced every three years, regardless of the vehicle's mileage. It is more convenient to replace the coolant when the car is installed on an inspection ditch or overpass. If the engine is hot, it is necessary to allow it to cool and then relieve excess pressure from the cooling system as described above.
8. To reduce the intensity of liquid drainage at the initial moment, the cap of the expansion tank should be tightly screwed. We place a wide container, with a volume of at least 6 liters, under the drain hole made in the lower part of the right radiator tank.
9. Unscrew the radiator drain plug by hand and drain the coolant into a container.
10. When draining the liquid, unscrew the cap of the expansion tank. The drain plug has a rubber O-ring.
11. To drain the coolant from the engine cooling jacket, place a container under the drain hole located on the front side of the cylinder block, closer to the clutch housing.
12. Using a 13 key, unscrew the drain plug of the cylinder block and drain the liquid. We tighten the drain plugs of the radiator and cylinder block. Pour 5-6 liters of liquid into the engine cooling system through the expansion tank.
13. Start the engine. With the engine running, vigorously compress all the hoses of the cooling system several times in turn, this will help the fluid fill the system and displace air from it. As the coolant level in the expansion tank drops, bring it to normal and screw on the tank cap. When the engine warms up, the outlet (lower) radiator hose should be cold for some time, and then quickly heat up, which will indicate the beginning of fluid circulation in a large circle. After waiting for the cooling system fan to turn on, stop the engine.
The article is missing:
- Photo of the instrument
- Photos of parts and consumables
- High-quality photos of repairs
Valve operation
Maintaining the pressure at the level of 1.1 - 1.5 kg/cm2 is ensured by the safety valve of the lid, which opens when the limit value is exceeded.
In addition, after the engine cools down and the coolant begins to decrease in volume, the atmospheric valve opens to allow air in, in order to avoid excessive vacuum in the system.
In order to fully appreciate the role of the expansion tank cap, it is necessary to become more familiar with how excess or insufficient pressure affects the condition of not only the cooling system, but also the engine as a whole.
What are the dangers of excess or lack of pressure?
Excessive impact from the inside on parts of the cooling system can, at a minimum, lead to the pipes being torn off the fittings. But there may be worse consequences - rupture of the thermostat housing or expansion tank. There have also been cases of depressurization of engine cooling radiators or heaters, as well as vapor breakthrough through the cylinder head gasket.
The harmful effects of low pressure are not so obvious. But it is precisely this that leads to the boiling of antifreeze.
And boiling not only disrupts heat transfer from parts, but also causes cavitation erosion, that is, tearing out metal particles from the surface. The surface of the parts becomes pitted, as it were, which over time causes their destruction.
Such expensive engine parts as the cylinder block and head fall into the “risk zone”.
If the atmospheric valve does not open when cooling the antifreeze, then a vacuum will arise in the cooling system, strong enough to provoke air leaks through the sealing gaskets, connections of pipes with fittings, etc. The air that gets into the system forms steam-air plugs, “locking” pipelines and disrupting coolant circulation.
Summarizing the above, we can briefly formulate the answer to the question of what will happen if the expansion tank cap is faulty:
- Destruction of cooling system elements.
- Reduced service life of some engine components and assemblies.
- Impaired coolant circulation.
Signs of a faulty plug
How to determine the malfunction?
A characteristic sign of a breakdown of the safety valve that does not “lock” the expansion tank is premature (at a temperature of about 100°C) boiling of antifreeze, which is “thrown out” into the tank.
Sometimes steam may come from under the hood, causing coolant to splash onto the hot exhaust manifold. In this case, the engine temperature arrow is in the green zone.
But this phenomenon can also be caused by a burnt-out cylinder head gasket and a jammed thermostat valve, which prevents coolant from entering the radiator. In order to establish the functionality of the thermostat, check the upper and lower radiator pipes by touch - they should be hot.
If the cylinder head gasket is “blown”, then the upper pipe will become hard, like an inflated bicycle tire - from excess vapor. A gasket failure is also accompanied by increased exhaust smoke - white steam will escape from the muffler.
Also, on some foreign cars, when the cap is unscrewed, the valve breaks off and gets stuck in the tank. This fact indicates that the vacuum valve has stopped working. It's time to replace the plug.
Possible causes of the malfunction and ways to eliminate them
There are three main malfunctions of the radiator cap:
- deformation and wear of the rubber seal under the cover, which prevents the normal operation of the outlet valve to maintain excess pressure in the system, because of this the liquid can either simply boil or gradually boil away;
- breakdown of the exhaust valve mechanism, which can lead to a coolant leak;
- jamming of the intake valve membrane, which can cause air locks in the cooling system.
You can check the valve mechanism of the radiator cap with an open structure yourself by visual inspection and alternating pressure on the inlet and outlet membrane. When the mechanism is fully operational, the rubber membrane seals should not have any deposits on their surface and fit snugly to the seats.
If, nevertheless, there is a leak of antifreeze from under the rubber seal along the neck, then you need to buy a new radiator cap, but you should not experiment and try to repair the valve mechanism yourself.
And it is worth remembering that you can only open and remove the radiator cap when the engine has completely cooled down.
What is an expansion tank?
Expansion tank - unit of the liquid cooling system of internal combustion engines; a specially designed container designed to compensate for leaks and thermal expansion of the coolant circulating in the system.
Expansion tanks are also used in other systems of vehicles, tractors and special equipment: in power steering (power steering) and in hydraulic systems for various purposes. In general, these tanks are similar in purpose and design to cooling system tanks, and their distinctive features are described below.
The expansion tank performs several functions:
- Compensation for thermal expansion of the coolant when the engine heats up - excess fluid flows from the system into the tank, preventing pressure build-up;
- Compensation for coolant leaks - a certain supply of liquid is always stored in the tank, which, if necessary, enters the system (after the liquid is released into the atmosphere during overheating, when minor leaks occur, etc.);
- Monitoring the coolant level in the system (using the corresponding marks on the tank body and the built-in sensor).
The presence of a reservoir in a liquid cooling system is determined by the characteristics and physical properties of the coolant - water or antifreeze. As the temperature increases, the liquid, in accordance with its coefficient of thermal expansion, increases in volume, which also leads to an increase in pressure in the system. If the temperature rises excessively, the liquid (especially water) may boil - in this case, the excess pressure is released into the atmosphere through a steam valve built into the radiator cap. However, with subsequent cooling of the engine, the liquid acquires a normal volume, and since part of it was lost during the release of steam, the pressure in the system drops - if the pressure drops excessively, the air valve built into the radiator cap opens, the pressure in the system equalizes with atmospheric pressure. In this case, air enters the system, which can have a negative effect - air pockets form in the radiator tubes, preventing normal fluid circulation. So after releasing the steam, it is necessary to replenish the water or antifreeze level.
Antifreezes of various types have a higher coefficient of thermal expansion compared to water, so the processes described above occur more intensively. To eliminate these negative effects, an expansion tank connected to the radiator is introduced into the cooling system. As the temperature rises, excess fluid is simply drained into the tank, and when the engine cools, it is returned to the system. This significantly increases the threshold for steam release into the atmosphere and increases the interval between replenishment of the liquid level in the system.
Engine cooling system and the location of the expansion tank in it
The expansion tank plays an important role in the operation of the cooling system and the entire power unit, so in case of any malfunction it must be replaced. To select the right tank and carry out repairs correctly, you must first understand the existing types and features of these parts.
Radiator repair
The most common radiator malfunction is a leak. Due to wear or mechanical damage, cracks appear in the radiator housing, which at the initial stage you can try to eliminate with various chemical additives. Practice shows, however, that such a measure is often temporary and the leakage resumes after a certain time. In this case, some car owners use so-called cold welding - a plasticine-like mixture that hardens when applied to metal. The most effective and proven means of combating radiator leaks is soldering the case with a regular soldering iron .
When starting to repair a radiator using the soldering method, you need to have on hand to begin with:
- Phillips screwdriver;
- socket wrench or 10mm socket with extension.
This set of tools is sufficient to remove the radiator, provided that the system is already freed of coolant. To remove the radiator, you must:
- Use a Phillips screwdriver to loosen the clamps holding the hoses to the nozzles.
- Remove the hoses from the inlet, outlet and safety connections.
After the radiator is dismantled, you should prepare:
Soldering damaged areas is performed in the following sequence:
- The damaged area is cleaned, degreased and treated with rosin or soldering acid.
- Using a well-heated soldering iron, the damaged surface area is evenly filled with tin.
- After the tin has cooled, the radiator is installed in place.
If a crack occurs on one of the radiator tanks, you can replace the failed tank with a similar one removed from another radiator. To do this you need:
- Using a flat-head screwdriver, press out the tabs that secure the tank to the radiator housing.
The radiator is installed in the reverse order of dismantling.
Video: DIY dismantling of the VAZ-2107 radiator
Radiator fan VAZ-2107
The electric radiator cooling fan installed in the VAZ-2107 car automatically turns on when the coolant temperature reaches 90 °C. The main purpose of the fan is to ensure normal engine temperature regardless of external conditions and vehicle driving mode . For example, if the car is stuck in a traffic jam, the engine continues to run and heat up. Natural air cooling of the radiator does not work at this time, and a fan comes to the rescue, which is turned on by a signal from a sensor installed on the radiator.
Fan switch sensor
The sensor must ensure timely activation of the fan in a situation where the radiator cannot cope with cooling the engine on its own. If all devices and mechanisms are working properly, then initially, after starting the engine, the coolant circulates in a small circle until it heats up to 80 °C. After this, the thermostat opens and the liquid begins to move in a large circle, including the radiator. And only if the radiator’s work is not enough for cooling and the liquid temperature reaches 90 °C, the fan is turned on at the command of the sensor, which is located in the lower part of the radiator and fixed in a specially provided hole. If the sensor is missing for some reason, the hole is closed with a plug.
If the fan does not turn on at 90 °C, do not touch the sensor immediately. First, make sure that the coolant level has not dropped below the permissible level. Another reason for overheating may be a malfunction of the thermostat: if the temperature has exceeded 90 °C, and the lower part of the radiator is cold, most likely, this is the problem with this device. You can check the serviceability of the sensor by disconnecting the terminals and shorting them together. If the fan turns on, it means the sensor has failed. You can check a sensor that is not yet installed on the car using an ohmmeter. To do this, the device is lowered into water (the part that is located inside the radiator), which begins to heat up. If it is working properly, the ohmmeter will work when the water heats up to a temperature of 90–92 °C.
Which radiator cap to install?
Many car enthusiasts who have started checking and replacing the mentioned cap are interested in the question of what are the best radiator caps? Before answering this question, you must immediately pay attention to the fact that the new cover must have the same performance characteristics as the one being replaced. In particular, it must have a similar diameter, thread pitch, internal valve size, and most importantly, it must be designed for similar pressure
As a rule, for most modern passenger cars, covers are sold that are designed to operate in the pressure range of 0.9...1.1 Bar. However, you should further clarify this information before purchasing, as exceptions sometimes occur. Accordingly, you need to choose a new cover with similar characteristics.
Please note that you can also find on sale so-called tuned radiator caps, designed to operate at increased pressure, in particular up to 1.3 Bar. This is done in order to further increase the boiling point of the antifreeze and thereby increase the efficiency of the car engine
Such covers can be used on sports cars whose engines are designed to operate at high power, but only for short periods of time.
For ordinary cars used in the urban cycle, such covers are absolutely not suitable. When installing them, a number of negative factors arise. Among them:
- The cooling system elements are subject to wear and tear. This leads to a decrease in their overall resource and the risk of premature failure. And if a pipe or clamp bursts due to excessive pressure, that’s half the problem, but this situation can end up much worse, for example, if the radiator or expansion tank bursts. This already threatens costly repairs.
- Reduced antifreeze life. Any coolant has a certain operating temperature range. Going beyond its limits reduces the performance characteristics of antifreeze and significantly reduces the time of its use. Therefore, when using tuned caps, you will have to change antifreeze more often.
Thus, it is better not to experiment and follow the recommendations of your car manufacturer. As for specific brands of radiator caps, there are quite a lot of them, and they are different for different cars (for European, American, Asian cars). It is best to buy original spare parts. Their articles can be found in the documentation or on special resources on the Internet.
Conclusion
Remember that a working radiator cap is the key to the normal operation of the engine of any car with a closed cooling system. Therefore, it makes sense to check its condition not only when it fails (or problems begin in the operation of the cooling system), but also periodically. This is especially true for older cars and/or cars that use water or diluted antifreeze in the cooling system. Over time, these compounds damage the material of the cover, and it fails. And the breakdown of its individual parts threatens to reduce the boiling point of the coolant and overheat the engine.
It is necessary to select a new cover according to previously known parameters. This applies to both its geometric dimensions (cap diameter, gasket diameter, spring force) and the pressure for which it is designed. You can find out this information from the manual or simply buy a radiator cap similar to the one installed before.
Radiator cap VAZ 2107 purpose and check
How to completely drain the coolant. Where is the coolant drain plug located?
Initially, it should be noted that the cooling system is an important system, the functioning of which determines the normal operation of the engine. Various problems in the cooling system lead to serious breakdowns, so they should be identified and corrected promptly to avoid serious and costly breakdowns.
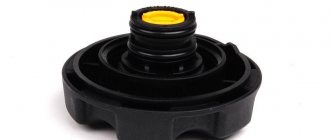
One of the important elements of the cooling system of the VAZ-2107 car is the radiator cap. Many people are accustomed to the fact that the lid is a regular stopper that helps limit the flow of liquid from the container. In addition to this main function, the VAZ 2107 radiator cap has another important function, which we will learn about in detail in the material.
Features of the VAZ 2107 radiator cap
The radiator cap for cars of the Lada family, including the VAZ 2107, combines two important functions:
- Limiting the flow of coolant from the system, or more precisely from the radiator.
- The lid also works as a valve.
The presence of a spring in the design of the plug is not superfluous, since it is with its help that excess pressure is released from the cooling system. The plug is a metal structure consisting of two parts connected by a spring mechanism.
It is important to know! The plug is considered to be in good condition when the spring is compressed with force. If no force is required when compressing the spring, the plug should be replaced immediately
Many VAZ-2107 car owners often have a question about how to check the heat exchanger (radiator) cap for serviceability? This is quite simple to do, for which there are two ways, which will be discussed below.
The principle of operation of the heat exchanger cover on the VAZ 2107
The operating principle of the radiator cap is quite simple. This element has inlet and outlet valves, through which the heat exchanger is connected to the expansion tank using a hose. The intake valve is not pressed against the gasket, so when the engine heats up or cools down, fluid circulates into the expansion tank.
When the coolant temperature increases, the intake valve does not have time to release it into the expansion tank, after which it closes. When the pressure increases to 50 kPa, the outlet valve opens. As a result, some of the liquid flows into the expansion tank. There is a rubber valve in the expansion tank plug, which is activated when the pressure in the tank reaches close to atmospheric pressure.
It is important to know! Over time, the functioning of the radiator cap becomes impaired. This product cannot be repaired and should be replaced with a new one.
Features of checking the proper operation of the heat exchanger plug on the seven
How to check the serviceability of the radiator plug of a VAZ 2107 car? Checking is carried out in two ways:
- The appearance of the plug is assessed, as well as the serviceability of the spring.
- The serviceability is checked with the lid running. To do this, you need to squeeze the pipe that fits the heat exchanger with your hand.
To carry out such a check, it is necessary that the engine is still warm, which means that there is residual pressure in the system. If, when squeezing the pipe with your hand, a “grunting” sound is heard in the heat exchanger cover, this sound is a sign of the functioning of the cover valve. If the valve is faulty, excess pressure in the device can lead to rupture of pipes, radiator and even stove.
When problems arise with the functioning of the cooling system, be sure to pay attention to such an important element as the radiator cap. Make sure it is in good working order. If it is not working properly, then it is better not to tempt fate, but to replace it immediately so that you do not have to overhaul the engine in the near future
More details about the features of checking the serviceability of the device in question can be seen in the video above.
If it is not working properly, then it is better not to tempt fate, but to replace it immediately so that you do not have to overhaul the engine in the near future. More details about the features of checking the serviceability of the device in question can be seen in the video above.
Symptoms of a bad radiator cap
It is recommended that the car owner periodically check the condition of the radiator cap, especially if the car is not new, the condition of the cooling system is average or lower, and/or if water or antifreeze diluted with it was used as coolant. It also makes sense to check the condition of the cap if antifreeze has been used in the cooling system for a very long time without replacing it. In this case, it may begin to corrode the rubber seal on the inner surface of the lid. A similar situation can arise, for example, when, when the cylinder head gasket is punctured, oil can get into the coolant. This process fluid is harmful to the lid seal, and in addition, it impairs the performance properties of the antifreeze.
The main symptom of a breakdown in this case is a leak from under the radiator cap. And the stronger it is, the worse the situation, although even with the slightest leakage of liquid it is necessary to perform additional diagnostics, repair or replace the cap.
There are several other indirect signs that the radiator cap is not maintaining pressure in the cooling system. These include:
- the bypass valve plunger sticks (usually skewed) during the return movement to compression;
- weakening of the cover spring;
- when pulling the atmospheric valve from its seat (seat), it jams and/or does not completely return to it;
- the diameter of the valve gasket is larger than the diameter of its seat;
- cracking (erosion) of rubber gaskets on the inner surface of the radiator cap.
The listed malfunctions can cause the radiator cap to let coolant (antifreeze or antifreeze) out. There are a couple more indirect signs of the cover failing. However, they may also indicate other, more serious failures in the cooling system. So, these include:
- when the bypass valve gets stuck, the upper radiator pipe swells;
- When the atmospheric valve sticks, the upper radiator hose is retracted.
Also, if one or the other valve does not work properly, the coolant level in the expansion tank will be the same. Under normal conditions, it should change (even if slightly) depending on the engine temperature.
Plug - radiator
Oil in the coolant expansion tank Ford Transit
The tap is screwed into the radiator plug or tee on the connection to the convectors. However, automatic air valves are more advanced, the operation of which is based on the property of dry material to allow air to pass through and retain it when moistened.
Next, by removing the radiator cap, check whether there is enough coolant in the system. If you had to drive on dusty or dirty roads before returning to the parking lot, then before inspecting the engine and washing the car, you need to clean the engine and engine compartment from dust and dirt.
How to remove the radiator cap to check the coolant level in the cooling system of a fully warmed-up engine.
If the rubber washers of the radiator plug valves are damaged, the cooling system ceases to be closed and the liquid in this case boils at 100 C. The temperature of the coolant in the cooling system is controlled by an indicator mounted on the instrument panel.
If the radiator cap is not opened correctly, water and steam can cause severe burns to the face, hands and other exposed areas of the body.
The valve cap or gasket of the radiator cap or expansion tank is faulty.
| Design diagrams of thermostats. but a single-valve one. 6 two-valve. |
These valves are often built into the radiator cap.
When draining the water, it is necessary to open the radiator cap, since the water cooling system is sealed. It is also necessary to check every time (especially in the cold season) whether the water has been completely drained from the system. Since the tap holes can be clogged with sediment formed in the cooling system or ice plugs (in winter), they should be cleaned with wire while draining the water.
| Block of liquid and oil radiators for a KamAZ vehicle. / – filler plug, 2, 3, 21 – drain pipes, 4 – radiator mounting bracket, 5 – rubber cushions, 6 – nut, 7 – radiator mounting rod to the cross member, 8 – liquid radiator, 9 – lower tank, 10 – core, / / – blinds, 12, 13, 17 – blinds control drive, 14 – power steering radiator, 15 – oil radiator, 16 – core tubes, 18 – upper tank, 19 – inlet pipe, 20 – fan casing, 22 – expansion tank. |
The filler neck of the upper tank is closed with a radiator cap (Fig. 4.5), in which outlet (steam) / and bypass 2 valves are installed.
When flushing the cooling system, it is necessary to close the radiator cap, and to remove gases and foam formed during the flushing process from the engine, put a rubber hose on the radiator steam pipe
Caution is recommended, as the acid can cause burns, and chromium can cause poisoning. . To protect your hands and face from burns, the radiator cap should be opened especially carefully.
To protect your hands and face from burns, the radiator cap should be opened especially carefully.
To drain the water, open the taps and the radiator cap. Water should be drained at a temperature no higher than 70 and no lower than 50 C.
In addition to the pressure reducing valve that opens outward, the radiator cap has another valve that opens inward. This valve opens when a vacuum forms in the radiator and allows some outside air into it. The pressure reducing valve is usually adjusted to a pressure of 0 2 - 0 3 ati, which corresponds to the boiling point of water 104 - 108 C. In special cases, a higher excess pressure in the water cooling system may be allowed.
Thermostat: purpose, signs of malfunction, replacement
Thermostat is a device for regulating the temperature of the coolant in the system, the main functional purpose of which is to block the flow of antifreeze while the engine is warming up. The principle of operation of the device is quite simple: the bypass and large valves, depending on the temperature, close the small and large coolant circulation circuits, respectively. The central element of the device is refractory wax, which, expanding when heated and contracting when cooled, changes the position of the piston that regulates the operation of the bypass valve.
The most common cause of malfunction or failure of the thermostat is a jammed valve. The easiest way to determine a broken thermostat
, - to the touch.
The testing process is quite simple: you need to start the engine and periodically feel the pipe coming from the bottom of the radiator. If the engine temperature has not reached 80°, and the pipe has already begun to heat up, then you will have to buy a thermostat
and replace it.
Depending on the design features of the cooling system, thermostats with different opening temperatures of the large valve are installed on cars, so you need to know exactly this parameter for your car (usually indicated on the body itself).
This question is asked by car enthusiasts at different times of the year. After all, the operation of the radiator cap provides increased pressure in the engine cooling system, which, in turn, makes it possible for the engine to operate normally and the interior heater to function during the cold season. Therefore, its condition must be regularly monitored, and if necessary, the valve, o-ring, or the entire lid must be replaced, since most often it is not a dismountable structure. Therefore, to check how the lid works, a visual inspection alone is not enough; you also need a pressure test.