There is no need to worry; replacing a muffler on a VAZ 2110 is not at all a regular job that will have to be done systematically.
Replacing the exhaust system is performed in several situations:
- The muffler begins to make a loud noise;
- Muffler elements burn out;
- Connecting pipes break.
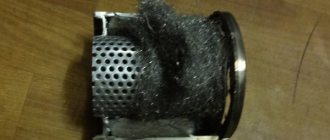
The sound of a burnt out muffler.
On a VAZ 2110, you can replace the muffler with your own hands, which will allow you to significantly save on the services of a service station.
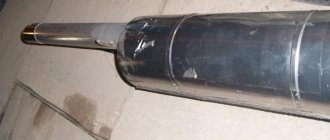
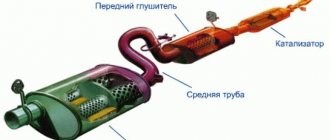
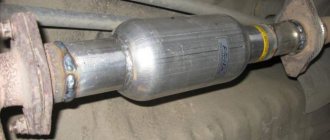
The exhaust system of the VAZ 2110 includes a downpipe (pants), a neutralizer, a resonator and a main muffler.
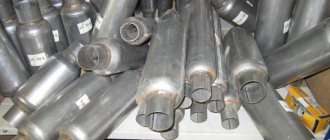
Photo of the new muffler on the VAZ 2110
Today we will tell you about replacing the muffler, as well as the resonator.
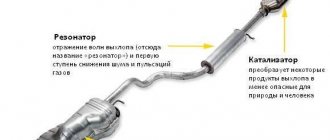
Exhaust system VAZ 2110
Dimensions of the VAZ 2110 Resonator
The exhaust system consists of several parts, each of which plays an important role. These include the exhaust pipe, catalyst, resonator and the muffler itself. The main functions it performs are noise reduction and reduction in the emission of harmful gases. Also, there is often a corrugation on the receiving pipe, designed to reduce vibration. A malfunction of any part of the exhaust system can affect the condition of the entire car and many other parts in particular, so it is necessary to regularly diagnose this element of the car.
RESONATOR REPLACEMENT
Resonator VAZ 2110
So:
- The resonator is attached to the muffler using a crimp clamp with an O-ring;
- It is attached to the neutralizer by means of a floating flange (two bolts) and flaring;
- On the opposite side of the neutralizer there is a “fist”;
- It is often problematic to unscrew the knuckle mounting bolts; they are simply cut off with a grinder and replaced with new ones;
- If suddenly you don’t have a tool at hand, we clean the places where the bolts are attached and treat them with a “liquid wrench” (WD-40 or its equivalent);
- Unscrew the bolts and remove the muffler clamp;
- We remove the resonator from the suspension rubber bands, change the rubber bands if necessary;
- Then we hook a new resonator onto rubber bands and attach it to the muffler so that the pipe running from the resonator to the muffler is parallel to the ground;
- When there is wear on the neutralizer fist or there are burrs, grooves or rust on it, it is necessary to lubricate the connection with a special high-temperature sealant;
- Using new bolts and nuts, tighten the flanges of the catalyst and resonator;
- The neutralizer is attached to the resonator by means of a flange connection (two bolts), to the receiving pipe (pants) by means of a spring-loaded connection and a pair of flares, between which there is a graphite or metal-asbestos ring.
How to repair a muffler
If your car's muffler requires repair or complete replacement, it is not recommended to do this work yourself, since there is a high risk that you will only worsen the condition of the exhaust system, and possibly the entire vehicle as a whole. In order to prevent such a situation, contact only specialized car services. In our car service center, qualified specialists with the necessary competence in the field of working with exhaust systems will competently diagnose the exhaust system of your car, and, if necessary, repair or install a new muffler in the shortest possible time.
If you encounter any malfunction in the exhaust system and you need to diagnose it, repair it or replace the muffler, then our salon specialists will be happy to help you with this, since we carry out all types of this work!
1200 rub. for the photo report
We pay for photo reports on car repairs. Earnings from 10,000 rubles/month.
Write:
The muffler resonator is a part of the exhaust system whose task is to dampen low-frequency sounds arising from engine operation. It will be useful for every car enthusiast to know where the resonator is located and what possible problems he will have to face during its service. A breakdown of the exhaust pipe resonator is not critical, but it can cause a lot of inconvenience not only to the driver, but also to those around him. We will talk about all this in this material about how to eliminate problems that have arisen, how to dismantle and install the unit, as well as how to make a resonator with your own hands
How to determine whether a muffler is faulty
All original mechanisms on the VAZ 2110–2112 are adjusted at the factory to ensure a minimum noise level while driving. At the same time, engineers take into account not only the design of the engine itself, but also the car body. Therefore, after tuning the car, the noise level of the muffler increases sharply.
The main malfunctions of the muffler are those factors that interfere with its correct operation:
formation of holes in the body;
The use of such an element is unsafe for the driver
The most common problem with silencers on VAZ 2110–2112 can be considered the occurrence of knocking noises while driving. Even new and original products can cling to the bottom of the car and make loud noises:
Not long ago I received my license and became the proud owner of a VAZ 2112, I am satisfied with the car in all respects. A strange problem appeared: the muffler began to knock on the bumper or on the bottom of the car, it’s difficult to say for sure. I went to the service center and they looked at it and they really said the muffler was a little crooked, so they started bending it as a result? It was bent, drove about 20 km and the knocking appeared again, the interesting thing is that it doesn’t knock all the time, but at some moments, maybe when driving or while standing at a traffic light.
Kkiss
https://www.autolada.ru/viewtopic.php?t=142153
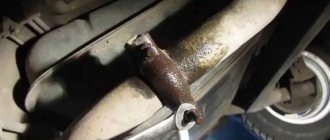
Problems with the operation of the device on the VAZ 2110–2112 can be determined visually. To do this, it is recommended to drive the car into a viewing hole or lift the rear of the body on a jack:
Inspect the entire exhaust system pipe. The presence of holes can be noticed immediately. In addition, rust spots will indicate that there is clearly damage inside the muffler housing.
Rock the mechanism with your hand - if it sways too much, then it’s time to change the fixation rubber bands and the reinforced gasket between the parts of the muffler.
After leaving the inspection hole, start the engine and sharply press the gas pedal several times - black exhaust smoke indicates severe burnout of the product.
Why do you need a gasket?
The gasket is an essential element between the main muffler and the resonator. Since all parts of the exhaust system become very hot, the gasket is made of heat-resistant materials.
If, when replacing a resonator or muffler, a gasket is not inserted between them, then the joint will not be as tight as possible. In addition, when driving on uneven roads, the two elements will rub against each other and quickly fail.
There is no need to worry about the procedure for replacing the gasket: it has a convenient shape and is placed on the element pipe with one movement of the hand:
- Attach the gasket to the resonator flange.
- Tighten 4 bolts.
- Make sure the insert is kept level.
- Tighten the bolts until they stop, without overtightening them.
The product prevents heating of muffler parts
Replacing rubber bands
The VAZ 2110–2112 muffler is attached to the bottom of the car with special rubber hangers. The elastic bands have minimal elasticity, so they can ensure reliable fixation of the mechanism. Usually two rubber bands are used - one is placed at the exhaust port, the other at the compartment with the resonator.
To change the suspension rubber bands, you need to place some kind of support (boards or bricks) under the device to fix its position at the maximum height. After this, the old rubber bands are removed. If necessary, the hooks on the bottom, on which new rubber bands are put on, can be cleaned of dirt and carbon deposits. After which the muffler is easily attached with hooks to the new rubber hangers. The suspensions are removed one by one from the front of the car to the rear.
Purpose of the resonator
First, let's figure out what a resonator is for . As mentioned above, it is part of the exhaust system of a car engine. Its main function is to dampen low-frequency sounds that arise during the exhaust process of gases and their entry into the gas exhaust system. There are two reasons why noise occurs in it:
- sound from expansion of gases;
- noise from vibration of exhaust system elements.
Along with a muffler, the tasks of a car resonator include reducing the speed of movement of exhaust gases. This becomes possible thanks to a physical law, according to which gases that move quickly in a narrow pipe, when they enter a large volume, lose their speed and, accordingly, energy. In the gas exhaust system, the resonator is located in front of the main muffler, being, in fact, the first link in the sound muffling chain of the exhaust system. That is, its main tasks are preliminary noise reduction and balancing of exhaust gas flow pulsations.
Some car owners call it the “middle muffler” (due to its physical location approximately in the middle of the bottom of the car) or the “second muffler.” However, this is not true because the exhaust system resonator and muffler have different operating principles.
The resonator of the car exhaust system also performs the function of freeing the engine exhaust from exhaust gases and creating uniform pressure in it. This ensures minimal resistance to the movement of exhaust gases, and it is possible to use almost all the useful engine power.
Problems with the resonator
Like any part, a car resonator periodically fails. After all, it passes through exhaust gases having a temperature of several hundred degrees Celsius. And in combination with the aggressive chemical elements contained in the escaping gas mixture, this leads to gradual burning of the metal parts of the system.
The main signs of resonator failure are:
- Deterioration of the muffler and exhaust system . This is manifested by increased sound coming from the exhaust pipe, especially low frequency sounds (roar).
- The appearance of exhaust gases from under the bottom of the car . This is a clear sign of depressurization of the resonator or other parts of the gas exhaust system.
- The presence of a characteristic rattling metallic sound from the resonator . It appears due to the fact that one (or more) of the internal components of the device burns out. Usually in such cases he “hangs out” or breaks away and rumbles in one of the cells.
- Significant drop in engine power . Due to a malfunction, the throughput of the resonator decreases significantly, so it dampens uneven pulsations of exhaust gases worse or not at all. And this gives feedback on the deterioration of the power unit.
If you encounter one or more of the above signs of a resonator malfunction, you need to inspect its operation as quickly as possible
How to check the catalyst?
Engine power depends on the condition of the catalyst. If there are characteristic symptoms of a breakdown, you should definitely check it. This can be done in light (by dismantling) and for back pressure or CO content without removing Read more
Shoots the silencer
Does your car engine need to shoot at the muffler? Then it’s worth checking the ignition system, fuel supply or timing marks. Find out the reasons and how to get rid of popping sounds from the muffler Read more
Replacing the VAZ 2110 resonator
Repairing the exhaust system or replacing the muffler on a VAZ 2110 most often involves replacing the resonator, since welding does not take long to solve the problem of burnout. The main task is to quickly remove the resonator Read more
Resonator device
Structurally, the resonator consists of a perforated (drilled along the entire length within the device) pipe placed in a metal casing. The design also has a throttle hole designed to increase the efficiency of damping wave vibrations in the pipe. The internal cavity of the resonator is divided into two or more unequal parts by partitions located in a transverse plane to the pipe. Also, more modern exhaust resonators are designed with thermal insulation and/or sound insulation (often the same material) located under the housing and designed to reduce its temperature and/or sounds emanating from the device.
Internal structure of the resonator
The internal cavities have an unequal volume in order to ensure periodic narrowing and expansion of the flow of exhaust gases, which in turn equalizes their uneven pulsation. That is, each chamber has its own resonant frequency. In addition, they have a slight offset relative to the axis of the body. This is necessary to achieve a change in the direction of the exhaust flow. And internal perforation on the pipe is needed to dampen the large amplitude of sound waves that produce gases.
The efficiency of the resonator is influenced by the following factors:
- the degree of its wear, tightness;
- level of contamination from soot (the cleaner, the more effective);
- diameter (the larger the diameter of the device, the greater its efficiency).
Checking the resonator
When identifying the problems listed above, every motorist should know how to check the resonator . This will not only normalize the operation of the engine and exhaust system, but also increase the comfort of using the car, including for the people around you.
To check, you will need an inspection hole (if you don’t have one, you can jack up the car). Diagnosis is made using visual inspection. During the process, it is necessary to carefully examine the integrity of both the device itself and the pipes connected to it (especially at their joints).
A clear sign of a problem is the formation of condensation in the cooling resonator, after which it begins to drip to the ground. This means that its body has lost its tightness and must be repaired, or better yet, replaced. You can check for condensation after some time, when you turn off the engine (to allow the resonator body to cool). Note! Some car enthusiasts, when making resonators on their own, specially drill a hole in its body to remove moisture . Therefore, if you bought a car with a similar resonator, then this testing method will not work for you.
Also, the integrity of the resonator body can be determined by the presence of exhaust gases leaving it. This also indicates depressurization and the need to replace it. This fact can be checked with the car engine running by looking under the bottom. To be sure, you can ask an assistant to “turn on the gas” at the same time so that more exhaust gases pass through the system. Also, suspicion of depressurization is caused by the appearance of smoke from under the bottom of the car while driving or when parked with the engine running.
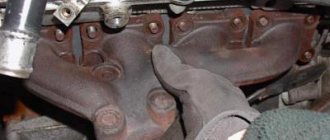
Downpipe, catalytic converter and resonator
The downpipe is painted with heat-resistant paint to prevent corrosion
Next in the exhaust diagram is the exhaust pipe. In carburetor engines it is just a pipe, but in injection engines a terrible part is integrated into it - a catalytic converter. The exhaust pipe on stock tens is attached to the exhaust manifold through a flange, a heat-resistant reinforced gasket using four or six bolts. The connection between the exhaust pipe and the catalyst is made in the form of a corrugated nozzle with a ferrule. The pipe must be made of heat-resistant steel of a certain grade, and in most cases this is the case on conveyor vehicles. If the car is more than ten years old, most likely the middle part has already been replaced, so you can only guess about the quality of the steel from which it is made.
Ideally, a steel pipe is painted with heat-resistant protective paint to prevent inevitable corrosion at least for a while. Often, the paint on pipes that come in spare parts kits is more decorative than protective. Therefore, when replacing, many people tend to install a stainless steel pipe. There is no point in changing its diameter, and stainless steel will extend the life of the part quite significantly. If it is easier with carburetor engines, then in later engines with an injection system you need to take into account the catalyst, which is worth saying a few words about separately.
Removing the exhaust pipe. VAZ 2110, 2111
Catalysts began to be installed not to make life more difficult for motorists, but to reduce the level of harmful components in exhaust gases. The main task of a working catalyst is to burn fuel that did not burn during engine operation. By and large, it is designed in the same way as any resonator type muffler. The gases pass through a fine mesh or set of plates on which a thin layer of platinum-containing substance is deposited. By reacting with the exhaust gas, the surface of the working parts of the catalyst heats up to a temperature of 500-600 degrees, helping to ensure that the remaining fuel burns out as it passes through it. The average response threshold of catalytic plates or grids is 300°C.
And here the most uninteresting part begins. The catalytic layer of the device cannot process an endless amount of unburned fuel, bringing it to Euro standards. Therefore, to control the situation, an oxygen sensor was installed on the exhaust. The lambda probe measures the amount of oxygen in the exhaust gases, and if the catalyst is not able to process the required amount of gases, the probe sends a signal to the electronic control unit. The ECU, in turn, adjusts the composition of the mixture so that the amount of CO output corresponds to the norm.
When replacing the exhaust pipe, it is better to use a stainless steel spare part.
But this correction does not always benefit the dynamic performance of the engine. More precisely, it prevents the motor from working correctly. If the catalytic layer is completely burnt out, the lambda probe shouts “guard”, and the ECU turns on the “Check Engine” light. In this case, it is necessary to replace the catalyst completely, since it is a non-separable unit and cannot be repaired. It costs as much as the entire exhaust system combined.
Types of automotive resonators
When choosing an exhaust system resonator, you need to know what types they are and what materials they are made from. Currently, automotive resonators made of aluminized steel and stainless steel . The former are distinguished by their low price, but short service life. Their body is made of thin steel, coated with aluminum on top to prevent corrosion. However, this anti-corrosion composition is not durable. Therefore, we do not recommend that you buy an exhaust resonator made of aluminized steel. It is better to buy a car resonator made of stainless steel. This material has a smoother surface (that is, creates a minimum of turbulence in the system), and is also more resistant when working under extreme temperatures.
REPLACING THE CONVERTER
Attaching the neutralizer to the resonator
- This connection dampens engine vibrations and prevents them from reaching the exhaust system.
Attaching the converter to the exhaust pipe (pants)
- When replacing the neutralizer, we leave the old springs and bolts, provided they are intact.
- We definitely need to change the ring - gases escaping through it will quickly damage the flaring of the exhaust pipe and the converter
- Having installed the neutralizer, we tighten the mounting bolts, then tighten them, first tighten the bolts securing the resonator.
You can also watch the video.
DIY resonator
Before designing and assembling a resonator of your own design, you need to understand one simple thing. The thicker the material from which the exhaust system is made (including the resonator), the more effective the fight against vibrations and resulting noise will be. It is for this reason that the exhaust manifold, which is the first to receive gases from the cylinder head, has such an impressive weight.
However, when choosing a material, you should not overdo it and choose too massive blanks. Otherwise, the mass of the resonator will be significant, and this will affect the dynamic characteristics of the car and the load on its chassis.
There are a number of reasons why car owners make their own exhaust resonators. One of them is to reduce the noise that a standard factory muffler produces. Usually, for this purpose, an additional resonator is installed in the exhaust system. The second reason is the manufacture and installation of a direct-flow car resonator . Its features are as follows:
- reduction in engine power loss (actually insignificant, about 5.10%);
- changing the sound background of the engine and exhaust system (for lovers of low sound).
To make a direct-flow resonator you will need:
- a set of locksmith tools;
- welding machine (it is advisable to use modern semi-automatic machines or inverters);
- angle grinder with a set of cutting and grinding discs.
The design of the resonator will differ depending on the materials used and the imagination of the car owner. We offer you one of the options for self-manufacturing a direct-flow automotive resonator :
- Pre-prepare the pipe that will serve as the internal base of the resonator. It should be the same or slightly larger diameter than the factory one. Make sure that it can be easily welded to the existing system in the future, so do not choose a diameter that is too large (unless it is possible to connect the pipe using a flange).
- Next, you need to drill holes in this pipe, similar to the stock resonator.
- After this, you need to find a pipe with a slightly larger diameter (about 3.5 cm) that will serve as the outer casing. Its length needs to be made smaller (depending on the design, on average by 5.10 cm on each side).
- The plugs necessary to seal the housing at the ends are made. For this, sheet metal is used, where the outer diameters of the large and small pipes are drawn. Afterwards, the blanks are cut out and processed using a grinding machine.
- A pipe with a larger diameter is placed on a pipe with a smaller diameter, and the cavity between them is filled with glass wool (or better yet, modern mineral wool with good heat and sound insulation characteristics).
- Next, you need to weld the ends around the edges of the pipe with a large diameter using pre-made plugs.
- After welding work, clean the seams using an angle grinder. After this you should paint them.
- The last stage is welding the new resonator into the car's exhaust system. After carrying out the work, also clean the welding seams.
Approximate prices
In Russia, a resonating device for VAZ 2109, 2110, 2112 can be purchased for an amount from 800 to 5000 rubles.
Approximate prices for VAZ resonators depending on the generation of the car:
- 2109 – from 1200 to 4600 rubles.
- 2110 – from 1100 to 2000 rubles.
- 2112 – from 1300 to 4000 rubles.
Approximate prices depending on the manufacturer:
- Walker - about 4400 rubles .
- AvtoVAZ - from 3600 rubles .
- TransMaster – from 1700 rubles .
An old auto part can be purchased for 800-1000 rubles .
Removing and installing the resonator
Many motorists are interested in a natural question - how to remove the resonator ? The answer to this question will vary depending on the brand of car. However, in general, the algorithm is simple and will be approximately as follows:
- it is necessary to disconnect the resonator pipes at the points of their connection with the exhaust gas removal system (front, on the engine or catalyst side, and at the rear, on the muffler side);
- remove the resonator from its suspensions, with the help of which it is attached to the bottom of the car;
- dismantle the resonator with its pipes.
How to replace a Renault Logan resonator
Installing a new device is done in the reverse order. When removing the resonator, it is important not to damage the O-rings that connect its pipes to the rest of the exhaust system.
As an example, we present to your attention two video instructions demonstrating the replacement of the resonator on popular Renault Logan cars and front-wheel drive VAZ 2110, VAZ 2111, VAZ 2112, VAZ 2114, VAZ 2115, Kalina, Priore, Grante.
Finally
Partial or complete failure of the car exhaust system resonator is not a critical failure . Diagnosing a resonator failure is not difficult even for an inexperienced car owner. This is indicated by a loss of power, the spread of exhaust gases under the bottom and/or into the cabin, and an increase in background noise when the engine is running. Please note that the car can be used case, however, we still recommend that you do not delay repairs, since driving with a burnt-out resonator can lead to failure of other elements of the vehicle’s exhaust system.
Publication date: August 25, 2016. Category: Automotive equipment.
When any mechanism operates, a characteristic noise is created, and when it comes to a gasoline internal combustion engine, the “sound effects” are distinguished by increased volume, which causes a lot of discomfort both to the driver himself and to other road users, as well as pedestrians. As you know, the role of a noise absorber is played by a standard muffler, which is part of the exhaust system, but few people know why a resonator is needed, which is also an important component of this unit.
From the name it is obvious that this part is responsible for resonating the sound streams that arise during the operation of the car engine. Simply put, the resonator dampens sound vibrations as exhaust gases exit the combustion chamber. Let's take a closer look at the device and features of this element.
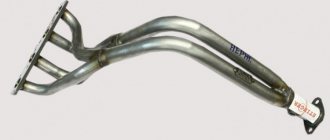
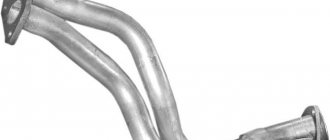
Replacing pants
Trousers
The exhaust pipe, also called pants (due to its appearance), is attached to the manifold using studs and nuts. Its fixation with the neutralizer is carried out by a spring-loaded connection.
- Remove the exhaust pipe, paying special attention to its attachment to the manifold. Studs are used here, not bolts. They are screwed into the manifold, and connecting nuts are screwed onto them.
- If the pin is damaged, it will be extremely difficult to replace it. Therefore, it is important to try to keep the old one intact and safe.
- Treat the nuts with WD40, a product we all know. This will allow you to avoid using excessive force and keep the studs intact. If that doesn't work, the studs are drilled out. The process is complex, lengthy, and requires experience and skill.
- There is a gasket between the manifold and the pants that needs to be replaced. Also install a new converter o-ring.
- Now firmly press the exhaust pipe using the nuts. To do this you will need to compress the gasket.
- Then tighten the bolts of the spring-loaded connection with the neutralizer of your VAZ 2110.
As you noticed, there is nothing complicated in this work. Each element is quite easily dismantled and a new one is installed in its place. Just be careful, act carefully and consistently. Plus, of course, do not forget about the importance of the quality of new parts. Buy only good spare parts that will ensure long-term and efficient service of the exhaust system on your VAZ 2110.
How does a resonator work?
Externally, the resonator is very similar to a muffler, which is why it is often called a small or additional muffler. This rather complex part consists of a large number of layers, and from them it performs its function.
When looking at the cross-section of the resonator, it becomes obvious that it really is very similar to a standard car muffler. In more detail:
- The design of the resonator consists of several chambers separated by a special mesh, due to which there is a constant narrowing and expansion of gas flows, which flow in sharp jerks. The resonator allows you to level out this pulsation, creating uniform flows.
- Due to the displacement of these chambers, the direction of movement of the exhaust gas flow changes, which also allows smoothing out uneven pulsations.
- The frequency of exhaust gases is also suppressed thanks to internal perforations. It allows you to reduce the volume of exhaust sounds.
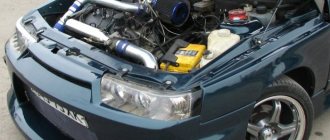
Installation of a new neutralizer
If you decide to modify your car, you can install the Stinger exhaust system on the VAZ-2110. It is more reliable and advanced than stock.
All work is carried out the same way. The neutralizer is installed as follows:
- Install the neutralizer, and then put on the bolts. This must be done very carefully, making half a turn, no more.
- When tightening, you must first tighten the bolts that secure the neutralizer to the resonator. The last to be tightened are the bolts securing the converter to the exhaust pipe.
Types of exhaust system resonators
Additional mufflers are divided into 2 types depending on the engines with which they are used:
- For two-stroke engines. If such a motor is installed on the car, then it is necessary to use a resonator. The fact is that the absence of this device will lead to increased gasoline consumption, the elimination of unburned fuel and gas removal. The speed of the car will decrease.
- For four strokes. In this case, the resonator becomes more of a problem than a solution. If you dismantle it, this will lead to an increase in engine power by 15%.
The resonators also differ in design. There are standard monoblock products, but increasingly, car enthusiasts prefer combined models. They consist of two parts: a classic design equipped with a pipe and partitions and a chamber filled with a special noise-absorbing material (most often basalt fiber). Combined resonators are considered more modern and efficient.
In addition, small mufflers come in short, medium and long. They also differ in volume. It is worth noting that the effectiveness of this device directly depends on this indicator. If the volume is not enough, then when you press the gas sharply, the noise will increase greatly.
Small mufflers are made from different materials. Inexpensive models are made from aluminized steel; by and large, this is ordinary steel with a thin layer of aluminum applied to it. This allows you to protect the product from corrosion for some time.
Healthy! The most durable and high-quality products are considered to be those made of stainless steel with a double body.
Since the exhaust system, including the resonator, is constantly exposed to high temperatures, this leads to frequent malfunctions. In order to avoid an unpleasant surprise, it is recommended to periodically diagnose this component of the car and identify possible “symptoms” of malfunctions.
Replacing the neutralizer
As you can see, the exhaust system of the VAZ 2110 car is designed quite standardly, its repair is not difficult even for a motorist with little experience.
When changing the muffler and resonator, it is likely that you may need to replace the converter. This operation is simple and can be done in a few steps.
The neutralizer serves to dampen vibrations from the engine and prevent them from occurring in the exhaust system of the domestically produced VAZ 2110 car.
If it needs to be replaced, it is done like this:
- If the old springs and bolts are intact and have no obvious damage, you can continue to use them. They show characteristic signs of wear, be sure to buy new elements.
- The ring should be replaced in any case, no matter how well the old one is preserved. If gases begin to leak through the old ring, this will lead to very rapid wear and damage to the converter flare and the exhaust pipe.
- After installing the neutralizer, new bolts are put on, they are carefully but firmly tightened. Moreover, the first thing you need to do is tighten the bolts that secure the resonator.
Signs of a malfunctioning muffler resonator
Any malfunction of the resonator can lead to a decrease in motor power and also affect the noise level. Most often, car enthusiasts encounter the following signs of deterioration in the performance of the additional muffler:
- The volume of the exhaust system sound has increased.
- A metallic rattling noise appeared in the place where the resonator was installed. The reason for this may be that one of the internal parts of the resonator has burned through.
- Engine power began to drop. This is a consequence of the reduced capacity of the additional muffler.
If you notice one or more characteristic signs, repair or replace the resonator.
HOW TO REPLACE THE SILENCER ON A VAZ 2110
We are changing the muffler of the VAZ 2110, the replacement is made in the inspection hole:
- The muffler is connected to the resonator through an o-ring, which is installed in the pipe flare and compressed with a clamp that folds in two halves
- We remove the clamp, then the ring, it is graphite and does not stick to the metal.
Attaching the muffler to the resonator
- Removing the old muffler
- We check the condition of the suspension rubber bands located on the sides of the muffler body. If they have cracks or are stretched, they should be replaced.
VAZ 2110 muffler suspension rubber band
- We install a new muffler, first on the rubber bands, then insert a graphite ring (preferably a new one) between the flares and compress it with a clamp.
So we replaced the muffler on the VAZ 2110, replacing the resonator is the next step.
Repairing the exhaust system resonator
The most common problem with almost all resonators is the appearance of holes and rust. In this case, it is not necessary to go to a car repair shop or buy a new part; it is easier and cheaper to repair the resonator yourself, for this:
- Cut a tin plate larger than the hole created.
- Sand the area where you plan to install the patch with sandpaper.
- Drill several holes on the additional muffler and the patch itself to secure it.
- Using putty and hardener, fix the patch to the resonator.
- Screw the screws into the holes made.
It is not recommended to start the car right away, as the putty must harden.
Thanks to this repair, you will be able to use the small muffler for another couple of years. However, if the breakdown turns out to be more serious, then it will be impossible to do without replacing the failed part.
Changing the muffler resonator with your own hands
To change the resonator without the help of specialists you will need:
- the resonator itself;
- a set of gaskets, fasteners, as well as a sealing connecting ring for a new small muffler;
- anti-corrosion spray (for example, WD-40);
- keys for 17.
After you have prepared everything you need, drive the car onto an overpass or inspection hole. Use the handbrake or parking brake, or simply put the car in gear. Further:
- Treat the mounting points of the resonator to the muffler and the bolts themselves with an anti-corrosion compound.
- Remove the old resonator. If it is difficult to remove, repeat the anticorrosive treatment. Most likely, the bolts will have to be torn off in any case, but there is a chance to save them.
- Disconnect the clamp that secures the resonator to the muffler.
- Separate the pipes and get rid of the metal seal.
- Loosen the resonator mounting nuts that connect it to the converter or manifold.
- While lifting the resonator, carefully remove the suspension cushions from the brackets.
- Completely unscrew the mounting nuts and remove the small muffler.
- Install the new resonator in reverse order.
Healthy! After you have connected the resonator to the mufflers, be sure to make sure that there are no cracks or gaps at the joints.
Changing the resonator
It is also advisable to replace the resonator on a VAZ 2110. This is done after changing the muffler.
New resonator for VAZ 2110
The work of replacing the resonator is performed in the following sequence:
- The resonator is secured to the muffler with a crimp clamp with an O-ring.
- It is attached to the neutralizer using a floating flange consisting of two bolts and a flare.
- On the opposite side of the element there is a so-called fist.
- Removing bolts is often quite difficult. So that you don't have to suffer, just cut them off with a grinder and buy new bolts. This is the simplest solution to the problem.
- If you couldn’t get a grinder, use a liquid key. This is a popular product among motorists - WD40 or its analogues. Treat the bolt attachment points with this compound, wait a while, after which the bolts should come off.
- After removing the bolts, remove the muffler clamp.
- Remove the resonator from the suspension rubber bands. Check the condition of the rubber bands. If they are worn out, replace them with new ones.
- Take a new resonator, secure them to rubber and connect them to the muffler so that the pipe leading to the muffler from the resonator is parallel to the ground.
- If you notice wear, burrs, or traces of rust on the neutralizer fist, be sure to coat the connection with sealant. Moreover, it must be a high-temperature sealant.
- Armed with new bolts and nuts, tighten the catalytic converter and resonator flanges.
- The neutralizer is fixed to the resonator with two bolts using a flange connection. The fastening occurs to the states, but there is a receiving pipe, using a spring-loaded connection and two flares. The space between them contains a sealing ring made of graphite or metal asbestos.